yum安装lnmp 精简版
在CentOS 6上yum安装lnmp服务
为了展示linux的简单易用,本文所有使用的应用,全部使用yum安装。
安装CentOS系统
本文假设您已经具备了安装CentOS系统的能力,此文将不再对安装过程进行讲解。
本文使用的操作系统为CentOS 6 x86_64。
安装常用工具
直接使用 yum 安装常用的工具。
yum install -y vim lrzsz
关闭SELINUX
SELinux(Security-Enhanced Linux) 是美国国家安全局(NSA)对于强制访问控制的实现,是 Linux历史上最杰出的新安全子系统。
SELinux的配置比较复杂,为了免其影响,建议新手直接将其关闭。
使用sed修改其配置文件,修改完成后,重启系统将不会再启用SELinux:
sed -i '/SELINUX/s/enforcing/disabled/' /etc/selinux/config
临时(无需重启)关闭SELinux:
setenforce 0
配置或关闭iptables
本文不对iptables进行讲解,将直接关闭iptables。
您可以执行iptables -L对比执行下面命令前后的对比。
- #清空iptables规则
- iptables -F
- #保存
- service iptables save
安装Nginx
CentOS 6 默认仓库不包含nginx,我们可以手动添加nginx的仓库。
访问nginx官网获取repo文件
我们需要先访问nginx的官方网站,获取官方的仓库地址。
点击这里访问nginx官方文档。
依照文档中的说明,最后的repo文件应该是下面这样,您可以直接复制。
[nginx]
name=nginx repo
baseurl=http://nginx.org/packages/centos/6/$basearch/
gpgcheck=0
enabled=1
使用vim将上面的配置保存到/etc/yum.repos.d/nginx.repo文件中。
安装nginx
安装好仓库后可以直接使用yum安装nginx。
yum install -y nginx
启动nginx
执行service nginx start启动nginx。
启动成功后执行netstat -tunlp|grep 80就可以看到nginx已经启动了80端口的监听。
- [root@localhost ~]# netstat -tunlp|grep 80
- tcp 0 0 0.0.0.0:80 0.0.0.0:* LISTEN 1881/nginx
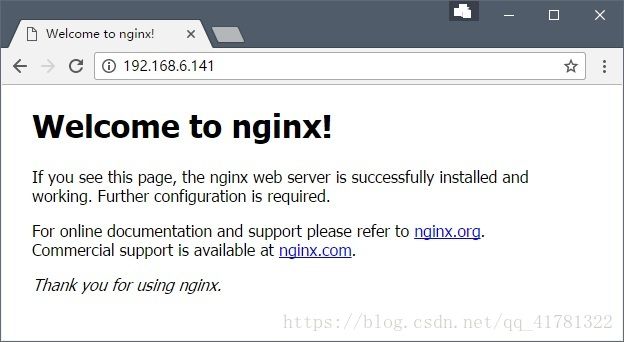
并且通过浏览器直接访问服务器的ip地址,能看到已经出现了nginx的欢迎页面。
设置nginx为开机启动
执行chkconfig nginx on设置nginx为开机启动。
安装MySQL
CentOS 6的默认仓库直接包含MySQL,可以直接通过yum安装 MySQL Server。
yum install -y mysql mysql-server
MySQL服务名称为mysqld,我们可以通过下面命令启动MySQL服务。
service mysqld start
同nginx一样,使用下面命令将mysqld加入开机启动任务。
chkconfig mysqld on
启动成功后执行netstat -tunlp|grep 3306就可以看到mysqld已经启动了3306端口的监听。
- [root@localhost ~]# netstat -tunlp|grep 3306
- tcp 0 0 0.0.0.0:3306 0.0.0.0:* LISTEN 2094/mysqld
还可以通过mysql客户端连接到MySQL服务器。
- [root@localhost ~]# mysql
- Welcome to the MySQL monitor. Commands end with ; or \g.
- Your MySQL connection id is 2
- Server version: 5.1.73 Source distribution
- Copyright (c) 2000, 2013, Oracle and/or its affiliates. All rights reserved.
- Oracle is a registered trademark of Oracle Corporation and/or its
- affiliates. Other names may be trademarks of their respective
- owners.
- Type 'help;' or '\h' for help. Type '\c' to clear the current input statement.
- mysql>
安装PHP
CentOS 默认仓库中包含了php套件,我们可以直接使用yum安装。
下面是最小化安装,我们使用php-fpm来解析php。
yum install -y php-cli php-fpm
您可以随时使用yum list php-*查看其它php扩展,下面是默认仓库中包含的所有扩展。
- [root@localhost ~]# yum list php-*
- Loaded plugins: fastestmirror
- Loading mirror speeds from cached hostfile
- * base: mirrors.sina.cn
- * extras: mirrors.sina.cn
- * updates: mirrors.sina.cn
- Installed Packages
- php-cli.x86_64 5.3.3-48.el6_8 @updates
- php-common.x86_64 5.3.3-48.el6_8 @updates
- php-fpm.x86_64 5.3.3-48.el6_8 @updates
- Available Packages
- php.x86_64 5.3.3-48.el6_8 updates
- php-bcmath.x86_64 5.3.3-48.el6_8 updates
- php-dba.x86_64 5.3.3-48.el6_8 updates
- php-devel.x86_64 5.3.3-48.el6_8 updates
- php-embedded.x86_64 5.3.3-48.el6_8 updates
- php-enchant.x86_64 5.3.3-48.el6_8 updates
- php-gd.x86_64 5.3.3-48.el6_8 updates
- php-imap.x86_64 5.3.3-48.el6_8 updates
- php-intl.x86_64 5.3.3-48.el6_8 updates
- php-ldap.x86_64 5.3.3-48.el6_8 updates
- php-mbstring.x86_64 5.3.3-48.el6_8 updates
- php-mysql.x86_64 5.3.3-48.el6_8 updates
- php-odbc.x86_64 5.3.3-48.el6_8 updates
- php-pdo.x86_64 5.3.3-48.el6_8 updates
- php-pear.noarch 1:1.9.4-5.el6 base
- php-pecl-apc.x86_64 3.1.9-2.el6 base
- php-pecl-apc-devel.i686 3.1.9-2.el6 base
- php-pecl-apc-devel.x86_64 3.1.9-2.el6 base
- php-pecl-memcache.x86_64 3.0.5-4.el6 base
- php-pgsql.x86_64 5.3.3-48.el6_8 updates
- php-process.x86_64 5.3.3-48.el6_8 updates
- php-pspell.x86_64 5.3.3-48.el6_8 updates
- php-recode.x86_64 5.3.3-48.el6_8 updates
- php-snmp.x86_64 5.3.3-48.el6_8 updates
- php-soap.x86_64 5.3.3-48.el6_8 updates
- php-tidy.x86_64 5.3.3-48.el6_8 updates
同样的,我们需要将php-fpm设置为开机启动。
- chkconfig php-fpm on
- service php-fpm start
启动完成后,我们可以通过netstat -tunlp|grep 9000命令查看到,php-fpm 已经开始监听9000端口。
- [root@localhost ~]# netstat -tunlp|grep 9000
- tcp 0 0 127.0.0.1:9000 0.0.0.0:* LISTEN 2147/php-fpm
配置php-fpm
cp /etc/php-fpm.d/www.conf /etc/php-fpm.d/www.confbak #备份原有配置文件
vi /etc/php-fpm.d/www.conf #编辑
user = nginx #修改用户为nginx
group = nginx #修改组为nginx
配置nginx使其支持php程序
接下来我们演示如何部署web服务的内容。
创建web目录和文件
我们假设web目录为/var/www,创建并进入这个目录。
- mkdir /var/www
- cd /var/www
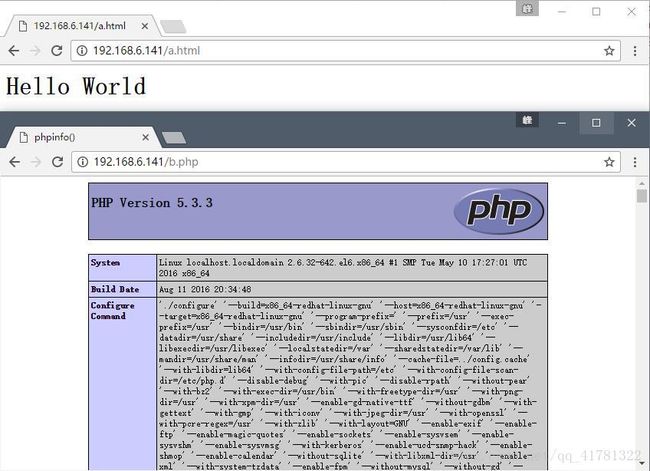
我们新建两个文件,一个html文件,一个php文件,稍后会看到效果。
a.html的内容为:
Hello World
b.php的内容为:
- phpinfo();
- // 将会打印出所有的PHP信息
- ?>
变更nginx配置
我们使用vim打开nginx第一个站点的配置文件vim /etc/nginx/conf.d/default.conf。
将第9行的root变更为我们指定的目录。
修改
- location / {
- root /usr/share/nginx/html;
- index index.html index.htm;
- }
变更为
- location / {
- root /var/www;
- index index.html index.htm;
- }
将30-36行的注释去掉,使其支持php文件,同时还需要修改root和fastcgi_param选项指定我们的工作目录。
修改
- # pass the PHP scripts to FastCGI server listening on 127.0.0.1:9000
- #
- #location ~ \.php$ {
- # root html;
- # fastcgi_pass 127.0.0.1:9000;
- # fastcgi_index index.php;
- # fastcgi_param SCRIPT_FILENAME /scripts$fastcgi_script_name;
- # include fastcgi_params;
- #}
变更为
- # pass the PHP scripts to FastCGI server listening on 127.0.0.1:9000
- #
- location ~ \.php$ {
- root /var/www;
- fastcgi_pass 127.0.0.1:9000;
- fastcgi_index index.php;
- fastcgi_param SCRIPT_FILENAME /var/www$fastcgi_script_name;
- include fastcgi_params;
- }
保存后,执行service nginx reload重新载入nginx配置。
此时,我们可以通过浏览器直接访问我们刚才建立的文件了。
vim a.html
hello world
vim info.php
phpinfo();
?>
yum install php-mysql
yum -y install php-mysql php-gd php-imap php-ldap php-odbc php-pear php-xml php-xmlrpc
结语
以上,就是lnmp的简单安装和配置,它已经可以解析php程序。生产环境中,往往还要对其配置文件进行各种更改,已对其性能进行优化。
例如,php的session目录可能默认会没有写权限、nginx的连接数要更改等各种问题。
熟悉了lnmp的简单安装以后,就可以继续深入了解,学习手动编译指定版本的nginx、php或mysql服务了。