本文目的
承上启下。作为对《【自制操作系统】HelloWorld》中的相关技术细节进行解释,也为以后将用使用的技术进行简要介绍。随着探索的深入,将不断地对此文进行修正和补充。
System V ABI
System V ABI,即System V Application Binary Interface,包含了一系列关于调用规范(Calling Convention)、对象文件格式、可执行文件格式等很多方面的规范细节。如果我们采用GNU Compiler Collection(GCC) 来开发我们的操作系统,那么我们最好遵循这些规范。
由于笔者水平有限,在此只能对相关概念进行简要介绍,如有不当还望指正。
ELF
ELF,Executable and Linkable Format,是Unix以及类Unix系统对象文件的格式标准。ELF是一种可扩展的文件格式,不同的硬件平台和操作系统下均有不同的实现。通用地讲,ELF对象文件主要包含三种:
- 可重定向文件(relocatable file)
用于和其它对象文件进行连接生成可执行文件或共享对象文件。
可执行文件(executable fiel)
共享对象文件(shared object file)
文件格式的根本目的就是描述一个文件的内容。而为了能对不同内容的文件进行描述,文件格式通常会定义各种复杂的数据结构来描述其中的内容。当这些复杂数据结构变成线性结构时常常转换为各种表格,通常是多重层叠的表格。如Java程序的字节码文件就使用了各种表格来描述可执行文件的内容。ELF文件也不例外,它也定义了各种不同的数据结构(表格)。
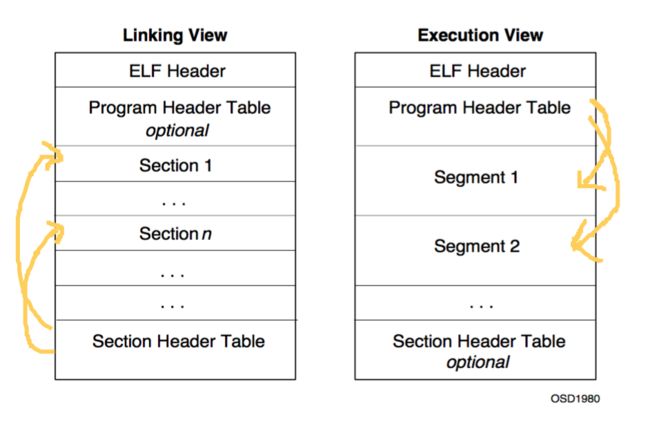
因为ELF格式既能描述一个可执行文件,也能描述一个用于链接的对象文件,所以ELF文件格式提供了两种不同的视角:
因为这款玩具操作系统将运行在intel平台之上,在此只对System V在Intel架构之上的ELF文件格式进行简要介绍。
假设现有kernel.c文件如下:
int main(){
    return 0xdead;
}
使用之前编译好的交叉编译工具对kernel.c文件进行编译,并生成kernel.o对象文件。具体编译指令为:i686-elf-gcc -std=gnu99 -ffreestanding -O2 -c kernel.c -o kernel.o
工具readelf可以查看ELF格式的文件内容。(注意,Mac不自带readelf工具,需要安装gnu的工具链,之前有过介绍)。
和所有文件格式一样,ELF格式文件最开始的若干字节为文件的魔数(magic number),用于描述文件格式。Header作为ELF格式文件的第一部分内容,从整体上描述了该ELF文件的内容。包含了此文件所对应的系统和硬件平台需求,以及Program Header Table/Section Header Table的概要信息(即如何找到这两个表格),以及其它的一些元信息。下图描述了a.out文件的Header信息
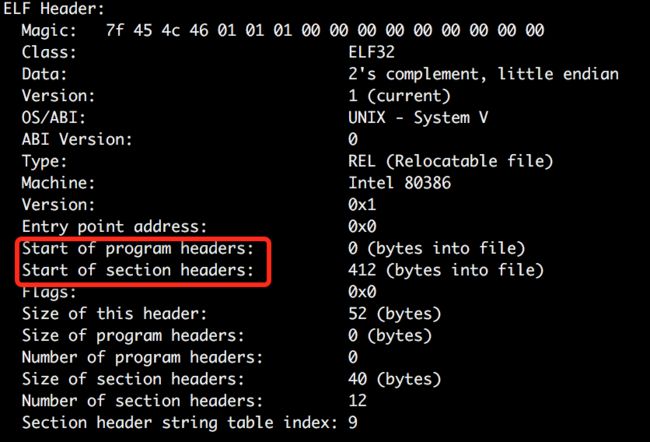
从上图中可以看出,由a.c文件所编译而来的a.out文件不是可执行文件,因此其并没有Program Header。相反,a.out文件使用几个section来描述其内容。
ELF文件中的Section Header Table描述了该文件中所有section的元信息,包括名称、类型、以及如果被加载到程序映像时的内存信息(地址、大小、权限等)等信息。
其中,所有预定义的section name都是以.开始。在ELF规范中预定了几个特殊的section,这里选几个常见的进行简要介绍。
.bss未初始化数据.data已初始化的数据.dynamic动态链接信息.strtab字符串表.symtab符号表.text可执行代码
而System V进一步地定义了几个特殊的section。这里只介绍两个我们需要关心的section:
.fini程序终止时需要执行的代码.init程序初始化时需要执行的代码(一般情况下,是在main函数之前被执行的代码).relname重定向信息,其中name为占位符。
下图描述了kernel.o文件中的section信息:

编译生成的kernel.o文件并不是一个可执行文件.它并没有一个Program Header Table,因此程序加载器也无法知道应该如何将文件加载到内存中以及如何将控制流传递给此文件所描述的程序。相反,它包含了关于如何重定向该文件的信息,如下图所示:

为了能让kernel.c所描述的程序能作为一个“内核”在bochs虚拟机上运行(通过grub加载),我们需要一个可执行的kernel文件。
下述代码所示的boot.s文件,主要是定义了能被grub识别的multi-boot信息,定义了_start函数。_start函数在会在调用kernel.c中的main函数之后进入死循环。通过命令i686-elf-as boot.s -o boot.o可将此汇编文件编译生成boot.o对象文件。
# Declare constants used for creating a multiboot header.
.set ALIGN,    1<<0             # align loaded modules on page boundaries
.set MEMINFO,  1<<1             # provide memory map
.set FLAGS,    ALIGN | MEMINFO  # this is the Multiboot 'flag' field
.set MAGIC,    0x1BADB002       # 'magic number' lets bootloader find the header
.set CHECKSUM, -(MAGIC + FLAGS) # checksum of above, to prove we are multiboot

# Declare a header as in the Multiboot Standard. We put this into a special
# section so we can force the header to be in the start of the final program.
# You don't need to understand all these details as it is just magic values that
# is documented in the multiboot standard. The bootloader will search for this
# magic sequence and recognize us as a multiboot kernel.
.section .multiboot
.align 4
.long MAGIC
.long FLAGS
.long CHECKSUM

# Currently the stack pointer register (esp) points at anything and using it may
# cause massive harm. Instead, we'll provide our own stack. We will allocate
# room for a small temporary stack by creating a symbol at the bottom of it,
# then allocating 16384 bytes for it, and finally creating a symbol at the top.
.section .bootstrap_stack, "aw", @nobits
stack_bottom:
.skip 16384 # 16 KiB
stack_top:

# The linker script specifies _start as the entry point to the kernel and the
# bootloader will jump to this position once the kernel has been loaded. It
# doesn't make sense to return from this function as the bootloader is gone.
.section .text
.global _start
.type _start, @function
_start:
    # Welcome to kernel mode! We now have sufficient code for the bootloader to
    # load and run our operating system. It doesn't do anything interesting yet.
    # Perhaps we would like to call printf("Hello, World\n"). You should now
    # realize one of the profound truths about kernel mode: There is nothing
    # there unless you provide it yourself. There is no printf function. There
    # is no  header. If you want a function, you will have to code it
    # yourself. And that is one of the best things about kernel development:
    # you get to make the entire system yourself. You have absolute and complete
    # power over the machine, there are no security restrictions, no safe
    # guards, no debugging mechanisms, there is nothing but what you build.

    # By now, you are perhaps tired of assembly language. You realize some
    # things simply cannot be done in C, such as making the multiboot header in
    # the right section and setting up the stack. However, you would like to
    # write the operating system in a higher level language, such as C or C++.
    # To that end, the next task is preparing the processor for execution of
    # such code. C doesn't expect much at this point and we only need to set up
    # a stack. Note that the processor is not fully initialized yet and stuff
    # such as floating point instructions are not available yet.

    # To set up a stack, we simply set the esp register to point to the top of
    # our stack (as it grows downwards).
    movl $stack_top, %esp

    # We are now ready to actually execute C code. We cannot embed that in an
    # assembly file, so we'll create a kernel.c file in a moment. In that file,
    # we'll create a C entry point called kernel_main and call it here.
    call kernel_main

    # This infinite loop will help us debug in bochs more easily.
LoopLabel:
    jmp LoopLabel


    # In case the function returns, we'll want to put the computer into an
    # infinite loop. To do that, we use the clear interrupt ('cli') instruction
    # to disable interrupts, the halt instruction ('hlt') to stop the CPU until
    # the next interrupt arrives, and jumping to the halt instruction if it ever
    # continues execution, just to be safe. We will create a local label rather
    # than real symbol and jump to there endlessly.
    cli
    hlt
.Lhang:
    jmp .Lhang

# Set the size of the _start symbol to the current location '.' minus its start.
# This is useful when debugging or when you implement call tracing.
.size _start, . - _start
将boot.o与kernel.o文件进行连接后,即可生成一个ELF格式的可执行文件。下述的linker.ld文件将指导链接器(linker)对boot.o文件与kenerl.o文件进行链接并生成可执行的kernel文件。具体编译指令为:i686-elf-gcc -T linker.ld -o kernel -ffreestanding -O0 -nostdlib kernel.o boot.o -lgcc
/* The bootloader will look at this image and start execution at the symbol
   designated as the entry point. */
ENTRY(_start)

/* Tell where the various sections of the object files will be put in the final
   kernel image. */
SECTIONS
{
    /* Begin putting sections at 1 MiB, a conventional place for kernels to be
       loaded at by the bootloader. */
    . = 1M;

    /* First put the multiboot header, as it is required to be put very early
       early in the image or the bootloader won't recognize the file format.
       Next we'll put the .text section. */
    .text BLOCK(4K) : ALIGN(4K)
    {
        *(.multiboot)
        *(.text)
    }

    /* Read-only data. */
    .rodata BLOCK(4K) : ALIGN(4K)
    {
        *(.rodata)
    }

    /* Read-write data (initialized) */
    .data BLOCK(4K) : ALIGN(4K)
    {
        *(.data)
    }

    /* Read-write data (uninitialized) and stack */
    .bss BLOCK(4K) : ALIGN(4K)
    {
        *(COMMON)
        *(.bss)
        *(.bootstrap_stack)
    }

    /* The compiler may produce other sections, by default it will put them in
       a segment with the same name. Simply add stuff here as needed. */
}
如果使用readelf工具查看kernel文件,可以发现:作为可执行的ELF文件,kernel稳重中包含了Program Header Table(如下图所示)。Program Header Table描述了此ELF文件作为可执行文件在被加载器(在此例子中,我们的kernel由grub加载)加载到内存中时,各个section应该被加载到何种内存段中,并应该具有什么样的权限。

从上图可以很容易地看出,Program Header Table由不同的Segment,而每个Segment包含若干Section。属于同一Segment的Section由相同的权限进行保护。
调用约定(Calling Convention)
这部分也只是System V在i386平台下的约定。
- 函数调用指令
汇编语言中函数调用使用
call指令调用函数。而对应的ret执行将从栈顶pop出一个地址(caller 调用callee的指令的下一条指令的地址)后,跳转到此指令执行。
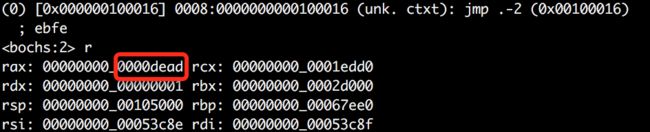
- 函数调用返回值
函数的返回值将存入寄存器%eax中。如果结果为64位,则其高32位存入寄存器%edx中
- 参数传递
使用栈传递参数值,采用“从右向左,一次压栈”的方式。
如我们在bochs中运行上文的kernel时,在进入死循环之后,可发现寄存器%eax中为main函数的返回值。
附相关资源
System V ABI (v4.1):http://www.sco.com/developers/devspecs/gabi41.pdf
ELF(V1.2):http://refspecs.linuxbase.org/elf/elf.pdf