SSM框架:SpringMVC + Spring + MyBatis实现简单的增删改查功能
SSM框架:SpringMVC + Spring + MyBatis实现简单的增删改查功能,从搭建到实现详细步骤与个人心得。
首先思考做项目的步骤和一些基础环境的搭建:
1.创建一个maven工程。
2.引入项目依赖的jar包。
------- spring、spring MVC、mybatis、数据库连接池,驱动包、其他(jstl,servlet-api,junit)
3.引入bootstrap前段框架。
4.编写ssm整合的关键配置文件。
------- web.xml配置文件, spring、spring MVC、mybatis的配置文件。使用Mybatis的逆向工程生成对应的bean以及mapper.
5.测试Mapper。
2019.01.13
lcxx_ssm_crud 项目开展第一天
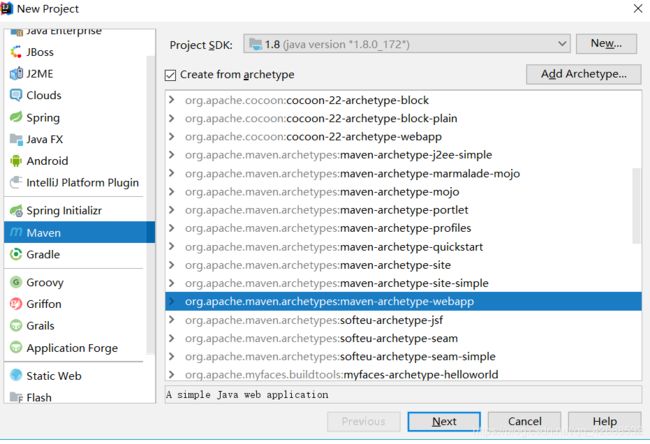
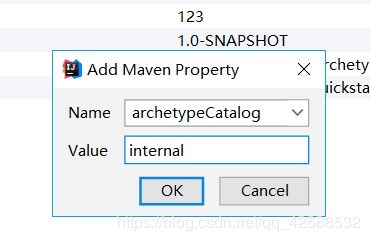
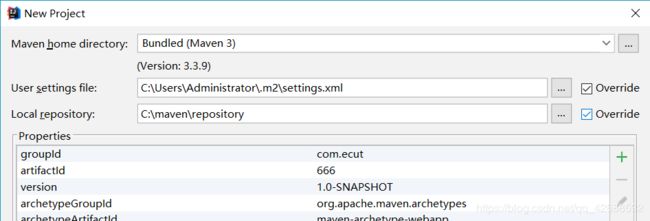
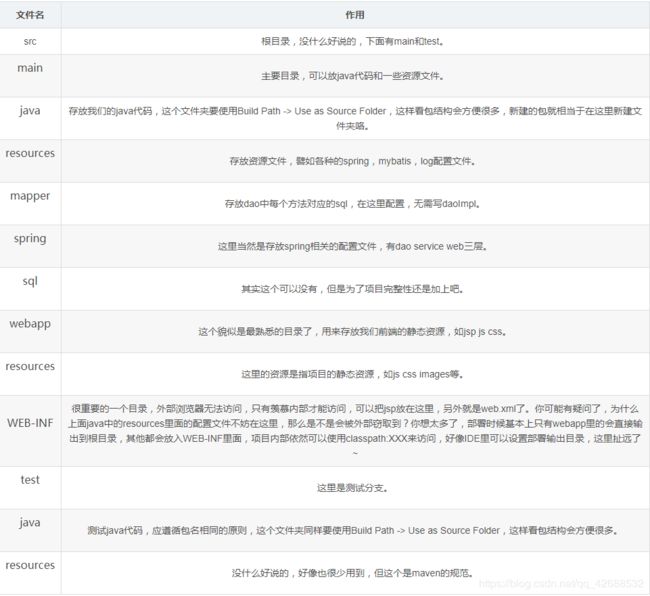
开始搭建项目:使用idea创建一个maven项目,其中一些细节的配置:
如图创建Maven项目完成后,开始配置setting.xml文件(我使用的中央仓库是阿里云镜像):
  C:/maven/repository


		nexus-aliyun
		Nexus aliyun
		http://maven.aliyun.com/nexus/content/groups/public/
		*


		alimaven
		aliyun maven
		http://maven.aliyun.com/nexus/content/groups/public/
		central


      jdk17

	      true
		  1.7


	      1.7
		  1.7
		  1.7
接下来开始在pom.xml里面引入jar包,(以下是一些项目需要的jar包):
      org.mybatis.generator
      mybatis-generator-core
      1.3.5


      org.springframework
      spring-webmvc
      4.3.17.RELEASE


      org.springframework
      spring-jdbc
      4.3.17.RELEASE


      org.springframework
      spring-aspects
      4.3.17.RELEASE


      org.mybatis
      mybatis
      3.4.2


      org.mybatis
      mybatis-spring
      1.3.1


      c3p0
      c3p0
      0.9.1


      mysql
      mysql-connector-java
      5.1.47


      jstl
      jstl
      1.2


      javax.servlet
      servlet-api
      2.5
      provided


      junit
      junit
      4.12
      test
2019.01.14
项目第二天
引入bootstrap样式以及jq文件:

在webapp文件夹添加index.jsp文件 并引入bootstrap和jquery

本地部署tomcat:


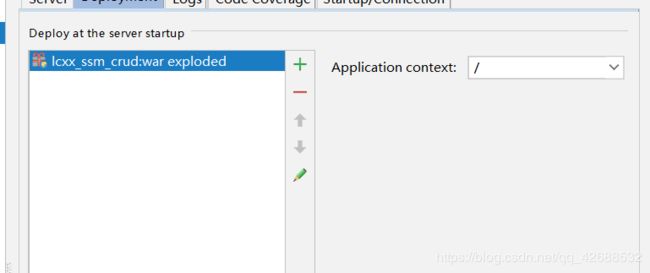
部署好点击OK
再次打开Edit Configurations
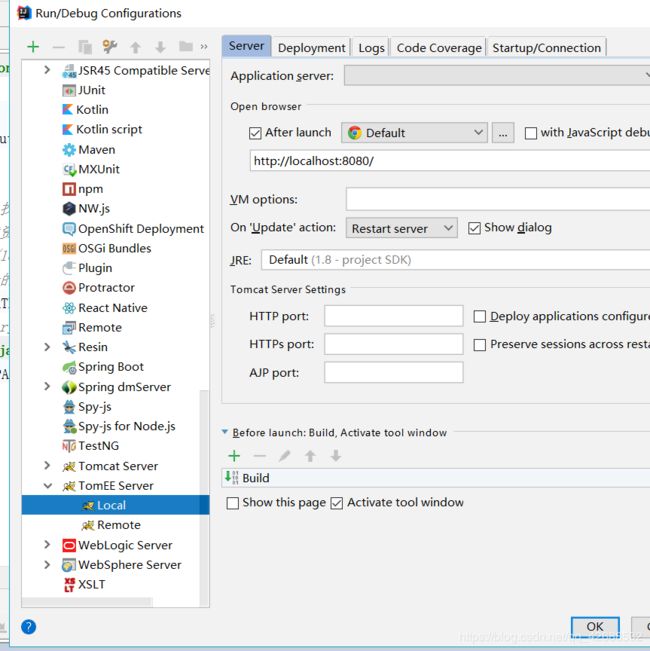
部署至本地Local,点击OK,完成本地部署tomcat。
调试index.jsp时,可用热部署:

index.jsp文件配置:

2019.01.15
项目第三天
编写ssm整合的关键配置文件(web.xml):
    contextConfigLocation
    classpath:applicationContext.xml


    org.springframework.web.context.ContextLoaderListener


    dispatcherServlet
    org.springframework.web.servlet.DispatcherServlet
    1


    dispatcherServlet
    /


    characterEncodingFilter
    org.springframework.web.filter.CharacterEncodingFilter

      encoding
      UTF-8


      forceRequestEncoding
      true

    在这里插入代码片
      forceResponseEncoding
      true


    characterEncodingFilter
    /*


    HiddenHttpMethodFilter
    org.springframework.web.filter.HiddenHttpMethodFilter


    HiddenHttpMethodFilter
    /*
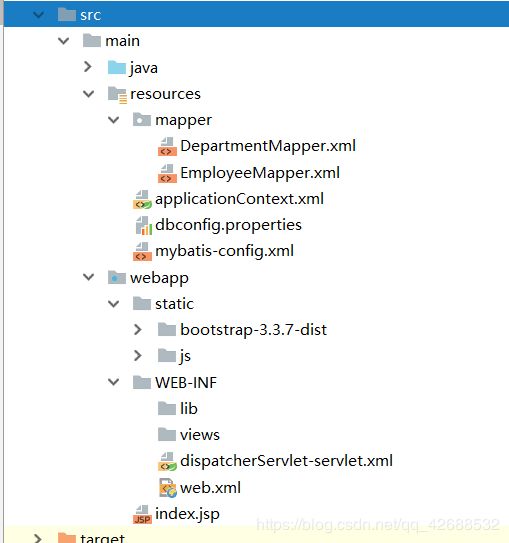
在WEB-INF同级目录下创建dispatcherServlet.xml文件,SpringMVC的配置文件
在resources目录下创建applicationContext.xml文件,Spring配置文件。
此时注意代码的头部是不完整的,运行tomcat服务器时遇到报错:
只要把头部修改一下即可解决:
创建mbg.xml文件,利用mybatis的逆向工程生成代码:(在编写mbg.xml文件之前,应该在数据库创建对应的数据库,数据表)
我创建的数据库和数据表:
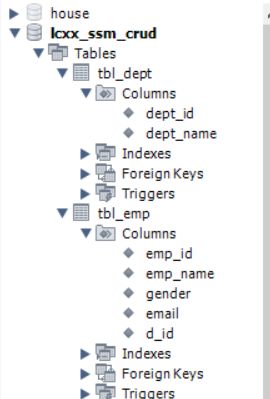
在tbl_emp表里面创建一个外键约束,方便联表查询:

mgb.xml:
编写好mbg.xml文件之后,既可以编写JAVA代码创建实现逆向工程的方法:
package crud.test;

import java.io.File;
import java.io.IOException;
import java.util.ArrayList;
import java.util.List;

import org.mybatis.generator.api.MyBatisGenerator;
import org.mybatis.generator.config.Configuration;
import org.mybatis.generator.config.xml.ConfigurationParser;
import org.mybatis.generator.exception.XMLParserException;
import org.mybatis.generator.internal.DefaultShellCallback;

public class MBGTest {

    public static void main(String[] args) throws Exception {
        List warnings = new ArrayList();
        boolean overwrite = true;
        File configFile = new File("mbg.xml");
        ConfigurationParser cp = new ConfigurationParser(warnings);
        Configuration config = cp.parseConfiguration(configFile);
        DefaultShellCallback callback = new DefaultShellCallback(overwrite);
        MyBatisGenerator myBatisGenerator = new MyBatisGenerator(config, callback, warnings);
        myBatisGenerator.generate(null);
    }
}
逆向工程指定的生成的JAVA代码位置和指定sql映射文件生成的位置:(在mbg.xml文件中编写)
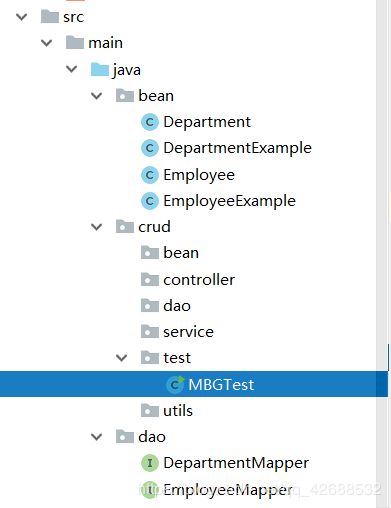

在生成的EmployeeMapper.xml中添加两个联表查询方法L:(因为涉及到需要添加sql板块和select板块,所以把整个EmployeeMapper.xml文件放在这里)
and ${criterion.condition}
and ${criterion.condition} #{criterion.value}
and ${criterion.condition} #{criterion.value} and #{criterion.secondValue}
and ${criterion.condition}
#{listItem}
and ${criterion.condition}
and ${criterion.condition} #{criterion.value}
and ${criterion.condition} #{criterion.value} and #{criterion.secondValue}
and ${criterion.condition}
#{listItem}
emp_id, emp_name, gender, email, d_id
e.emp_id, e.emp_name, e.gender, e.email, e.d_id, d.dept_id, d.dept_name
delete from tbl_emp
where emp_id = #{empId,jdbcType=INTEGER}
delete from tbl_emp
insert into tbl_emp (emp_id, emp_name, gender,
email, d_id)
values (#{empId,jdbcType=INTEGER}, #{empName,jdbcType=VARCHAR}, #{gender,jdbcType=CHAR},
#{email,jdbcType=VARCHAR}, #{dId,jdbcType=INTEGER})
insert into tbl_emp
emp_id,
emp_name,
gender,
email,
d_id,
#{empId,jdbcType=INTEGER},
#{empName,jdbcType=VARCHAR},
#{gender,jdbcType=CHAR},
#{email,jdbcType=VARCHAR},
#{dId,jdbcType=INTEGER},
update tbl_emp
emp_id = #{record.empId,jdbcType=INTEGER},
emp_name = #{record.empName,jdbcType=VARCHAR},
gender = #{record.gender,jdbcType=CHAR},
email = #{record.email,jdbcType=VARCHAR},
d_id = #{record.dId,jdbcType=INTEGER},
update tbl_emp
set emp_id = #{record.empId,jdbcType=INTEGER},
emp_name = #{record.empName,jdbcType=VARCHAR},
gender = #{record.gender,jdbcType=CHAR},
email = #{record.email,jdbcType=VARCHAR},
d_id = #{record.dId,jdbcType=INTEGER}
update tbl_emp
emp_name = #{empName,jdbcType=VARCHAR},
gender = #{gender,jdbcType=CHAR},
email = #{email,jdbcType=VARCHAR},
d_id = #{dId,jdbcType=INTEGER},
where emp_id = #{empId,jdbcType=INTEGER}
update tbl_emp
set emp_name = #{empName,jdbcType=VARCHAR},
gender = #{gender,jdbcType=CHAR},
email = #{email,jdbcType=VARCHAR},
d_id = #{dId,jdbcType=INTEGER}
where emp_id = #{empId,jdbcType=INTEGER}
2019.01.16
项目第四天
前面三天已经将lcxx_ssm_crud项目的基本框架搭建完毕.开始测试Mapper
package crud.test;

import bean.Department;
import bean.Employee;
import dao.DepartmentMapper;
import dao.EmployeeMapper;
import org.apache.ibatis.session.SqlSession;
import org.junit.Test;
import org.junit.runner.RunWith;
import org.springframework.beans.factory.annotation.Autowired;
import org.springframework.test.context.ContextConfiguration;
import org.springframework.test.context.junit4.SpringJUnit4ClassRunner;

import java.util.UUID;

/**
 * 测试dao层的工作
 * @author  Xx、
 * 推荐spring的项目就可以用spring的单元测试,可以自动注入我们需要的组件
 * 1.导入SpringTest模块
 * 2.@ContextConfiguration指定Spring配置文件的位置
 * 3.直接autowired要使用的组件即可
 */

//使用单元测试模块时,需要删除pm依赖中对单元测试的限制
@RunWith(SpringJUnit4ClassRunner.class)
@ContextConfiguration(locations={"classpath:applicationContext.xml"})
public class MapperTest {
    @Autowired
    DepartmentMapper departmentMapper;

    @Autowired
    EmployeeMapper employeeMapper;

    @Autowired
    SqlSession sqlSession;

    /**
     * 测试DepartmentMapper
     */
    @Test
    public void testCRUD(){
        /*//1.创建SpringIOC容器
        ApplicationContext ioc= new ClassPathXmlApplicationContext("applicationContext.xml");
        //2.从容器中获取Mapper
        ioc.getBean(DepartmentMapper.class);*/
        System.out.println(departmentMapper);

        //1.插入几个部门
        //departmentMapper.insertSelective(new Department(null,"开发部"));
        //departmentMapper.insertSelective(new Department(null,"测试部"));

        //2.生成员工数据,测试员工插入
        //employeeMapper.insertSelective(new Employee(null,"Jerry","M","[email protected]",1));
        //employeeMapper.insertSelective(new Employee(null,"TOM","N","[email protected]",1));

        //3.批量插入多个员工;使用可执行批量操作的sqlSession
        EmployeeMapper mapper=sqlSession.getMapper(EmployeeMapper.class);
        for(int i=0;i<10;i++){
            String uid=UUID.randomUUID().toString().substring(0,5)+i;
            mapper.insertSelective(new Employee(null,uid,"M",uid+"@ecut.com",1));
        }
        System.out.println("批量完成!");
    }
}
在员工和部门的.java文件中生成有参和无参构造函数(一定要有无参构造函数)


然后运行MapperTest.java,数据库结果如下:(我写的是利用UUID批量生成10个员工数据,上面附有源码):


测试成功啦!!!!!!!!!!!!!!!!!!(这里表示很舒服)
到这之前的就是lcxx_ssm_crud项目的一些基础配置和SSM框架的整合,搭建完了这些基础的环境,就可以开始写增删改查的功能。
·
·
·
·
·
·
