CMake入门教程
简介
cmake的亮点在于编译复杂项目上的应用 —— cmake是一个跨平台的Makefile 生成工具! 一言以蔽之——cmake 为项目自动生成Makefile, 虽然cmake功能远不止步于此,但是本文聚焦于此。
例1:Hello World
源代码只有一个文件HelloWorld.cpp
#includeCMakeLists.txt也只有三行而已(使用cmake管理项目的过程,也就是编写CMakeLists.txt的过程)
cmake_minimum_required(VERSION 2.8.9)
project (hello)
add_executable(hello helloworld.cpp)
第一行用于指定cmake最低版本
第二行指定项目名称(这个名称是任意的)
第三行指定编译一个可执行文件,hello是第一个参数,表示生成可执行文件的文件名(这个文件名也是任意的),第二个参数helloworld.cpp则用于指定源文件。
如果您电脑上已经安装了cmake,那么我们就已经完事具备了。
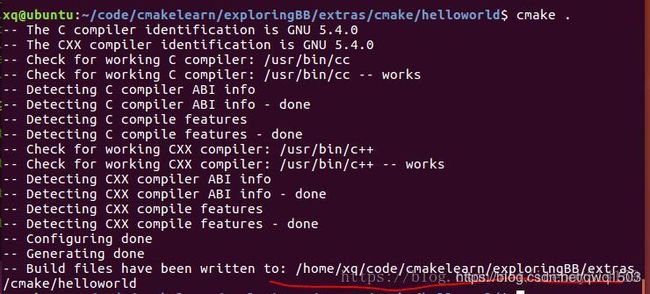
第一步,用cmake生成Makefile文件
- 注:cmake命令后边跟的就是CMakelist.txt所在的目录,这个目录不必是当前目录,你也可以新建一个build目录或者其他名字的目录来生成build文件,实际项目中也都是这么做的,这样代码会很干净也便于git管理.
第二步,make编译程序 && 编译成功
通过上一步我们发现,当前目录下已经多出了几个文件,特别是Makefile文件
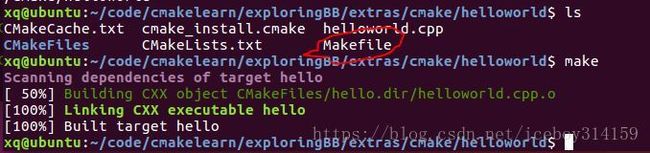
第三步,测试程序
到此,第一个用cmake管理的程序,成功了!

例2: 包含目录结构的项目
在例1中完全体现不出cmake的任何优势,用g++一行可以解决的问题我们绕了一大圈。可是cmake本来的优势就是管理庞大的项目的。
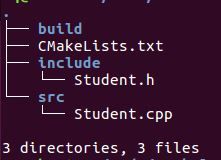
这个例子用最小的程序来体现一个带目录结构的项目。其中有源文件目录,头文件目录。

cmake_minimum_required(VERSION 2.8.9)
project(directory_test)

#Bring the headers, such as Student.h into the project
include_directories(include)

#Can manually add the sources using the set command as follows:
#set(SOURCES src/mainapp.cpp src/Student.cpp)

#However, the file(GLOB...) allows for wildcard additions:
file(GLOB SOURCES "src/*.cpp")

add_executable(testStudent ${SOURCES})
和第一个例子比起来,CMakelist.txt有如下改变:
- 使用include_directories() 包含头文件目录
- 使用set(SOURCES … ) 或GLOB (or GLOB_RECURSE) 设置源文件SOURCES
- add_executable 使用变量SOURCES ,而不是具体的文件名
接下来的步骤就和例子1一样了,不同之处是我们新建了一个build目录来存储编译中间文件,如下图:

下一步make,然后运行结果如下:

例3:动态库编译(.so)
有了前两个例子的基础,接下来的例子我们只需要看一下目录结构和CMakelist.txt.

CMakelist.txt如下:
project(directory_test)
set(CMAKE_BUILD_TYPE Release)

#Bring the headers, such as Student.h into the project
include_directories(include)

#However, the file(GLOB...) allows for wildcard additions:
file(GLOB SOURCES "src/*.cpp")

#Generate the shared library from the sources
add_library(testStudent SHARED ${SOURCES})

#Set the location for library installation -- i.e., /usr/lib in this case
# not really necessary in this example. Use "sudo make install" to apply
install(TARGETS testStudent DESTINATION /usr/lib)
两个重要变化:
- 我们不再使用add_executable() 而是使用add_library()
- install 指定安装目录,执行sudo make install时动态库将被安装在/usr/lib目录
如前两个例子,我们依次执行,cmake make编译结果如下:

例4:静态库编译 (.a)
基于例3,我们编译一个静态库
将CMakeList.txt修改为如下所示:
cmake_minimum_required(VERSION 2.8.9)
project(directory_test)
set(CMAKE_BUILD_TYPE Release)

#Bring the headers, such as Student.h into the project
include_directories(include)

#However, the file(GLOB...) allows for wildcard additions:
file(GLOB SOURCES "src/*.cpp")

#Generate the static library from the sources
add_library(testStudent STATIC ${SOURCES})

#Set the location for library installation -- i.e., /usr/lib in this case
# not really necessary in this example. Use "sudo make install" to apply
install(TARGETS testStudent DESTINATION /usr/li
可以看出,只需将add_library中的shared改为static即可。
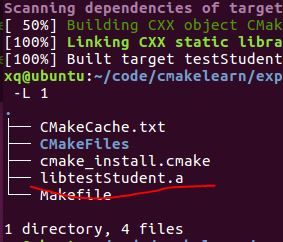
编译结果如下:
例5:使用静态库或动态库
下边我们来测试一下我们例3的结果,代码和CMakeList.txt如下:
#include"Student.h"

int main(int argc, char *argv[]){
   Student s("Joe");
   s.display();
   return 0;
}
cmake_minimum_required(VERSION 2.8.9)
project (TestLibrary)

#For the shared library:
set ( PROJECT_LINK_LIBS libtestStudent.so )
link_directories( ~/exploringBB/extras/cmake/studentlib_shared/build )

#For the static library:
#set ( PROJECT_LINK_LIBS libtestStudent.a )
#link_directories( ~/exploringBB/extras/cmake/studentlib_static/build )

include_directories(~/exploringBB/extras/cmake/studentlib_shared/include)

add_executable(libtest libtest.cpp)
target_link_libraries(libtest ${PROJECT_LINK_LIBS} )
结果如下(CMakeList.txt中的目录要根据自己的情况改一下):
![]()
成功了!!