RoboMaster 目标检测训练(官方数据集)附完整Demo代码
参考: Yolov3 训练自己的数据集 Pytorch 最简单 最少代码 最易调参
名言:大部分人都是死在了调参和配置的路上。。。。。然后归咎于设备不行。好了,现在你不需要再担心这些问题了,因为下面这个教程一般来说都不会怎么报错。
首先声明,以下训练是在我的笔记本上完成的,我的是那种很菜鸡的轻薄本,市面上任何一款游戏本都可以吊打它,显卡型号:MX150 2048MB。读者完全可以迁移到更高级设备上进行训练,请留意本文关于迁移到其他设备的说明。
下载数据集
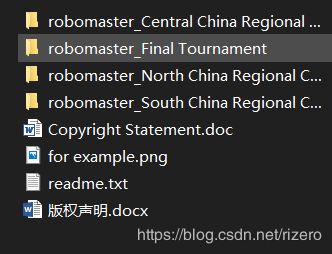
Robomaster2019 数据集上官网就有的下载,文件名称:DJCOCO.zip
数据集官网下载地址:https://terra-1-g.djicdn.com/b2a076471c6c4b72b574a977334d3e05/resources/DJI%20ROCO.zip
数据集百度云下载地址:链接:https://pan.baidu.com/s/1Ezh1ip8ZOLJeVzhBD9JuOQ 提取码:ytls
安装第三方快速训练包:芷山
使用这个zisan包之前确保你已经配置好PyTorch+CUDA+CUDNN环境,如果你还没配置环境,移步到这里:Pytorch+CUDA+CUDNN配置教程
然后安装如下包:
pip install numpy pillow matplotlib opencv-python
然后安装zisan:
pip install zisan
一般来说不会有任何报错,如果报错那就是之前的环境配置出现问题,请仔细检查。因为我们使用的深度学习框架是Pytorch,不像tensorflow会有那么多api接口版本迭代问题,pytorch非常简洁优美。
这里提供 ‘zisan芷山’ 的官网:http://jintupersonal.com/zisan/
相关文档资料:http://jintupersonal.com/zisan/doc/1.html
这个第三方包是开源的,可以到Github自取(求点一个star):https://github.com/JintuZheng/zisan
目前迭代版本1.0.11,更新频率比较快,我也来不及写文档,有的接口用法请读者自行浏览源码理解使用。
训练示例
(1)数据集和本次训练目标

数据集非常大,一共9.8GB,作为本次演示我不会训练完所有数据集,设备也不允许嘛,作为演示,我先实现识别annotations标签里面的car识别,就是把车子抠出来。
如下图,只把黄色car标签训练识别出来。

另外说一句,zisan里面底层使用的是Yolov3的Pytorch版本复现代码,是优化过的版本。
(2)打造一个训练目录
首先,我们下载预训练权重文件和zisan的目标检测配置文件,下载地址:
百度云:https://pan.baidu.com/s/1qj-Lpe4OKV0L-w9uKO8EFw
提取码:x9wl
它有图像语义分割权重和目标检测权重,我们只需要完成训练数据集的目标检测任务,只需要Yolov3的权重,找到 runBox.zip (475 MB)下载:

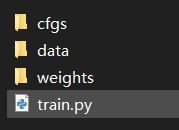
把runBox解压到一个没有中文路径的地方,里面的文件如下:

此时,cfgs和weights文件夹是有权重和网络配置文件的,我们不要也不需要取改动它。
然后,我们跑回到我们之前下载的那个Robomaster2019数据集里面,任意选一个比赛的文件夹,在image文件选246张图片
注意,我这里为了演示才选那么少,不过迭代30次已经有一定效果了,很明显的,设备好一点的可以选择1000-2000张左右一次训练,下次训练我们使用冷却的权重再训练其他更多的图片。
我们把image的图片选246张复制到刚才runBox/data/images/文件夹下面,然后把相应的246个xml标签文件复制到runBox/data/Annotations/文件夹下面,睁大你的卡斯兰大眼睛!!别复制错了,只是两个文件夹,其余的文件夹不要管也千万不要删除。

至此,我们的训练目录打造完成,接下来我们只需要很少量的代码就能完成训练。
(3)编写train.py
我们在runBox文件夹新建一个py文件

train.py:
from zisan.ObjDetect.Interface import ObjDetect_train, ObjDetect_Preprocess
import os

if __name__ == "__main__":

    pr=ObjDetect_Preprocess(classnames=['car'],currentpath='D:/xxx/runBox') # cuurentpath is needed, it is your runBox path, car是我们需要训练的类别名称
    #pr.clear_data() #clear all data
    trainModel=ObjDetect_train(currentpath='D:/xxx/runBox')
    trainModel.Run(cfg='yolov3-tiny.cfg',epochs=35,img_size=(1920/3,1080/3)) # 开始训练,训练好的权重文件保存在 weights文件夹里面
解释:
(1)classnames=[‘class1’,‘class2’],这里是描述你annotation里面xml文件标签的类别名字,我这里只训练一类,就识别所有的车,所以classnames=['car'],必须和xml文件里面的类名字保持一致。
(2)Yolov3版本选择:
zisan一共提供三种版本:Yolov3-tiny,Yolov3-spp,Yolov3,其中要求最低配置的就是tiny了。我也说过了我这个破机器就只能跑tiny了。如果你有更好的机器,你可以把cfg参数cfg='yolov3-tiny.cfg'换成:
- ‘yolov3-spp.cfg’
- ‘yolov3.cfg’
(小心引号别漏了)
(4)其他参数说明:
如果你不熟悉调参,请不要随意调参数。使用默认参数即可(我已经调过了)
epochs: The times you loop training.
batch_size: The sum of once you
put into training. cfg: You can choose ‘yolov3-tiny.cfg’,
‘yolov3-spp.cfg’ and ‘yolov3.cfg’, you must sure the weights folder
has the corresponding weight.
img_size: You can set as (height,width),
also like above 416 means (416,416)
resume: Due to the limitation of device resources, you may not be able to train too much data at a time. At this time, you can use resume to continue training for the weight of last cooling
num_workers: Multithreading, you must use main to use this nosave: if save each epoch weight
(5)关于图片放缩参数问题:
img_size=(1920/3,1080/3)
我这里放缩是1920/3=640,1080/3=360,也就是把图片放缩:1/3。
你无需手动去写代码批量处理图片,zisan包里面已经把这些操作做好了,你用就好了。
如果你是土豪拥有一个超厉害的1080 ti或者Tesla之类的,直接img_size=(1920,1080)
(4)启动
万事俱备,自己启动该train.py文件即可,命令行方式和IDE里面调试方式关于currentpath参数的问题上面说过了,自己回去看。下面就是优美的训练画面…
Using CUDA device0 _CudaDeviceProperties(name='GeForce MX150', total_memory=2048MB)

Reading image shapes: 100%|████████████████████████████████████████████████████████████████████████████████
████████████████████████████████████████████| 222/222 [00:00<00:00, 5701.61it/s]
Model Summary: 37 layers, 8.85237e+06 parameters, 8.85237e+06 gradients

   Epoch       Batch        xy        wh      conf       cls     total   targets      time
   30/34        0/27    0.0257     0.012    0.0906  8.16e-07     0.128        27      7.86
   30/34        1/27    0.0264    0.0123      0.11  1.44e-05     0.148        34      0.15
   30/34        2/27    0.0234    0.0115     0.113  9.88e-06     0.148        42     0.105
   30/34        3/27    0.0241    0.0123     0.121   9.2e-06     0.157        46     0.112
   30/34        4/27    0.0225     0.012     0.115  7.93e-06      0.15        31     0.111
   30/34        5/27    0.0249     0.012     0.131  2.69e-05     0.168        36     0.112
   30/34        6/27    0.0249    0.0123     0.133  2.54e-05      0.17        40      0.11
   30/34        7/27    0.0254    0.0125     0.134  2.29e-05     0.172        45     0.125
   30/34        8/27    0.0263    0.0124     0.133  2.05e-05     0.171        34     0.107
   30/34        9/27     0.025    0.0125     0.131  1.97e-05     0.168        38     0.113
   30/34       10/27    0.0241    0.0124      0.13  1.85e-05     0.167        37     0.111
   30/34       11/27    0.0236    0.0125     0.131  1.77e-05     0.167        35      0.11
   30/34       12/27     0.024    0.0123      0.13  1.66e-05     0.166        35     0.114
   30/34       13/27    0.0241    0.0121     0.129  1.56e-05     0.165        41     0.113
   30/34       14/27    0.0243    0.0121     0.128  1.59e-05     0.164        36     0.115
   30/34       15/27    0.0243    0.0121     0.126  1.54e-05     0.162        37     0.118
   30/34       16/27     0.024    0.0122     0.125  1.48e-05     0.161        40     0.113
   30/34       17/27    0.0241    0.0121     0.123  1.41e-05     0.159        36     0.108
   30/34       18/27     0.024    0.0121     0.123  1.35e-05     0.159        43      0.11
   30/34       19/27    0.0237    0.0119     0.123  1.34e-05     0.159        36     0.115
   30/34       20/27    0.0239     0.012     0.124  1.29e-05      0.16        37     0.109
   30/34       21/27    0.0237     0.012     0.128   1.3e-05     0.164        47     0.102
   30/34       22/27    0.0233    0.0118     0.127  1.63e-05     0.162        35     0.104
   30/34       23/27    0.0231    0.0117     0.126  1.56e-05     0.161        40     0.108
   30/34       24/27    0.0231    0.0117     0.127  1.58e-05     0.162        42     0.102
   30/34       25/27     0.023    0.0119     0.127  1.55e-05     0.162        40     0.103
   30/34       26/27    0.0228    0.0119     0.128  2.15e-05     0.163        33     0.103
   30/34       27/27    0.0229     0.012     0.126  2.08e-05     0.161        24      4.24
Reading image shapes: 100%|████████████████████████████████████████████████████████████████████████████████
██████████████████████████████████████████████| 21/21 [00:00<00:00, 7019.48it/s]
               Class    Images   Targets         P         R       mAP        F1
Computing mAP:  33%|█████████████████████████████████████████████▋
Computing mAP:  67%|████████████████████████████████████████████████████████████████████████████████████
Computing mAP: 100%|████████████████████████████████████████████████████████████████████████████████████
Computing mAP: 100%|████████████████████████████████████████████████████████████████████████████████████
█████████████████████████████████████████████████████| 3/3 [00:03<00:00,  1.32s/it]
                 all        21        94     0.524     0.798     0.634     0.633

   Epoch       Batch        xy        wh      conf       cls     total   targets      time
   31/34        0/27    0.0203    0.0113    0.0937     1e-06     0.125        30      7.96
   31/34        1/27    0.0212    0.0112     0.118  2.24e-05      0.15        37     0.115
   31/34        2/27    0.0222      0.01     0.125  1.75e-05     0.157        36     0.143
   ........
我的参数:
epoch:30
batch_size:8
autoLearnRate
246张图,一个类car训练了3分钟,在笔记本一张垃圾显卡MX150上,完成了。
测试
我其实很好奇,在这么小的迭代次数和batch_size上会有怎样的效果,来让我们来编写一个detect.py:
同理,在runBox文件夹里面新建一个detect.py 文件:

detect.py:
from zisan.ObjDetect.Interface import ObjDetect_detect, ObjDetect_train, ObjDetect_Preprocess
import os
from skimage import io
import cv2

if __name__ == "__main__":
    detectModel=ObjDetect_detect(cfg='yolov3-tiny.cfg',currentpath='D:/xxx/runBox') # cuurentpath is needed, it is your runBox path
	img=io.imread('D:/1.jpg')
	img=cv2.resize(img,(480,640)) # Here rechange for your train images set Height and width
    re=detectModel.detect_from_RGBimg(img,is_showPreview=True)
	print(re) #re is a result list, item is dictionary and the format is: {'class':xx,'x0':xx,'x1':xx,'y0':xx,'y1':xx}
竟然还能识别到三个,哈哈:

所以,请不要老是抱怨什么机器设备不行之类的屁话,要学会提高自己工程能力。
权重解冻再训练
你可能会说我有那么多图片数据,显存不足怎么办?
不怕,zisan的训练代码已经有resume功能,你只需要稍稍改一下train.py:
我们只需要使用 resume=True 和把epoches 调大即可,开始训练。
if __name__ == "__main__":
    pr=ObjDetect_Preprocess(classnames=['car'],currentpath='D:/xxx/runBox') # cuurentpath is needed, it is your runBox path
    trainModel=ObjDetect_train(currentpath='D:/xxx/runBox')
    trainModel.Run(cfg='yolov3-tiny.cfg',epochs=50,resume=True)
另外,训练好最好的权重文件是weights文件夹的best.pth,你在使用detect.py的时候务必让weights文件和detect.py文件夹在同一目录即可,你也无需关心pth文件在什么地方。
迁移到无人机和哨兵机器人上实现辅助自动打击
这个只是展望了,不要尝试迁移到C++平台上,如果你觉得Python解释器太慢了,推荐你使用基于numpy做编译优化的numba,速度马上提升一个量级。
有问题可以评论留言,或者邮箱:[email protected]
zisan是我的一个开源项目,用于快速搭建CV的工程开发,用很少的代码就能实现目标检测,对象语义分割的功能,如你所见,目前github只有两个star,如果你感兴趣的话可以顺手给我点个star,谢谢啦:https://github.com/EpsilionJT/zisan
代码Demo:https://download.csdn.net/download/rizero/12240567