springboot用拦截器实现Token的权限认证
对于很多系统来说,登陆权限控制是每个系统都具有的,不过实现的方案也多种多样。
下面利用简单的demo来实现使用 Token认证来控制系统的权限访问。
pom、数据库配置、Redis配置略
自定义注解:AuthToken
package com.csq.study.springcloud.token.annotation;
import java.lang.annotation.ElementType;
import java.lang.annotation.Retention;
import java.lang.annotation.RetentionPolicy;
import java.lang.annotation.Target;
/**
*
* @Description: TODO
* @ClassName: AuthToken
* @author chengshengqing 2019年7月2日
* @see TODO
*/
@Target({ElementType.METHOD, ElementType.TYPE})
@Retention(RetentionPolicy.RUNTIME)
public @interface AuthToken {
}
配置类:WebAppConfiguration
package com.csq.study.springcloud.token.configuration;
import org.springframework.context.annotation.Configuration;
import org.springframework.web.servlet.config.annotation.InterceptorRegistry;
import org.springframework.web.servlet.config.annotation.WebMvcConfigurer;
import com.csq.study.springcloud.token.interceptor.TokemInterceptor;
/**
*
* @Description: TODO
* @ClassName: WebAppConfiguration
* @author chengshengqing 2019年7月2日
* @see TODO
*/
@Configuration
public class WebAppConfiguration implements WebMvcConfigurer {
@Bean
public HandlerInterceptor getUserInterceptor(){
    return new TokemInterceptor();
}
//这里与原文不同,在TokemInterceptor拦截器中注入service无效,此法可解决该问题

@Override
public void addInterceptors(InterceptorRegistry registry) {
    registry.addInterceptor(getUserInterceptor()).addPathPatterns("/**");
}
}
controller:TokenController
package com.csq.study.springcloud.token.controller;
import com.alibaba.fastjson.JSONObject;
import com.csq.study.springcloud.token.UserDao.UserDao;
import com.csq.study.springcloud.token.annotation.AuthToken;
import com.csq.study.springcloud.token.entity.ResponseTemplate;
import com.csq.study.springcloud.token.entity.User;
import com.csq.study.springcloud.token.util.CommonUtil;
import com.csq.study.springcloud.token.util.Md5TokenGenerator;
import org.slf4j.Logger;
import org.slf4j.LoggerFactory;
import org.springframework.beans.factory.annotation.Autowired;
import org.springframework.web.bind.annotation.GetMapping;
import org.springframework.web.bind.annotation.RequestMapping;
import org.springframework.web.bind.annotation.RequestMethod;
import org.springframework.web.bind.annotation.RestController;
import redis.clients.jedis.Jedis;
/**
*
* @Description: TODO
* @ClassName: welcome
* @author chengshengqing 2019年7月2日
* @see TODO
*/
@RestController
public class TokenController {
Logger logger = LoggerFactory.getLogger(TokenController.class);
@Autowired
private Md5TokenGenerator tokenGenerator;
@Autowired
private UserDao userDao;
@GetMapping("/welcome")
public String Welcome(){
return "welcome TokenController ";
}
@RequestMapping(value = "/login", method = RequestMethod.GET)
public ResponseTemplate Login(String username, String password) {
logger.info("用户名username为:"+username+ "密码password为:"+password);
User user = userDao.getUser(username,password);
logger.info("从数据库查出来的用户user为:"+user);
JSONObject obj = new JSONObject();
if (user != null) {
String token = SetRedisData(username, password);
obj.put("status", "用户登录成功");
obj.put("token", token);
} else {
obj.put("status", "用户登录失败");
}
return ResponseTemplate.builder().code(200).message("用户登录成功").data(obj).build();
}
@RequestMapping(value = "test", method = RequestMethod.GET)
@AuthToken
public ResponseTemplate test() {
logger.info("**************测试start**************");
return ResponseTemplate.builder().code(200).message("测试成功").data("测试数据").build();
}
/**
* 在redis中进行数据的绑定
* @Title: SetRedisData
* @Description: TODO
* @param username
* @param password
* @return
* @author chengshengqing 2019年7月2日
*/
private String SetRedisData(String username, String password) {
//此处主要设置你的redis的ip和端口号,我的redis是在本地
Jedis jedis = new Jedis("127.0.0.1", 6379);
String token = tokenGenerator.generate(username, password);
jedis.set(username, token);
//设置key过期时间,到期会自动删除
jedis.expire(username, CommonUtil.TOKEN_EXPIRE_TIME);
//将token和username以键值对的形式存入到redis中进行双向绑定
jedis.set(token, username);
jedis.expire(token, CommonUtil.TOKEN_EXPIRE_TIME);
Long currentTime = System.currentTimeMillis();
jedis.set(token + username, currentTime.toString());
//用完关闭
jedis.close();
return token;
}
}
User、ResponseTemplate略
拦截器(重点):
package com.csq.study.springcloud.token.interceptor;
import com.alibaba.fastjson.JSONObject;
import com.csq.study.springcloud.token.annotation.AuthToken;
import com.csq.study.springcloud.token.util.CommonUtil;
import org.slf4j.Logger;
import org.slf4j.LoggerFactory;
import org.springframework.http.HttpStatus;
import org.springframework.http.MediaType;
import org.springframework.web.method.HandlerMethod;
import org.springframework.web.servlet.HandlerInterceptor;
import org.springframework.web.servlet.ModelAndView;
import redis.clients.jedis.Jedis;
import javax.servlet.http.HttpServletRequest;
import javax.servlet.http.HttpServletResponse;
import java.io.PrintWriter;
import java.lang.reflect.Method;
/**
*
* @Description: TODO
* @ClassName: AuthorizationInterceptor
* @author chengshengqing 2019年7月2日
* @see TODO
*/
public class TokemInterceptor implements HandlerInterceptor {
Logger log = LoggerFactory.getLogger(TokemInterceptor.class);
//存放鉴权信息的Header名称,默认是Authorization
private String Authorization = "Authorization";
//鉴权失败后返回的HTTP错误码,默认为401
private int unauthorizedErrorCode = HttpServletResponse.SC_UNAUTHORIZED;
/**
* 存放用户名称和对应的key
*/
public static final String USER_KEY = "USER_KEY";
@Override
public boolean preHandle(HttpServletRequest request, HttpServletResponse response, Object handler) throws Exception {
if (!(handler instanceof HandlerMethod)) {
return true;
}
HandlerMethod handlerMethod = (HandlerMethod) handler;
Method method = handlerMethod.getMethod();
//验证token
if (method.getAnnotation(AuthToken.class) != null || handlerMethod.getBeanType().getAnnotation(AuthToken.class) != null) {
String token = request.getParameter(Authorization);
log.info("获取到的token为: {} ", token);
//此处主要设置你的redis的ip和端口号,我的redis是在本地
Jedis jedis = new Jedis("127.0.0.1", 6379);
String username = null;
if (token != null && token.length() != 0) {
//从redis中根据键token来获取绑定的username
username = jedis.get(token);
log.info("从redis中获取的用户名称为: {}", username);
}
//判断username不为空的时候
if (username != null && !username.trim().equals("")) {
String startBirthTime = jedis.get(token + username);
log.info("生成token的时间为: {}", startBirthTime);
Long time = System.currentTimeMillis() - Long.valueOf(startBirthTime);
log.info("token存在时间为 : {} ms", time);
//重新设置Redis中的token过期时间
if (time > CommonUtil.TOKEN_RESET_TIME) {
jedis.expire(username, CommonUtil.TOKEN_EXPIRE_TIME);
jedis.expire(token, CommonUtil.TOKEN_EXPIRE_TIME);
log.info("重置成功!");
Long newBirthTime = System.currentTimeMillis();
jedis.set(token + username, newBirthTime.toString());
}
//关闭资源
jedis.close();
request.setAttribute(USER_KEY, username);
return true;
} else {
JSONObject jsonObject = new JSONObject();
PrintWriter out = null;
try {
response.setStatus(unauthorizedErrorCode);
response.setContentType(MediaType.APPLICATION_JSON_VALUE);
jsonObject.put("code", response.getStatus());
//鉴权失败后返回的错误信息,默认为401 unauthorized
jsonObject.put("message", HttpStatus.UNAUTHORIZED);
out = response.getWriter();
out.println(jsonObject);
return false;
} catch (Exception e) {
e.printStackTrace();
} finally {
if (null != out) {
out.flush();
out.close();
}
}
}
}
request.setAttribute(USER_KEY, null);
return true;
}
@Override
public void postHandle(HttpServletRequest request, HttpServletResponse response, Object handler, ModelAndView modelAndView) throws Exception {
}
@Override
public void afterCompletion(HttpServletRequest request, HttpServletResponse response, Object handler, Exception ex) throws Exception {
}
}
userDao略
工具类:CommonUtil
package com.csq.study.springcloud.token.util;
public final class CommonUtil {
/**
* redis存储token设置的过期时间,10分钟
*/
public static final Integer TOKEN_EXPIRE_TIME = 60 * 10;
/**
* 设置可以重置token过期时间的时间界限
*/
public static final Integer TOKEN_RESET_TIME = 1000 * 100;
}
Md5TokenGenerator 类
package com.csq.study.springcloud.token.util;
import org.springframework.stereotype.Component;
import org.springframework.util.DigestUtils;
@Component
public class Md5TokenGenerator implements TokenGenerator {
@Override
public String generate(String... strings) {
long timestamp = System.currentTimeMillis();
String tokenMeta = "";
for (String s : strings) {
tokenMeta = tokenMeta + s;
}
tokenMeta = tokenMeta + timestamp;
String token = DigestUtils.md5DigestAsHex(tokenMeta.getBytes());
return token;
}
}
TokenGenerator 接口:
package com.csq.study.springcloud.token.util;
import org.springframework.stereotype.Component;
@Component
public interface TokenGenerator {
public String generate(String[] strings);
}
启动类:TokenApplication
小贴士:整合到自己项目中时,该配置可以省略,否则会导致项目发布构建时报错,报错截图如下:
原因是原来的项目已经用@SpringBootApplication配置过了,从而导致上述报错。
package com.csq.study.springcloud.token;
import org.springframework.boot.SpringApplication;
import org.springframework.boot.autoconfigure.SpringBootApplication;
@SpringBootApplication
public class TokenApplication {
public static void main(String[] args) {
SpringApplication.run(TokenApplication.class, args);
}
}
启动项目,然后启动redis
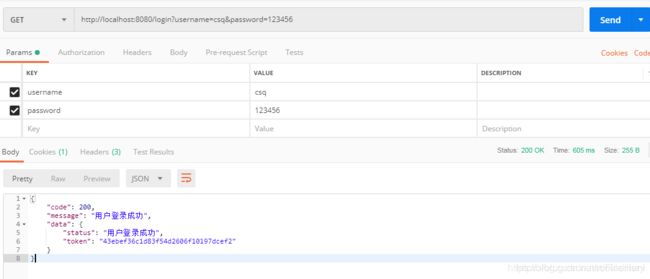
再访问:http://localhost:8080/login?username=csq&password=123456
看到如下截图:
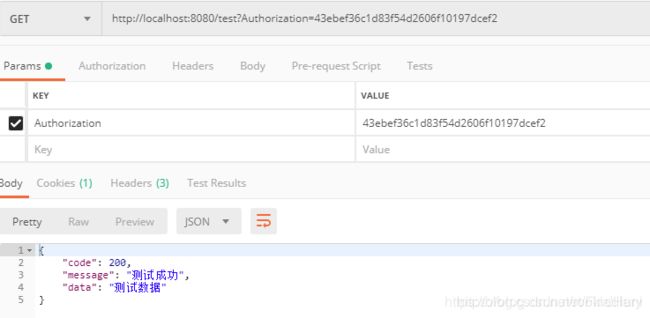
然后 我们访问:http://localhost:8080/test?Authorization=43ebef36c1d83f54d2606f10197dcef2
然后我们在稍微改一下那个token:访问: http://localhost:8080/test?Authorization=43ebef36c1d83f54d2606f10197dcef4
看截图:
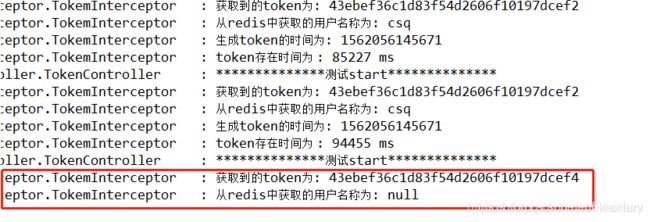
然后我们去看下控制台输出的截图:
以上说明 :我们的token实现权限控制小demo搭建成功了。
此demo容易出错的地方:
1.redis错误,我们在本地安装的redis一般默认是没有密码的。所以在配置文件中不需要配置密码
2.redis需要在访问项目之前启动
3.在eclipse中lombok的jar包问题有的会导致@Builder注解不能用,可以试试这个方法(请点击查看),就可以解决这个问题
————————————————
版权声明:本文为CSDN博主「努力前行的小coder」的原创文章,遵循CC 4.0 BY-SA版权协议,转载请附上原文出处链接及本声明。
原文链接:https://blog.csdn.net/FindHuni/article/details/94451136


