《异常检测——从经典算法到深度学习》2 基于LOF的异常检测算法
目录
- 0 概论
- 1 基于隔离森林的异常检测算法
- 2 基于LOF的异常检测算法
- 3 基于One-Class SVM的异常检测算法
- 4 基于高斯概率密度异常检测算法
- 5 Opprentice——异常检测经典算法最终篇
2. 基于 LOF 的异常检测算法
此篇主要介绍以下内容:
- LOF 算法概述
- LOF 算法应用实例
- 小结
2.1 LOF算法概述
LOF (Local Outliers Factor,局部异常因子) 算法 是一种非监督异常检测算法,它是通过计算给定数据点相对于其邻域的局部密度偏差而实现异常检测。LOF: Identifying Density-Based Local Outliers 论文下载
核心思路: LOF算法是通过比较每个点p和邻域点的密度来判断该点是否为异常:点p的密度越低,越有可能是异常点。而点的密度是通过点之间的距离来计算的,点之间距离越远,密度越低;距离越近,密度越高。也就是说,LOF算法中点的密度是通过点的k邻域计算得到的,而不是通过全局计算得到,这里的"k邻域”也就是该算法中“局部”的概念。
相关定义: 论文中一共有七个定义,详细内容请下载论文了解。这里只介绍其中的五处定义,理解这几个定义基本上就能明白算法核心内容:
- Definition 3, k-distance of an object (对象p的k距离): 对于任意正整数
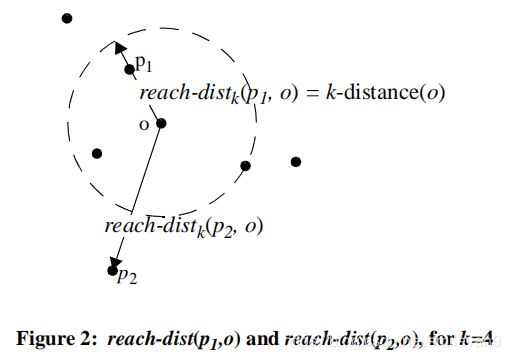
k,p的k距离表示为k-distance(p),定义为对象p和数据集D中对象o之间的距离d(p,o),满足: - `Definition 4, k-distance neighborhood of an object p (对象p的k距离邻域): 给定k值,那么p对象的k距离领域则可表示为: N k − d i s t a n c e ( p ) ( P ) = { q ∈ D ∖ { p } ∣ d ( p , q ) ≤ k − d i s t a n c e ( p ) } N_{k-distance(p)}(P) = \{ q\in D \setminus \{p\} | d(p,q) \leq k-distance(p) \} Nk−distance(p)(P)={q∈D∖{p}∣d(p,q)≤k−distance(p)},最好是结合上面的图进行理解。
- Definition 5, reachability distance of an object p w.r.t. object o (对象p关于对象o的可达距离): r e a c h − d i s k k ( p , o ) = m a x { k − d i s t a n c e ( o ) , d ( p , o ) } reach-disk_k(p, o)=max\{k-distance(o),d(p,o)\} reach−diskk(p,o)=max{k−distance(o),d(p,o)}
这句话的理解可以参考上图,对于两个不同的点p1和p2,它们的可达距离计算是不一样的,对p1来说,因为p1在o的k邻域内(可以看出这里的k=3),所以它们的距离就是k-distance(o)的距离,也就是等于圆的半径;而对于p2,很明显它不在o的k邻域内,所以它的可达距离就是实际距离,也就是这两点之间的距离。 - Definition 6, local reachability density of an object p (对象p的局部可达密度):

即对象p的局部可达密度是基于p的MinPts邻居的平均可达距离的倒数。对象p的局部可达密度越高,越可能属于统一簇;密度越低,越可能是离群点。 - Definition 7, local outlier factor of an object p (对象p的局部异常因子):

对象p的局部异常因子表示p的异常程度。如果这个比值的绝对值越接近1,说明p与邻域点的密度相差不多,p和邻域同属一簇;如果这个比值的绝对值小于1,说明p的密度高于邻域点的密度,p为密集点;如果这个比值的绝对值大于1的部分越多,说明p的密度小于邻接点的密度,p越有可能是异常点。
LOF算法特点
LOF 算法基本原理从定义中就可以看得出来,该算法特点主要包括:
- LOF算法是一种非监督算法
- LOF算法是一种基于密度的算法
- LOF算法适合于对不同密度的数据的异常检测
2.2 LOF 算法应用实例
实例1
实例1来自sklearn官网,详细地址
import numpy as np
from sklearn.neighbors import LocalOutlierFactor
X = [[-1.1], [0.2], [101.1], [0.3]]
clf = LocalOutlierFactor(n_neighbors=2)
clf.fit_predict(X)

clf.negative_outlier_factor_
输出内容:
array([ -0.98214286, -1.03703704, -73.36970899, -0.98214286])
绝对值越大于1则越有可能是异常。很明显 101.1 最有可能是异常。
实例2
该实例来自于sklearn官网,详细地址
具体代码如下:
import numpy as np
import matplotlib.pyplot as plt
from sklearn.neighbors import LocalOutlierFactor
np.random.seed(42)

# Generate train data
X_inliers = 0.3 * np.random.randn(100, 2)
X_inliers = np.r_[X_inliers + 2, X_inliers - 2]

# Generate some outliers
X_outliers = np.random.uniform(low=-4, high=4, size=(20, 2))
X = np.r_[X_inliers, X_outliers]

n_outliers = len(X_outliers)
ground_truth = np.ones(len(X), dtype=int)
ground_truth[-n_outliers:] = -1

# fit the model for outlier detection (default)
clf = LocalOutlierFactor(n_neighbors=20, contamination=0.1)
# use fit_predict to compute the predicted labels of the training samples
# (when LOF is used for outlier detection, the estimator has no predict,
# decision_function and score_samples methods).
y_pred = clf.fit_predict(X)
n_errors = (y_pred != ground_truth).sum()
X_scores = clf.negative_outlier_factor_

plt.title("Local Outlier Factor (LOF)")
plt.scatter(X[:, 0], X[:, 1], color='k', s=3., label='Data points')
# plot circles with radius proportional to the outlier scores
radius = (X_scores.max() - X_scores) / (X_scores.max() - X_scores.min())
plt.scatter(X[:, 0], X[:, 1], s=1000 * radius, edgecolors='r',
            facecolors='none', label='Outlier scores')
plt.axis('tight')
plt.xlim((-5, 5))
plt.ylim((-5, 5))
plt.xlabel("prediction errors: %d" % (n_errors))
legend = plt.legend(loc='upper left')
legend.legendHandles[0]._sizes = [10]
legend.legendHandles[1]._sizes = [20]
plt.show()
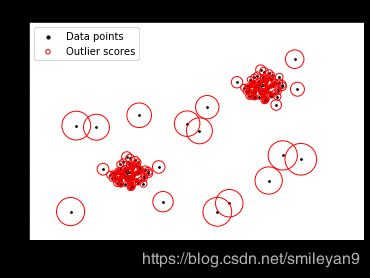
展示的图片如下:

代码非常简单,可能需要关注一下这几个参数:
n_neighbors即论文中k-distance中的k,表示待测点附近的邻接点的个数,需要根据这个数字确定待测点的可达距离等等。LOF算法中的”局部“关键字即跟此参数密切相关,如果该参数过大,则会把所有样本都考虑在内,不再是“局部异常检测”。algorithm在找k个邻接点的时候需要排序,所以这个参数是用来选择排序算法的。novelty:默认false,是否用来做新奇检测(novelty detection)
实例3
这个例子叫做novelty detection(新奇点检测),不妨在这里比较一下其与异常检测的区别,如下表所示(来自sklearn官网):
| 异常检测(outlier detection) | 新奇点检测 novelty detection |
|---|---|
| 训练集中包含异常数据,这些异常数据的值远离了正常数据因此,孤立点检测估计器试图拟合训练数据最集中的区域,而忽略了偏差观测。 | 训练数据不受异常值的污染,我们感兴趣的是检测一个新的观测值是否是异常值。在这种情况下,离群值也称为新奇值。 |
也非常容易理解——在对一堆测试集进行检测的时候,除了可以检测出异常,也可以将正常的标记为 novelty ,具体代码如下:
import numpy as np
import matplotlib
import matplotlib.pyplot as plt
from sklearn.neighbors import LocalOutlierFactor

print(__doc__)

np.random.seed(42)

xx, yy = np.meshgrid(np.linspace(-5, 5, 500), np.linspace(-5, 5, 500))
# Generate normal (not abnormal) training observations
X = 0.3 * np.random.randn(100, 2)
X_train = np.r_[X + 2, X - 2]
# Generate new normal (not abnormal) observations
X = 0.3 * np.random.randn(20, 2)
X_test = np.r_[X + 2, X - 2]
# Generate some abnormal novel observations
X_outliers = np.random.uniform(low=-4, high=4, size=(20, 2))

# fit the model for novelty detection (novelty=True)
clf = LocalOutlierFactor(n_neighbors=20, novelty=True, contamination=0.1)
clf.fit(X_train)
# DO NOT use predict, decision_function and score_samples on X_train as this
# would give wrong results but only on new unseen data (not used in X_train),
# e.g. X_test, X_outliers or the meshgrid
y_pred_test = clf.predict(X_test)
y_pred_outliers = clf.predict(X_outliers)
n_error_test = y_pred_test[y_pred_test == -1].size
n_error_outliers = y_pred_outliers[y_pred_outliers == 1].size

# plot the learned frontier, the points, and the nearest vectors to the plane
Z = clf.decision_function(np.c_[xx.ravel(), yy.ravel()])
Z = Z.reshape(xx.shape)

plt.title("Novelty Detection with LOF")
plt.contourf(xx, yy, Z, levels=np.linspace(Z.min(), 0, 7), cmap=plt.cm.PuBu)
a = plt.contour(xx, yy, Z, levels=[0], linewidths=2, colors='darkred')
plt.contourf(xx, yy, Z, levels=[0, Z.max()], colors='palevioletred')

s = 40
b1 = plt.scatter(X_train[:, 0], X_train[:, 1], c='white', s=s, edgecolors='k')
b2 = plt.scatter(X_test[:, 0], X_test[:, 1], c='blueviolet', s=s,
                 edgecolors='k')
c = plt.scatter(X_outliers[:, 0], X_outliers[:, 1], c='gold', s=s,
                edgecolors='k')
plt.axis('tight')
plt.xlim((-5, 5))
plt.ylim((-5, 5))
plt.legend([a.collections[0], b1, b2, c],
           ["learned frontier", "training observations",
            "new regular observations", "new abnormal observations"],
           loc="upper left",
           prop=matplotlib.font_manager.FontProperties(size=11))
plt.xlabel(
    "errors novel regular: %d/40 ; errors novel abnormal: %d/40"
    % (n_error_test, n_error_outliers))
plt.show()
小结
LOF 算法同样是一种非常经典的异常检测算法,它最明显的缺点就是检测的数据必须有明显的密度差异,计算比较复杂,应用场景有限。
Smileyan
2020.5.23

