【Spring学习15】自动装配Bean
在Spring使用中,我们在xml配置文件通过
如果使用自动装配(autowiring) ,就可以减少甚至消除配置
设置

注意:自动装配功能和手动装配要是同时使用,那么自动装配就不起作用。
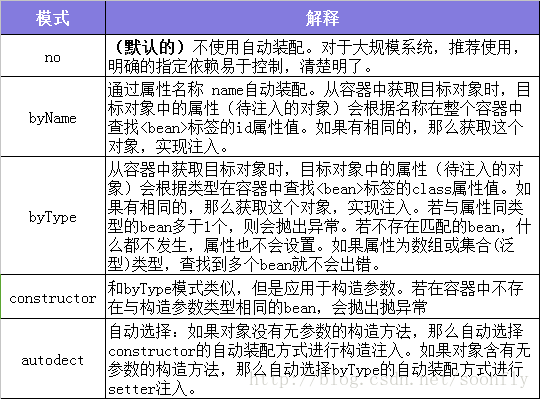
来看看几种自动装配方式:
首先假设User类有两个setter方法,一个是setUsername(),一个是setAccount()。
byName方式
<bean id="ac_100" class="twm.demo.Account"/>

<bean id="user" class="twm.demo.User">
  <property name="username" value="Yanglan"/>
  <property name="account" ref="ac_100"/>
bean>


<bean id="account" class="twm.demo.Account"/>

<bean id="user" class="twm.demo.User" autowire="byName">
  <property name="username" value="Yanglan"/>
bean>
我们看看上下两种配置的方式的区别,user bean的属性account的值是一个定义好的Bean,在属性中通过ref引用其id(ac_100)实现注入。
第二种方式把该Bean的id改成了与引用它的Bean属性相同的名字(id=”account” 可忽略属性首字每大小写),然后使用byName的方式来自动装配,对user bean来说省略配置一个
byType方式
id="ac_anyname" class="twm.demo.Account"/>
id="user" class="twm.demo.User" autowire="byType">
  <property name="username" value="Yanglan"/>
把autowire属性值改为byType后,在注入account属性时,并不关心bean id了,而是查找容器中是否有类型为twm.demo.Account的bean。但是如果有多个bean的类型都匹配的情况,那么就会出错,因为byType方式只允许匹配一个类型相同的Bean。
如果在容器中存在多个类型相同的bean怎么办呢?spring提供了另外两种选择,可以设置一个首选bean,或者排除一些bean。
但是spring默认每个bean的primary属性都是true,所以如果需要设置首选bean需要将那些非首选bean的primary属性标注为false。
代码:
id="account" class="twm.demo.Account"/>
id="account_ent" class="twm.demo.Account" primary="false" />
constructor构造方式
<bean id="yanglan" class="twm.demo.User" autowire="constructor">
bean>
构造器自动装配只需要把autowire属性设置为constructor就可以了,这样就免去了声明元素
autodetect最佳自动装配
<bean id="yanglan" class="twm.demo.User" autowire="autodetect">
bean>
首先使用constructor方式进行装配,如果不行,就使用byType方式装配。使用方法跟以上介绍的都是一样的 ,这里不多说了
默认自动装配
在
... default-autowire="byType">
自动装配侯选者
XML配置中默认所有的bean都是自动装配的侯选者。如果设置
default-autowire-candidates=“*abc”,则所有以“abc”结尾的Bean都将被包含到自动装配的待选类中。该属性可以指定多个匹配字符串,匹配任一字符串的Bean都将作为侯选者。
使用注解自动装配
如果不想在xml文件中使用autowire属性来启用自动装配,还可以直接在类定义中使用@Autowired或@Resource来装配bean。
在使用注解装配之前,首先要开启注解装配的方式,在配置文件中加上下面这句话
<context:annotation-config>当然还要在xml文件添加context命名空间并指定schema
"http://www.springframework.org/schema/beans"
    xmlns:context="http://www.springframework.org/schema/context"
    xmlns:xsi="http://www.w3.org/2001/XMLSchema-instance"
    xsi:schemaLocation="http://www.springframework.org/schema/beans
    http://www.springframework.org/schema/beans/spring-beans.xsd
    http://www.springframework.org/schema/context
    http://www.springframework.org/schema/context/spring-context-4.2.xsd">
spring支持多种注解装配的方式,这里主要介绍spring自带的Autowired注解装配
注:@Resource也可用于自动装配。但@Resource并不是Spring的注解,他的包是javax.annotation.Resource。Spring支持该注解的注入,@Resource通过设置可以按byName和byType 方式注入,如果都没有写,默认按byName方式。
1、使用@Autowired注解
@Autowired注解可以用在任何方法上,不一定非得是setter方法,只要方法有需要自动装配的参数都可以,但是一般都是使用在setter方法和构造器上的。
注意:@Autowired注解默认使用的是byType的方式向Bean里面注入相应的Bean。
1.1、用于setter方法:看如下代码:
@Autowired
public void setNotifyservice(NotifyService notifyservice) {
    this.notifyservice = notifyservice;
}
以上代码是把@Autowired注解在setter方法上,在spring创建该类的bean的时候,就会自动寻找匹配的参数注入到该bean当中。
1.2、用于构造函数:
@Autowired另外一个用法就是注解构造函数:
public class Order {
@Autowired
public Order(NotifyService notifyservice) {
    this.notifyservice = notifyservice;
}
//......省略部分代码
}
1.3、直接注解在属性:
@Autowired还有一种用法就是直接注解在属性上,从而去掉setter方法
@Autowired
private NotifyService notifyservice;
使用@Autowired自动装配时,容器中只能有一个适合的Bean待选,否则的话,spring会抛出异常。
如果在应用上下文当中找不到相应的bean去自动装配,那么spring也会抛出异常(NoSuchBeanDefinitionException)。
如果想避免这种情况发生,而且需要装配的属性也不是必须要装配的话,可以使用如下代码来使用注解:
@Autowired(required=false)
private Instrument instrument;
在这里添加@Autowired的required属性,将这个属性设置为false,意思就是在创建bean的时候该属性不是必须的
2、@Qualifier注解
刚才提到,如果在容器中出现了两个适合的bean,就会出错。怎么解决呢?这个时候可以使用@Qualifier注解指定一个Bean来装配,这样就不会报异常了。@Qualifier注解采用的是byName的方式。
@Autowired
@Qualifier("CellPhoneNotifyserviceImpl")
private NotifyService notifyservice;
括号中的字符串标注的是需要自动装配进来的Bean的id 在注解注入中使用表达式
3、@Value注解
在使用注解自动装配的过程当中,如果想要自动装配基本类型的或者是字面值常量的参数的话,可以是用@Value注解
@Value("Messi")
private String username;
上例为一个String类型的属性装配了一个String类型的值,同样可以装配int,boolean等基本类型的属性。
在@Value注解中,还可以使用表达式来动态的计算并装配属性的值。比如使用spel表达式从某个对象属性中取得一个值
@Value("#{systemConfig.UploadPath}")
private String savePath;