初写SSM,spring+springmvc+mybatis 实现增删改查加上分页
(这是本人第一次写,有错误的地方请多多关照)
代码是根据老师视频打出来的,发出来分享一下。
本项目涉及到的一些技术点:
1.spring+springmvc+mybatis
2.显示页面用到了bootstrap,jQuery,ajax。
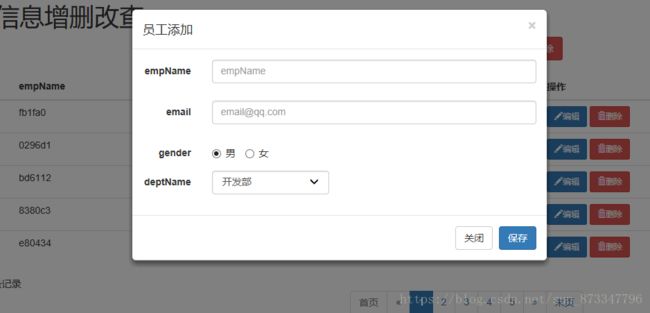
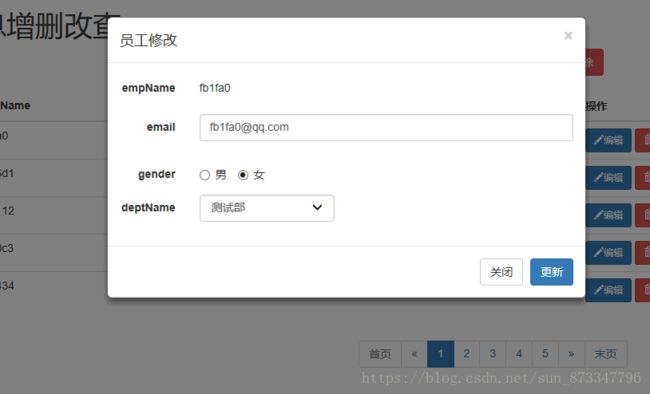
首先 看一下最后效果
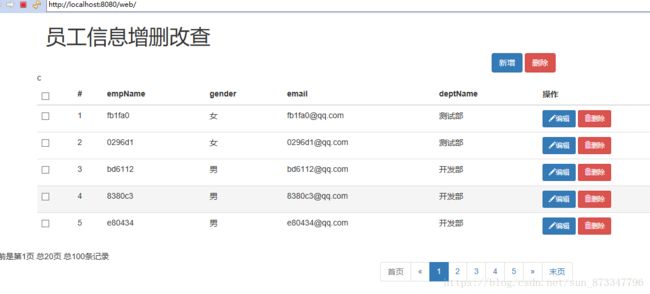
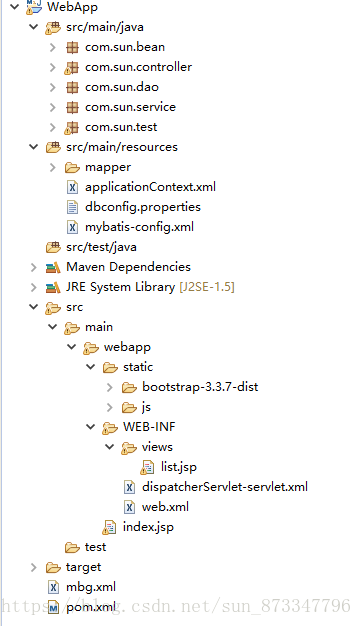
项目的整体
先来配置pom.xml
			com.github.pagehelper
			pagehelper
			5.0.0


			org.mybatis.generator
			mybatis-generator-core
			1.3.5


			org.springframework
			spring-webmvc
			4.3.7.RELEASE


			com.fasterxml.jackson.core
			jackson-databind
			2.8.8


			org.hibernate
			hibernate-validator
			5.4.1.Final


			org.springframework
			spring-jdbc
			4.3.7.RELEASE


			org.springframework
			spring-test
			4.3.7.RELEASE


			org.springframework
			spring-aspects
			4.3.7.RELEASE


			org.mybatis
			mybatis
			3.4.2


			org.mybatis
			mybatis-spring
			1.3.1


			c3p0
			c3p0
			0.9.1


			mysql
			mysql-connector-java
			5.1.18


			jstl
			jstl
			1.2


			javax.servlet
			javax.servlet-api
			3.0.1
			provided


			junit
			junit
			4.12
web.xml
		contextConfigLocation
		classpath:applicationContext.xml


		org.springframework.web.context.ContextLoaderListener


		dispatcherServlet
		org.springframework.web.servlet.DispatcherServlet
		1


		dispatcherServlet
		/


		CharacterEncodingFilter
		org.springframework.web.filter.CharacterEncodingFilter

			encoding
			utf-8


			forceRequestEncoding
			true


			forceResponseEncoding
			true


		CharacterEncodingFilter
		/*


		HiddenHttpMethodFilter
		org.springframework.web.filter.HiddenHttpMethodFilter


		HiddenHttpMethodFilter
		/*


		HttpPutFormContentFilter
		org.springframework.web.filter.HttpPutFormContentFilter


		HttpPutFormContentFilter
		/*
配置dispatcherServlet-servlet.xml
我们来写一下数据库,这里我就直接贴上sql语句,数据库连接要特别注意你的数据库版本,版本错了可能就导致你连接不上你的数据库
CREATE TABLE `tb_dept` (
  `dept_id` int(11) NOT NULL AUTO_INCREMENT,
  `dept_name` varchar(255) NOT NULL,
  PRIMARY KEY (`dept_id`)
) ENGINE=InnoDB AUTO_INCREMENT=3 DEFAULT CHARSET=utf8;
CREATE TABLE `tb_emp` (
`emp_id` int(11) NOT NULL AUTO_INCREMENT,
`emp_name` varchar(255) NOT NULL,
`gender` varchar(2) NOT NULL,
`email` varchar(255) NOT NULL,
`d_id` int(11) NOT NULL,
PRIMARY KEY (`emp_id`),
KEY `fk_emp_dept` (`d_id`),
CONSTRAINT `fk_emp_dept` FOREIGN KEY (`d_id`) REFERENCES `tb_dept` (`dept_id`)
) ENGINE=InnoDB AUTO_INCREMENT=101 DEFAULT CHARSET=utf8;要想插入语句的话可以在eclipse中用语句插入 再Java/test下创建MapperTest
package com.sun.test;

import java.util.UUID;

import org.apache.ibatis.session.SqlSession;
import org.junit.Test;
import org.junit.runner.RunWith;
import org.springframework.beans.factory.annotation.Autowired;
import org.springframework.test.context.ContextConfiguration;
import org.springframework.test.context.junit4.SpringJUnit4ClassRunner;

import com.sun.bean.Department;
import com.sun.bean.Employee;
import com.sun.dao.DepartmentMapper;
import com.sun.dao.EmployeeMapper;

/**
 * 测试dao层的工作
 *
 * @author lfy 推荐Spring的项目就可以使用Spring的单元测试,可以自动注入我们需要的组件 1、导入SpringTest模块
 *         2、@ContextConfiguration指定Spring配置文件的位置 3、直接autowired要使用的组件即可
 */
@RunWith(SpringJUnit4ClassRunner.class)
@ContextConfiguration(locations = { "classpath:applicationContext.xml" })
public class MapperTest {

	@Autowired
	DepartmentMapper departmentMapper;

	@Autowired
	EmployeeMapper employeeMapper;

	@Autowired
	SqlSession sqlSession;

	/**
	 * 测试DepartmentMapper
	 */

	@Test
	public void testCRUD() {

		// 1、创建SpringIOC容器
		// ApplicationContext ioc = new
		// ClassPathXmlApplicationContext("applicationContext.xml");
		// 2、从容器中获取mapper
		// DepartmentMapper bean = ioc.getBean(DepartmentMapper.class);
		System.out.println(departmentMapper);

		// 1、插入几个部门
		 departmentMapper.insertSelective(new Department(null,"开发部"));
		 departmentMapper.insertSelective(new Department(null,"测试部"));

		// 2、生成员工数据,测试员工插入
		// employeeMapper.insertSelective(new Employee(null, "sun", "W",
		// "[email protected]", 2));

		// 3、批量插入多个员工;批量,使用可以执行批量操作的sqlSession。
		 EmployeeMapper mapper = sqlSession.getMapper(EmployeeMapper.class);
		 for (int i = 0; i < 100; i++) {
	     String uid = UUID.randomUUID().toString().substring(0, 5) + i;
		 mapper.insertSelective(new Employee(null, uid, "M", uid + "@qq.com", 1));
		}
		System.out.println("批量完成");

	}

}
运行后,数据库就应该有数据了
数据库完成后,就来配置mybatis
mybatis-config.xml
dbconfig.properties 用来连接数据库
jdbc.jdbcUrl=jdbc:mysql://localhost:3306/ssm_crud
jdbc.driverClass=com.mysql.jdbc.Driver
jdbc.user=root
jdbc.password=写你自己的
applicationContext.xml 其中用到的包名如果有不同请自行更换
当我们使用数据库时,我们要用到增删改查 我们在这里要用到mybatis的逆向工程,在pom.xml中我们已经添加的所用到的jar包
mbg.xml
然后在Java/test包中创建MBGTest
package com.sun.test;

import java.io.File;
import java.util.ArrayList;
import java.util.List;

import org.mybatis.generator.api.MyBatisGenerator;
import org.mybatis.generator.config.Configuration;
import org.mybatis.generator.config.xml.ConfigurationParser;
import org.mybatis.generator.internal.DefaultShellCallback;

public class MBGTest {

	public static void main(String[] args) throws Exception {
		List warnings = new ArrayList();
		boolean overwrite = true;
		File configFile = new File("mbg.xml");
		ConfigurationParser cp = new ConfigurationParser(warnings);
		Configuration config = cp.parseConfiguration(configFile);
		DefaultShellCallback callback = new DefaultShellCallback(overwrite);
		MyBatisGenerator myBatisGenerator = new MyBatisGenerator(config,
				callback, warnings);
		myBatisGenerator.generate(null);
	}
}
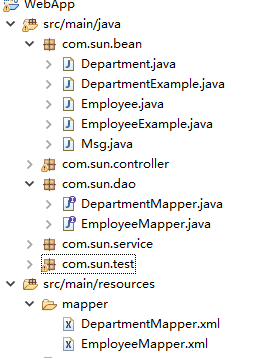
然后运行一下,再刷新一下项目,就会出现
创建完后,因为我们数据库的有外键,我们有的查询需要用到两张表,所以我们还需要自己添加方法在java/dao下面 EmployeeMapper中添加
 List selectByExampleWithDept(EmployeeExample example);

    Employee selectByPrimaryKeyWithDept(Integer empId);
在resources/mapper中的EmployeeMapper.xml
e.emp_id, e.emp_name, e.gender, e.email, e.d_id,d.dept_id,d.dept_name
在这里我就直接先把Java下面的包中的内容都先完成 分页也在里面,有需要的自己看一下,我都有注释
com.sun.controller下面有 DepartmentController
package com.sun.controller;

import java.util.List;

import org.springframework.beans.factory.annotation.Autowired;
import org.springframework.stereotype.Controller;
import org.springframework.web.bind.annotation.RequestMapping;
import org.springframework.web.bind.annotation.ResponseBody;

import com.sun.bean.Department;
import com.sun.bean.Msg;
import com.sun.service.DepartmentService;

/*
 * 处理与部门有关的请求
 * */

@Controller
public class DepartmentController {
	@Autowired
      private DepartmentService departmentService;

	/*
	 * 返回所有部门的信息
	 * */
	@RequestMapping("/depts")
	@ResponseBody
	public Msg getDepts() {
		//查出的所有部门
		List list=departmentService.getDepts();
		return Msg.success().add("depts",list);

	}
}
EmployeeController
package com.sun.controller;


import java.util.ArrayList;
import java.util.HashMap;
import java.util.List;
import java.util.Map;

import javax.validation.Valid;

import org.springframework.beans.factory.annotation.Autowired;
import org.springframework.stereotype.Controller;
import org.springframework.ui.Model;
import org.springframework.validation.BindingResult;
import org.springframework.validation.FieldError;
import org.springframework.web.bind.annotation.PathVariable;
import org.springframework.web.bind.annotation.RequestMapping;
import org.springframework.web.bind.annotation.RequestMethod;
import org.springframework.web.bind.annotation.RequestParam;
import org.springframework.web.bind.annotation.ResponseBody;

import com.github.pagehelper.PageHelper;
import com.github.pagehelper.PageInfo;
import com.sun.bean.Employee;
import com.sun.bean.Msg;
import com.sun.service.EmployeeService;

/*
 * 处理员工的增删改查
 *
 * */
@Controller
public class EmployeeController {
	@Autowired
	EmployeeService employeeService;

	/**
	 * 单个批量二合一
	 * 批量删除:1-2-3
	 * 单个删除:1
	 *
	 * @param id
	 * @return
	 */
	@ResponseBody
	@RequestMapping(value="/emp/{ids}",method=RequestMethod.DELETE)
	public Msg deleteEmp(@PathVariable("ids")String ids){
		//批量删除
		if(ids.contains("-")){
			List del_ids = new ArrayList();
			String[] str_ids = ids.split("-");
			//组装id的集合
			for (String string : str_ids) {
				del_ids.add(Integer.parseInt(string));
			}
			employeeService.deleteBatch(del_ids);
		}else{
			//单个删除
			Integer id = Integer.parseInt(ids);
			employeeService.deleteEmp(id);
		}
		return Msg.success();
	}

	/**
	 * 如果直接发送ajax=PUT形式的请求
	 * 封装的数据
	 * Employee
	 * [empId=1014, empName=null, gender=null, email=null, dId=null]
	 *
	 * 问题:
	 * 请求体中有数据;
	 * 但是Employee对象封装不上;
	 * update tbl_emp  where emp_id = 1014;
	 *
	 * 原因:
	 * Tomcat:
	 * 		1、将请求体中的数据,封装一个map。
	 * 		2、request.getParameter("empName")就会从这个map中取值。
	 * 		3、SpringMVC封装POJO对象的时候。
	 * 				会把POJO中每个属性的值,request.getParamter("email");
	 * AJAX发送PUT请求引发的血案:
	 * 		PUT请求,请求体中的数据,request.getParameter("empName")拿不到
	 * 		Tomcat一看是PUT不会封装请求体中的数据为map,只有POST形式的请求才封装请求体为map
	 * org.apache.catalina.connector.Request--parseParameters() (3111);
	 *
	 * protected String parseBodyMethods = "POST";
	 * if( !getConnector().isParseBodyMethod(getMethod()) ) {
                success = true;
                return;
            }
	 *
	 *
	 * 解决方案;
	 * 我们要能支持直接发送PUT之类的请求还要封装请求体中的数据
	 * 1、配置上HttpPutFormContentFilter;
	 * 2、他的作用;将请求体中的数据解析包装成一个map。
	 * 3、request被重新包装,request.getParameter()被重写,就会从自己封装的map中取数据
	 * 员工更新方法
	 * @param employee
	 * @return
	 */

	//更新员工信息

	@RequestMapping(value="/emp/{empId}",method=RequestMethod.PUT)
	@ResponseBody
	public Msg saveEmp(Employee employee) {

		employeeService.updateEmp(employee);
		return Msg.success() ;
		}

	//安装员工ID查询
	@RequestMapping(value="/emp/{id}",method=RequestMethod.GET)
	@ResponseBody
	public Msg getEmp(@PathVariable("id") Integer id) {

		Employee employee=  employeeService.getEmp(id);

		return Msg.success().add("emp", employee);
	}


	//检查用户名是否可用
	@ResponseBody
	@RequestMapping("/checkuser")
	public Msg checkuser(@RequestParam("empName") String empName) {
		//先判断用户名是否是合法的表达式;
			 String regx = "(^[a-zA-Z0-9_-]{6,16}$)|(^[\u2E80-\u9FFF]{2,5})";
				if(!empName.matches(regx)){
				return Msg.failure().add("va_msg", "用户名必须是6-16位数字和字母的组合或者2-5位中文");
				}
	    //数据库用户名重复校验
		boolean b=employeeService.checkUser(empName);
		if (b) {
			return Msg.success();
		}else {
			return Msg.failure().add("va_msg", "用户名不可用");
		}


	}

	/*
	 * 讲页面上输入的数据保存到数据库中
	 * 1.支持JSR303校验
	 * 2.导入Hibernate-vaildator
	 */
	@RequestMapping(value = "/emp", method = RequestMethod.POST)
	@ResponseBody
	public Msg saveEmp(@Valid Employee employee,BindingResult result) {
		if(result.hasErrors()){
			//校验失败,应该返回失败,在模态框中显示校验失败的错误信息
			Map map = new HashMap();
			List errors = result.getFieldErrors();
			for (FieldError fieldError : errors) {
				System.out.println("错误的字段名:"+fieldError.getField());
				System.out.println("错误信息:"+fieldError.getDefaultMessage());
				map.put(fieldError.getField(), fieldError.getDefaultMessage());
			}
			return Msg.failure().add("errorFields", map);
		}else{
			employeeService.saveEmp(employee);
			return Msg.success();
		}

	}

	/*
	 * 需要导入json包
	 */
	@RequestMapping("/emps")
	@ResponseBody
	public Msg getEmpsWithJson(@RequestParam(value = "pn", defaultValue = "1") Integer pn) {
		// 这不是一个分页查询;
		// 引入PageHelper分页插件
		// 在查询之前只需要调用,传入页码,以及每页的大小
		PageHelper.startPage(pn, 5);
		// startPage后面紧跟的这个查询就是一个分页查询
		List emps = employeeService.getAll();
		// 使用pageInfo包装查询后的结果,只需要将pageInfo交给页面就行了。
		// 封装了详细的分页信息,包括有我们查询出来的数据,传入连续显示的页数
		PageInfo page = new PageInfo(emps, 5);

		return Msg.success().add("pageInfo", page);
	}

	/*
	 * 查询员工数据(分页查询)
	 */

	// @RequestMapping("/emps")
	public String getEmps(@RequestParam(value = "pn", defaultValue = "1") Integer pn, Model model) {
		// 这不是一个分页查询;
		// 引入PageHelper分页插件
		// 在查询之前只需要调用,传入页码,以及每页的大小
		PageHelper.startPage(pn, 5);
		// startPage后面紧跟的这个查询就是一个分页查询
		List emps = employeeService.getAll();
		// 使用pageInfo包装查询后的结果,只需要将pageInfo交给页面就行了。
		// 封装了详细的分页信息,包括有我们查询出来的数据,传入连续显示的页数
		PageInfo page = new PageInfo(emps, 5);
		model.addAttribute("pageInfo", page);

		return "list";
	}
}
com.sun.service下面:DepartmentService
package com.sun.service;

import java.util.List;

import org.springframework.beans.factory.annotation.Autowired;
import org.springframework.stereotype.Service;

import com.sun.bean.Department;
import com.sun.dao.DepartmentMapper;

@Service
public class DepartmentService {
	@Autowired
	private DepartmentMapper departmentMapper;

	public List getDepts() {
		List list=departmentMapper.selectByExample(null);
		return list;
	}

}
EmployeeService
package com.sun.service;

import java.util.List;

import org.springframework.beans.factory.annotation.Autowired;
import org.springframework.stereotype.Service;

import com.sun.bean.Employee;
import com.sun.bean.EmployeeExample;
import com.sun.bean.EmployeeExample.Criteria;
import com.sun.dao.EmployeeMapper;


@Service
public class EmployeeService {
	@Autowired
	EmployeeMapper employeeMapper;
     //查询所有员工
	public List getAll() {

		return employeeMapper.selectByExampleWithDept(null);
	}

    //保存员工
	public void saveEmp(Employee employee) {

		employeeMapper.insertSelective(employee);
	}

	//检验用户名是否可用      return ture :表示当前用户名可用
	//                     false:代表不可用
	public boolean checkUser(String empName) {
		EmployeeExample example=new EmployeeExample();
		Criteria criteria =example.createCriteria();
		criteria.andEmpNameEqualTo(empName);
		long count =employeeMapper.countByExample(example);
		return count == 0;
	}


	//安装员工ID查询
	public Employee getEmp(Integer id) {
	Employee employee =	employeeMapper.selectByPrimaryKey(id);
		return employee;
	}
    //更新信息
	public void updateEmp(Employee employee) {
		employeeMapper.updateByPrimaryKeySelective(employee);
	}
   //删除信息
	public void deleteEmp(Integer id) {
		employeeMapper.deleteByPrimaryKey(id);
	}
   //批量删除
	public void deleteBatch(List del_ids) {
		EmployeeExample example=new EmployeeExample();
		Criteria criteria=example.createCriteria();
		criteria.andEmpIdIn(del_ids);
		employeeMapper.deleteByExample(example);
	}


}
最后就是页面的编写
首先我们要加入bootstrap 这个可以在网上下载,很方便。你会发现我的项目WEB-INF下面有个views 但是没有用到,你也可以删除 我们来写index.jsp
<%@ page language="java" contentType="text/html; charset=UTF-8"
pageEncoding="UTF-8"%>
<%@taglib uri="http://java.sun.com/jsp/jstl/core" prefix="c"%>
员工列表
<%
pageContext.setAttribute("APP_PATH", request.getContextPath());
%>
员工信息增删改查
c
#
empName
gender
email
deptName
操作
本来想把整个项目也贴上的,但是不会,抱歉了 ,第一次写可能写的不太好,很多功能都不会,请见谅。
如果有错误请大神们指出来,以免误人子弟。谢谢了。
