OpenCV4.0 与 Processing 图像格式分析和转换
目前主要通过Processing作为交互界面,所有的图像最后要通过Processing展示。
一、Processing图像的使用格式
首先,看Processing的图像对格式的要求。
Processing的图像使用 PImage 类封装(有图有真相)。
这是 PImage 的缺省构造方法,默认的图像格式就是 ARGB,也就是使用4个通道表达图像的像素 (alpha, red, green, and blue)
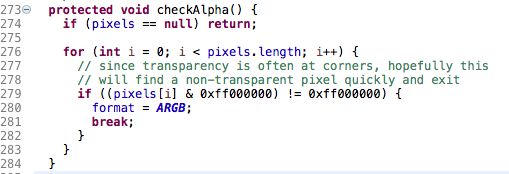
这是检查图像的像素,如果任何一个像素包含 alpha 通道(透明度),则格式设定为 ARGB !
这里展示的这两个方法,想表达的意思是: Processing 环境下,需要的图像格式的正确顺序是 ARGB ,请记住这个顺序!
二、OpenCV使用的图像格式
问题来了?
OpenCV使用的图像格式是 BGR ! 为什么?
早期开发者使用BGR作为颜色的空间的原因在于:那个时候的BGR格式在相机制造厂商和软件提供商之间比较受欢迎。

例如:在Windows中,当使用 COLORREF 指定颜色值时,使用BGR格式0x00bbggrr。

更多看这里  --> https://www.learnopencv.com/why-does-opencv-use-bgr-color-format/
前面的OpenCV4从摄像头获取的视频数据,每一帧都是BGR的格式。
虽然 OpenCV4提供了图像格式转换类 Imgproc (官方Java doc),提供了大量的图像格式转换方法(下面是其中的一部分),
static int |
COLOR_mRGBA2RGBA |
static int |
COLOR_RGB2BGR |
static int |
COLOR_RGB2BGR555 |
static int |
COLOR_RGB2BGR565 |
static int |
COLOR_RGB2BGRA |
static int |
COLOR_RGB2GRAY |
static int |
COLOR_RGB2HLS |
static int |
COLOR_RGB2HLS_FULL |
static int |
COLOR_RGB2HSV |
static int |
COLOR_RGB2HSV_FULL |
static int |
COLOR_RGB2Lab |
static int |
COLOR_RGB2Luv |
static int |
COLOR_RGB2RGBA |
static int |
COLOR_RGB2XYZ |
static int |
COLOR_RGB2YCrCb |
static int |
COLOR_RGB2YUV |
static int |
COLOR_RGB2YUV_I420 |
static int |
COLOR_RGB2YUV_IYUV |
static int |
COLOR_RGB2YUV_YV12 |
static int |
COLOR_RGBA2BGR |
static int |
COLOR_RGBA2BGR555 |
static int |
COLOR_RGBA2BGR565 |
static int |
COLOR_RGBA2BGRA |
static int |
COLOR_RGBA2GRAY |
static int |
COLOR_RGBA2mRGBA |
static int |
COLOR_RGBA2RGB |
static int |
COLOR_RGBA2YUV_I420 |
static int |
COLOR_RGBA2YUV_IYUV |
static int |
COLOR_RGBA2YUV_YV12 |
但是,没有直接将 BGR格式直接转换为 ARGB 格式的方法!
前面的程序使用: Imgproc.cvtColor(tmp, src, Imgproc.COLOR_BGR2RGBA);
只能将图像格式从BGR装换到 RGBA,而Processing需要的格式是 ARGB !
这就是导致上一篇文章中图像颜色失真的原因了!
三、解决方法
OpenCV提供了一个混合(颜色)通道的方法 Core.mixChannels( ),可以实现不同通道的颜色交换!
就是他了!
1、原来的方法
draw( )方法如下:
void draw() {
  background(0);
  Mat tmp = new Mat();
  cap.read(tmp);
  Imgproc.cvtColor(tmp, fm, Imgproc.COLOR_BGR2RGBA);
  PImage img = matToImg(fm);
  image(img, 0, 0);
  tmp.release();
}
2、修改后的方法
draw() 方法如下:
void draw() {
  background(0);
  Mat tmp = new Mat();
  Mat src = new Mat();
  cap.read(tmp);
  Imgproc.cvtColor(tmp, src, Imgproc.COLOR_BGR2RGBA);
  fm = src.clone();
  ArrayList srcList = new ArrayList();
  ArrayList dstList = new ArrayList();
  Core.split(src, srcList);
  Core.split(fm, dstList);
  Core.mixChannels(srcList, dstList, new MatOfInt(0, 1, 1, 2, 2, 3, 3, 0));
  Core.merge(dstList, fm);
  PImage img = matToImg(fm);
  image(img, 0, 0);
  src.release();
  tmp.release();
}
三、解释一下
1、创建两个空矩阵 src、tmp;
Mat tmp = new Mat();
Mat src = new Mat();
2、将图像的一帧数据读入 tmp 矩阵;
cap.read(tmp);3、将 tmp 矩阵的图像格式由 BGR 转换为 RGBA,保存到 src 中;
Imgproc.cvtColor(tmp, src, Imgproc.COLOR_BGR2RGBA);4、克隆一个 src 为 fm;
fm = src.clone();这时候,src 和 fm 的内容相同的、都是转换成 RGBA 格式的图像信息;
5、创建两个ArrayList ,把两个矩阵src和fm转换成一维数组srcList和dstList;
ArrayList srcList = new ArrayList();
ArrayList dstList = new ArrayList();
Core.split(src, srcList);
Core.split(fm, dstList);
6、使用Core.mixChannels() 交换两个一维数组指定位置的数据,将RGBA 的数据交换成 ARGB 数据(后面说怎么指定位置)把需要的数据保存到 dstList 中;
Core.mixChannels(srcList, dstList, new MatOfInt(0, 1, 1, 2, 2, 3, 3, 0));这时候,dstList 一维数组保存的是交换后的 AGRB 数据;
7、然后把 dstList 保存到 fm 矩阵中。
Core.merge(dstList, fm);8、把 fm矩阵数据转换为PImage。
PImage img = matToImg(fm);9、显示 PImage 图像。
image(img, 0, 0);
四、OpenCV提供的方法
前面三段中第3步和第6步,都是使用OpenCV提供的方法完成
A)由 BGR 转换为 RGBA;
B)交换一维数组指定位置的数据;
下面用数据进行黑盒测试,看看这两个方法的效果。
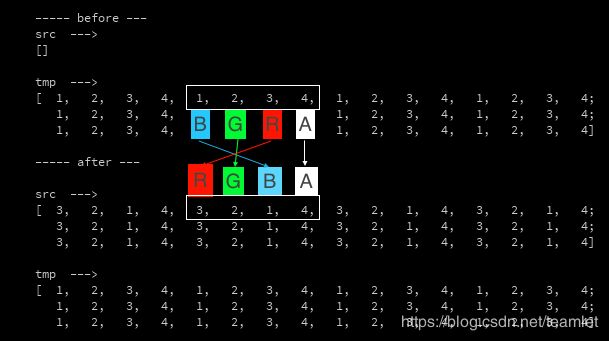
1、测试 Imgproc.cvtColor()将 BGR 转换为 RGBA
创建一个空矩阵 src ,一个tmp 矩阵设置一些模拟数据;
import org.opencv.core.*;
import org.opencv.videoio.*;
import org.opencv.imgproc.*;
import java.nio.ByteBuffer;
import java.util.ArrayList;

void setup(){
  size(640,480);
  System.loadLibrary(Core.NATIVE_LIBRARY_NAME);
  noLoop();
}

void draw(){
  background(0);
  Mat src = new Mat();
  Mat tmp = new Mat(new Size(4,3),CvType.CV_8UC4,new Scalar(1,2,3,4));
  println("----- before ---");
  println("src  --->");
  println(src.dump()+"\n");
  println("tmp  --->");
  println(tmp.dump()+"\n");
  Imgproc.cvtColor(tmp, src, Imgproc.COLOR_BGR2RGBA);
  println("----- after ---\n");
  println("src  --->");
  println(src.dump()+"\n");
  println("tmp  --->");
  println(tmp.dump());
}
结果:
可以看出,经过 Imgproc.cvtColor(),tmp的 BGRA 格式转换成了 RGBA格式。
2、交换一维数组指定位置的数据
模拟两个矩阵数据,转换成一维数组
import org.opencv.core.*;
import org.opencv.videoio.*;
import org.opencv.imgproc.*;
import java.nio.ByteBuffer;
import java.util.ArrayList;

void setup(){
  size(640,480);
  System.loadLibrary(Core.NATIVE_LIBRARY_NAME);
  noLoop();
}

void draw(){
  background(0);

  Mat src = new Mat(new Size(4,3),CvType.CV_8UC4,new Scalar(0,1,2,3));
  Mat fm = new Mat(new Size(4,3),CvType.CV_8UC4,new Scalar(0,1,2,3));

  println("----- before ---");
  println("src  --->");
  println(src.dump()+"\n");
  println("fm  --->");
  println(fm.dump()+"\n");

  ArrayList srcList = new ArrayList();
  ArrayList dstList = new ArrayList();
  Core.split(src, srcList);
  Core.split(fm, dstList);

  Core.mixChannels(srcList, dstList, new MatOfInt(0, 1, 1, 2, 2, 3, 3, 0));
  Core.merge(dstList, fm);

  println("----- after ---\n");
  println("src  --->");
  println(src.dump()+"\n");
  println("fm  --->");
  println(fm.dump());
}
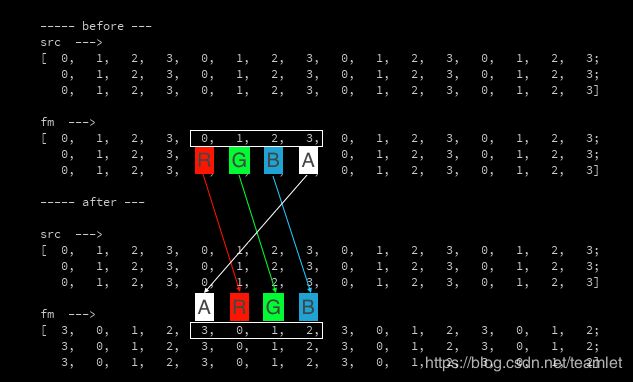
调用 Core.mixChannels(srcList, dstList, new MatOfInt(0, 1, 1, 2, 2, 3, 3, 0)); 方法得出:
数据从 RGBA 转换为 ARGB。
从上面这张图,讲一下 MatOfInt(0,1,1,2,2,3,3,0)的作用。
把 MatOfInt 的参数,两两一对,组成 (0,1) (1,2) (2,3) (3,0)
表示:
(0,1) R 从 源通道0 -->目标通道1,
(1,2) G 从 源通道1-->目标通道2,
(2,3) B 从 源通道2 -->目标通道3,
(3,0) A 从 源通道3 -->目标通道0
五、结论
只要通过OpenCV的两个方法Imgproc.cvtColor()和Core.mixChannels()方法组合,可以将OpenCV的 BGR格式转换成Processing需要的 ARGB格式。
只要理解了OpenCV的 BGR 格式,Processing的ARGB格式,就可以更好的利用API对图像、视频进行处理。


