ELK日志分布式日志平台搭建
首先先搭建好ELK中的ElasticSearch存储数据 和Logstash采集数据
ElasticSearch 本地快速搭建与使用
es的独立性也很强,它本身是一个分布式的搜索引擎,通过倒排序索引对存储的数据进行索引。
当输入查询关键字之后,es依据命中结果的匹配度有序返回结果,效果就像大家百度或者google搜索一样。
在ELK组合中,担当的是数据存储、索引和提供查询接口的功能。
Logstash安装配置
kibana图形显示数据
kibana是一个数据展示的客户端,提供对es中数据的可视化搜索和展示功能,主要提供了时间维度和数据中字段值的检索。以及功能丰富的看板,能够添加曲线图、饼图、地址分布图等多种样式的展示图形。
安装
下载地址:https://www.elastic.co/downloads/kibana
解压:tar zxvf kibana-6.4.0-linux-x64.tar.gz
配置 Kibana
Kibana server 启动时从 kibana.yml 文件中读取配置属性。Kibana 默认配置 localhost:5601 。改变主机和端口号,或者连接其他机器上的 Elasticsearch,需要更新 kibana.yml 文件。也可以启用 SSL 和设置其他选项。
Kibana 基础配置项
https://www.elastic.co/guide/cn/kibana/current/settings.html(官方配置文档)
#默认值: 5601 Kibana 由后端服务器提供服务,该配置指定使用的端口号。
server.port: 5601
#默认值: "localhost" 指定后端服务器的主机地址。
server.host: "192.168.1.191"
#默认值: "http://localhost:9200" 用来处理所有查询的 Elasticsearch 实例的 URL 。
elasticsearch.url: "http://192.168.1.191:9200"
启动Kibana
./kibana  //不能关闭终端
nohup  ./kibana > /nohub.out &  //可关闭终端,在nohup.out中查看log
在浏览器中访问:http://192.168.1.191:5601/
ELK日志平台整合
因为没有特负责的业务,所以这里采用FileBeats收集日志直接输出到elasticsearch ,用kibana展示查询
安装运行 FileBeats
FileBeats 也提供了下载包,地址为 https://www.elastic.co/downloads/beats/filebeat 。找到系统对应的包下载后解压即可。
tar zxvf filebeat-6.2.2-darwin-x86_64.tar.gz
cd filebeat-6.2.2-darwin-x86_64
进入目录编辑 filebeat.yml 找到对应的配置项,配置如下
###################### Filebeat Configuration Example #########################

# 此文件是一个示例配置文件,仅突出显示最常见的配置文件

#=========================== Filebeat inputs =============================

filebeat.inputs:
# 每个 - 是一个输入。 大多数选项可以在输入级别设置,因此您可以使用不同的输入进行各种配置。下面是输入特定的配置。
- type: log
  # 为true以启用此输入配置。
  enabled: true
  # 采集文件的路径
  paths:
    - /usr/local/apache-tomcat-8.5.34/logs/*.txt

  #要匹配的正则表达式列表。 它会删除与列表中任何正则表达式匹配的行。
  #exclude_lines: ['^DBG']
  # 要匹配的正则表达式列表
  #include_lines: ['^ERR', '^WARN']

  # 排除文件。 要匹配的正则表达式列表
  #exclude_files: ['.gz$']

  # 可选的附加字段。 可以自由选择这些字段以将其他信息添加到已爬网日志文件以进行过滤
  #fields:
  #  level: debug
  #  review: 1

  ### Multiline options

  # 多行可用于跨越多行的日志消息。 这对于Java Stack Traces或C-Line Continuation来说很常见
  # 必须匹配的正则表达式模式。 示例模式匹配以[以[]开头的所有行
  #multiline.pattern: ^\[

  # 定义是否取消设置的模式。 默认值为false。
  #multiline.negate: false


#============================= Filebeat modules ===============================

filebeat.config.modules:
  # 用于配置加载的Glob模式
  path: ${path.config}/modules.d/*.yml
  #设置为true以启用配置重新加载
  reload.enabled: false
  #检查路径下文件的更改周期
  #reload.period: 10s

#====================Elasticsearch模板设置 ==========================

setup.template.settings:
  index.number_of_shards: 3
  #index.codec: best_compression
  #_source.enabled: false

#============================== Kibana 设置=====================================
setup.kibana:
  host: "192.168.1.191:5601"

#-------------------------- Elasticsearch output ------------------------------
output.elasticsearch:
  hosts: ["192.168.1.191:9200"]


  # Optional protocol and basic auth credentials.
  #protocol: "https"
  #username: "elastic"
  #password: "changeme"

  #定义索引模板
output.elasticsearch.index: "web1-%{+yyyy.MM.dd}"
setup.template.name: "web1"
setup.template.pattern: "web1-*"
setup.dashboards.index: "web1-*"
配置完成后执行如下命令,启动 FileBeat 即可(elasticsearch先启动)
# FileBeat 需要以 root 身份启动,因此先更改配置文件的权限
sudo chown root filebeat.yml
sudo ./filebeat -e -c filebeat.yml -d "publish"
#后台启动
nohup ./filebeat -e -c filebeat.yml >/dev/null 2>&1 &
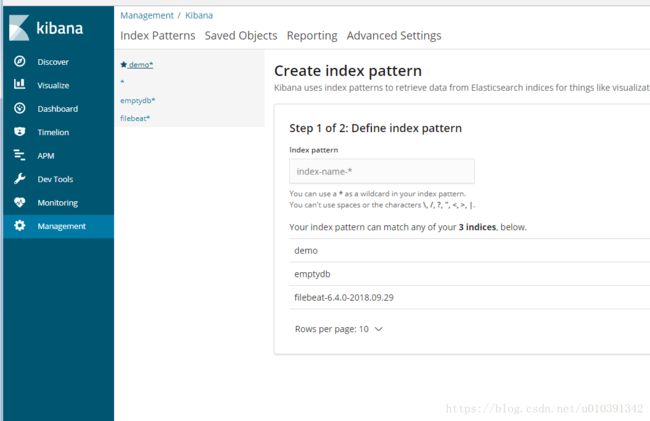
访问kibana就会出现新加入的索引列表filebeat-6.4.0-2018.09.29

ELK版本更新x-pack认证
Elasticsearch和kibana默认的访问是直接打开连接就可以访问,显然数据的全兴得不到保证。
在ELK6.3版本已经不需要手动安装x-pack认证,直接配置既可使用。
因为x-pack是收费的,所以试用期只有一个月
破解方式:https://www.cnblogs.com/JeremyWYL/p/9482273.html
设置所有内置用户的密码
该setup-passwords命令是第一次设置内置用户密码的最简单方法。
设置了内置的密码elastic, kibana和logstash_system用户。
此命令仅在X-Pack的初始配置期间使用用户设置密码后,引导密码不再处于活动状态,您无法使用此命令。相反,您可以使用Kibana中的管理界面来更改密码。或api接口更改密码
#参数
auto
#将随机生成的密码输出到控制台。
-b, --batch
#如果启用,则在不提示用户的情况下运行更改密码进程。
-E
#配置标准Elasticsearch或X-Pack设置。
-h, --help
#显示帮助信息。
interactive
#提示您手动输入密码。
-s, --silent
#显示最小输出。
-u, --url ""
#指定工具用于提交用户管理API请求的URL。默认值由elasticsearch.yml文件中的设置确定 。如果xpack.security.http.ssl.enabled 设置为true,则必须指定HTTPS URL。
-v, --verbose
显示详细输出。
在elasticsearch.yml末尾加上如下配置
#启用xpack安全验证
xpack.security.enabled: true
 #设置此项以false禁用对默认“changeme”密码的支持。
# xpack.security.authc.accept_default_password:false
进入elasticsearch安装目录充值初始密码
[root@web1 ~]# cd /usr/local/elasticsearch/elasticsearch-6.4.0
[root@web1 elasticsearch-6.4.0]# bin/elasticsearch-setup-passwords interactive

Your cluster health is currently RED.
This means that some cluster data is unavailable and your cluster is not fully functional.

It is recommended that you resolve the issues with your cluster before running elasticsearch-setup-passwords.
It is very likely that the password changes will fail when run against an unhealthy cluster.

Do you want to continue with the password setup process [y/N]Y

Initiating the setup of passwords for reserved users elastic,kibana,logstash_system,beats_system.
You will be prompted to enter passwords as the process progresses.
Please confirm that you would like to continue [y/N]y


Enter password for [elastic]:
Reenter password for [elastic]:
Enter password for [kibana]:
Reenter password for [kibana]:
Enter password for [logstash_system]:
Reenter password for [logstash_system]:
Enter password for [beats_system]:
Reenter password for [beats_system]:
Changed password for user [kibana]
Changed password for user [logstash_system]
Changed password for user [beats_system]
Changed password for user [elastic]
[root@web1 elasticsearch-6.4.0]#
在访问http://192.168.1.191:9200/就会提示输入账户密码 : elastic/123456
api接口更改密码
密码修改 https://www.elastic.co/guide/en/elasticsearch/reference/6.2/security-api-change-password.html
角色管理: https://www.elastic.co/guide/en/elasticsearch/reference/6.2/security-api-users.html
通过Change Password API,您可以提交更改用户密码的请求。
POST _xpack/security/user/_password
POST _xpack/security/user//_password
每个用户都可以更改自己的密码。拥有该manage_security 权限的用户可以更改其他用户的密码
以下示例更新elastic用户的密码:
POST _xpack / security / user / elastic / _password
{
  “password”:“x-pack-test-password”
}

#linux请求方式
curl -H "Content-Type:application/json" -XPOST -u elastic 'http://192.168.36.61:9200/_xpack/security/user/elastic/_password' -d '{ "password" : "123456" }'
路径参数
username
(字符串)要更改其密码的用户。如果未指定此参数,则会更改当前用户的密码。
kibana安全性配置
更新kibana.yml配置文件中的以下设置:
elasticsearch.username: "kibana"
elasticsearch.password: "123456"
Kibana服务器以此用户身份提交请求以访问群集监视API和.kibana索引。该服务器并没有需要访问用户索引。内置kibana用户的密码通常设置为Elasticsearch上X-Pack安全配置过程的一部分
访问http://192.168.1.191:5601 Kibana管理界面 就会出现登录页面
但是Kibana用户进入无法创建账号和分配权限,也看不了锁定数据
改用elastic用户名登录就能看到权限模块和索引数据

如果您的账户使用具有管理权限啊,则可以使用Kibana中的Management / Security / Users页面或 用户管理API分配角色。例如,以下内容创建一个名为的用户jacknich并为其分配kibana_user 角色:
POST /_xpack/security/user/jacknich
{
  "password" : "t0pS3cr3t",
  "roles" : [ "kibana_user" ]
}
X-Pack安全性还提供了一组可以明确分配给用户的内置角色。这些角色具有一组固定的权限,无法更新
https://www.elastic.co/guide/en/x-pack/current/built-in-roles.html
ingest_admin
    授予访问权限以管理所有索引模板和所有摄取管道配置。
    kibana_dashboard_only_user
    授予对Kibana仪表板的访问权限和对.kibana 索引的只读权限。此角色无权访问Kibana中的编辑工具
    kibana_system
    授予Kibana系统用户读取和写入Kibana索引,管理索引模板以及检查Elasticsearch集群可用性所需的访问权限。
    kibana_user
    授予任何Kibana用户所需的最低权限。此角色授予对Kibana索引的访问权限并授予群集的监视权限。
    logstash_admin
    授予对.logstash*索引的访问权限以管理配置。
    logstash_system
    授予Logstash系统用户向Elasticsearch发送系统级数据(如监控)所需的访问权限
    machine_learning_admin
    授予manage_ml群集权限和对.ml-*索引的读取权限。
    superuser
    授予对群集的完全访问权限,包括所有索引和数据。具有该superuser角色的用户还可以管理用户和角色,并 模拟系统中的任何其他用户。由于此角色具有许可性质,因此在将其分配给用户时要格外小心。
基本整合完毕!
