pycharm使用总结
原文:https://segmentfault.com/a/1190000000340219
以下我将会介绍一些在我在使用PyCharm时感到惊奇的一些事情。
声明
我无意批评Eclipse或者PyDev,我用了它们很多年,它们很棒!请记住,这是我的个人经验,你的或许有所不同。
实时比较
PyCharm 对一个文件里你做的改动保持实时的跟踪,通过在编辑器的左侧栏显示一个蓝色的标记。
这一点非常方便,我之前一直是在Eclipse里面用命令“Compare against HEAD” 来比较一个文件前后的改动。
在PyCharm中,你可以对你的改动一览无余。同时,点击那个标记,会显示出之前的内容以及一个工具栏:
你可以很容易地回滚这些改动,在一个详尽的对话框中查看这些改动或是将之前的文本粘贴到剪切板上。
提交时的比较预览
在Eclipse 中,当你提交改动时,会有一个提交对话框向你展示将要被提交的文件列表。
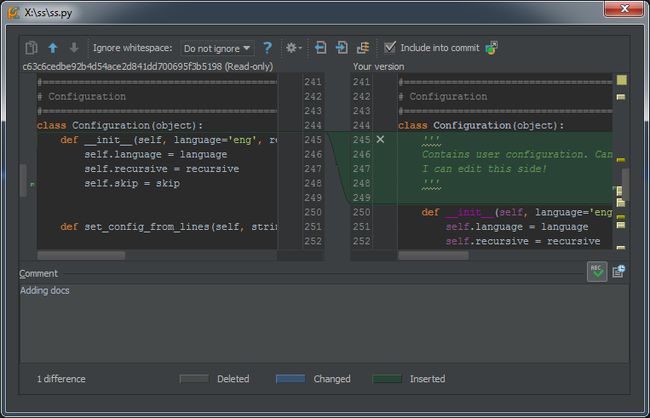
你可以双击其中任意一项来查看改动的对比:这时候,如果你看到代码里一些想修改的地方(比如一个拼错的单词,一段遗漏的文档,等等),那可就不爽了:你必须关闭所有的东西(包括带有你精心写好的提交注释的提交框),去找到那处惹人烦的代码,改正,然后从头再来一遍。
PyCharm 有同样的特性,但是你的改动是可编辑的。我简直不能再去强调可以当场修正那些错误有多么棒啦!
一个额外好处是,无论你因为何种原因关闭了提交对话框,当再次尝试提交时,它会保留你刚才填写的那些提交注释。
提交时检查
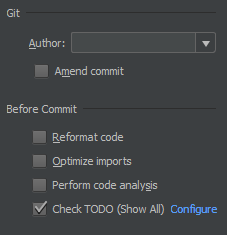
在提交过程中,我们还可以在实际提交前执行其他一些选项,像“优化导入(排序并移除未使用过的导入)“,检查变动集合中的待完成项等等。
代码审查
你可以让PyCharm在一个文件,目录或整个项目里执行“代码审查”操作。它会在无需实际执行程序的情况下,
找出存在问题以及相应的改进办法,比如类型检查,可静态的方法,违反代码规范等等问题。
正如在上一节中解释过的,这也可以在提交时在发生改动的文件中自动完成。这是一个文件一次审查之后的结果:
对于其中一些审查结果来说,你还可以应用一个修复建议。例如,对于“Function call can be replaced with set literal()”这一建议,我们可以选择相应的选项来修复。
PyCharm 会将这句:
extensions = set(['.avi', '.mp4', '.mpg', '.mkv'])
自动替换为:
extensions = {'.avi', '.mp4', '.mpg', '.mkv'}
你可以关闭任何你不希望的审查,包括在项目一级。
重构
我一直在试图重命名一个模块,可在菜单项里一直找不到那一项。。。F2也无济于事。
突然我注意到文件子菜单下面的”重构/重命名“一项,就想。。。会是它吗?果然就是!
在你重命名一个模块时,PyCharm会询问你是否需要自动修改所有与之关联的项目。有福了!
还有很多其他的重构项目,但目前为止我还没有机会一一尝试。
关于过时代码的提示以及改进建议
PyCharm可以告诉你代码里面过时的结构块,并且提出一些改进建议。比如,我有像下面一段这样的代码:
with nested(open(filename1), open(filename2)) as (f1, f2):
 <代码块>
我用的是Python2.7,事实上你可以使用嵌套上下文管理器,但是,唉,我还得支持python的一些老版本,就保留了nested。
但PyCharm提醒了我,这个事情本身还是很酷的。
任务+特性 分支
如同Eclipse一样(需要Mylin支持),PyCharm也支持基于任务的工作流(包括任务感知的上下文)。
然而PyCharm本身自带了很多直接可用的连接器(GitHub,Mantis,Jira,Bugzilla,等等)。
而且,当你开启一项任务时,它会询问你是否想要创建那个任务的一个特性分支,分支的名字可以配置。

这就避免了必须手动创建一个新的分支,而这个操作确实挺繁琐的(拿到任务的ID,选择名称,等等)。
这个是加分项。
快速
我观察到PyCharm在执行代码的自动完成时扫瞄代码的速度要远快于Eclipse,而且还不打断你当前的工作。
当你想保存一个文件时,Eclipse会阻止你这么做因为它正在后台执行一个任务,这有多惹人烦。。。
快速查看文档
当你把光标挪到一个函数、方法,类或者别的什么上的时候,你会得到一个选项来浏览”快速文档“。看一眼:
正如你看到的,它会用一种赏心悦目的格式展示方法的文档说明,还从代码使用说明中提示了参数的类型。。。即使该函数没有对应的文档说明,你还是会得到像下面这样的一个说明:
很好!
Docutils 支持
PyCharm 还包括了对于doctils的一流支持,这让它很容易从集成开发环境中直接再生成文档。
另一方面,它还包括了一个非常好的富文本(译者注:ReST即reStructuredTexteditor)编辑器(比Eclipse的IMHO好用的多):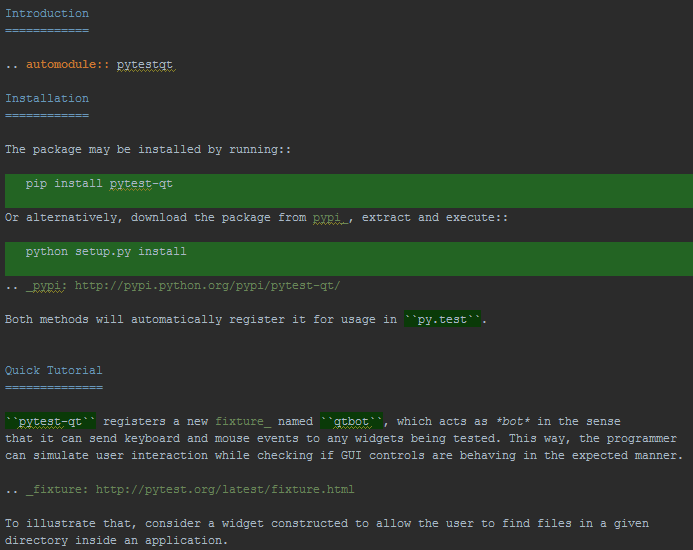
完善的插件系统
跟据我的使用经验,在Eclipse里面安装插件是件挺痛苦的事情:
很难找到你想要去的地方(提示: 帮助/安装新软件。。。);你没有一个单一的索引,所以你得去网上去找那些插件源;系统有时会因为库的依赖问题而崩溃,结果我就没装上那些我想要的插件(工作中还有其他人也同样遇到这个问题,最后不得不放弃);PyCharm的插件体验则要流畅地多。
首先,它位于一个你认为它有可能会存在的地方:就在”设置”下面的一项: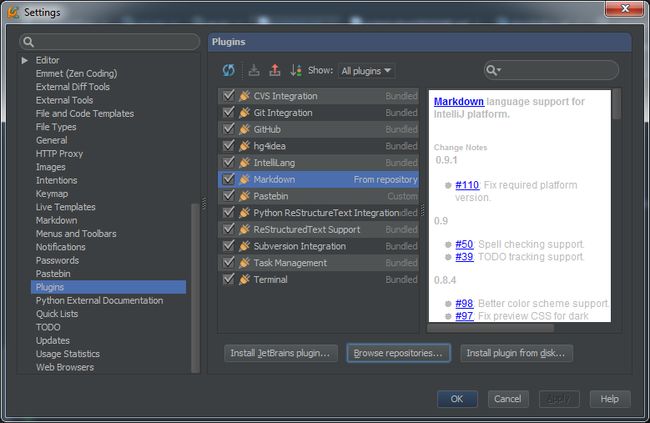
你可以很容易地浏览插件: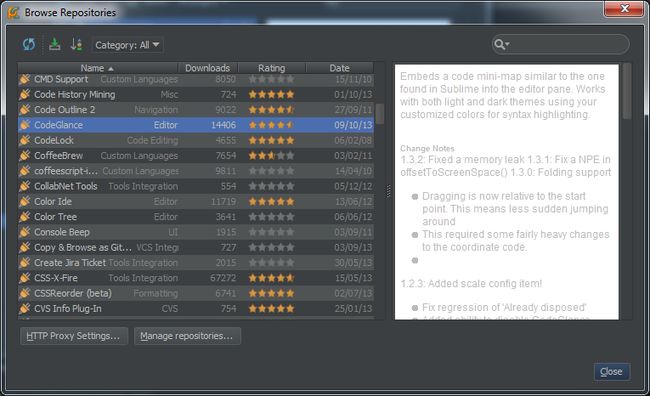
我快速安装了一个标记编辑器(和ReST一样),一个临时存放代码片段的插件,可以让我直接从选择的文本中快速地剪贴,并且预览代码,和SublimeText类似,还用一个漂亮的代码外观。
结语
目前为止就这些了。我会向我的朋友尽力展示一切我认为“看这有多酷”的事情。我使用PyCharm的时间很短,如果我发现还有更多有趣的事情值得再写一篇发表的话,我会继续写。
1. pycharm可以实时按照pep8的规范检查code style和naming rules, 尤其是naming rules(类名/方法名/attr名/文件名), 这个我非常看重.
2. pycharm可以做code inspection, 不仅仅是python代码, html也可以. 这个很赞, pydev只能检查python代码.
3. pycharm 还有个很赞的功能, 能列出virtual env 中已经安装的包, 能显示安装包的版本和当前最新的版本, 这样比较好确定需要升级哪些包.
参考:http://www.wtoutiao.com/a/2454799.html
pycharm常用设置:
file -> Setting ->Editor
1. 设置Python自动引入包,要先在 >general > autoimport -> python :show popup
快捷键:Alt + Enter: 自动添加包
2. “代码自动完成”时间延时设置
> Code Completion -> Auto code completion in (ms):0 -> Autopopup in (ms):500
3. Pycharm中默认是不能用Ctrl+滚轮改变字体大小的,可以在〉Mouse中设置
4. 显示“行号”与“空白字符”
> Appearance -> 勾选“Show line numbers”、“Show whitespaces”、“Show method separators”
5. 设置编辑器“颜色与字体”主题
> Colors & Fonts -> Scheme name -> 选择"monokai"“Darcula”
说明:先选择“monokai”,再“Save As”为"monokai-pipi",因为默认的主题是“只读的”,一些字体大小颜色什么的都不能修改,拷贝一份后方可修改!
修改字体大小
> Colors & Fonts -> Font -> Size -> 设置为“14”
6. 设置缩进符为制表符“Tab”
File -> Default Settings -> Code Style
-> General -> 勾选“Use tab character”
-> Python -> 勾选“Use tab character”
-> 其他的语言代码同理设置
7. 去掉默认折叠
> Code Folding -> Collapse by default -> 全部去掉勾选
8. pycharm默认是自动保存的,习惯自己按ctrl + s 的可以进行如下设置:
> General -> Synchronization -> Save files on frame deactivation 和 Save files automatically if application is idle for .. sec 的勾去掉
> Editor Tabs -> Mark modified tabs with asterisk 打上勾
9.>file and code template>python scripts
#!/usr/bin/env python
# -*- coding: utf-8 -*-
"""
__title__ = "$Package_name"
__author__ = "$USER"
__mtime__ = "$DATE"
# code is far away from bugs with the god animal protecting
I love animals. They taste delicious.
┏┓ ┏┓
┏┛┻━━━┛┻┓
┃ ☃ ┃
┃ ┳┛ ┗┳ ┃
┃ ┻ ┃
┗━┓ ┏━┛
┃ ┗━━━┓
┃ 神兽保佑 ┣┓
┃ 永无BUG! ┏┛
┗┓┓┏━┳┓┏┛
┃┫┫ ┃┫┫
┗┻┛ ┗┻┛
"""
10 python文件默认编码
File Encodings> IDE Encoding: UTF-8;Project Encoding: UTF-8;
File -> Settings -> appearance
1. 修改IDE快捷键方案
> Keymap
1) execute selection in console : add keymap > ctrl + enter
系统自带了好几种快捷键方案,下拉框中有如“defaul”,“Visual Studio”,在查找Bug时非常有用,“NetBeans 6.5”,“Default for GNOME”等等可选项,
因为“Eclipse”方案比较大众,个人用的也比较多,最终选择了“Eclipse”。
还是有几个常用的快捷键跟Eclipse不一样,为了能修改,还得先对Eclipse方案拷贝一份:
(1).代码提示功能,默认是【Ctrl+空格】,现改为跟Eclipse一样,即【Alt+/】
Main menu -> code -> Completion -> Basic -> 设置为“Alt+/”
Main menu -> code -> Completion -> SmartType -> 设置为“Alt+Shift+/”
不过“Alt+/”默认又被
Main menu -> code -> Completion -> Basic -> Cyclic Expand Word 占用,先把它删除再说吧(单击右键删除)!
(2).关闭当前文档,默认是【Ctrl+F4】,现改为跟Eclipse一样,即【Ctrl+W】
Main menu -> Window -> Active Tool Window -> Close Active Tab -> 设置为 “Ctrl+F4”;
Main menu -> Window -> Editor -> Close -> 设置为 “Ctrl+W”;
2.设置IDE皮肤主题
> Theme -> 选择“Alloy.IDEA Theme”
或者在setting中搜索theme可以改变主题,所有配色统一改变
File > settings > build.excution
1 console > pyconsole
import sys
# print("Python %s on %s" % (sys.version, sys.platform))
sys.path.extend([WORKING_DIR_AND_PYTHON_PATHS])
import  os
print("current workdirectory : ", os.getcwd() )
import  numpy as  np
import  scipy as sp
import  matplotlib as mpl
File > settings > Project : initial project
project dependencies > LDA > project depends on these projects > 选择sim_cluster就可以在LDA中调用sim_cluster中的包
[Configure PyCharm]
Pycharm实用功能:
[PyCharm中的那些实用功能]
pycharm中配置python脚本和console执行路径和当前工作目录
1 ctrl + shift + f10 / f10 执行python脚本时
当前工作目录cwd为run/debug configurations 中的working directory
可在edit configurations > project or defaults中配置
2 python console中执行时
cwd为File > settings > build.excution > console > pyconsole中的working directory
并可在其中配置
pycharm版本控制
[不了解git版本控制的可以阅读这篇 - Git版本控制教程 - Git本地仓库]
Enabling version control开启版本控制
Click ![]() >clickVersion Control. By default, the only root is
>clickVersion Control. By default, the only root is
-
First, click
 . In the Add VCS Directory Mapping dialog, click the ellipsis(省略) button, and choose thedirectory you want to put under version control. From the VCS drop-down list, select a version control system you are going to use (in our example, let it be Git):
By the way, if you have several directories, you can map each of them to its own version control system, or leave some of them unversioned.
Note:
1. 如果python workspace已经在git版本控制下了,点击version control就会看到Directory下有提示unregistered roots:project_name,点击这个project,再点击+号就添加到版本控制中了。
2. 新建的包都最好先通过这种方式加入到git版本控制下,再进行下面的操作。
-
Next, apply your new version control settings, and close the Settings dialog.设置git:将git添加到pycharm版本管理中来:settings > version control > git > path to git excutable > D:Gitingit.exe 选择git.exe的安装路径就可以了。
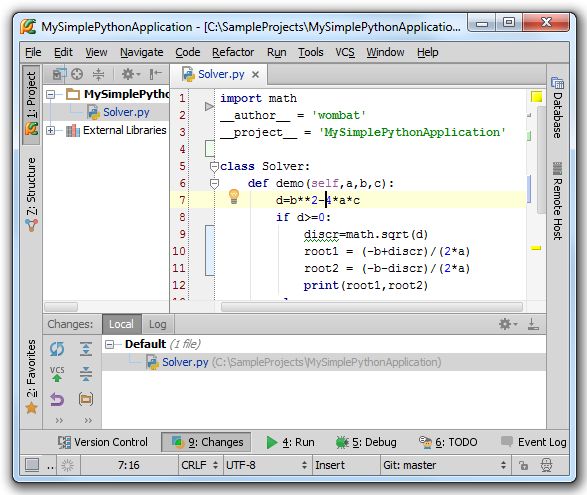
How does it affect PyCharm"s appearance?上述操作完成后pycharm界面的变化
Something has changed. PyCharm now looks differently...Let"s explore the changes in PyCharm"s UI.
-
You see the new color code of the file Solver.py. Now it is brown, which means that the file exists, but is not yet added to the version control.
-
Changes tool window appears - you see its button along the lower border of PyCharm. Click this button to open the tool window, and see the list of unversioned files. Later we"ll see what to do with them.
-
The VCS menu, and the VCS operations pop-up now show more commands. In particular, you see the commands that allow checking your changes in therepository(贮藏室), and updating the entire project. These commands aredenoted(表示) with the icons
 and
and respectively.
 -
Same icons appear on the main toolbar.
-
A Git node appeared on the VCS menu, and on the context menus of the Project tool window and the editor. Have we selected a different version control system to associate with a directory, this node would be different (Perforce, CVS, etc.). This node contains VCS-specific commands.
-
In the Status bar, you see the Git widget - this is a Git-specificmodification(修改).
Putting a file under version control将某个文件加入到版本控制中(default中)(相当于git中添加到repository中的暂存区stage)
1. 在changes窗口中添加:
Look at the list of unversioned files in the Changes tool window:
Select Solver.py, and pressCtrl+Alt+Ato add this file to version control: you see that the color code of the file changed - now it is green, which means that the file is added to version control, but not yet committed to therepository(贮藏室). The file moved to the new changelist with the name Default.
2. 在左侧的project中添加:
指定某个文件夹(包、项目) 1. 右键 > git > + / Add 或者 2. ctrl + alt + a
Note:
1. 要将已添加到git版本管理中的文件删除(不是删除文件,只是不添加到repository中的暂存区stage): changes窗口 > default > 1. 右键文件 > revert 或者 2.ctrl + alt +z
2. 删除本地文件后:若添加到repository中的文件已push到远程,删除本地文件后,changes窗口会出现刚刚删除的改动,要push到远程才能将远程的文件也删除了。如果不push或者commit,那么删除的文件总在default文件list中,待commit状态。
3. 删除本地文件后:可以通过changes窗口中的ctrl+alt+z撤销修改(删除)
将文件提交到repository中(相当于git中提交到repository中的master)
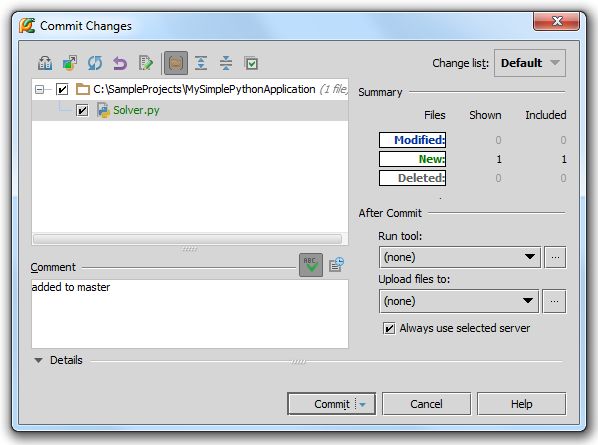
Now press Ctrl+K(or click![]() button in the Changes tool window) to commit your changes:
button in the Changes tool window) to commit your changes:
Next, enter your check-in comment(相当于git中的git commit -m "comment"中的comment参数), and finally click theCommit button:
OK, the changes are checked in. The Default changelist is now empty, and the color code of the file nameSolver.py changed again - it becameblack, which means that there are nopending(在…期间) changes.
Note:
1. 上图中如果选择commit改为选择commit and push就可以在commit同时将代码提交到远程仓库github中。远程仓库设置见下面 pycharm版本远程控制 部分。注意push到哪个分支,在git中修改过当前分支可能反映到pycharm中也是那个分支。
2. 将修改过的files push的另一种方法: 在当前文件中 > 右键 > Git > Repository > push > 选择push的位置/分支
Files under .idea directory
There are more unversioned files left. If you click the button![]() in the Changes tool window, you will see that all these filesreside(住) in the directory.idea under the project root. However, we don"t see this directory under the project root in the Project tool window.
in the Changes tool window, you will see that all these filesreside(住) in the directory.idea under the project root. However, we don"t see this directory under the project root in the Project tool window.
The files under this directory are the settings files of your project.It is recommended to place all of them, except one, under version control. So, do it as described in the previous section.
Ignoring files要忽略的文件,不添加到版本控制中
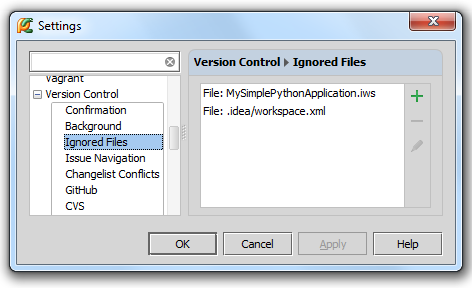
This only file that should be ignored, stores your workspace preferences; its name isworkspace.xml. The fileworkspace.xml is ignored by default. Open theIgnored Files page of the Settings dialog (![]() →Version Control→Ignored Files), and see the list of files ignored by version control by default:(相当于git中的.gitignore文件的作用)
→Version Control→Ignored Files), and see the list of files ignored by version control by default:(相当于git中的.gitignore文件的作用)
If you want more files to be ignored by your version control system, click![]() , and then enter specific file name, or a mask, or a directory name. Refer to the pageConfiguring Ignored Files for details.
, and then enter specific file name, or a mask, or a directory name. Refer to the pageConfiguring Ignored Files for details.
Note:
1. 在changes窗口中也可以confige ignored files{同上面提到的“Ignoring files要忽略的文件,不添加到版本控制中”} / show ignored files
2. 在changes窗口 > unversioned files > 选择要ignore的文件 > 右键 > ignore也可以忽略文件
Viewing changes in the editor在编辑器中查看变化
Let"s edit the source code: for example, rename a variable, remove a line, add a line. All the changes are marked in the left gutter:
Click a line with a change - a pop-up window with a toolbar appears:修改代码后windows左边会出现一个pop-up,可以随时返回到修改前的状态。
As you see, this toolbar helps doing many useful things: navigate between changes, view differences, roll the changes back, and put the previous version toclipboard(剪贴板).
Refer to the page Using Change Markers to View and Navigate Through Changes in the Editor for details.
By the way, the color code of the file name changed again - it became blue, which means that there arepending(未决定的) changes not yet committed to yourrepository(贮藏室). Since you already know how to commit changes, do it now - and see that the change markers in the left guttervanished(消失).文件提交到repository中的master之后,左边的pop-up就消失了。
Gettingup-to-date information from the repository从repository中获得最新的信息
Suppose somebody else is working on the same project. Now you want to get the external changes locally.
PyCharm, as usual, provides several ways to do it:
-
Press Ctrl+T
-
Click
 on the main toolbar
 -
Choose VCS→Update Project...
The action per se is VCS-agnostic. However, the dialog box that shows up when youinvoke(调用) updating, is VCS-dependent. It will be different, for example, forGit update and forPerforce update - compare the dialog descriptions.
[pycarm中给某个文件的父目录创建新的repository、创建新分支]
pycharm版本远程控制
[不了解git远程版本控制的可以参考这篇 -Git版本控制教程 - Git远程仓库]
Two ways to share source code分享原代码的两种方法
To publish your source code, you need write access to a remote storage, for example, to theGitHub storage.
To initiate publishing, open the project described in the tutorial"Using PyCharm"s Git integration locally" if it is closed. Your further actions depend on the selected strategy, since PyCharm provides two ways of sharing your source code.
Note that all actions are performed with the current branch.
Sharing on GitHub在github上分享代码
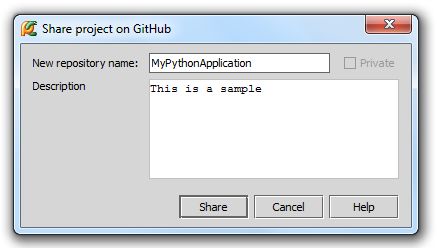
On the main menu, choose VCS→Import into Version Control→Share project on GitHub:
If you have your GitHub account properly configured, you will see the dialog box, where you have tospecify the repository name and optional description:
Click Share - and behold your source code in a brand new remote repository.
commit到本地repository中
changes窗口 > local > 向上箭头标志commit changes.
Pushing your source code将代码push到github远程仓库中
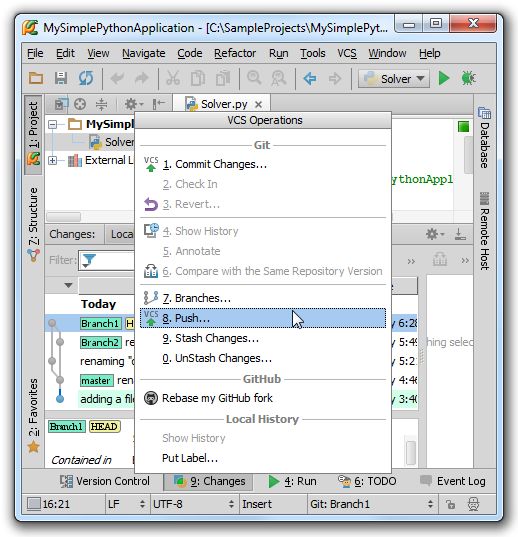
Press Alt+` to show the VCS operations pop-up window, and then press8 to invoke thePushcommand:
选择要push的project, 然后在弹出的窗口中输入github账户名和密码
亲测成功,登录github查看文件,文件都更新了。ps:本地文件原来在a目录并提交到github上,后来本地移动到b目录后,再提交到远程,github上的文件也会移动到b中,很好用!
原文:http://pedrokroger.net/getting-started-pycharm-python-ide/
How to Get Started with PyCharm and Have a Productive Python IDE
Contents [hide]
- 1 Initial Customization
- 2 Virtualenv and the Python Interpreter
- 3 Shortcuts
- 4 External Editor
- 5 Running Code and the REPL
- 6 Finding Commands
- 7 Code completion
- 8 Access to documentation
- 9 Code quality
- 10 Finding your way in the source code
- 11 Unit tests
- 12 Dealing with multiple files
- 13 Split Windows
- 14 Conclusion
The whole Editors versus IDEs debate is getting old and boring, especially because it is not a zero sum game. I’ve been using Emacs for 15+ years and at one point I used it to read myemail, browse the web, and make coffee (haven’t we all?). But today I find that I’m more productive by using the right tool for the right job.
Powerful editors like Emacs and Vim are fantastic. I find it puzzling that some editors or IDEs perform basic operations such as search and replace clunkily while Vim and Emacs get it just right.
And yet a search for terms like “Vim as a Python IDE” or “Emacs as a Python IDE returns hundreds of thousands of links, which shows that people want features such as smart completion, code navigation, and project support. To give you one data point, one of my most popular posts is how to configure Emacs as a Python IDE, even if it’s three years old and out-of-date.
PyCharm is one of the most popular IDEs for Python and it’s packed with great features. In this post I will show how to get started with PyCharm quickly to have a productive Python development environment. I’m using PyCharm 3.0.2 Professional Edition on the Mac (they have an open-source version as well). I use a heavily modified default keymap (it also has Emacs and Vim keymaps). I suggest you check the officialMac and the Windows/Linux reference cards for the default shortcuts.
Initial Customization
When you start PyCharm for the first time it asks what keymap and theme you want to use. I don’t like its Emacs keymap, so I use the default Mac OS X keymap and customize the shortcuts I want:
If this is the first time you are using PyCharm and don’t have a configuration to import you may want to click on “Configure” in the welcome screen to set some basic things:
I like to show the line numbers and method separators (Editor→Appearance→Show method separators, Show line numbers):
Also, I like the Solarized theme. I install it by following the instructions and select it as the default theme in Editor→Colors & Fonts. Solarized light for IntelliJ has some weird colors choices (for instance, it uses gray for the default text instead of a crisper black), so I change it on Editor→Colors & Fonts→General. My advice is not to be afraid to change the colors to something you like. You can export your settings in case you need to re-install PyCharm.
Compared to some IDEs, I find PyCharm visually clean, and if you want an even cleaner UI, you can hide the toolbar, the tool buttons, the navigation bar, and the status bar (on the View menu):
Virtualenv and the Python Interpreter
You can create new projects with File→New Project or open an existing project with File→Open Directory. PyCharm supports many types of Python projects such as Django or Flask out-of-the-box. For this post I’ll create a simple project to test thepyquery library (I’ll choose the “Empty project”).
You need to tell PyCharm what Python interpreter you want to use since it can use a different interpreter for each project. It will use this information to index all available libraries. A good practice is to have onevirtualenv for each project. You can either use an existing virtualenv or create a new one from PyCharm (Settings→Project Interpreter→Python Interpreters).
For this project I’ll create a new virtualenv and make it available to all projects:
You can quickly search, read the description, and install packages from PyCharm. This is nothing you couldn’t do on the terminal, but it’s very convenient to be able to search for packages without leaving your IDE.
Some packages may take a while to install, especially if they need to be compiled. PyCharm runs the installation in background and you can see what is happening by clicking on the status bar:
As we can see, it installed not only pyquery, but its dependencies as well, such as lxml (as we would expect):
Shortcuts
PyCharm is no Vim, but you can do a lot by using only the keyboard. You can assign shortcuts to dozens (if not hundreds) of actions in Settings→Keymap. I change the default keymap pretty heavily since I like to have shortcuts like Control-a, Control-e, Control-k, and Control-y that are default in any Cocoa text box but are not setup by default in the “Mac OS X” keymap. You can also define mouse shortcuts. For instance, I changed Quick Documentation to use Option-Click. If you are a Vim user you may want tot tryIdeaVim, a Vim emulator plugin. I heard good things about it, but I didn’t have the chance to try it yet.
I use the Dvorak keyboard layout, and annoyingly, there’s a bug where the wrong keys are used. People have reported this problem with French Canadian and German layouts as well. This means that I have to rebind quite a few shortcuts just to avoid this problem.
PyCharm uses function keys such as F1 and F2 a lot. As you probably know, on the Mac the top keys work as “multimedia” keys by default and as function keys by pressing the Fn key. We can swap this behavior in System Preferences→Keyboard.
I like to be able control the sound volume and change the brightness without having to reach for the Fn key, but I also like to use the function keys while programming without reaching for the Fn key (I’m lazy, what can I say?). I usePalua to switch between the “multimedia” and function keys. You can switch with a global key or you can configure Palua to switch automatically when using a specific application. I use the multimedia keys for all applications (the default) and configure Palua to use the Function keys for Xcode and PyCharm.
External Editor
PyCharm can launch any external tool, so I configure it to open Emacs with the current file. This is useful when you want to do some quick editing that is faster with your favorite editor (Emacs, Vim, TextMate, etc).
Go to Settings→External Tools, make sure “Open console” is unchecked and insert the path to the Program, the Parameters (in this case we can get the full file name with$FilePath$) and the Working directory ($ProjectFileDir$/$FileRelativeDir$/).
You can assign it to a shortcut:
And now it’s available from the menu as well.
Running Code and the REPL
There are many ways to run our code with PyCharm. We can use the venerable print function (or statement, depending on your Python version), import code on the REPL, send code to the console, use the debugger, or use IPython on a terminal.
The Venerable Print
Using print to display values is a useful and widely used technique, but it can lead to messy code if not used carefully.
We can run the code by clicking on the “play” button or with Control-R if the file is already selected to run.
If the file is not selected to run, with can select and run it with Control-Option-R or by right clicking and selecting from the context menu. PyCharm will remember your choice and you can use Control-R the next time. It sounds complicated but it is really simple. Check the manual for more information.
Console and REPL
My favorite way is to run the code on the REPL. You can open a Python console inside PyCharm on Tools→Run Python Console (I’ve assigned it to Control-C Control-C). It’ll useIPython if available (I recommend you install IPython inside the virtualenv) and will add the path of the current file to Python’s path. On the console you can import the functions you want to execute as usual.
Completion is available in the console as well:
Having imported the function, we can run it as usual. And we can toggle the console visibility easily with ⌘–4.
Execute Selection in Console
If the code I want to run is more than a couple of one-liners and not formal enough to write unit tests (I may be playing with data, for instance) I may save it in a scratch file. We can select the code we want to run (usually I just select the whole file with ⌘-A) and pick “Execute Selection in Console” from the context menu (or, even better, use the keyboard shortcut). [I omitted some menu items in the screenshot to make it shorter].
In the following example the headlines variable is available in the console since we have selected the wholescratch file to be executed in the console:
Macros
It would be nice if we could send the whole file to the console in one operation. Fortunately, we can record a macro. Select Edit→Macros→Start Macro Recording and perform the operations as before (select the whole file, send the selection to console, switch to the console). As you can see, my macro has only four actions (I press the down arrow key to remove the selection):
After you record the macro it’s available in the Macros menu and you can assign a shortcut to it (I use Control-C Control-E, but for some reason PyCharm only shows the first half of shortcuts with two strokes).
Debugger
Many people like to use the debugger to inspect data. Even if I prefer to use the REPL, sometimes the debugger is just more efficient, especially when inspecting complex objects. PyCharm doesn’t allow you to set a breakpoint on an empty line, so in this short example I had to add an extra line (I used print, but I could have usedpass) since I wanted the debug to stop after setting the headlines variable. In real-life code this is seldom necessary.
Vanilla IPython
Finally, there’s nothing wrong with running an external terminal with IPython and using features such as%run and autoreload.
Finding Commands
It’s easy to get overwhelmed with so many commands. If you use PyCharm on the Mac you can use Help→Search as usual, or you can use Help→Find Action in any platform. It allows you to search for any PyCharm command, including the ones not available from the menu. (Emacs addicts will note this is somewhat similar to Emacs’ M-x). This is very useful and powerful and I use it all the time.
Code completion
Completion in PyCharm is top notch. By default PyCharm will suggest things while you are typing:
Since this feature can be a little power hungry, you can disable it by selecting File→Power Save Mode. You can still use completion by calling it explicitly with Control-Space.
When completing, you can narrow the suggestion list by typing a substring:
Or you can type only the first letters of CammelCaseClasses or function_names_with_underscores:
If you type Control-Space once PyCharm will try to list the most related items:
If you type Control-Space again it will list every name it knows. This can be overwhelming, but notice it is listing the functionname_of_mother from the unimported bar.py file.
But often you just want to complete the name of a local variable in one of the opened buffers. This feature has been available in Emacs and Vim for ages and now it’s available in PyCharm as well. The manual calls itHippie Completion, but the actual command name (that is, the name you will find in Find Action) is “Cyclic Expand Word” and in my tests it’s working even inside docstrings.
Completion may not work in some cases when a library doesn’t have type hints. This StackOverflow page suggests to set a breakpoint in pdb and list the possible attributes withdir. One similar solution is to create a breakpoint in PyCharm and evaluate an expression at the breakpoint by clicking on the last icon in the debug toolbar (or using the appropriate keyboard shortcut). In this case I evaluated the expression “dir(r)”.
Access to documentation
PyCharm has three ways to access documentation: Quick Definition, Quick Documentation, External Documentation, and Parameter Info. You can access them from the View menu or from the respective shortcuts.
Quick definition will show the whole definition (duh!) of a symbol (class, method, function, etc), including the documentation, of course. It’s useful when you just want to take a quick look at the definition without jumping to it.
Quick documentation will show the symbol’s documentation and signature.
Finally, External Documentation, and Parameter Info are pretty straightforward. The first opens the documentation in the default browser and the second shows the parameter information for a function or method (useful to quick check the name of keyword arguments, for instance).
The external documentation works out-of-the-box with Python (of course), PyQt4, PySide, gtk, wx, numpy, scipy, and kivy and you can add the path for external documentation in Settings→Python External Documentation.
Code quality
PyCharm checks if your code conforms to PEP8 while you are typing. It’ll let you know if you have too many spaces or blank lines, if you are using underscores instead of CamelCase for classes names, and so on. If you want, you can configure PyCharm torun pylint as an external tool, as well.
Finding your way in the source code
PyCharm’s power starts when you master its navigation commands. It can jump to classes, functions, and so on. You can jump to the definition of a class, method, function, or variable quickly with ⌘-B or ⌘-Click on a Mac or Ctrl-B or Control-Click on Windows and Linux.
The mechanism to navigate to a class, file, or symbol is pretty much the same. You are presented with a dialog where you can type a substring, include items outside your project, and filter the results if necessary. Go to the Navigate menu or use the appropriate keyboard shortcut:
This is a typical dialog to navigate to a Class definition:
You can enter part of the name, including the file extension. For instance, if you want to open a JavaScript in a Django project but don’t remember its name, you can search for “.js”.
These features allow us to navigate the source code very quickly. Let’s suppose we are studying the Django source code and we want to see how the functionrender is implemented. We don’t know where it’s defined, so we go to Navigate→Symbol (⌥-⌘-O), type “render” and pick the first option (we can see it’s defined indjango.shortcuts). If we have hidden the navigation bar we can show it quickly with Navigate→Jump to the Navigation Bar (⌘-↑) and see where the file is located (django→django→shortcuts.py):
Sometimes it’s useful to filter the completion results to take out things you are not interested. In the following example I remove the results related to JavaScript to have a much cleaner completion list:
PyCharm allows you to fold blocks such as classes, methods, and functions, but you can create your ownfoldable regions. This is useful when it makes sense to group things (classes, methods, functions, etc) in one bigger block. These blocks can be folded allowing us to focus on particular regions of the code. You can list all regions in a file by going to Navigate→Custom Region or using the appropriate keyboard shortcut. Sadly there’s no way to list all regions in a project.
Unit tests
Before we can run a test we need to add a new Run/Debug configuration. We go to Run→Edit Configurations and click on the plus button on the top left corner. Then, we select “Python tests” and the test runner. For this example I’ll use Unittests:
Finally, we need to add the folder where the tests are and pick the right Python interpreter:
Now we can run our tests just like we run code: by clicking in the toolbar or by selecting Run→Run (Control-⌥-R). This will open a dialog where you can choose what you want to run (you may have other things to run). You can run all tests or only the test on the cursor.
After you run the tests, PyCharm will remember your last choice, so you can repeat it with Control-R. This is useful if you are fixing one particular test case and want to run it multiple times without running the other tests. You don’t need to have the cursor on the test file you want to run; you can run the tests from any file. You can go from the code to its test by selecting Navigate→Test (or appropriate hotkeys).
Dealing with multiple files
As you noticed, PyCharm uses one tab per file:
To switch to tabs we can use the commands Select Next Tab and Select Previous Tab. They are bound to Control-→ and Control-← by default, but OS X uses these keys, so I rebind them to Control-⌘-N
and Control-⌘-P (I use the same shortcuts to switch tabs in the Terminal).
One more direct approach to go to a tab is to use Navigate→File as we’ve seen, or View→Recent Files (⌘-E) and View→Recently Changed Files (⇧-⌘-E). These last two commands will present a list of files where you can click on type a substring to narrow the selection. In the following example I only had to type “⌘-E”, “s”, “enter” to go to the tab with thescratch.py file:
Split Windows
PyCharm has support for split windows. It’s not as advanced as in Emacs and Vim but it’s useful enough.
No command to deal with split windows have shortcuts assigned to them by default, so you’ll have to do it yourself. These are the keys that I use:
- Split Vertically, Control-S
- Split Horizontally, Control-H
- Unsplit, Control-C Control-U
- Unsplit All, Control-C Control-A
- Goto Next Splitter, Control-C Control-N
- Goto Previous Splitter, Control-C Control-P
- Move to Opposite Group, Control-C Control-M
Move to Opposite Group will move a tab to another group, but it only works if we have only two panes. In this case it’s just easier to drag and drop the tab to the desired place.
Conclusion
PyCharm can do a lot for us out-of-the-box. We saw how to use virtualenv, define shortcuts, use an external editor, run code, define macros, find commands with Find Action, be productive with code completion, access documentation, navigate the source code, run unit tests, and deal with multiple files and split windows.
And we are just scratching the surface. We didn’t talk about editing, version control, plugins, debugging (local and remote), templates, using TextMate bundles, web development, and much more.
I suggest you check PyCharm’s official documentation, including the Quickstart Guide and the Online Help. Also, Andrew Brookins wrote a very good PyCharm review from a Vim’s user perspective. I recommend it even if you don’t use Vim.
Let me know in the comments what is your favorite PyCharm feature.
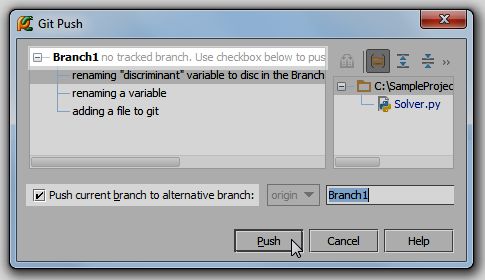
In the Git Push dialog box, you have to select specific revision to push. Note, however, that when doing the very first push of a branch, you have to select the check box below:
After pushing changes, PyCharm shows an information message in the balloon:
![]()
Again, if you go to your repository and choose the desired branch, you will see your source code successfully committed.
选择和合并分支
选择:菜单栏 > VCS > Git > Branches > 选择当前分支
合并:菜单栏 > VCS > Git > Merge changes > 选择要和当前分支合并的分支
根据上面讲到的本地Gettingup-to-date information from the repository从repository中获得最新的信息
-
Press Ctrl+T
-
Click
 on the main toolbar
 -
Choose VCS→Update Project...
可以进行Pushing your source code将代码push到github远程仓库中反操作,就是将github上的项目update到本地中(可以是不同电脑)。表示没有在B电脑上输入github用户和密码就能进行这个操作,可能是pycharm登录的账户名相同吧??如果两个人使用同一个pycharm账户会怎样?
[PyCharm Tutorials]
在pycharm上打开github上的项目
pycharm > 所有project空白界面上 > 右键 > open on github就可以直接在浏览器中打开github上对应的项目了
pycharm简单数据库管理
[使用pycharm进行简单的数据库管理]
from:http://blog.csdn.net/pipisorry/article/details/39909057
ref:pycharm的一些设置和快捷键
pycharm 2.7 快捷键
pycharm Learning tips学习技巧
A special variant of the Code Completion feature invoked by pressing Ctrl+Space twice allows you to complete the name of any class no matter if it was imported in the current file or not. If the class is not imported yet, the import statement is generated automatically.
You can quickly find all places where a particular class, method or variable is used in the whole project by positioning the caret at the symbol"s name or at its usage in code and pressing Alt+Shift+F7 (Find Usages in the popup menu).
To navigate to the declaration of a class, method or variable used somewhere in the code, position the caret at the usage and press F12. You can also click the mouse on usages with the Ctrl key pressed to jump to declarations.
You can easily rename your local variables with automatic correction of all places where they are used.
To try it, place the caret at the variable you want to rename, and press Shift+F6 (Refactor | Rename). Type the new name in the popup window that appears, or select one of the suggested names, and press Enter.
