《神经网络和深度学习 学习笔记》(二)人工神经网络简介
文章目录
-
第10章 人工神经网络简介
1 从生物神经元到人工神经元
1.1 生物神经元
1.2 具有神经元的逻辑计算
1.3 感知器
1.4 多层感知器和反向传播
2 用TensorFlow的高级API来训练MLP
3 使用纯TensorFlow训练DNN
3.1 构建阶段
3.2 执行阶段
3.3 使用神经网络
4 微调神经网络的超参数
4.1 隐藏层的个数
4.2 每个隐藏层中的神经元数
4.3 激活函数
5 练习
1. 从生物神经元到人工神经元
我们从鸟类那里学会了飞翔,有很多发明都是被自然所启发。这么说来看看大脑的组成,启发我们构建智能机器,就合乎情理了。这就是人工神经网络ANN(Artificial Neural Network)的根本来源。
人工神经网络是深度学习的核心中的核心。它们通用、强大、可扩展,使它成为解决复杂机器学习任务的理想选择。比如,数以亿计的图片分类,击败世界冠军的AlphaGo。
1.1 生物神经元
它是在动物的大脑皮层中的非凡细胞。生物神经元通过这些突出接受从其他细胞发来的很短的电脉冲,即信号。当一个神经元在一定时间内收到足够多的信号,就会发出自己的信号。
超级复杂的计算可以通过这些简单的神经元来完成。
1.2 具有神经元的逻辑计算
生物神经元的简化模型,人工神经元:它有一个或多个二进制 (开\关) 输入 和 一个输出。
逻辑非的应用场景,比如dropout。
1.3 感知器Perceptron
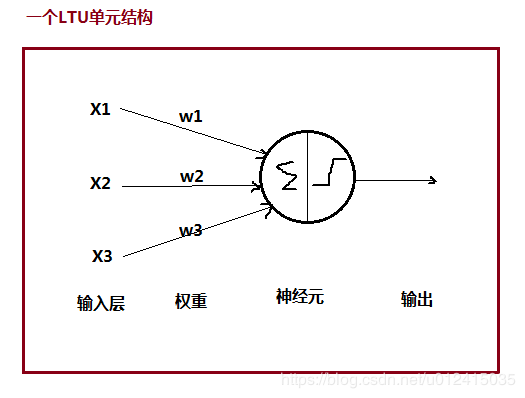
感知器是最简单ANN架构。它是基于一个线性阈值单元(LTU,Linear Threshold Unit)的人工神经元。
分析上图,x和w没啥好说的,就是普通的数字或向量,那么做变换的其实是神经元,它做了哪些操作? ① 加权求和 z = w t ⋅ x z = w^t \cdot x z=wt⋅x;② 经过阶跃函数进一步变换函数空间 step(z)。③ 最后的输出: h w ( x ) = s t e p ( w t ⋅ x ) 。 h_w(x) = step(w^t \cdot x)。 hw(x)=step(wt⋅x)。
单个LTU结构可以用于线性二值分类,输出为一个概率,如果该概率超过了阈值就是正,否则为负(跟LR和SVM一样)
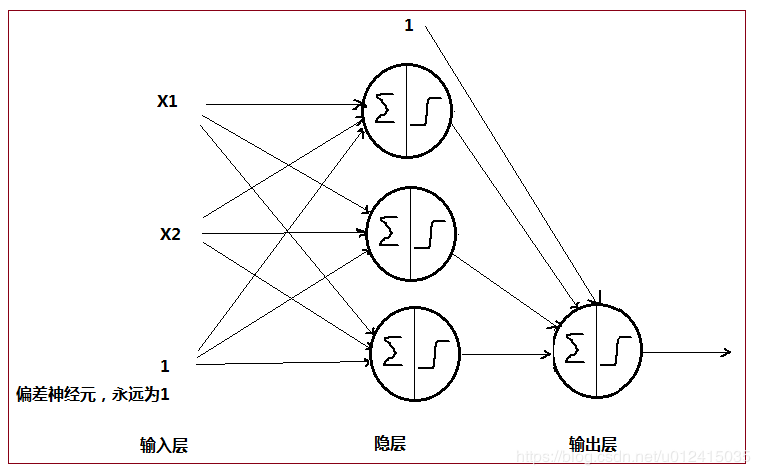
感知器Perceptron就是多个LTU单元的单层全连接NN结构。注意:X1、X2 是特征 特征 , 1为偏差特征,永远为1!!!
总的来看,上面这个感知器结构做了什么?它将一个实例(x1 x2是单个实例的2个特征)分为3个不同的二进制类,所以它是多输出分类器。当然也可以做成单输出分类器,在后面再加一层单个LTU单元的输出就好了,此时拥有2层的感知器叫多层感知器(MLP, Multi-Layer Perceptron)。
感知器训练算法很大程度上受hebb’s定律的启发,同时处于激活状态的细胞是会连在一起的。这个规律后来被称为hebb定律(又叫hebbinan学习):当2个神经元有相同的输出时,它们之间的链接权重就会增强。perceptron就是根据这个规则的变体来训练。
感知器训练算法 (权重更新):
w i j n e x t s t e p = w i j + η ( y ^ j − y j ) x i w_{ij}^{next step} = w_{ij} + \eta(\hat y_j-y_j)x_i wijnextstep=wij+η(y^j−yj)xi
w i j w_{ij} wij是第i个输入神经元和第j个输出神经元的链接权重;
x i x_i xi是当前训练实例的第i个输入值;
y ^ j \hat y_j y^j是当前训练实例的第j个输出神经元的输出,即预测值;
y i y_i yi是当前训练实例的第j个输出神经元的目标输出,即真实值;
η \eta η 是学习率。
注意: 感知器的每个输出神经元的决策边界是线性的,所以无法学习复杂的模式。(这点跟LR一样)
sklearn实现了一个单一LTU忘了的Perceptron类。
import numpy as np
from sklearn.datasets import load_iris
from sklearn.linear_model import Perceptron

iris = load_iris()
X = iris.data[:, (2, 3)]  # petal length, petal width
y = (iris.target == 0).astype(np.int)

per_clf = Perceptron(max_iter=100, tol=-np.infty, random_state=42)
per_clf.fit(X, y)

y_pred = per_clf.predict([[2, 0.5]])

a = -per_clf.coef_[0][0] / per_clf.coef_[0][1] #前两个系数相除
b = -per_clf.intercept_ / per_clf.coef_[0][1]  #截距 除以 系数

axes = [0, 5, 0, 2]

x0, x1 = np.meshgrid(
        np.linspace(axes[0], axes[1], 500).reshape(-1, 1),# 0 ~ 5之间产生500个等差数列的数
        np.linspace(axes[2], axes[3], 200).reshape(-1, 1),# 0 ~ 2之间产生200个等差数列的数
    )
#生成测试实例
X_new = np.c_[x0.ravel(), x1.ravel()] # 按列合并
y_predict = per_clf.predict(X_new)
zz = y_predict.reshape(x0.shape)

plt.figure(figsize=(10, 4))
plt.plot(X[y==0, 0], X[y==0, 1], "bs", label="Not Iris-Setosa")
plt.plot(X[y==1, 0], X[y==1, 1], "yo", label="Iris-Setosa")

#画出决策边界
plt.plot([axes[0], axes[1]], [a * axes[0] + b, a * axes[1] + b], "k-", linewidth=3)
from matplotlib.colors import ListedColormap
custom_cmap = ListedColormap(['#9898ff', '#fafab0'])

plt.contourf(x0, x1, zz, cmap=custom_cmap)#正负样本区域 展示不同颜色
plt.xlabel("Petal length", fontsize=14)
plt.ylabel("Petal width", fontsize=14)
plt.legend(loc="lower right", fontsize=14)
plt.axis(axes)

# save_fig("perceptron_iris_plot")
plt.show()
注意:感知器只能根据一个固定的阈值来做预测,而不是像LR输出一个概率,所以从灵活方面来说应该使用LR而不是Perception。
1.4 多层感知器和反向传播
多层感知器,就是多个感知器堆叠起来。
反向传播的实质其实就是复合函数求导的链式法则。 反向传播的训练过程:
① 先正向做一次预测,度量误差;
② 反向的遍历每个层次来度量每个连接的误差;
③ 微调每个连接的权重来降低误差(梯度下降)。
反向传播可以合作的激活函数,除了逻辑函数sigmoid等外,最流行的是2个:
① 双曲正切函数 t a n h ( z ) = 2 σ ( 2 z ) − 1 tanh(z)=2 \sigma(2z)-1 tanh(z)=2σ(2z)−1
② ReLU函数 R e L U ( z ) = m a x ( 0 , z ) ReLU(z) = max(0,z) ReLU(z)=max(0,z)
z = np.linspace(-5, 5, 200)

plt.figure(figsize=(11,4))

plt.subplot(121)
plt.plot(z, np.sign(z), "r-", linewidth=1, label="Step")
plt.plot(z, sigmoid(z), "g--", linewidth=2, label="Sigmoid")
plt.plot(z, np.tanh(z), "b-", linewidth=2, label="Tanh")
plt.plot(z, relu(z), "m-.", linewidth=2, label="ReLU")
plt.grid(True)
plt.legend(loc="center right", fontsize=14)
plt.title("Activation functions", fontsize=14)
plt.axis([-5, 5, -1.2, 1.2])

plt.subplot(122)
plt.plot(z, derivative(np.sign, z), "r-", linewidth=1, label="Step")
plt.plot(0, 0, "ro", markersize=5)
plt.plot(0, 0, "rx", markersize=10)
plt.plot(z, derivative(sigmoid, z), "g--", linewidth=2, label="Sigmoid")
plt.plot(z, derivative(np.tanh, z), "b-", linewidth=2, label="Tanh")
plt.plot(z, derivative(relu, z), "m-.", linewidth=2, label="ReLU")
plt.grid(True)
#plt.legend(loc="center right", fontsize=14)
plt.title("Derivatives", fontsize=14)
plt.axis([-5, 5, -0.2, 1.2])

save_fig("activation_functions_plot")
plt.show()
2. 用TensorFlow的高级API来训练MLP
需要用到tf.contrib包 和 sklearn结合,contrib里面的东西经常迭代,属于第三方提供的代码库,这里就不描述了。
3. 使用纯TensorFlow训练DNN
3.1 构建阶段
#shuffle分批分桶
def shuffle_batch(X, y, batch_size):
    rnd_idx = np.random.permutation(len(X))
    n_batches = len(X) // batch_size
    for batch_idx in np.array_split(rnd_idx, n_batches):
        X_batch, y_batch = X[batch_idx], y[batch_idx]
        yield X_batch, y_batch #yield生成器,节省内存

n_inputs = 28*28  # MNIST
n_hidden1 = 300 #隐层1的神经元数量
n_hidden2 = 100 #隐层2的神经元数量
n_outputs = 10  #输出层的神经元数量,对于MNIST为多输出,0 - 9 共10种数字

reset_graph()
#------------------构建阶段 --------------------
X = tf.placeholder(tf.float32, shape=(None, n_inputs), name="X") #占位符,相当于先定义出来因变量X
y = tf.placeholder(tf.int32, shape=(None), name="y")

#构建nn结构
with tf.name_scope("dnn"):
    hidden1 = tf.layers.dense(X, n_hidden1, name="hidden1",
                              activation=tf.nn.relu)
    hidden2 = tf.layers.dense(hidden1, n_hidden2, name="hidden2",
                              activation=tf.nn.relu)
    logits = tf.layers.dense(hidden2, n_outputs, name="outputs")
    y_proba = tf.nn.softmax(logits)

#定义损失函数
with tf.name_scope("loss"):
    xentropy = tf.nn.sparse_softmax_cross_entropy_with_logits(labels=y, logits=logits)
    loss = tf.reduce_mean(xentropy, name="loss")

#定义优化器和最小化损失函数的op
learning_rate = 0.01

with tf.name_scope("train"):
    optimizer = tf.train.GradientDescentOptimizer(learning_rate)
    training_op = optimizer.minimize(loss)

#定义模型评估
with tf.name_scope("eval"):
    correct = tf.nn.in_top_k(logits, y, 1)
    accuracy = tf.reduce_mean(tf.cast(correct, tf.float32))
3.2 执行阶段
#------------------执行阶段 --------------------
init = tf.global_variables_initializer() # 定义全局变量初始化器
saver = tf.train.Saver() #定义saver用于保存模型

n_epochs = 20 #迭代轮次
n_batches = 50 #每个批次的实例数量

with tf.Session() as sess:
    init.run() #初始化变量
    for epoch in range(n_epochs):
        for X_batch, y_batch in shuffle_batch(X_train, y_train, batch_size):
            sess.run(training_op, feed_dict={X: X_batch, y: y_batch}) #开始训练
        acc_batch = accuracy.eval(feed_dict={X: X_batch, y: y_batch}) #每个批次的训练集精确率
        acc_valid = accuracy.eval(feed_dict={X: X_valid, y: y_valid}) #每个批次的验证集的精确率
        print(epoch, "Batch accuracy:", acc_batch, "Validation accuracy:", acc_valid)

    save_path = saver.save(sess, "./my_model_final.ckpt") #保存模型
当然也可以自定义层结构,其他代码跟上面一样:
def neuron_layer(X, n_neurons, name, activation=None):
    with tf.name_scope(name):
        n_inputs = int(X.get_shape()[1])
        stddev = 2 / np.sqrt(n_inputs)
        init = tf.truncated_normal((n_inputs, n_neurons), stddev=stddev)
        W = tf.Variable(init, name="kernel")
        b = tf.Variable(tf.zeros([n_neurons]), name="bias")
        Z = tf.matmul(X, W) + b
        if activation is not None:
            return activation(Z)
        else:
            return Z
#唯一区别是这里使用了我们自定义的层结构,而不是dense
with tf.name_scope("dnn"):
    hidden1 = neuron_layer(X, n_hidden1, name="hidden1",
                           activation=tf.nn.relu)
    hidden2 = neuron_layer(hidden1, n_hidden2, name="hidden2",
                           activation=tf.nn.relu)
    logits = neuron_layer(hidden2, n_outputs, name="outputs")
3.3 使用神经网络
前面已经将训练好的NN保存成了ckpt文件,我们可以直接取出来用于预测:
with tf.Session() as sess:
    saver.restore(sess, "./my_model_final.ckpt") # or better, use save_path
    X_new_scaled = X_test[:20] #这里需要特征缩放  0 ~ 1
    Z = logits.eval(feed_dict={X: X_new_scaled}) # logits为nn最后的输出节点
    y_pred = np.argmax(Z, axis=1) #取出最大值的索引下标,即为预测图片
Z
y_pred
4. 微调神经网络的超参数
有太多超参数需要调整:层数、每层神经元数、每层的激活函数类型、初始化逻辑的权重等等。所以,了解每个超参数的合理取值会很有帮助。
4.1 隐藏层的个数
① 大多数问题可以用一个或两个隐藏层来处理,此时可以增加神经元的数量。比如,对于MINST数据集,一个隐藏层拥有数百个神经元就可以达到97%的精度,2层可以获得超过98%的精度。
② 非常复杂的问题,比如大图片的分类,语音识别,通常需要数十层的隐藏层,此时每层的神经元数量要非常少。当然他们也需要超大的数据集。隐藏层多神经元少的目的是为了训练起来更加快速。不过,很少会有人从头构建这样的网络:更常见的是重用别人训练好的用来处理类似任务的网络。
4.2 每个隐藏层中的神经元数(重要)
① 对于输入层和输出层,由具体任务要求决定,比如MNIST输出10种数字,输出层神经元数就是10;
② 对于隐藏层,经验是以漏斗型来定义其尺寸,每层的神经元数依次减少,原因:许多低级功能可以合并成数量更少的高级功能。
③ 对于以上经验也不是那么绝对,可以逐步增加神经元的数量,直到过拟合。通常来说,通过增加每层的神经元数量比增加层数会产生更多的消耗。
④ 一个更简单的方式:使用更多的层次和神经元,然后提前设置1 早停来避免过拟合,或者使用2 dropout正则化技术。这被称为 弹力裤 方法。
4.3 激活函数
大多数情况下,可以在隐藏层中使用ReLU激活函数(或其变种)。它比其他激活函数快,因为梯度下降对于大数据值没有上限,会导致它无法终止。
对于输出层,Softmax对于分类任务( 若分类是互斥的) 来说是一个不错的选择。对于回归任务,完全可以不使用激活函数?。
5. 练习
在MNIST数据集上训练一个深度MLP,看看预测准确度能不能超过98%。尝试一些额外的功能(保存检查点,中断后从检查点恢复,添加汇总,用tensorboard绘制学习曲线)
from datetime import datetime
#定义日志路径
def log_dir(prefix=""):
    now = datetime.utcnow().strftime("%Y%m%d%H%M%S")
    root_logdir = "tf_logs"
    if prefix:
        prefix += "-"
    name = prefix + "run-" + now
    return "{}/{}/".format(root_logdir, name)

n_inputs = 28*28  # MNIST
n_hidden1 = 300
n_hidden2 = 100
n_outputs = 10

reset_graph()

X = tf.placeholder(tf.float32, shape=(None, n_inputs), name="X")
y = tf.placeholder(tf.int32, shape=(None), name="y")

with tf.name_scope("dnn"):
    hidden1 = tf.layers.dense(X, n_hidden1, name="hidden1",
                              activation=tf.nn.relu)
    hidden2 = tf.layers.dense(hidden1, n_hidden2, name="hidden2",
                              activation=tf.nn.relu)
    logits = tf.layers.dense(hidden2, n_outputs, name="outputs")

with tf.name_scope("loss"):
    xentropy = tf.nn.sparse_softmax_cross_entropy_with_logits(labels=y, logits=logits)
    loss = tf.reduce_mean(xentropy, name="loss")
    loss_summary = tf.summary.scalar('log_loss', loss)

learning_rate = 0.01

with tf.name_scope("train"):
    optimizer = tf.train.GradientDescentOptimizer(learning_rate)
    training_op = optimizer.minimize(loss)

with tf.name_scope("eval"):
    correct = tf.nn.in_top_k(logits, y, 1)
    accuracy = tf.reduce_mean(tf.cast(correct, tf.float32))
    accuracy_summary = tf.summary.scalar('accuracy', accuracy)

init = tf.global_variables_initializer()
saver = tf.train.Saver()

#定义二进制日志文件writer
file_writer = tf.summary.FileWriter(logdir, tf.get_default_graph())

m, n = X_train.shape

# -------------- 执行计算图--------------------
n_epochs = 10001
batch_size = 50
n_batches = int(np.ceil(m / batch_size))

checkpoint_path = "./tmp/my_deep_mnist_model.ckpt" #第一次训练时路径不对
checkpoint_epoch_path = checkpoint_path + ".epoch"
final_model_path = "./my_deep_mnist_model"

best_loss = np.infty
epochs_without_progress = 0
max_epochs_without_progress = 50

with tf.Session() as sess:
    if os.path.isfile(checkpoint_epoch_path):
        # if the checkpoint file exists, restore the model and load the epoch number
        with open(checkpoint_epoch_path, "rb") as f:
            start_epoch = int(f.read())
        print("Training was interrupted. Continuing at epoch", start_epoch)
        saver.restore(sess, checkpoint_path)
    else:
        start_epoch = 0
        sess.run(init)

    for epoch in range(start_epoch, n_epochs):
        for X_batch, y_batch in shuffle_batch(X_train, y_train, batch_size):
            sess.run(training_op, feed_dict={X: X_batch, y: y_batch})
        accuracy_val, loss_val, accuracy_summary_str, loss_summary_str = sess.run([accuracy, loss, accuracy_summary, loss_summary], feed_dict={X: X_valid, y: y_valid})
        file_writer.add_summary(accuracy_summary_str, epoch)
        file_writer.add_summary(loss_summary_str, epoch)
        if epoch % 5 == 0:
            print("Epoch:", epoch,
                  "\tValidation accuracy: {:.3f}%".format(accuracy_val * 100),
                  "\tLoss: {:.5f}".format(loss_val))
            #保存当前模型
            saver.save(sess, checkpoint_path)
            #保存当前迭代轮次到.epoch后缀的文件中
            with open(checkpoint_epoch_path, "wb") as f:
                f.write(b"%d" % (epoch + 1))
            if loss_val < best_loss:
                saver.save(sess, final_model_path)
                best_loss = loss_val
            else:
                epochs_without_progress += 5
                if epochs_without_progress > max_epochs_without_progress:
                    print("Early stopping")
                    break

#模型训练完成后,删除检查点文件
os.remove(checkpoint_epoch_path)


