opencv-python 实现鱼眼矫正 棋盘矫正法
鱼眼矫正有很多的方法, 比较常用的有:
- 棋盘标定法
- 经纬度法
opencv自带鱼眼矫正算法, 也就是第一种, 棋盘矫正法。
第一步:制作棋盘格
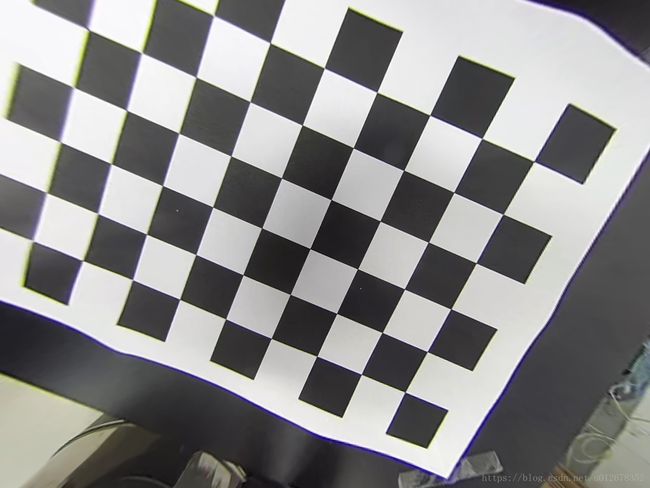
用A4纸打印一张棋盘格, 固定到硬纸板上, 然后用鱼眼镜头对着拍摄。 保留拍到的图片, 如下图所示:
可以从不同角度拍摄, 多保存一些。
第二步: 计算内参和矫正系数
棋盘标定法, 必须要先计算出鱼眼的内参和矫正系数, 可直接调用以下函数计算
import cv2
assert cv2.__version__[0] == '3'
import numpy as np
import os
import glob

def get_K_and_D(checkerboard, imgsPath):

    CHECKERBOARD = checkerboard
    subpix_criteria = (cv2.TERM_CRITERIA_EPS+cv2.TERM_CRITERIA_MAX_ITER, 30, 0.1)
    calibration_flags = cv2.fisheye.CALIB_RECOMPUTE_EXTRINSIC+cv2.fisheye.CALIB_CHECK_COND+cv2.fisheye.CALIB_FIX_SKEW
    objp = np.zeros((1, CHECKERBOARD[0]*CHECKERBOARD[1], 3), np.float32)
    objp[0,:,:2] = np.mgrid[0:CHECKERBOARD[0], 0:CHECKERBOARD[1]].T.reshape(-1, 2)
    _img_shape = None
    objpoints = []
    imgpoints = []
    images = glob.glob(imgsPath + '/*.png')
    for fname in images:
        img = cv2.imread(fname)
        if _img_shape == None:
            _img_shape = img.shape[:2]
        else:
            assert _img_shape == img.shape[:2], "All images must share the same size."

        gray = cv2.cvtColor(img,cv2.COLOR_BGR2GRAY)
        ret, corners = cv2.findChessboardCorners(gray, CHECKERBOARD,cv2.CALIB_CB_ADAPTIVE_THRESH+cv2.CALIB_CB_FAST_CHECK+cv2.CALIB_CB_NORMALIZE_IMAGE)
        if ret == True:
            objpoints.append(objp)
            cv2.cornerSubPix(gray,corners,(3,3),(-1,-1),subpix_criteria)
            imgpoints.append(corners)
    N_OK = len(objpoints)
    K = np.zeros((3, 3))
    D = np.zeros((4, 1))
    rvecs = [np.zeros((1, 1, 3), dtype=np.float64) for i in range(N_OK)]
    tvecs = [np.zeros((1, 1, 3), dtype=np.float64) for i in range(N_OK)]
    rms, _, _, _, _ = \
    cv2.fisheye.calibrate(
                                objpoints,
                                imgpoints,
                                gray.shape[::-1],
                                K,
                                D,
                                rvecs,
                                tvecs,
                                calibration_flags,
                                (cv2.TERM_CRITERIA_EPS+cv2.TERM_CRITERIA_MAX_ITER, 30, 1e-6)
                                )
    DIM = _img_shape[::-1]
    print("Found " + str(N_OK) + " valid images for calibration")
    print("DIM=" + str(_img_shape[::-1]))
    print("K=np.array(" + str(K.tolist()) + ")")
    print("D=np.array(" + str(D.tolist()) + ")")

    return DIM, K, D

# 计算内参和矫正系数
'''
# checkerboard: 棋盘格的格点数目
# imgsPath: 存放鱼眼图片的路径
'''
get_K_and_D((6,9), 'fisheyeImage')
第三步: 根据计算的K和D, 矫正鱼眼图
保存第二步计算的DIM, K, D, 利用一下程序, 矫正鱼眼图。
def undistort(img_path):
    img = cv2.imread(img_path)
    img = cv2.resize(img, DIM)
    map1, map2 = cv2.fisheye.initUndistortRectifyMap(K, D, np.eye(3), K, DIM,cv2.CV_16SC2)
    undistorted_img = cv2.remap(img, map1, map2, interpolation=cv2.INTER_LINEAR,borderMode=cv2.BORDER_CONSTANT)
    cv2.imwrite('unfisheyeImage.png', undistorted_img)
DIM, K, D是固定不变的,因此,map1和map2也是不变的, 当你有大量的数据需要矫正时, 应当避免map1和map2的重复计算, 只需要计算remap即可。
矫正效果
后续
矫正结束, 对于上面的矫正结果, 应该适用于很多场景了, 但是矫正之后, 很多有效区域被截掉了, 能否矫正出更大的有效面积呢? 答案当然是有的, 具体的细节, 去我的github上看项目里面的pdf吧, 这里不再介绍了。
github: https://github.com/HLearning/fisheye
def undistort(img_path,K,D,DIM,scale=0.5,imshow=False):
    img = cv2.imread(img_path)
    dim1 = img.shape[:2][::-1]  #dim1 is the dimension of input image to un-distort
    assert dim1[0]/dim1[1] == DIM[0]/DIM[1], "Image to undistort needs to have same aspect ratio as the ones used in calibration"
    if dim1[0]!=DIM[0]:
        img = cv2.resize(img,DIM,interpolation=cv2.INTER_AREA)
    Knew = K.copy()
    if scale:#change fov
        Knew[(0,1), (0,1)] = scale * Knew[(0,1), (0,1)]
    map1, map2 = cv2.fisheye.initUndistortRectifyMap(K, D, np.eye(3), Knew, DIM, cv2.CV_16SC2)
    undistorted_img = cv2.remap(img, map1, map2, interpolation=cv2.INTER_LINEAR, borderMode=cv2.BORDER_CONSTANT)
    if imshow:
        cv2.imshow("undistorted", undistorted_img)
    return undistorted_img
