转载请注明出处:http://blog.csdn.net/fishle123/article/details/50759893
这里把布局动画和Activity切换动画都归类为特殊场景的动画使用,因此放在一起来介绍它们的使用技巧。所谓布局动画即在ViewGroup布局发生改变(如addView,removeView...)时提供的一个过渡动画。根据布局动画效果的不同,布局动画即可以是属性动画,也可以是视图动画,两种类型的动画有各自的不同应用场景。Activity过渡动画是指Activity在打开或者退出时的过渡动画。
1.基于属性动画的布局动画
可以通过LayoutTransition 类来实现布局动画。在ViewGroup中添加、删除子View、调用setVisibility()修改ViewGroup内部的View的可见性( VISIBLE, INVISIBLE,GONE)的时候,都可以使用布局动画来过渡。布局动画既可以作用在被操作的View上,也可以作用到其他的子View上(如从ViewGroup中添加或删除view,剩余的Views通过布局动画移动到新的位置上)。Android提供了以下几种类型的布局动画,每种类型在LayoutTransition中都一个常量与之对应:
1)APPEARING - View在ViewGroup中出现时的动画,这个动画时作用在新出现的View上。
2)CHANGE_APPEARING -当新的View出现在ViewGroup中时,其他Views因此产生变化时的过渡动画 ,这个动画作用在除新出现的View之外的Views。
3)DISAPPEARING - 在View消失时出现的动画,这个动画作用在即将消失的View上。
4)CHANGE_DISAPPEARING - 在View消失时,其他Views因此产生变化时 的过渡动画,这个动画作用在除即将消失的View之外的Views。
针对这四种类型的布局动画,我们可以定义自己的动画,也可以让ViewGroup使用默认的布局动画。使用默认的布局动画,在XML中可以如下实现:
- <LinearLayout xmlns:android="http://schemas.android.com/apk/res/android"
- android:orientation="vertical"
- android:layout_width="match_parent"
- android:layout_height="match_parent"
- >
- <Button
- android:layout_width="wrap_content"
- android:layout_height="wrap_content"
- android:text="Add Button"
- android:id="@+id/addNewButton"
- />
- <GridLayout
- android:columnCount="4"
- android:layout_width="wrap_content"
- android:layout_height="wrap_content"
- android:id="@+id/gridContainer"
- android:animateLayoutChanges="true"
- />
- LinearLayout>
即通过 android:animateLayoutChanges="true"这一句就可以了。
同样地,我们也可以使用代码来实现布局动画。
- public class MainActivity extends Activity implements OnCheckedChangeListener {
-
- private Button mAddBtn;
- private CheckBox mCustomCB;
- private CheckBox mAppearCB;
- private CheckBox mChangeAppearCB;
- private CheckBox mDisappearCB;
- private CheckBox mChangeDisppearCB;
- private GridLayout mGrid;
- private LayoutTransition mTransition;
- private int mCount = 1;
-
- private Animator mDefaultAppearAnimator;
- private Animator mDefaultChangeAppearAnimator;
- private Animator mDefaultDisappearAnimator;
- private Animator mDefaultChangeDisappearAnimator;
-
- private Animator mCustomAppearAnimator;
- private Animator mCustomChangeAppearAnimator;
- private Animator mCustomDisappearAnimator;
- private Animator mCustomChangeDisappearAnimator;
-
- @Override
- protected void onCreate(Bundle savedInstanceState) {
- super.onCreate(savedInstanceState);
- setContentView(R.layout.activity_main);
-
- mGrid = (GridLayout) findViewById(R.id.grid);
- mCustomCB = (CheckBox) findViewById(R.id.customCB);
- mAppearCB = (CheckBox) findViewById(R.id.appearCB);
- mChangeAppearCB = (CheckBox) findViewById(R.id.changeAppearCB);
- mDisappearCB = (CheckBox) findViewById(R.id.disappearCB);
- mChangeDisppearCB = (CheckBox) findViewById(R.id.changeDisappearCB);
- mAddBtn = (Button) findViewById(R.id.addBtn);
-
- mCustomCB.setOnCheckedChangeListener(this);
- mAppearCB.setOnCheckedChangeListener(this);
- mChangeAppearCB.setOnCheckedChangeListener(this);
- mDisappearCB.setOnCheckedChangeListener(this);
- mChangeDisppearCB.setOnCheckedChangeListener(this);
-
- mAddBtn.setOnClickListener(new View.OnClickListener() {
-
- @Override
- public void onClick(View v) {
-
- Button child = new Button(MainActivity.this);
- child.setText(String.valueOf(mCount++));
- child.setOnClickListener(new View.OnClickListener() {
-
- @Override
- public void onClick(View v) {
-
- mGrid.removeView(v);
- }
- });
-
- mGrid.addView(child, Math.min(1, mGrid.getChildCount()));
- }
- });
-
- mTransition = new LayoutTransition();
- mGrid.setLayoutTransition(mTransition);
- createCustomAnimations(mTransition);
-
-
- mDefaultAppearAnimator = mTransition.getAnimator(LayoutTransition.APPEARING);
- mDefaultChangeAppearAnimator = mTransition.getAnimator(LayoutTransition.CHANGE_APPEARING);
- mDefaultDisappearAnimator = mTransition.getAnimator(LayoutTransition.DISAPPEARING);
- mDefaultChangeDisappearAnimator = mTransition.getAnimator(LayoutTransition.CHANGE_DISAPPEARING);
-
- }
-
-
- @Override
- public void onCheckedChanged(CompoundButton buttonView, boolean isChecked) {
-
-
- mTransition.setAnimator(LayoutTransition.APPEARING,
- mAppearCB.isChecked() ? (mCustomCB.isChecked() ? mCustomAppearAnimator : mDefaultAppearAnimator) : null);
-
- mTransition.setAnimator(LayoutTransition.CHANGE_APPEARING,
- mChangeAppearCB.isChecked() ? (mCustomCB.isChecked() ? mCustomChangeAppearAnimator
- : mDefaultChangeAppearAnimator) : null);
-
- mTransition.setAnimator(LayoutTransition.DISAPPEARING,
- mDisappearCB.isChecked() ? (mCustomCB.isChecked() ? mCustomDisappearAnimator : mDefaultDisappearAnimator)
- : null);
-
- mTransition.setAnimator(LayoutTransition.CHANGE_DISAPPEARING,
- mChangeDisppearCB.isChecked() ? (mCustomCB.isChecked() ? mCustomChangeDisappearAnimator
- : mDefaultChangeDisappearAnimator) : null);
-
- }
-
- private void createCustomAnimations(LayoutTransition transition) {
-
-
- PropertyValuesHolder pvhLeft = PropertyValuesHolder.ofInt("left", 0, 1);
- PropertyValuesHolder pvhTop = PropertyValuesHolder.ofInt("top", 0, 1);
- PropertyValuesHolder pvhRight = PropertyValuesHolder.ofInt("right", 0, 1);
- PropertyValuesHolder pvhBottom = PropertyValuesHolder.ofInt("bottom", 0, 1);
- PropertyValuesHolder pvhScaleX = PropertyValuesHolder.ofFloat("scaleX", 1f, 0f, 1f);
- PropertyValuesHolder pvhScaleY = PropertyValuesHolder.ofFloat("scaleY", 1f, 0f, 1f);
- mCustomChangeAppearAnimator = ObjectAnimator.ofPropertyValuesHolder(this, pvhLeft, pvhTop, pvhRight,
- pvhBottom, pvhScaleX, pvhScaleY).setDuration(
- transition.getDuration(LayoutTransition.CHANGE_APPEARING));
- mCustomChangeAppearAnimator.addListener(new AnimatorListenerAdapter() {
- public void onAnimationEnd(Animator anim) {
- View view = (View) ((ObjectAnimator) anim).getTarget();
- view.setScaleX(1f);
- view.setScaleY(1f);
- }
- });
-
-
- Keyframe kf0 = Keyframe.ofFloat(0f, 0f);
- Keyframe kf1 = Keyframe.ofFloat(.9999f, 360f);
- Keyframe kf2 = Keyframe.ofFloat(1f, 0f);
- PropertyValuesHolder pvhRotation = PropertyValuesHolder.ofKeyframe("rotation", kf0, kf1, kf2);
- mCustomChangeDisappearAnimator = ObjectAnimator.ofPropertyValuesHolder(this, pvhLeft, pvhTop,
- pvhRight, pvhBottom, pvhRotation).setDuration(
- transition.getDuration(LayoutTransition.CHANGE_DISAPPEARING));
- mCustomChangeDisappearAnimator.addListener(new AnimatorListenerAdapter() {
- public void onAnimationEnd(Animator anim) {
- View view = (View) ((ObjectAnimator) anim).getTarget();
- view.setRotation(0f);
- }
- });
-
-
- mCustomAppearAnimator = ObjectAnimator.ofFloat(null, "rotationY", 90f, 0f).setDuration(
- transition.getDuration(LayoutTransition.APPEARING));
- mCustomAppearAnimator.addListener(new AnimatorListenerAdapter() {
- public void onAnimationEnd(Animator anim) {
- View view = (View) ((ObjectAnimator) anim).getTarget();
- view.setRotationY(0f);
- }
- });
-
-
- mCustomDisappearAnimator = ObjectAnimator.ofFloat(null, "rotationX", 0f, 90f).setDuration(
- transition.getDuration(LayoutTransition.DISAPPEARING));
- mCustomDisappearAnimator.addListener(new AnimatorListenerAdapter() {
- public void onAnimationEnd(Animator anim) {
- View view = (View) ((ObjectAnimator) anim).getTarget();
- view.setRotationX(0f);
- }
- });
-
- }
- @Override
- public boolean onCreateOptionsMenu(Menu menu) {
-
- getMenuInflater().inflate(R.menu.main, menu);
- return true;
- }
- }
对应的布局文件为activity_main.xml,内容如下:
- "http://schemas.android.com/apk/res/android"
- xmlns:tools="http://schemas.android.com/tools"
- android:layout_width="match_parent"
- android:layout_height="match_parent"
- android:orientation="vertical"
- tools:context=".MainActivity" >
-
-
- android:id="@+id/addBtn"
- android:layout_width="wrap_content"
- android:layout_height="wrap_content"
- android:text="addBtn" />
-
-
- android:id="@+id/customCB"
- android:layout_width="wrap_content"
- android:layout_height="wrap_content"
- android:checked="false"
- android:text="customAnimation" />
-
- android:id="@+id/appearCB"
- android:layout_width="wrap_content"
- android:layout_height="wrap_content"
- android:checked="true"
- android:text="APPEARING " />
-
-
- android:id="@+id/changeAppearCB"
- android:layout_width="wrap_content"
- android:layout_height="wrap_content"
- android:checked="true"
- android:text="CHANGE_APPEARING " />
-
-
- android:id="@+id/disappearCB"
- android:layout_width="wrap_content"
- android:layout_height="wrap_content"
- android:checked="true"
- android:text="DISAPPEARING" />
-
-
- android:id="@+id/changeDisappearCB"
- android:layout_width="wrap_content"
- android:layout_height="wrap_content"
- android:checked="true"
- android:text="CHANGE_DISAPPEARING" />
-
-
- android:id="@+id/grid"
- android:layout_width="match_parent"
- android:layout_height="wrap_content"
- android:columnCount="5" >
-
-
-
这个例子中,点击addBtn按钮往GridLayout中添加Button,点击GridLayout中的Button时该Button会移除,大家可以仔细观察一下动画效果。可以通过几个CheckBox来选择使用哪些布局动画效果,里面的custonmAnimation表示是使用自定义的动画效果还是使用默认的动画效果。效果如下:
2.基于视图动画的布局动画
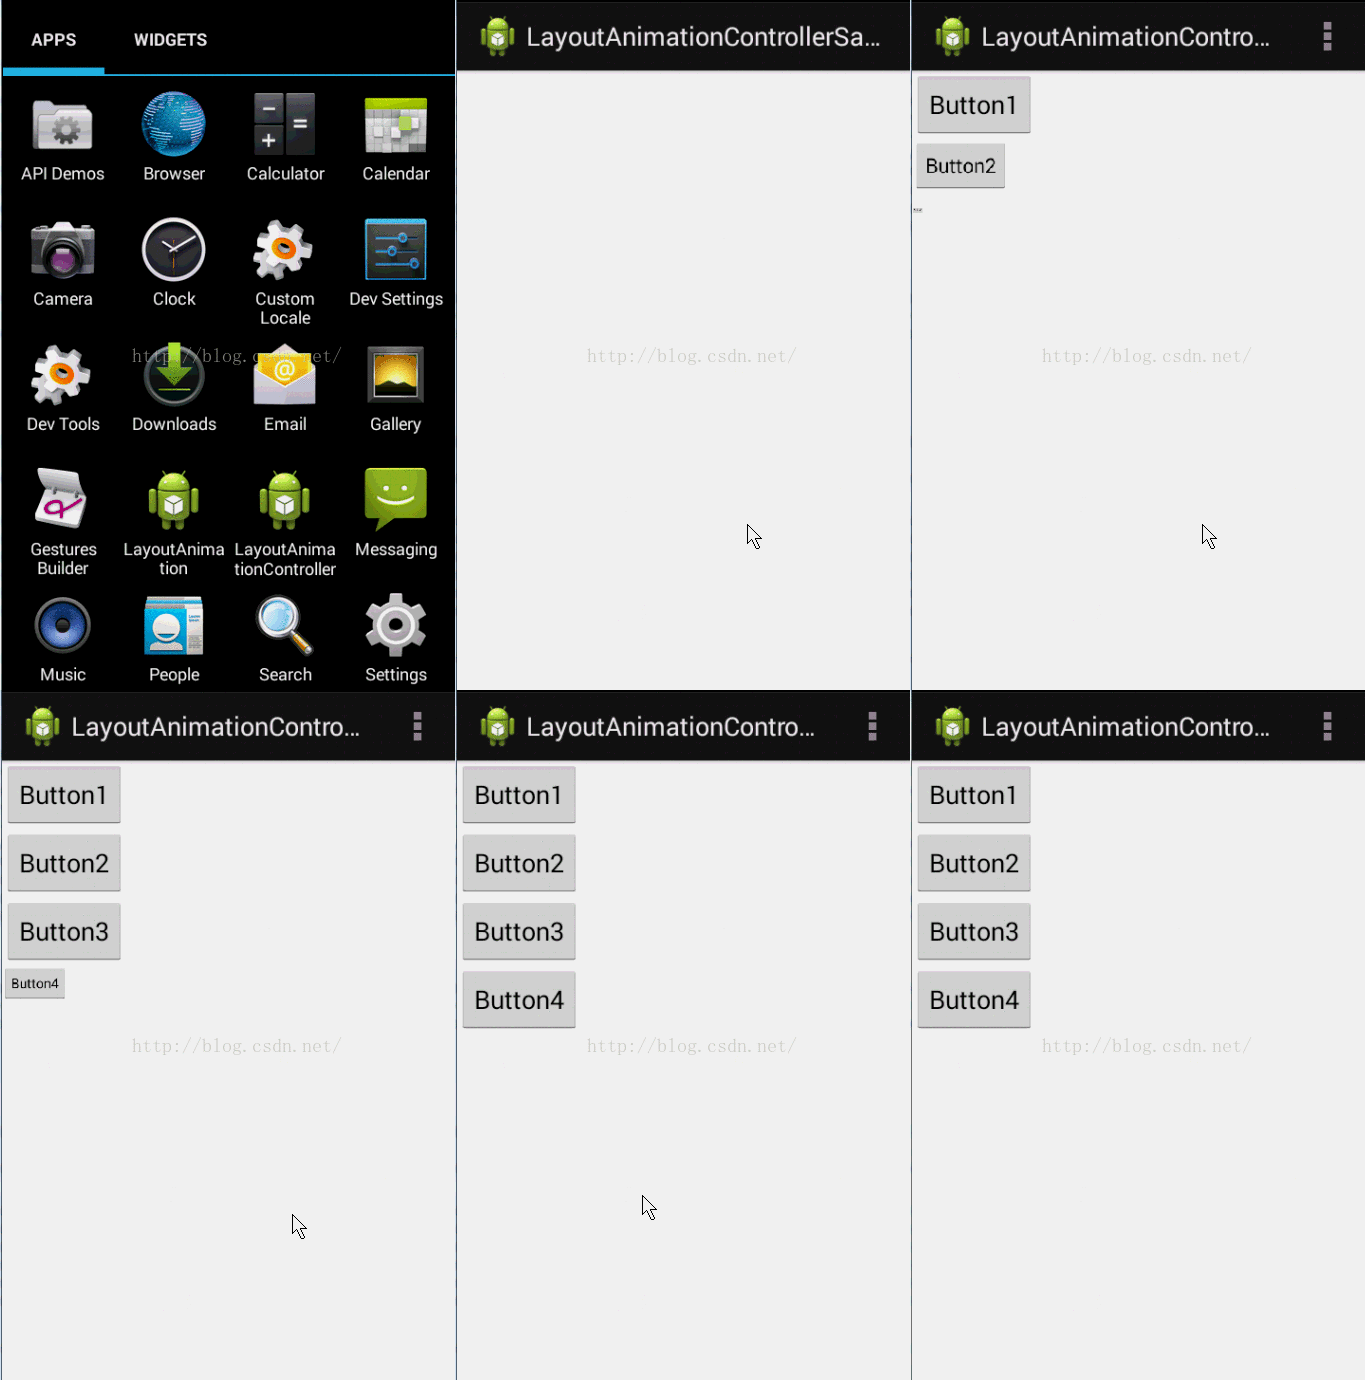
还可以使用LayoutAnimationController来实现布局动画,不过LayoutAnimationController使用的视图动画,而LayoutTransition使用的的是属性动画。LayoutAnimationController中的动画用来控制ViewGroup中每个Item显示的时候的过渡动画,每个item使用的都是相同的动画,但是可以设置每个item的动画的开始时间以此达到控制每个item的显示顺序。需要注意的是,LayoutAnimationController设置的动画只在ViewGroup第一次layout的时候播放。LayoutAnimationController有一个子类GridLayoutAnimationController,专门针对GridLayout的布局动画。
LayoutAnimationController的构造函数有两个参数,一个是需要使用的动画,另一个是每个子View显示的延时时间delay。通过设置延时时间,可以控制每个子View的显示顺序。子View延时时间根据参数delay来计算,公式如下:
child animation delay = child index * delay * animation duration
当delay不为0的时候,就可以控制子View的显示顺序,LayoutAnimationController提供了以下三种顺序:
1)LayoutAnimationController.ORDER_NORMAL----顺序
2)LayoutAnimationController.ORDER_RANDOM----随机
3)LayoutAnimationController.ORDER_REVERSE----倒序
下面看一个例子:
- public class MainActivity extends Activity {
-
- private LinearLayout mContainer;
-
- @Override
- protected void onCreate(Bundle savedInstanceState) {
- super.onCreate(savedInstanceState);
- setContentView(R.layout.activity_main);
- mContainer = (LinearLayout) findViewById(R.id.container);
- ScaleAnimation scaleAnimation = new ScaleAnimation(0, 1, 0, 1);
- scaleAnimation.setDuration(1000);
- LayoutAnimationController controller = new LayoutAnimationController(scaleAnimation, 0.5f);
- controller.setOrder(LayoutAnimationController.ORDER_NORMAL);
- mContainer.setLayoutAnimation(controller);
- }
-
- }
动画效果如下:

3.Activity的切换动画
Activity有默认的切换动画,我们也可以修改这个自定义这个动画。只需要调用overridePendingTransition(int enterAnim,int exitAnim)这个方法就可以了。这两个参数的含义如下:
enterAnim----Activity打开时的动画资源id
exitAnim----Activity被暂停是的动画资源id
下面看一个例子:
- public class MainActivity extends Activity {
-
- @Override
- protected void onCreate(Bundle savedInstanceState) {
- super.onCreate(savedInstanceState);
- setContentView(R.layout.activity_main);
- Button startBtnButton = (Button)findViewById(R.id.btnStartActivity);
- startBtnButton.setOnClickListener(new View.OnClickListener() {
- @Override
- public void onClick(View v) {
-
- Intent intent =new Intent(MainActivity.this,SecondActivity.class);
- startActivity(intent);
- overridePendingTransition(R.anim.enter_anim,R.anim.out_anim);
- }
- });
- }
-
- @Override
- public boolean onCreateOptionsMenu(Menu menu) {
-
- getMenuInflater().inflate(R.menu.main, menu);
- return true;
- }
-
- }
两个动画设计如下,enter_anim.xml的内容:
- xml version="1.0" encoding="utf-8"?>
- <set xmlns:android="http://schemas.android.com/apk/res/android"
- android:interpolator="@android:anim/accelerate_decelerate_interpolator">
-
- <scale android:fromXScale="0"
- android:toXScale="1"
- android:fromYScale="0"
- android:toYScale="1"
- android:pivotX="50%"
- android:pivotY="50%"
- android:duration="1000"/>
-
- set>
out_anim.xml的内容:
- xml version="1.0" encoding="utf-8"?>
- <translate xmlns:android="http://schemas.android.com/apk/res/android"
- android:duration="1000"
- android:fromXDelta="0"
- android:interpolator="@android:anim/linear_interpolator"
- android:toXDelta="-100%" />
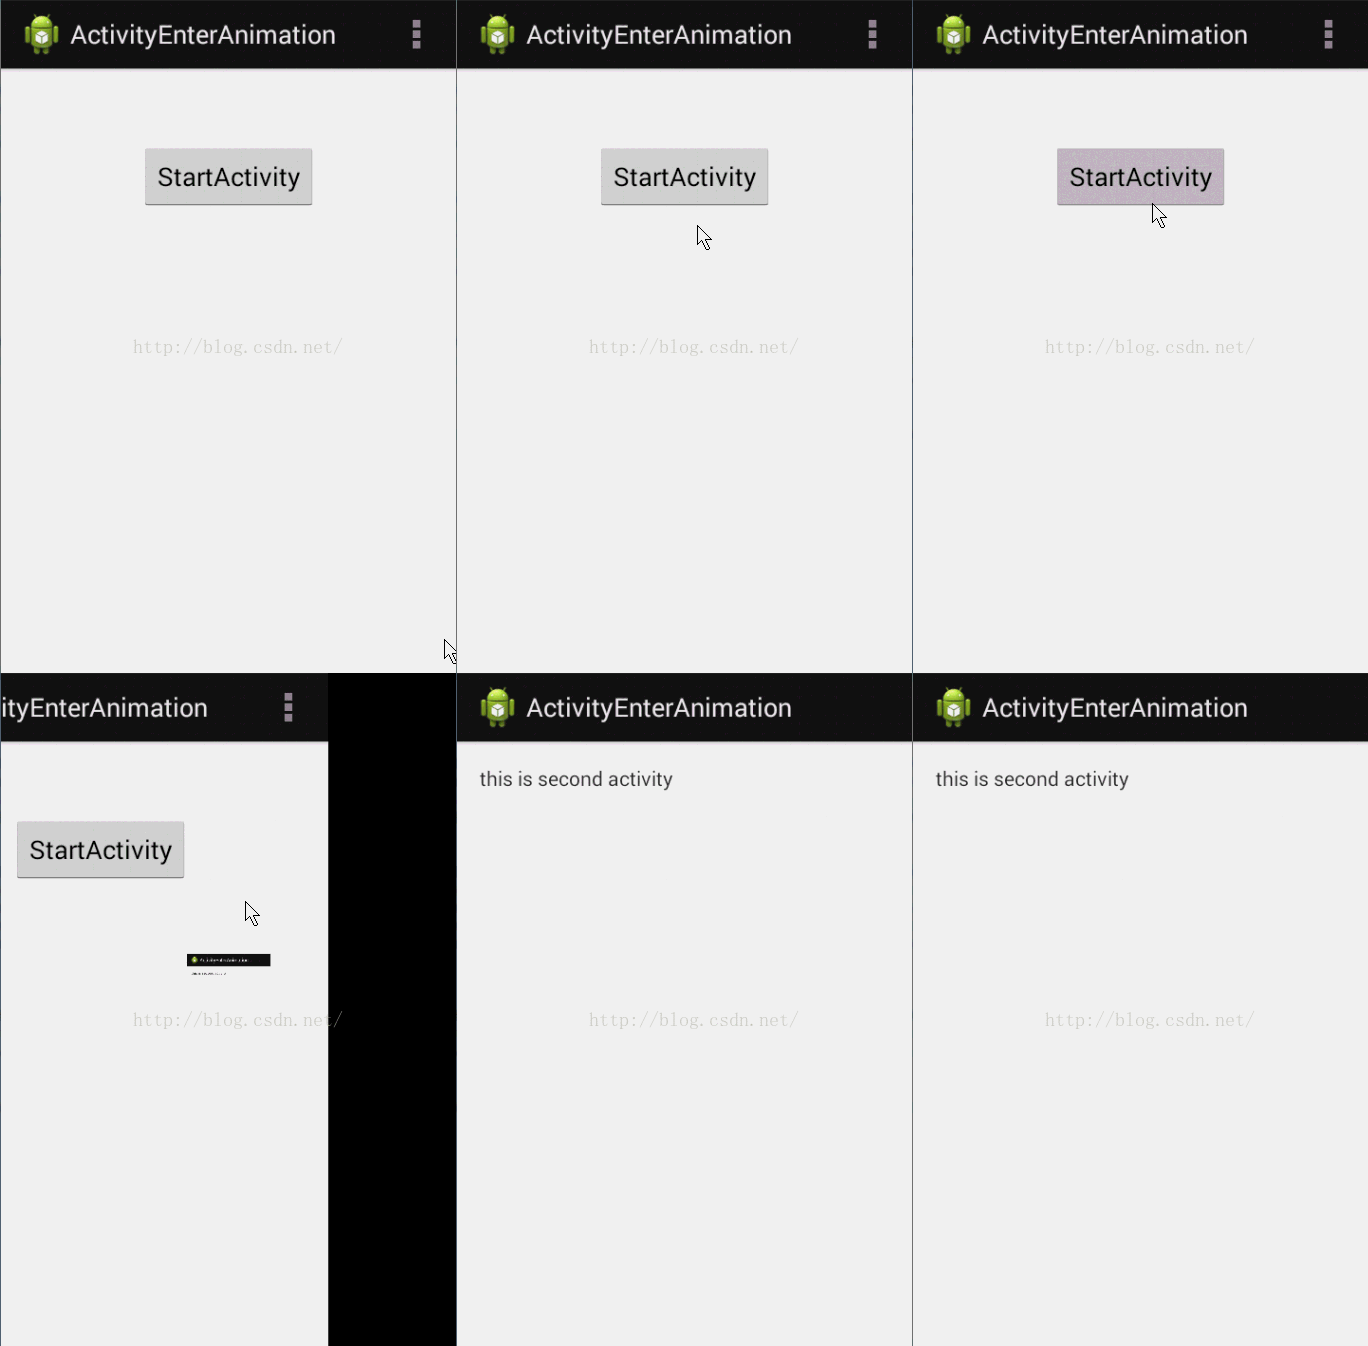
动画效果如下:

可以看到,Activity的切换动画使用起来非常简单。需要注意的一点就是:overridePendingTransition必须在startAcitivy或者finish之后调用,如果在overridePendingTransition中传入0,表示不使用动画。
当然,我们也可以给Fragment设置切换动画,代码如下:
- FragmentManager fm= getFragmentManager();
- FragmentTransaction transaction = fm.beginTransaction();
- transaction.setCustomAnimations(R.anim.enter_anim,R.anim.out_anim);
-
- transaction.commit();
总结
到此为止,介绍完布局动画和Activity、Fragment切换动画的使用方法。ViewGroup的显示终于不在那么单调了。需要注意的是,LayoutAnimationController设置的动画只在ViewGroup第一次layout的时候播放。而LayoutTransition 是在布局发生改变的时候使用动画,当我们动态的往ViewGroup中添加或删除View的使用时可以提高用户体验。
对于属性动画和视图动画不熟悉的可以阅读我的动画相关的其他文章,看完这些文章相信大多数动画相关的问题都能解决了。
Android动画框架(一)-----视图动画&帧动画
Android动画框架(二)----属性动画

