Android Service 基础与使用
Service 作为 Android 四大组件之一,有着非常重要的作用,Service 被设计为在后台长时间执行而不需要提供页面的任务。
Service 基础知识
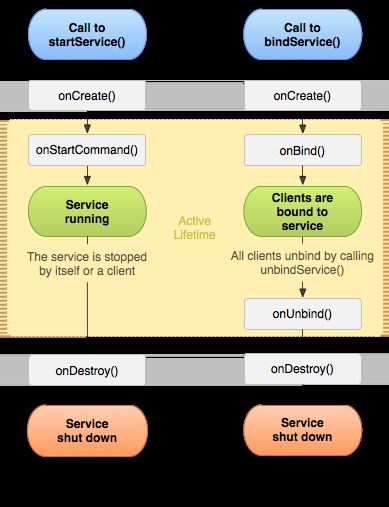
Service 的生命周期如下图所示:
启动/关闭 Service
通过如下代码既可启动 Service。
val intent = Intent(this, SampleService::class.java)
startService(intent)
如果我们期望启动一个前台 Service,对于 Android O 之前的版本可以直接用上面的代码,否则需要使用如下代码:
val intent = Intent(this, SampleService::class.java)
startForegroundService(intent)
简单起见,也可以使用 ContextCompat 中提供的方法:
val intent = Intent(this, SampleService::class.java)
//内部会判断 Android 版本号,来调用不同的方法
ContextCompat.startForegroundService(this, intent)
使用 Intent 参数调用 startService 或者 startForegroundService 方法后,如果服务是未启动状态则会启动该服务,然后会将该 Intent 作为参数回调 Service 中的 onStartCommand 方法。
所以不管服务是启动还是未启动状态,只要我们调用了启动服务的方法,onStartCommand 方法都会被回调,且参数就是我们启动服务时传的 Intent。
onStartCommand 方法返回值为一个整形,用于描述系统应如何在系统终止服务的情况下继续运行服务。返回值必须为如下几个值之一:
-
START_NOT_STICKY
如果系统在 onStartCommand() 返回后终止服务,则除非有待传递的挂起 Intent,否则系统不会重建服务。这是最安全的选项,可以避免在不必要时以及应用能够轻松重启所有未完成的作业时运行服务。 -
START_STICKY
如果系统在 onStartCommand() 返回后终止服务,则其会重建服务并调用 onStartCommand(),但不会重新传递最后一个 Intent。相反,除非有挂起 Intent 要启动服务,否则系统会调用包含空 Intent 的 onStartCommand()。在此情况下,系统会传递这些 Intent。此常量适用于不执行命令、但无限期运行并等待作业的媒体播放器(或类似服务)。 -
START_REDELIVER_INTENT
如果系统在 onStartCommand() 返回后终止服务,则其会重建服务,并通过传递给服务的最后一个 Intent 调用 onStartCommand()。所有挂起 Intent 均依次传递。此常量适用于主动执行应立即恢复的作业(例如下载文件)的服务。
在服务使用完成后,我们需要关闭服务释放资源,在 Activity 中使用 stopService 来关闭服务,在 Service 内部使用 stopSelf 关闭。
//关闭 SampleService 服务
stopService(Intent(this, SampleService::class.java))
另外,对于前台 Service,必须在 AndroidManifest 中配置前台服务的权限:
<uses-permission android:name="android.permission.FOREGROUND_SERVICE"/>
绑定/解绑 Service
Service 允许其他组件通过 bindService 对其绑定,从而建立连接。在组件使用完成后,需要调用 unbindService 接触绑定。
我们同样可以使用 bindService 来启动 Service,只要使用 Context.BIND_AUTO_CREATE 参数既可。
调用 bindService 时还需要提供一个 ServiceConnection 实例作为参数,ServiceConnection 会监听服务的连接,连接成功或失败都会回调对应的方法。
对于 Service 来说,如果期望允许被绑定到其他组件,则应该实现其中的 onBind 方法,该方法返回一个 IBinder 对象。
服务必须提供 IBinder 实现给绑定到它的组件,我们有三种方式创建 IBinder 接口的实例:
- 扩展 Binder 类:服务于绑定组件运行在同一进程时可以使用这种方式创建 IBinder。
- Messenger:服务于绑定组件运行在不同进程时,使用它可以实现跨进程通信,也是 IPC 最简单的方式。
- AIDL:与 Messenger 相同,都可以实现跨进程通信,但实现比较复杂。
跨进程通信不在本文的讨论范围内,后面会专门介绍跨进程相关的知识,这里只介绍扩展 Binder 类的方式。
下面代码显示了使用扩展 Binder 类的方式:
class SampleService : Service() {
    private val binder = SampleServiceBinder()
    //省略其他代码
    inner class SampleServiceBinder() : Binder(){
        fun getService() = this@SampleService
    }
    override fun onBind(intent: Intent?): IBinder? = binder
}
在 Activity 中,我们通过如下方式来绑定及解除绑定到 Service:
class ServiceActivity : AppCompatActivity() {

    private var service: SampleService? = null
    private val serviceConnection = object : ServiceConnection {
        override fun onServiceDisconnected(name: ComponentName?) {
        }

        override fun onServiceConnected(name: ComponentName?, service: IBinder) {
            this@ServiceActivity.service = (service as SampleService.SampleServiceBinder).getService()
        }
    }
    //省略其他代码
    private fun bindSampleService(v: View) {
        val intent = Intent(this, SampleService::class.java)
        //使用 BIND_AUTO_CREATE 参数可以在未启动服务的情况下启动服务
        bindService(intent, serviceConnection, Context.BIND_AUTO_CREATE)
    }
    override fun onDestroy() {
        super.onDestroy()
        //解除绑定
        unbindService(serviceConnection)
    }
}
需要注意的是,调用 unbindService 可能会导致服务关闭。
Service 的设计逻辑是,如果我们调用了 startService 就必须调用 stopService 或者 stopSelf 才能关闭服务,如果我们调用了 bindService 就必须调用 unbindService 才能关闭服务,start 与 stop,bind 与 unbind 必须一一对应。
这意味着,无论是 stopService 还是 unbindService 都未必能准确的关闭服务。
关于服务绑定更多的知识看这里:
https://developer.android.com/guide/components/bound-services?hl=zh-cn
Notification
通过上面的设置之后就可以启动一个服务了,如果你启动的是前台服务且是 Android O 或者之后的版本那么你会收到一个如下的错误:
android.app.RemoteServiceException: Context.startForegroundService() did not then call Service.startForeground()
Android O 对 Service 做了一些限制,用户启动一个前台 Service 时必须在五秒内调用 startForeground() 方法显示一个 Notification 通知,否则会出现上面的 ANR,另外,如果启动之后五秒内未调用 startForeground() 方法就直接关闭该 Service 也会出现上面的 ANR。
这个也是 Android 系统逐渐优化用户体验的一个表现了,前台 Service 本来就是设计为用户可见的服务,所以强制要求必须要显示一个 Notification 给用户看到。
Notification 也就是下拉框里的一个通知视图,这属于 RemoteView 的知识范畴,本文也不多做介绍,只单纯的叙述下跟服务有关的知识点。
显示 Notification 一般分为如下几步。
- 使用 NotificationManager 创建 NotificationChannel
- 调用 Service#startForeground 方法显示 Notification
- 调用 NotificationManager#notify 方法更新 Notification
- 调用 NotificationManager#cancel 方法关闭 Notification
对于 Android O 及之后的版本来说,在显示 Notification 之前必须先使用 NotificationManager 创建 Notification 的唯一标识符。
 /**
  * @param unique 该 Notification 的唯一表示,同一个 package 中的 Notification 不可重复
  * @param name Notification 的名字,可被用户看到
  * @param importance 重要等级,默认为 LOW
  */
@RequiresApi(Build.VERSION_CODES.O)
fun createChannel(context: Context,
                  unique: String,
                  name: String,
                  importance: Int = NotificationManager.IMPORTANCE_LOW) {
    val channel = NotificationChannel(unique, name, importance)
    val service = context.getNotificationManager()
    service.createNotificationChannel(channel)
}
创建好后,我们显示一个默认的 Notification。
val notification = NotificationCompat.Builder(service, channelUnique).build()
//channelId 为 notification 的身份 id
service.startForeground(channelId, notification)
当我们有数据更新时,可以通过上面设置的 channelId 及 notification 更新视图。
service.getNotificationManager().notify(channelId, notification)
在关闭服务时记得一起把这个 notification 关掉:
service?.getNotificationManager()?.cancel(channelId)
显示一个不可见的 Notification
有时候我们希望启动一个前台 Service,但是在必要的时候能隐藏对应的 Notification,这也是有办法的。这里只讨论相关的技术,这么做当然是不合规的,也不提倡,但工作中难免遇到这种奇葩需求。
service.stopForeground(true)
service.startForeground(0, null)
service.getNotificationManager().cancel(channelId)
IntentService
IntentService 用于在子线程中处理一个或者一些任务,会执行以下操作:
- 创建默认的工作线程,用于在应用的主线程外执行传递给 onStartCommand() 的所有 Intent。
- 创建工作队列,用于将 Intent 逐一传递给 onHandleIntent() 实现,这样您就永远不必担心多线程问题。
- 在处理完所有启动请求后停止服务,因此您永远不必调用 stopSelf()。
- 提供 onBind() 的默认实现(返回 null)。
- 提供 onStartCommand() 的默认实现,可将 Intent 依次发送到工作队列和 onHandleIntent() 实现。
创建 IntentService 子类必须实现 onHandleIntent 方法,所有启动该服务的 Intent 都将会被传递给这个方法。然后依次执行。全部执行完毕后结束服务。
class SampleIntentService : IntentService("SampleIntentService") {
  //省略其他代码
  override fun onHandleIntent(intent: Intent?) {
        Log.d("ZK_LOG", "SampleIntentService onHandleIntent(), " +
                "Thread:${Thread.currentThread().name}, " +
                "data:${intent?.getStringExtra("data")}")
        Thread.sleep(2000)
    }
}
欢迎关注我的公众号,还有更多干货。

