分享篇 - 基于 Android 图解 ReactNative 原理
基于 Android 图解 ReactNative 原理,深度好文。(编写中...)
目录:
- RN 的优点和缺陷
- RN 的启动流程
- Java、Js 的调用流程
1. RN 的优点和缺陷
优点:
- 最大的优点是合理简单不具备黑科技的热更新能力和媲美 Native 般的 UI 体验;
- 对比原生开发更为灵活,对比 H5 体验更为高效;
- 多个版本迭代后的今天,它已经拥有了丰富的第三方插件支持。
缺点:
- 底层需要大量的 Native(Android & Ios) 开发工作量来做封装和定制,并且涉及到接口方面的修改仍然需要 Native 发版;
- 相对增大了 App 的体积;
- Android 上的兼容性问题;
- 整体体验还是不如原生,特别是依赖于 JsBridge 的频繁交互;
- 转输大数据慢:如图像的 base64 字符串信息;
- 无线同步通信:通信都是异步;
- Js Thread 帧率低:Js 解释执行,同时需要执行业务逻辑与 diff 操作,在低端手机里,快速滑动时,掉帧严重。
2. RN 的启动流程
使用 RN 有两种方式:
继承 ReactActivity 或者通过 ReactRootView 进行处理,这两种方式最终都会触发 ReactRootView 的 startReactApplication(), 所以可以从这个函数作为 RN 启动流程的切入点。
先来看段 ReactActivity 使用的代码片段:
    public class MainActivity extends ReactActivity {

        @Override
        protected ReactActivityDelegate createReactActivityDelegate() {
            return new MyReactDelegate(this, getMainComponentName());
        }

        class MyReactDelegate extends ReactActivityDelegate {

            MyReactDelegate(Activity activity, @javax.annotation.Nullable String mainComponentName) {
                super(activity, mainComponentName);
            }

            //...
        }
    }
为了方便统一,我们从 ReactActivityDelegate 开始入手。
2.1 ReactActivityDelegate
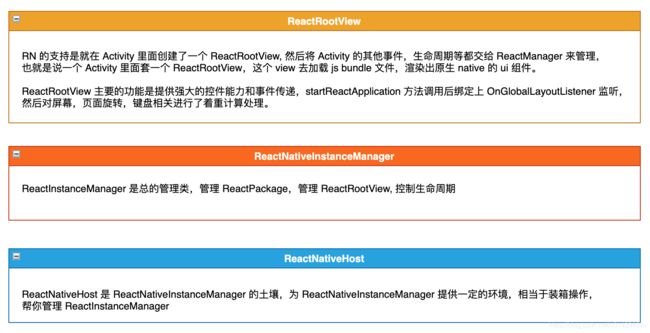
ReactActivityDelegate 中有几个角色:
再来看看 ReactActivityDelegate 的代码:
public class ReactActivityDelegate {


    public ReactActivityDelegate(Activity activity, @Nullable String mainComponentName) {
        // 构造器,传入 Activity 与 mainComponentName 名称
    }

    public ReactActivityDelegate(FragmentActivity fragmentActivity, @Nullable String mainComponentName) {
        // 构造器,传入 FragmentActivity 与 mainComponentName 名称
    }

    @Nullable
    protected Bundle getLaunchOptions() {
        return null;
    }

    protected ReactRootView createRootView() {
        // 构建 ReactRootView
        return new ReactRootView(this.getContext());
    }

    protected ReactNativeHost getReactNativeHost() {
        // 获取 ReactNativeHost
        return ((ReactApplication)this.getPlainActivity().getApplication()).getReactNativeHost();
    }

    public ReactInstanceManager getReactInstanceManager() {
        // 获取 ReactInstanceManager
        return this.getReactNativeHost().getReactInstanceManager();
    }

    protected void onCreate(Bundle savedInstanceState) {
        if (this.mMainComponentName != null) {
            this.loadApp(this.mMainComponentName);
        }
        // ...
    }

    protected void loadApp(String appKey) {
        if (this.mReactRootView != null) {
            throw new IllegalStateException("Cannot loadApp while app is already running.");
        } else {
            // 创建 ReactRootView
            this.mReactRootView = this.createRootView();
            // ReactRootView.startReactApplication
this.mReactRootView.startReactApplication(this.getReactNativeHost().getReactInstanceManager(), appKey, this.getLaunchOptions());
            // 将 ReactRootView 设置为 Activity 的 contentView
            this.getPlainActivity().setContentView(this.mReactRootView);
        }
    }

    protected void onPause() {
        if (this.getReactNativeHost().hasInstance()) {
            // 将 onPause 交给 ReactInstanceManager 去管理
this.getReactNativeHost().getReactInstanceManager().onHostPause(this.getPlainActivity());
        }
    }

    protected void onResume() {
        // 将 onPause 交给 ReactInstanceManager 去管理
    }

    protected void onDestroy() {
       // 将 onDestroy 交给 ReactInstanceManager 去管理
    }

    public void onActivityResult(int requestCode, int resultCode, Intent data) {
       // 将 onActivityResult 交给 ReactInstanceManager 去管理
    }

    public boolean onKeyDown(int keyCode, KeyEvent event) {
      // 将 onKeyDown 交给 ReactInstanceManager 去管理
    }

    public boolean onKeyUp(int keyCode, KeyEvent event) {
      // 将 onKeyUp 交给 ReactInstanceManager 去管理
    }

    public boolean onKeyLongPress(int keyCode, KeyEvent event) {
      // 将 onKeyLongPress 交给 ReactInstanceManager 去管理
    }

    public boolean onNewIntent(Intent intent) {
      // 将 onNewIntent 交给 ReactInstanceManager 去管理
    }
}
从上述代码可以看的,ReactActivityDelegate 其实做的事情很简单:
2.2 ReactRootView
ReactRootView 的真身为 FrameLayout, 我们着重来看下上面的 startReactApplication().
    public void startReactApplication(ReactInstanceManager reactInstanceManager, String moduleName, @Nullable Bundle initialProperties) {
        try {
            // 必须运行在主线程
            UiThreadUtil.assertOnUiThread();
            this.mReactInstanceManager = reactInstanceManager;
            this.mJSModuleName = moduleName;
            this.mAppProperties = initialProperties;

            // 如果没有初始化 ReactContext,则异步创建 ReactContext
            if (!this.mReactInstanceManager.hasStartedCreatingInitialContext()) {
                this.mReactInstanceManager.createReactContextInBackground();
            }

            // 和 ReactRootView 绑定在一起
            this.attachToReactInstanceManager();
        } finally {
            Systrace.endSection(0L);
        }

}- ReactInstanceManager: 大内总管接口类,提供一个构造者模式的初始化 Builder,实现类是 XReactInstanceManagerImpl,这类也是我们在集成 RN 时 new ReactRootView 的之前自己创建的。
- moduleName: 与 JS 代码约定的 String 类型识别 name,JS 端通过 AppRegistry.registerComponent 方法设置这个 name,Java 端重写基类的 getMainComponentName 方法设置这个 name,这样两边入口就对上了。
- launchOptions: 这里默认是 null 的,如果自己不继承 ReactActivity 而自己实现的话可以通过这个参数在 startActivity 时传入一些参数到 JS 代码,用来依据参数初始化 JS 端代码。
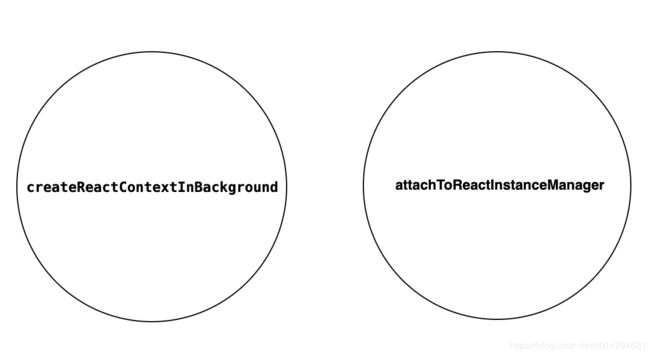
startReactApplication 中主要做了两件事:
# ReactInstanceManager.createReactContextInBackground()
@ThreadConfined("UI")
    private void recreateReactContextInBackgroundInner() {
        UiThreadUtil.assertOnUiThread();
        // ...

        final DeveloperSettings devSettings = this.mDevSupportManager.getDevSettings();
        // 如果是 dev 模式,BuildConfig.DEBUG=true 就走这里,在线更新 bundle,手机晃动出现调试菜单等
        if (this.mDevSupportManager.hasUpToDateJSBundleInCache() && !devSettings.isRemoteJSDebugEnabled()) {
            this.onJSBundleLoadedFromServer((NativeDeltaClient)null);
        } else if (this.mBundleLoader == null) {
            this.mDevSupportManager.handleReloadJS();
        } else {
            this.mDevSupportManager.isPackagerRunning(new PackagerStatusCallback() {
                public void onPackagerStatusFetched(final boolean packagerIsRunning) {
                    UiThreadUtil.runOnUiThread(new Runnable() {
                        public void run() {
                            if (packagerIsRunning) {
                                ReactInstanceManager.this.mDevSupportManager.handleReloadJS();
                            } else {
                                devSettings.setRemoteJSDebugEnabled(false);
                                // recreateReactContextInBackgroundFromBundleLoader
                                ReactInstanceManager.this.recreateReactContextInBackgroundFromBundleLoader();
                            }

                        }
                    });
                }
            });
        }
    }
@ThreadConfined("UI")
private void recreateReactContextInBackgroundFromBundleLoader() {
Log.d("ReactNative", "ReactInstanceManager.recreateReactContextInBackgroundFromBundleLoader()");
PrinterHolder.getPrinter().logMessage(ReactDebugOverlayTags.RN_CORE, "RNCore: load from BundleLoader");
this.recreateReactContextInBackground(this.mJavaScriptExecutorFactory, this.mBundleLoader);
}注意这个 mBundleLoader: 自定义热更新时 setJSBundleFile 方法参数就是巧妙的利用这里是 JSBundleLoader.createAssetLoader还是 JSBundleLoader.createFileLoader.
最终调用到 runCreateReactContextOnNewThread(),在子线程中创建 ReactContext(继承于 Context):
@ThreadConfined("UI")
    private void runCreateReactContextOnNewThread(final ReactInstanceManager.ReactContextInitParams initParams) {
        UiThreadUtil.assertOnUiThread();
        synchronized(this.mReactContextLock) {
            if (this.mCurrentReactContext != null) {
                this.tearDownReactContext(this.mCurrentReactContext);
                this.mCurrentReactContext = null;
            }
        }

        this.mCreateReactContextThread = new Thread(new Runnable() {
            public void run() {
                // ...
                ReactInstanceManager.this.mHasStartedCreatingInitialContext = true;
                try {
                    // 调用 createReactContext()
                    final ReactApplicationContext reactApplicationContext = ReactInstanceManager.this.createReactContext(initParams.getJsExecutorFactory().create(), initParams.getJsBundleLoader());
                    // ...
                    Runnable setupReactContextRunnable = new Runnable() {
                        public void run() {
                            try {
                                // 调用 setupReactContext()
                                ReactInstanceManager.this.setupReactContext(reactApplicationContext);
                            } catch (Exception var2) {
                                ReactInstanceManager.this.mDevSupportManager.handleException(var2);
                            }

                        }
                    };
                    reactApplicationContext.runOnNativeModulesQueueThread(setupReactContextRunnable);
                } catch (Exception var4) {
                }

            }
        });
        this.mCreateReactContextThread.start();
    }
runCreateReactContextOnNewThread() 中的两个重点:
- createReactContext()
- setupReactContext()
private ReactApplicationContext createReactContext(JavaScriptExecutor jsExecutor, JSBundleLoader jsBundleLoader) {
        // ......
        // 默认不就是上面刚刚分析的 "assets://" + bundleAssetName 么
        mSourceUrl = jsBundleLoader.getSourceUrl();
        List moduleSpecs = new ArrayList<>();
        Map reactModuleInfoMap = new HashMap<>();
        // Js 层模块注册表,通过它把所有的 JavaScriptModule 注册到 CatalystInstance。我们自定义的继承 JavaScriptModule 接口的 Java 端也是通过它来管理。
        JavaScriptModuleRegistry.Builder jsModulesBuilder = new JavaScriptModuleRegistry.Builder();
        // ContextWrapper 封装类,其实就是 getApplicationContext 的封装,用在 ReactContext 中
        final ReactApplicationContext reactContext = new ReactApplicationContext(mApplicationContext);
        // 如果是开发模式下 ReactApplicationContext 中有崩溃就捕获后交给 mDevSupportManager 处理(出错时弹个红框啥玩意的都是这货捕获的功劳)
        if (mUseDeveloperSupport) {
            // mDevSupportManager 实例对象来源于 XReactInstanceManagerImpl 构造方法中一个工厂方法,实质由 useDeveloperSupport 决定 DevSupportManager 是哪个实例
            // 非开发模式情况下 mDevSupportManager 为 DisabledDevSupportManager 实例,开发模式下为 DevSupportManagerImpl 实例
            reactContext.setNativeModuleCallExceptionHandler(mDevSupportManager);
        }
        // ......
        try {
            // 创建 CoreModulesPackage(ReactPackage),RN framework 的核心 Module Package,主要通过 createNativeModules、createJSModules 和 createViewManagers 等方法创建本地模块,JS 模块及视图组件等
            //CoreModulesPackage封装了通信、调试等核心类。
            CoreModulesPackage coreModulesPackage = new CoreModulesPackage(this, mBackBtnHandler, mUIImplementationProvider);
            // 拼装来自 coreModulesPackage 的各种 module 了,JS 的直接 add 进了 jsModulesBuilder 映射表、Native 的直接保存在了 moduleSpecs、reactModuleInfoMap 中
            processPackage(
                coreModulesPackage,
                reactContext,
                moduleSpecs,
                reactModuleInfoMap,
                jsModulesBuilder);
        } finally {
            Systrace.endSection(TRACE_TAG_REACT_JAVA_BRIDGE);
        }
        // 加载我们自定义的 ReactPackage,譬如自己封装的和 MainReactPackage 等,mPackages 就来源于我们自己定义的;整个过程同上 CoreModulesPackage,进行各种拼装 module
        for (ReactPackage reactPackage : mPackages) {
            Systrace.beginSection(
                TRACE_TAG_REACT_JAVA_BRIDGE,
                "createAndProcessCustomReactPackage");
            try {
                processPackage(
                    reactPackage,
                    reactContext,
                    moduleSpecs,
                    reactModuleInfoMap,
                    jsModulesBuilder);
            } finally {
                Systrace.endSection(TRACE_TAG_REACT_JAVA_BRIDGE);
            }
        }
        // Java 层模块注册表,通过它把所有的 NativeModule 注册到 CatalystInstance。我们自定义的继承 NativeModule 接口的 Java 端也是通过它来管理
        NativeModuleRegistry nativeModuleRegistry;
        try {
            // new 一 个NativeModuleRegistry,其管理了 NativeModule 和 OnBatchCompleteListener 列表(JS 调用 Java 结束时的回调管理)
            nativeModuleRegistry = new NativeModuleRegistry(moduleSpecs, reactModuleInfoMap);
        } finally {
            Systrace.endSection(TRACE_TAG_REACT_JAVA_BRIDGE);
            ReactMarker.logMarker(BUILD_NATIVE_MODULE_REGISTRY_END);
        }
        // 依据外面是否设置 mNativeModuleCallExceptionHandler 异常捕获实现来决定 exceptionHandler 是使用外面的还是DevSupportManager
        NativeModuleCallExceptionHandler exceptionHandler = mNativeModuleCallExceptionHandler != null
            ? mNativeModuleCallExceptionHandler
            : mDevSupportManager;
        // 重点创建 CatalystInstance 的 CatalystInstanceImpl 实现实例
        CatalystInstanceImpl.Builder catalystInstanceBuilder = new CatalystInstanceImpl.Builder()
            .setReactQueueConfigurationSpec(ReactQueueConfigurationSpec.createDefault())
            .setJSExecutor(jsExecutor)
            .setRegistry(nativeModuleRegistry)
            .setJSModuleRegistry(jsModulesBuilder.build())
            .setJSBundleLoader(jsBundleLoader)
            .setNativeModuleCallExceptionHandler(exceptionHandler);

        final CatalystInstance catalystInstance;
        try {
            catalystInstance = catalystInstanceBuilder.build();
        } finally {
            Systrace.endSection(TRACE_TAG_REACT_JAVA_BRIDGE);
            ReactMarker.logMarker(CREATE_CATALYST_INSTANCE_END);
        }

        if (mBridgeIdleDebugListener != null) {
            catalystInstance.addBridgeIdleDebugListener(mBridgeIdleDebugListener);
        }
        // 关联 reactContext 与 catalystInstance
        reactContext.initializeWithInstance(catalystInstance);
        // 通过 catalystInstance 加载 js bundle 文件
        catalystInstance.runJSBundle();

        return reactContext;
    }
总的来说 createReactContext() 方法做的都是一些取数据组表放表的过程,核心就是通过 ReactPackage 实现类的 createNativeModules()、createJSModules() 等方法把所有 NativeModule 包装后放入 NativeModuleRegistry 及 JavaScriptModule 包装后放入 JavaScriptModuleRegistry,然后把这两张映射表交给 CatalystInstanceImpl,同时包装创建 ReactContext 对象,然后通过 CatalystInstanceImpl 的 runJSBundle() 方法把 JS bundle 文件的 JS 代码加载进来等待 Task 结束以后调用 JS 入口进行渲染 RN.
既然上面涉及到了 CatalystInstanceImpl, 我们来简单看一下 CatalystInstanceImpl:
public class CatalystInstanceImpl implements CatalystInstance {
        // C++ 部分
        private final HybridData mHybridData;
        private native static HybridData initHybrid();

        private CatalystInstanceImpl(
            final ReactQueueConfigurationSpec ReactQueueConfigurationSpec,
            final JavaScriptExecutor jsExecutor,
            final NativeModuleRegistry registry,
            final JavaScriptModuleRegistry jsModuleRegistry,
            final JSBundleLoader jsBundleLoader,
            NativeModuleCallExceptionHandler nativeModuleCallExceptionHandler) {
            // native C++ 方法,用来初始化 JNI 相关状态然后返回 mHybridData。
            mHybridData = initHybrid();
            // 创建 ReactNative 的三个线程 nativeModulesThread 和 jsThread、uiThread,都是通过 Handler 来管理的
            mReactQueueConfiguration = ReactQueueConfigurationImpl.create(ReactQueueConfigurationSpec, new NativeExceptionHandler());
            mBridgeIdleListeners = new CopyOnWriteArrayList<>();
            mJavaRegistry = registry;
            mJSModuleRegistry = jsModuleRegistry;
            mJSBundleLoader = jsBundleLoader;
            mNativeModuleCallExceptionHandler = nativeModuleCallExceptionHandler;
            // native C++ 方法,用来初始化 Bridge
            initializeBridge(new BridgeCallback(this), jsExecutor,
                mReactQueueConfiguration.getJSQueueThread(),
                mReactQueueConfiguration.getNativeModulesQueueThread(),
                mJavaRegistry.getModuleRegistryHolder(this));
            mMainExecutorToken = getMainExecutorToken();
        }

        private native void initializeBridge(ReactCallback callback,
            JavaScriptExecutor jsExecutor,
            MessageQueueThread jsQueue,
            MessageQueueThread moduleQueue,
            ModuleRegistryHolder registryHolder);
            // ...
        }

        //  initializeBridge 建立了 Bridge 连接
        private native void initializeBridge(ReactCallback var1, JavaScriptExecutor var2, MessageQueueThread var3, MessageQueueThread var4, Collection var5, Collection var6);
    }
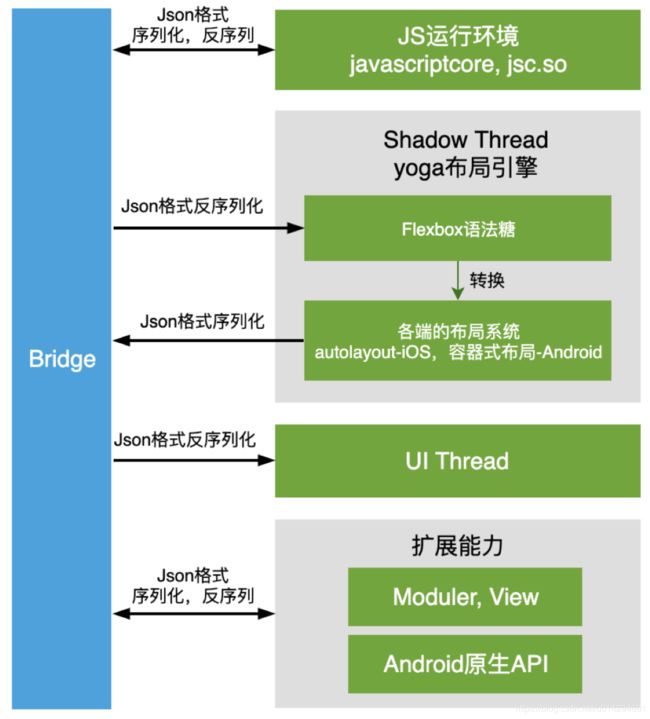
CatalystInstanceImpl 就是个封装总管,负责了 Java 层代码到 JNI 封装初始化的任务和 Java 与 JS 调用的 Java 端控制中心,initializeBridge 与 JsBridge 建立了连接。注意里面创建了 ReactNative 的三个线程 nativeModulesThread 和 jsThread、uiThread,这边来简单说下 RN 的三个线程:
- UI Thread:Native 的 UI 渲染。
- Shadow Thread:yoga 引擎,基于 flexbox 的语法糖转换为各端的扁平化框架。
- Javascript Thread:React 执行环境,业务逻辑与 diff 操作执行环境。
再来看下 setupReactContext():
  private void setupReactContext(ReactApplicationContext reactContext) {
    ......
    CatalystInstance catalystInstance =
        Assertions.assertNotNull(reactContext.getCatalystInstance());
    // 执行 Native Java Module 的 initialize
    catalystInstance.initialize();
    // 重置 DevSupportManager 实现类的 reactContext 相关
    mDevSupportManager.onNewReactContextCreated(reactContext);
    // 内存状态回调设置
    mMemoryPressureRouter.addMemoryPressureListener(catalystInstance);
    // 置位生命周期
    moveReactContextToCurrentLifecycleState();
    // 核心方法
    for (ReactRootView rootView : mAttachedRootViews) {
      attachMeasuredRootViewToInstance(rootView, catalystInstance);
    }
    ......
  }
最后,我们来总结一下 RN 的启动流程:
3. Java、Js 的调用流程
参考链接:
https://blog.csdn.net/yanbober/article/details/53157456


