Python基础学习笔记(5)
《Python编程快速上手》
Python读写文件
文件夹/文件常用操作:
#1.获取当前文件目录
os.getcwd()
'C:\\python\\py-demo'

#2.切换文件目录
os.chdir('C:\Windows\System32')
os.getcwd()
>>C:\Windows\System32

#3.新建文件夹(与os.makedirs()作用相同)
os.mkdir('test-dir02')
或
path1 = os.path.join(os.getcwd(),'test-dir')
os.mkdir(path1)

#4.拼接文件夹路径
os.path.join('usr','bin','spam')
>>'usr\\bin\\spam'

#5.得到当前文件夹下的所有文件和文件夹
os.listdir()
>>['.idea', 'test-dir', 'test01.py', 'test02.py', 'test03.py', 'test04.py']

#6.检查是否是文件/文件夹
print(os.path.isfile(' '))
print(os.path.isdir(' '))

#7.检查文件路径是否存在
print(os.path.exists(''))
1.处理绝对路径和相对路径
绝对路径和相对路径
os.path模块提供了一些函数,返回一个相对路径的绝对路径,以及检查给定的路径是否为绝对路径。
1.os.path.abspath(path)将返回参数的绝对路径的字符串。
os.path.abspath('.')
>> 'C:\\Pyth34'

2.os.path.isbas(path),如果参数是一个绝对路径,就返回True。
os.path.isabs('.')
>>True
os.path.isabs(os.path.abspath('.'))
>>True
2.路径替换
os.path.replace(path,start)将返回从start路径到path的相对路径的字符串。
如果没有提供start,就使用当前工作目录为开始路径。
os.path.relpath('C:\\Windows','C:\\')
>>'C:\\Windows'
3.返回目录名称和基本名称
调用os.path.dirname(path)将返回一个字符串,它包含path参数中最后一个斜杠之前的所有内容。
调用os.path.basename(path)将返回一个字符串,它包含path参数中最后一个斜杠之后的所有内容。
path1 = 'C:\\Windows\\System32\\cal.exe'
os.path.basename(path1)
>> 'cal.exe'
os.path.dirname(path1)
>> 'C:\\Windows\\System32'如果同时需要一个路径的目录名称和基本名称,就可以调用os.path.split(),获得这两个字符串的元组。
path1 = 'C:\\Windows\\System32\\cal.exe'
os.path.split(path)
>>('C:\\Windows\\System32','cal.exe')如果需要返回每个文件夹的字符串列表,可以与pathname.split(os.path.sep)
path1 = 'C:\\Windows\\System32\\cal.exe'
path1.split(os.path.sep)
>>['C:','Windows','System32','cal.exe']
4.查看文件大小和文件夹内容
os.path.getsize(path)将返回path参数中文件的字节数
os.path.getsize('C:\\Windows\\System32\\cal.exe')
>> 776192
os.listdir(path)将返回文件/文件夹字符串的列表
os.listdir()
>> ['.idea',
 'test-dir',
 'test-dir02',
 'test-dir03',
 'test-dir04',
 'test01.py',
 'test02.py',
 'test03.py',
 'test04.py']
如果想知道这个目录下所有文件/文件夹的总字节数,可以使用遍历和os.path.getsize()和os.path.listdir()。
totalSize = 0
for filename in os.listdir('C:\\Windows\\System32\\cal.exe'):
    totalSize = totalSize + os.path.getsize(os.path.join('C:\\Windows\\System32',filename))

print(totalSize)
>> 111784656
5.检查路径有效性
os.path.exists(path)检查路径(文件/文件夹)是否存在。
os.path.isFile(path)检查是否是一个文件。
os.path.isdir(path)检查是否是一个文件夹。
os.path.exists('C:\\Windows')
>>True
os.path.isFile('C:\\Windows\\System32\\cal.exe')
>>True
os.path.iddir('C:\\Windows\\System32')
>>True
6.文件读写过程
open()打开文件
在Python中,只读模式是默认的模式。比如open(‘hello.txt’)将以读取纯文本的模式打开文件,或简称为“读模式”,你不能以任何方式写入或修改它。
helloFile = open('hello.txt')调用open()将返回一个File对象。如果你需要读取或写入该文件,就可以调用File对象的方法了。
read()读取文件内容
既然有了一个File对象,就可以开始从它读取内容了。
helloContent = helloFile.read()
>>'Hello World!'
或者使用readlines()方法,从该文件中取得一个字符串的列表。
helloFile = open('C:\\python\\py-demo\\test-dir\\123.txt')
helloFile.readlines()
>> ['12\n','ddsahf\n','dakds\n','jfhka\n','jhfadl\n']
write()写入文件
baconFile = open('bacon.txt','w')
baconFile.write('Hello World!\n')
baconFile.close()

baconFile = open('bacon.txt','a')
baconFile.write('Bacon is not a vegetable.')
baconFile.close()

baconFile = open('bacon.txt')
content = baconFile.read()
baconFile.close()

print(content)
>>Hello World!
Bacon is not a vegetable.
附注:
1.open时候选择’w’还是’a’,’w’时是擦除之前文件的所有内容,’a’是在之前的文件上面添加。
2.write()方法不会像print()函数那样,在字符串的末尾自动添加换行字符。必须自己添加该字符。
7.用shelve模块保存变量
shelve类似于一个存储持久化对象的持久化字典,即字典文件。
#1.利用shelve模型写入数据
shelfFile = shelve.open('123.txt')
cats = ['Zohie','Pooka','Simon']
shelfFile['cats'] = cats
shelfFile.close()

#2.利用shelve模型读取数据
shelfFile = shelve.open('123.txt')
shelfFile['cats']
>>['Zohie', 'Pooka', 'Simon']
shelfFile.close()

$3.返回shelf中的键和值的序列的值
shelfFile = shelve.open('123.txt')
list(shelfFile.keys())
>> ['cats']

list(shelfFile.values())
>>[['Zohie', 'Pooka', 'Simon']]
shelfFile.close()
用pprint-pformat()函数保存变量
8.Python组织文件
组织文件:复制、改名、移动、删除、压缩等等。
shutil模型,让你在Python程序中复制、移动、改名和删除文件。
复制文件和文件夹
shutil.copy(source,destination),将路径source处的文件复制到路径destination处的文件夹。
如果destination是一个文件名,它将作为被复制文件的新名字。
该函数返回新位置的绝对路径的字符串。
import shutil,os
os.chdir('C:\\')

shutil.copy('C:\\spam.txt','C:\\delicious')
>>C:\\delicious\\spam.txt

shutil.copy('eggs.txt','C:\\delicious\\eggs2.txt')
>>'C:\\delicious\\eggs2.txt'
shutil.copytree(source,destination)将复制整个文件夹,以及它包括的文件夹和文件。将路径source处的文件夹,包括它所有文件夹和子文件夹,复制到路径destination处的文件夹。
shutil.copytree('C:\\bacon','C:\\bacon_backup')文件和文件夹的移动和改名
shutil.copy(source,destination),如果destination指向一个文件夹,source文件将移动到destination中,并保存原来的文件名。
#1.destination是文件夹时,会把txt文件移动到文件夹中。若存在同名,则覆盖
shutil.move('C:\\python\\py-demo\\test-dir\\321.txt','C:\\python\\py-demo\\test-dir02')
>> 'C:\\python\\py-demo\\test-dir02\\321.txt'

#2.destination是文件时,有可能进行改名
shutil.move('C:\\python\\py-demo\\test-dir\\321.txt','C:\\python\\py-demo\\test-dir01\\123.txt')
如果copy()或move()destination不存在该文件夹,会自动新建该名称对应的文件,而不是文件夹。
shutil.copy('C:\\python\\py-demo\\test-dir\\321.txt','C:\\python\\py-demo\\test-dir05')
>>'C:\\python\\py-demo\\test-dir05'

shutil.move('C:\\python\\py-demo\\test-dir\\321.txt','C:\\python\\py-demo\\test-dir06')
>>'C:\\python\\py-demo\\test-dir06'

open()中如果参数对应文件不存在,会自动创建对应文件。
baconFile = open('bacon.txt','w')9.Python删除文件和文件夹
os.unlink(path)删除path处的文件。 os.remove(path)类似功能。
os.rmdir(path)将删除path处的文件夹。 os.removedirs(path)类似功能。
shutil.rmtree(path)将删除path处的文件夹,它包含的所有文件和文件夹都会被删除。
os.remove('123.txt')
os.unlink('123.txt')

os.rmdir('test-dir')
os.removedirs('test-dir')

shultil.retree('test-dir')
用send2trash模块安全地删除
Python的内建shutil.rmtree()函数不可恢复地删除文件和文件夹,所以可能有危险。
send2trash模块删除时,会把文件夹和文件发送到垃圾箱或回收站,而不是永久删除它们。
import send2trash
send2trash.send2trash('bacon.txt')
10.遍历目录树
os.walk的参数如下:
os.walk(top,topdown=True,οnerrοr=None,followlinks=False)
其中:
- top是要遍历的目录。
- topdown是代表要从上而下还是从下而上遍历。
- onerror可以用来设置当便利出现错误的处理函数(该函数接受一个OSError的实例作为参数),设置为空则不作处理。
- followlinks表示是否要跟随目录下的链接去继续遍历,要注意的是,os.walk不会记录已经遍历的目录,所以跟随链接遍历的话有可能一直循环调用下去。
os.walk返回的是一个3个元素的元组 (root, dirs, files) ,分别表示遍历的路径名,该路径下的目录列表和该路径下文件列表。注意目录列表和文件列表不是具体路径,需要具体路径(从root开始的路径)的话可以用 os.path.join(root,dir) 和 os.path.join(root,dir) 。
假设现在存在如下的文件和目录结构:
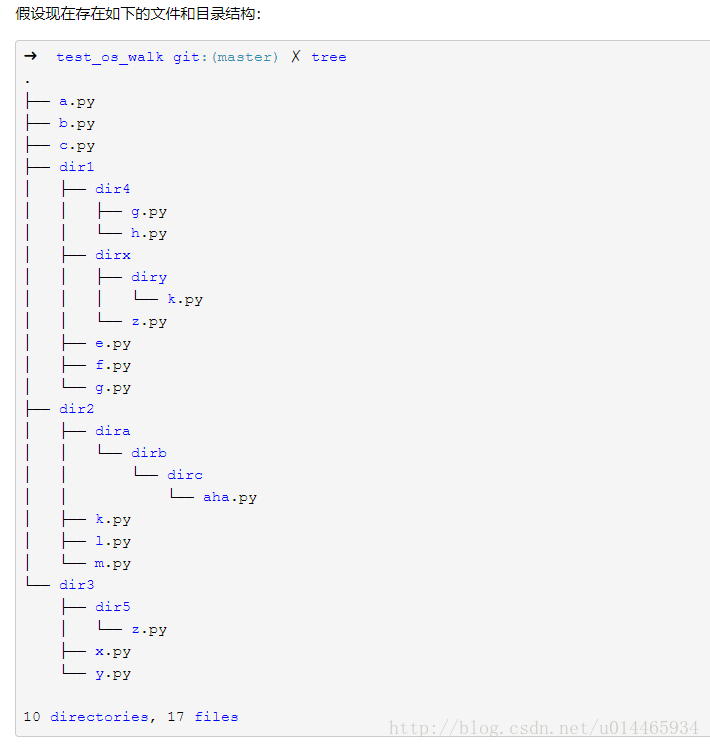
import os

path = '/Users/nisen/Projects/python_advanced_class/test/test_os_walk'

for root, dirs, files in os.walk(path, True):
    print 'root: %s' % root
    print 'dirs: %s' % dirs
    print 'files: %s' % files
    print ''
结果如下,从root的路径可以看出遍历是自上而下的:
root: /Users/nisen/Projects/python_advanced_class/test/test_os_walk
dirs: ['dir1', 'dir2', 'dir3']
files: ['a.py', 'b.py', 'c.py']

root: /Users/nisen/Projects/python_advanced_class/test/test_os_walk/dir1
dirs: ['dir4', 'dirx']
files: ['e.py', 'f.py', 'g.py']

root: /Users/nisen/Projects/python_advanced_class/test/test_os_walk/dir1/dir4
dirs: []
files: ['g.py', 'h.py']

root: /Users/nisen/Projects/python_advanced_class/test/test_os_walk/dir1/dirx
dirs: ['diry']
files: ['z.py']

root: /Users/nisen/Projects/python_advanced_class/test/test_os_walk/dir1/dirx/diry
dirs: []
files: ['k.py']

root: /Users/nisen/Projects/python_advanced_class/test/test_os_walk/dir2 dirs: ['dira'] files: ['k.py', 'l.py', 'm.py'] root: /Users/nisen/Projects/python_advanced_class/test/test_os_walk/dir2/dira dirs: ['dirb'] files: [] root: /Users/nisen/Projects/python_advanced_class/test/test_os_walk/dir2/dira/dirb dirs: ['dirc'] files: [] root: /Users/nisen/Projects/python_advanced_class/test/test_os_walk/dir2/dira/dirb/dirc dirs: [] files: ['aha.py'] root: /Users/nisen/Projects/python_advanced_class/test/test_os_walk/dir3 dirs: ['dir5'] files: ['x.py', 'y.py'] root: /Users/nisen/Projects/python_advanced_class/test/test_os_walk/dir3/dir5 dirs: [] files: ['z.py']
而当设置os.walk的topdown为False时,结果如下, 可以看出他是自下而上遍历的:
root: /Users/nisen/Projects/python_advanced_class/test/test_os_walk/dir1/dir4
dirs: []
files: ['g.py', 'h.py']

root: /Users/nisen/Projects/python_advanced_class/test/test_os_walk/dir1/dirx/diry
dirs: []
files: ['k.py']

root: /Users/nisen/Projects/python_advanced_class/test/test_os_walk/dir1/dirx
dirs: ['diry']
files: ['z.py']

root: /Users/nisen/Projects/python_advanced_class/test/test_os_walk/dir1
dirs: ['dir4', 'dirx']
files: ['e.py', 'f.py', 'g.py']

root: /Users/nisen/Projects/python_advanced_class/test/test_os_walk/dir2/dira/dirb/dirc
dirs: []
files: ['aha.py']

root: /Users/nisen/Projects/python_advanced_class/test/test_os_walk/dir2/dira/dirb dirs: ['dirc'] files: [] root: /Users/nisen/Projects/python_advanced_class/test/test_os_walk/dir2/dira dirs: ['dirb'] files: [] root: /Users/nisen/Projects/python_advanced_class/test/test_os_walk/dir2 dirs: ['dira'] files: ['k.py', 'l.py', 'm.py'] root: /Users/nisen/Projects/python_advanced_class/test/test_os_walk/dir3/dir5 dirs: [] files: ['z.py'] root: /Users/nisen/Projects/python_advanced_class/test/test_os_walk/dir3 dirs: ['dir5'] files: ['x.py', 'y.py'] root: /Users/nisen/Projects/python_advanced_class/test/test_os_walk dirs: ['dir1', 'dir2', 'dir3'] files: ['a.py', 'b.py', 'c.py']
10.用zipfile模块压缩文件
利用zipfile模块中的函数,Python程序可以创建、打开或解压ZIP文件。
读取ZIP文件
import zipfile,os
#创建一个ZipFile对象
exampleZip = zipfile.ZipFile('example.zip')

#1.使用namelist()方法,返回ZipFile对象中所有文件和文件夹的 字符串的列表
exampleZip.namelist()
>>['spam.txt','cats/','cats/catnames','cats/zophie.jpg']

#2.ZipFile对象的 getinfo('') 获取ZipInfo对象(这个对象是针对zip中的每一个具体文件的)
spamInfo = exampleZip.getinfo('spam.txt')
ZipFile对象表示整个文档,而ZipInfo对象则保存该归档文件中每个文件的有用信息。
#ZipInfo对象 的 file_size 属性
spamInfo.file_size
>> 13908
#ZipInfo对象 的 compress_size 属性
spamInfo.compress_size
>> 3828
从ZIP文件中解压缩
ZipFile对象的 extractall()方法从ZIP文件中解压缩所有文件和文件夹,放到当前工作目录中。
import zipfile,os
#创建一个ZipFile对象
exampleZip = zipfile.ZipFile('example.zip')

#1.解压缩ZIP文件中所有的文件和文件夹
exampleZip.extractall()
#2.指定解压的文件夹路径
exampleZip.extractall('C:\python\py-demo\zip')

#解压单个文件
exampleZip.extra('spam.txt')
#解压单个文件夹到指定文件夹
exampleZip.extra('spam.txt','C:\\some\\new\folders')

exampleZip.close()
附注,关于extract()方法解压单个文件。
exampleZip = zipfile.ZipFile('py-demo.zip')
exampleZip.namelist()
['py-demo/', 'py-demo/123.txt', 'py-demo/test01.py']

exampleZip.extract('py-demo/123.txt')
>>'C:\\python\\py-demo\\py-demo\\123.txt'
exampleZip.extract(‘py-demo/123.txt’)解压单个文件,并把解压出来的目录进行返回,也就是解压到了’C:\python\py-demo\py-demo\123.txt’。
创建和添加到Zip文件
要创建你自己的压缩ZIP文件,必须以“写模式”打开ZipFile对象,即传入’w’作为第二个参数。
write
import zipfile
#1.创建ZipFile对象,且指定是“写模式”
newZip = zipfile.ZipFile('new.zip','w')
#指定压缩文件的目录
newZip = zipfile.ZipFile('C:\\python\\py-demo\\zip\\new.zip','w')

#2.write()方法第一个参数是指要添加的文件名,第二个参数是“压缩类型”
newZip.write('spam.txt',compress_type=zipfile.ZIP_DEFLATED)
#压缩文件夹
newZip.write('C:\python\py-demo',compress_type=zipfile.ZIP_DEFLATED)

newZip.close()