1.工具类(CameraManager)
一个自定义照相机的工具类你可能需要以下功能:
这个工具类看起来可能是这样的:
- 用户相机授权检测
+ (BOOL)checkAuthority;
- 通过一个自定义视图初始化
- (instancetype)initWithCameraCustomView:(UIView *)customView;
- 拍照结束的照片返回可以是代理或者block
- (void)takePhotoWithImageBlock:(void(^)(UIImage *originImg, NSError *error))imageBlock;
- 开始/结束拍照
  - (void)startCamera;
  - (void)stopCamera;
- 闪光灯、聚焦、缩放、前后摄像头切换、照片裁剪加工等等
自定义相机的实现基于AVFoundation框架
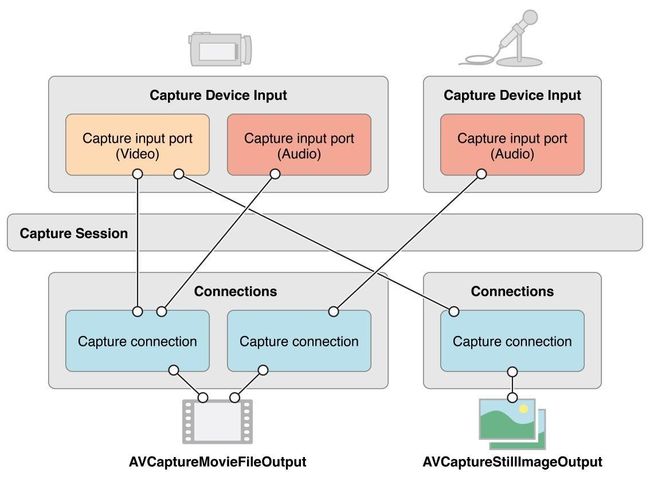
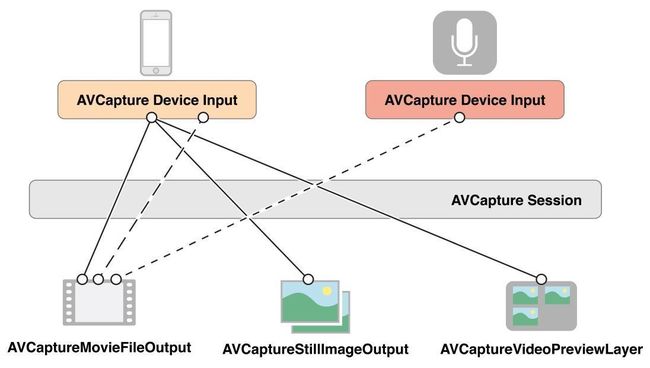
1.AVCaptureSession
自定义相机的核心类,主要用于建立输入流和输出流之间的联系。
你需要实现以下基本方法:
 - (void)addInput:(AVCaptureInput *)input;    // 添加输入设备
 - (void)addOutput:(AVCaptureOutput *)output;  // 添加输出设备
 - (void)startRunning;   // 开始拍照
 - (void)stopRunning;  // 结束拍照
再添加设备之前以下方法应该对你会有帮助
 - (BOOL)canAddInput:(AVCaptureInput *)input
 - (BOOL)canAddOutput:(AVCaptureOutput *)output;
同上,调用拍照方法前请检查相机连接设备,可能是这样的
 - (AVCaptureConnection *)findVideoConnection {      /**< 相机连接设备*/
  AVCaptureConnection *videoConnection = nil;
  for (AVCaptureConnection *connection in self.stillImageOutput.connections) {
    for (AVCaptureInputPort *port in connection.inputPorts) {
      if ([[port mediaType] isEqual:AVMediaTypeVideo]) {
        videoConnection = connection;
        break;
      }
    }
    if (videoConnection) {
      break;
    }
  }
  return videoConnection;
}
2.AVCaptureVideoPreviewLayer
照相视图显示的layer,继承与CALayer
你需要做以下基本设置:
 - (instancetype)initWithSession:(AVCaptureSession *)session;  // 关联AVCaptureSession
@property CGRect frame; // 设置frame
 - (void)addSublayer:(CALayer *)layer;  // 添加sublayer
3.AVCaptureDeviceInput
照相输入设备
你需要做以下基本设置:
+ (instancetype)deviceInputWithDevice:(AVCaptureDevice *)device error:(NSError **)outError; // 初始化
以下代码可能对你有所帮助
NSArray *devices = [AVCaptureDevice devices];
AVCaptureDevice *backCamera;
AVCaptureDevice *frontCamera;
for (AVCaptureDevice *device in devices) {
  if ([device hasMediaType:AVMediaTypeVideo]) {
    if ([device position] == AVCaptureDevicePositionBack) {
      backCamera = device;
    } else if ([device position] == AVCaptureDevicePositionFront) {
      frontCamera = device;
    }
  }
}
4.AVCaptureStillImageOutput
照片输出设备
你需要做以下基本设置:
- (instancetype)init;  // 初始化
@property(nonatomic, copy) NSDictionary *outputSettings;  // 设置输出类型它可能是这样的@{AVVideoCodecKey : AVVideoCodecJPEG}
- (void)captureStillImageAsynchronouslyFromConnection:(AVCaptureConnection *)connection completionHandler:(void (^)(CMSampleBufferRef imageDataSampleBuffer, NSError *error))handler;  // 实现这个异步的方法,就可以拿到照片了,在这个方法中可以对照片进行修改,并且把照片回调出去
以下代码可能对你有所帮助
NSData *imgData = [AVCaptureStillImageOutput jpegStillImageNSDataRepresentation:imageDataSampleBuffer];
UIImage *originImg = [UIImage imageWithData:imgData];
至此一个相机的基本拍照功能已经全部完成
In order to set hardware properties on an AVCaptureDevice, such as focusMode and exposureMode, clients must first acquire a lock on the device. Clients should only hold the device lock if they require settable device propertiesto remain unchanged.
参考以上说明,你在对相机做对焦,闪光灯,缩放等等功能时候必须给AVCaptureDevice上锁,像这样
- (BOOL)lockForConfiguration:(NSError **)outError;  // 操作之前
- (void)unlockForConfiguration; // 操作完成之后
1.对焦
if ([device lockForConfiguration:nil]) {
  CGPoint pointOfInterest = [self pointOfInterestWithTouchPoint:touchPoint];// 点击point在屏幕中的坐标
    if (device.focusPointOfInterestSupported) {  // 聚焦
      device.focusPointOfInterest = pointOfInterest;
    }
    if (device.exposurePointOfInterestSupported) {  // 曝光
      device.exposurePointOfInterest = pointOfInterest;
    }
    if ([device isFocusModeSupported:AVCaptureFocusModeContinuousAutoFocus]) {
      device.focusMode = AVCaptureFocusModeContinuousAutoFocus;
    }
    if ([device isExposureModeSupported:AVCaptureExposureModeContinuousAutoExposure]) {
      device.exposureMode = AVCaptureExposureModeContinuousAutoExposure;
    }
    [device unlockForConfiguration];
}
2.缩放,请参考
@property(nonatomic) CGFloat videoZoomFactor
建议关联pan手势的代理
3.闪光灯,请参考
@property(nonatomic) AVCaptureFlashMode flashMode
默认是AVCaptureFlashModeAuto
设置AVCaptureFlashModeOn和AVCaptureFlashModeOff切换
4.前后摄像头切换,请参考
@property(nonatomic, readonly) AVCaptureDevicePosition position
可以通过移除输入设备后再添加的方式
2.视图类
自定义照相界面,你需要一个可爱的产品和设计,如果你的产品足够仔细,或者对原生相机功能情有独钟,他可能有这样的需求
1.照片时候闪屏的效果,它可能是通过这样实现
CABasicAnimation *twinkleAnim = [CABasicAnimation animationWithKeyPath:@"opacity"];
twinkleAnim.fromValue = @(1);
twinkleAnim.toValue = @(0);
twinkleAnim.duration = 0.2;
[self.view.layer addAnimation:twinkleAnim forKey:nil];
2.外接物理按键,比如声音的放大缩小按键,它可能是这样实现的
NSError *error;
[[UIApplication sharedApplication] beginReceivingRemoteControlEvents];
[[AVAudioSession sharedInstance] setActive:YES error:&error];
[[NSNotificationCenter defaultCenter] addObserver:self selector:@selector(volumeClick) name:@"AVSystemController_SystemVolumeDidChangeNotification" object:nil];
[[NSNotificationCenter defaultCenter] removeObserver:self name:@"AVSystemController_SystemVolumeDidChangeNotification" object:nil];
[[UIApplication sharedApplication] endReceivingRemoteControlEvents];
监听系统音量通知,在volumeClick的方法中调用拍照的方法
如果你通过音量键拍照的时候看到了这个令你感到不愉快的东西,请继续往下看

导入库
MediaPlayer.framework
导入头文件
#import
自定义这个视图,并把它放到屏幕外面,像这样:
MPVolumeView *volumeView = [[MPVolumeView alloc]initWithFrame:CGRectMake(-20, -40, 10, 10)];
volumeView.hidden = NO;
[self.view addSubview:volumeView];
如果有更好的方法或者建议,以及文中的缺陷,希望大家可以留言告知,虚心求教
如果转载本文,请注明本文出处,感谢