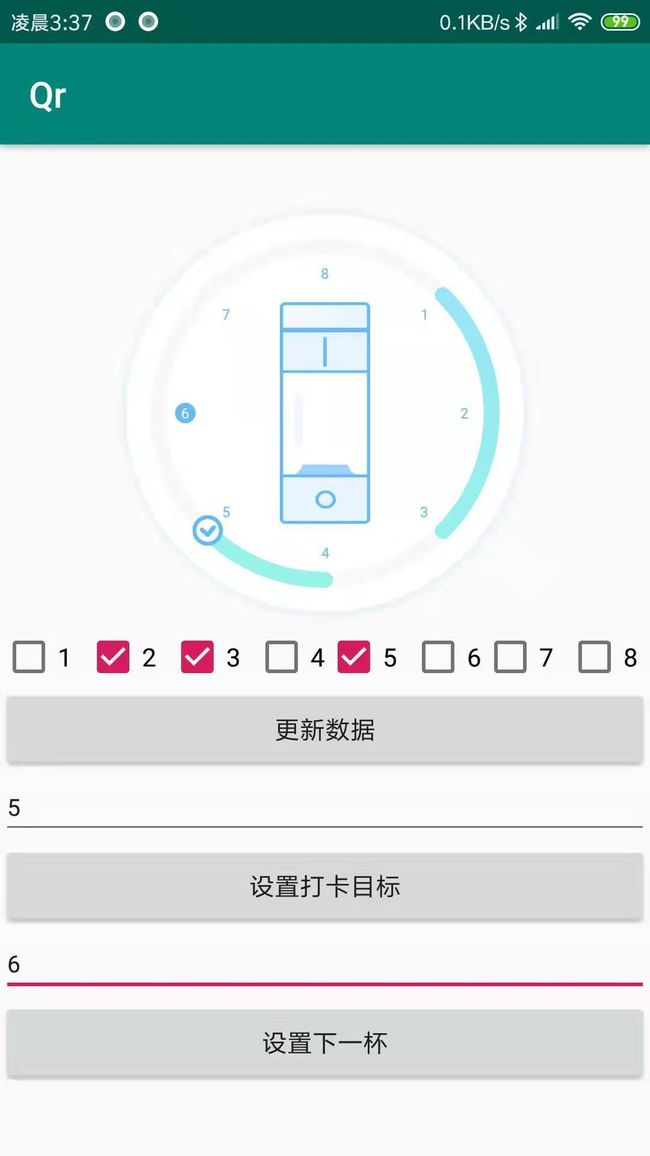
安卓自定义表盘
安卓自定义表盘
前情
因为最近公司项目在做饮水打卡的模块,所以需要有一个表盘去显示饮水进度。
设计稿以及需求理解
套用我弟的名言:犹豫不决总是梦,开干!
开干
初具模型
玩View我喜欢先在onDraw那里画个十字坐标系,大概是因为脑部能力有限,有个坐标系更方便想象。
    /**
     * 画辅助坐标系
     *
     * @param canvas
     */
    private void drawSystem(Canvas canvas) {
        canvas.drawLine(-mDx, 0, mDx, 0, mPaintForComment);
        canvas.drawLine(0, -mDy, 0, mDy, mPaintForComment);
    }
按照我们之前的分析,先把各个模块划分出来,依次实现即可:
 @Override
    protected void onDraw(Canvas canvas) {
        canvas.setDrawFilter(pfd);
        super.onDraw(canvas);
        canvas.translate(mDx, mDy);
//        drawSystem(canvas);
        drawShader(canvas);
        drawCenterImg(canvas);
        drawCircle(canvas);
        drawNumbers(canvas);
        drawProgress(canvas);
        drawScaleImg(canvas);
    }
注意这里我把圆心挪到了中间点,这样比较方便,即坐标系为:
灵魂画手
阴影模块
给view添加阴影是最常见的需求,很多时候图省事就是一个cardView包上去,然而结果肯定是UI走查的时候被设计吐槽了并且打回修改,比如上图的外圈阴影模块就是被设计拎着改了一个中午才改出来的…
一般我们应对阴影会给出几种方案:
- cardView
- .9
- drawable
- view加
这里用了ShadowLayer来做阴影。
public void setShadowLayer(float radius, float dx, float dy, int color)
- radius:模糊半径,radius越大越模糊,越小越清晰,但是如果radius设置为0,则阴影消失不见
- dx:阴影的横向偏移距离,正值向右偏移,负值向左偏移
- dy:阴影的纵向偏移距离,正值向下偏移,负值向上偏移
- color: 绘制阴影的画笔颜色,即阴影的颜色(对图片阴影无效)
实操代码为:
  /**
     * 画阴影
     *
     * @param canvas
     */
    private void drawShader(Canvas canvas) {

        mPaintForShader.setShadowLayer(20, 1, 1, Color.parseColor("#3363BAFF"));
        mPaintForShader.setAntiAlias(true);
        mPaintForShader.setColor(Color.WHITE);
        mPaintForShader.setStyle(Paint.Style.FILL);
        canvas.drawCircle(0, 0, mRadius + mDefOutSizeCircleWidth, mPaintForShader);
    }
画基础的圆形
这个没什么好说的,就是一个圆形
    /**
     * 画基础的圆形 也就是默认的没打卡的点
     *
     * @param canvas
     */
    private void drawCircle(Canvas canvas) {
        mPaintForCircle.setAntiAlias(true);
        mPaintForCircle.setStrokeWidth(mWidthForCircle);
        mPaintForCircle.setColor(mColorForCircle);
        mPaintForCircle.setStyle(Paint.Style.STROKE);
        canvas.drawCircle(0, 0, mRadius, mPaintForCircle);
    }
画刻度
因为我们目前是推荐一日八杯水,所以刻度值为1~8,画这种随着弧度而弧度的字,推荐是让canvas 进行translate配合rotate,
 /**
     * 绘制进度刻度
     *
     * @param canvas
     */
    private void drawNumbers(Canvas canvas) {
        int singleAngle = 360 / mPunchList.size();
        for (int i = 0; i < mScaleMsgList.size(); i++) {
            mPaintForText.setTextSize(mScaleFontSize);
            String text = mScaleMsgList.get(i);
            Rect textBound = new Rect();
            mPaintForText.getTextBounds(text, 0, text.length(), textBound);
            canvas.save();
            canvas.translate(0, -mRadius + dip2px(getContext(), 2) + mPadding + ((textBound.bottom - textBound.top) >> 1));
            canvas.rotate(-singleAngle * i);
            if (i == mTargetIndex) {
                mPaintForCircle.setColor(mColorForText);
                mPaintForText.setColor(mColorForTextWithTarget);
                mPaintForCircle.setStyle(Paint.Style.FILL);
                mPaintForCircle.setAntiAlias(true);
                canvas.drawCircle(0, 0, mDefNumberCircleRadius * 0.95f, mPaintForCircle);
            } else {
                mPaintForText.setColor(mColorForText);
            }
            canvas.drawText(text, ((float) (textBound.right + textBound.left) / -2), ((float) -(textBound.bottom + textBound.top) / 2), mPaintForText);
            canvas.restore();
            canvas.rotate(singleAngle);
        }
    }
画进度条
虽然不说看不太出来,但是其实进度条是一个渐变色的哦…
    //进度条渐变色
    private int mColorProgressStart = Color.parseColor("#97e0fb");
    private int mColorProgressEnd = Color.parseColor("#97f6e5");
渐变色我一般用LinearGradient处理:
LinearGradient(float x0, float y0, float x1, float y1, int colors[], float positions[], TileMode tile)
- 第一个参数为线性起点的x坐标
- 第二个参数为线性起点的y坐标
- 第三个参数为线性终点的x坐标
- 第四个参数为线性终点的y坐标
- 第五个参数为实现渐变效果的颜色的组合
- 第六个参数为前面的颜色组合中的各颜色在渐变中占据的位置(比重),如果为空,则表示上述颜色的集合在渐变中均匀出现
- 第七个参数为渲染器平铺的模式,一共有三种:
- -CLAMP 边缘拉伸
- -REPEAT 在水平和垂直两个方向上重复,相邻图像没有间隙
- -MIRROR 以镜像的方式在水平和垂直两个方向上重复,相邻图像有间隙 (我不喜欢这个,密恐患者路过)
数据源处理
这里插一句,因为后台的数据结构问题,数据源我打算用map来做处理,即:
Map
key作为打卡点,value作为是否饮水打卡的标志。
这里强烈推荐 SparseBooleanArray:
public class SparseBooleanArray implements Cloneable {
    ...
}
真香!!
具体实现
 /**
     * 画进度条
     *
     * @param canvas
     */
    private void drawProgress(Canvas canvas) {
        int[] colors = {mColorProgressStart, mColorProgressEnd};
        LinearGradient linearGradient = new LinearGradient(-mStartPointX, mStartPointY, mEndPointX, mEndPointY,
                colors,
                null, Shader.TileMode.REPEAT);
        mPaintForComment.setAntiAlias(true);
        mPaintForComment.setStrokeWidth(mWidthForCircle);
        mPaintForComment.setStyle(Paint.Style.STROKE);
        mPaintForComment.setStrokeCap(Paint.Cap.ROUND);

        RectF f = new RectF(-mRadius, -mRadius, mRadius, mRadius);
        int angle = 360 / mPunchList.size();
        for (int i = 1; i <= mPunchList.size(); i++) {
            if (mPunchList.get(i)) {
                mPaintForComment.setShader(linearGradient);
                mPaintForComment.setStrokeCap(Paint.Cap.ROUND);
                canvas.drawArc(f, (i - 3) * angle, angle, false, mPaintForComment);
            }
        }
    }
画进度打卡点
从成品图可以看到,打卡点是位于进度条上的,要拿到它的点的位置,就需要一点三角函数的计算
示意图
 /**
     * 画进度条到了哪天打卡
     *
     * @param canvas
     */
    private void drawScaleImg(Canvas canvas) {
        canvas.save();
        Bitmap scaleImg = BitmapFactory.decodeResource(getResources(), R.mipmap.icon_tick);
        int width = (int) (Math.min(scaleImg.getWidth(), mDefTargetImgSize) * 0.90);
        int height = (int) (Math.min(scaleImg.getHeight(), mDefTargetImgSize) * 0.90);
        mTargetBitmap = Bitmap.createScaledBitmap(scaleImg, width, height, true);
        scaleImg.recycle();
        int allNumbers = mPunchList.size();
        int single = (360 / allNumbers);
        if (mDefSignIndex >= 0 && mDefSignIndex <= 7 && mTargetBitmap != null) {
            double radian = 2 * PI / 360 * (360 - single * (1 - mDefSignIndex));
            int xD = (int) (Math.cos(radian) * mRadius);
            int yD = (int) (Math.sin(radian) * mRadius);
            Rect rect = new Rect(xD - width / 2, yD - height / 2, xD + width / 2, yD + height / 2);
            mPaintForComment.setAntiAlias(true);
            canvas.drawBitmap(mTargetBitmap, null, rect, mPaintForComment);
        }
        canvas.restore();
    }
怎么说呢,我只想对我的数学老师说我错了,我后悔了。
画居中的水杯图
   /**
     * 画居中的图片
     *
     * @param canvas
     */
    private void drawCenterImg(Canvas canvas) {
        Bitmap bitmap = BitmapFactory.decodeResource(getResources(), mResIdForCup);
        int width = (bitmap.getWidth());
        int height = (bitmap.getHeight());
        int realW = (int) ((width * mDx / height) * 0.9);
        Rect rect = new Rect(-realW * 2 / 3, (int) (-mRadius * 2 / 3), realW * 2 / 3, (int) (mRadius * 2 / 3));
        canvas.drawBitmap(bitmap, null, rect, mPaintForComment);
    }
定义属性,style
这一个模块的没什么好说的,
 private void initUserAttrs(AttributeSet attrs) {
        TypedArray array = null;
        try {
            array = getContext().obtainStyledAttributes(attrs, R.styleable.MeterView);
            mPadding = array.getDimension(R.styleable.MeterView_def_padding, dip2px(getContext(), 10));
            mScaleFontSize = array.getDimension(R.styleable.MeterView_def_font_size, dip2px(getContext(), 8));
            mColorForText = array.getColor(R.styleable.MeterView_def_font_color, Color.parseColor("#64BAFF"));
            mColorForCircle = array.getColor(R.styleable.MeterView_def_circle_color, Color.parseColor("#F9F9F9"));
            mWidthForCircle = array.getDimension(R.styleable.MeterView_def_circle_width, 30);
            mColorProgressStart = array.getColor(R.styleable.MeterView_def_progress_gradient_start, Color.parseColor("#97e0fb"));
            mColorProgressEnd = array.getColor(R.styleable.MeterView_def_progress_gradient_end, Color.parseColor("#97f6e5"));
            mDefNumberCircleRadius = array.getDimension(R.styleable.MeterView_def_number_circle_radius, dip2px(getContext(), 10));
            mDefTargetImgSize = array.getDimension(R.styleable.MeterView_def_target_img_size, dip2px(getContext(), 20));
        } catch (Exception e) {
            mScaleFontSize = dip2px(getContext(), 8);
            mPadding = dip2px(getContext(), 10);
            e.printStackTrace();
        }
        if (array != null) {
            array.recycle();
        }
    }
踩坑&疑问
因为一直都是混日子…哎,不知道咋说,工作也是挺久了,怎么总结呢?
勤奋得感动了自己,然而p用没有
适配问题
在项目里面的一个fragment里面会出现打卡的图片边缘锯齿问题,一开始怀疑是我create出来的bitmap被拉伸了or像素太低等原因,且只有在红米note4上面会出现,也试了很多方法:
- 原bitmap大小
- 动态去修改大小
- …
扑街…
后来发现也和fragment所放置的viewpager添加了PageTransformer有关:
public class CardTransformer implements ViewPager.PageTransformer {
    private static final float MAX_SCALE = 0.95f;
    private static final float MIN_SCALE = 0.80f;//0.85f
    private onScaleChange mOnScaleChange;

    public void setOnScaleChange(onScaleChange onScaleChange) {
        mOnScaleChange = onScaleChange;
    }

    public CardTransformer() {
        float result = MIN_SCALE + (MAX_SCALE - MIN_SCALE);
        Log.d("lht", "CardTransformer: " + result);
    }

    @Override
    public void transformPage(@NotNull View page, float position) {
        if (position <= 1) {
            //   1.2f + (1-1)*(1.2-1.0)
            float scaleFactor = MIN_SCALE + (1 - Math.abs(position)) * (MAX_SCALE - MIN_SCALE);
            Log.d("lht", "transformPage: " + scaleFactor);
            page.setScaleX(scaleFactor);  //缩放效果

            if (position > 0) {
                page.setTranslationX(-scaleFactor * 2);
            } else if (position < 0) {
                page.setTranslationX(scaleFactor * 2);
            }
            page.setScaleY(scaleFactor);

            if (mOnScaleChange != null) {
                mOnScaleChange.onChange(scaleFactor);
            }
        } else {
            page.setScaleX(MIN_SCALE);
            page.setScaleY(MIN_SCALE);
//            if (mOnScaleChange != null) {
//                mOnScaleChange.onChange(MIN_SCALE);
//            }
        }
    }

    public interface onScaleChange {
        void onChange(float scale);
    }
}
怀疑是在fragment被拉伸了,因为这个view的属性为:
最后做了一个无奈的办法:
        constraintLayout.getViewTreeObserver().addOnPreDrawListener(new ViewTreeObserver.OnPreDrawListener() {
            @Override
            public boolean onPreDraw() {
                ConstraintLayout.LayoutParams layoutParams = (ConstraintLayout.LayoutParams) mMeterView.getLayoutParams();
                layoutParams.width = (int) (constraintLayout.getWidth() * 0.83);
                layoutParams.height = (int) (constraintLayout.getWidth() * 0.83);
                mMeterView.setLayoutParams(layoutParams);
                return true;
            }
        });
canvan的clipXX方法:
其实这个我之前也是一直用的:之前的文章
不过一直都只是觉得方便、画图好用而已…
最近在看优化才知道这个东西用得好也可以用来降低过度绘制问题,挺不错的。
总结
很多不足,还是要补啊… 互勉!!
and
饮茶+听歌+coding=真的好舒服。
and
这首歌贼好听
