一、最小化安装centos7.6
cat /etc/redhat-release
二、配置网络,可以上外网
三、安装常用命令工具,修改系统时区,校对系统时间,关闭selinux,关闭firewalld,修改主机名,修改系统文件描述符,内存锁限制及vm.max_map_count 数量(否则启动elasticsearch时报错)
1、安装常用命令工具
yum install vim net-tools bash-completion wget unzip ntp bzip2 epel-release -y
2、修改系统时区,校对系统时间
timedatectl set-timezone Asia/Shanghai
ntpdate pool.ntp.org
3、关闭selinux
vi /etc/selinux/config
4、关闭防火墙
systemctl restart firewalld.service
systemctl disable firewalld.service
5、修改主机名
vi /etc/hostname
6、修改系统文件描述符大小
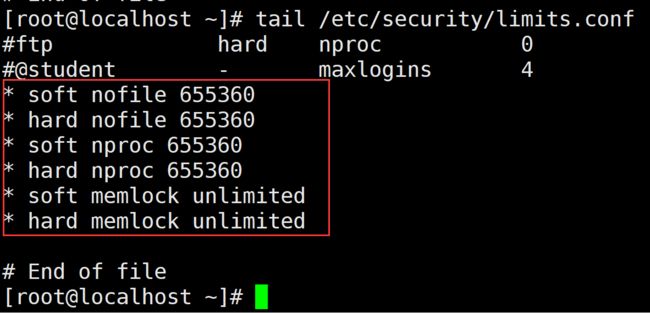
vim /etc/security/limits.conf
最后添加:
* soft nofile 655360
* hard nofile 655360
* soft nproc 655360
* hard nproc 655360
* soft memlock unlimited
* hard memlock unlimited
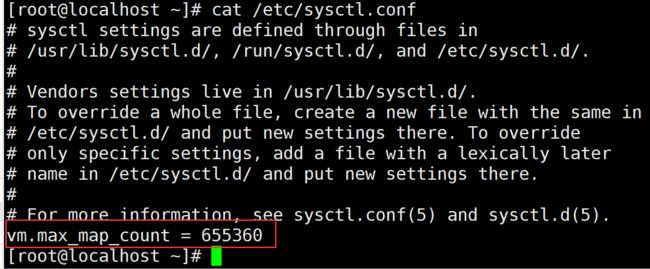
7、修改 vm.max_map_count值
vi /etc/sysctl.conf
最后添加:
vm.max_map_count = 655360
8、重启系统使配置生效
init 6
四、安装elasticsearch
1、安装java1.8
yum install java-1.8.0-openjdk -y
设置java环境变量
vim /etc/profile
export JAVA_HOME=/usr/lib/jvm/java-1.8.0-openjdk-1.8.0.191.b12-1.el7_6.x86_64
export CLASSPATH=:$JAVA_HOME/lib/dt.jar:$JAVA_HOME/lib/tools.jar:$JRE_HOME/lib
export JRE_HOME=/usr/lib/jvm/java-1.8.0-openjdk-1.8.0.191.b12-1.el7_6.x86_64/jre
export PATH=$PATH:$JAVA_HOME/bin:$JRE_HOME/bin
source /etc/profile
2、官网下载最新版elasticsearch
wget https://artifacts.elastic.co/downloads/elasticsearch/elasticsearch-6.6.0.tar.gz
tar -zxf elasticsearch-6.6.0.tar.gz
mv elasticsearch-6.6.0 /opt/elasticsearch
3、添加elasticsearch用户,用来启动elasticsearch
groupadd elasticsearch
useradd elasticsearch -g elasticsearch
4、将elasticsearch目录授权给elasticsearch用户
chown -R elasticsearch:elasticsearch /opt/elasticsearch
5、修改elasticsearch配置文件
vim /opt/elasticsearch/config/elasticsearch.yml
最后添加:
cluster.name: logsearch
node.name: node-1
path.data: /opt/elasticsearch/data
path.logs: /opt/elasticsearch/logs
bootstrap.memory_lock: true
network.host: 0.0.0.0
http.port: 9200
#discovery.zen.ping.unicast.hosts: ["192.168.0.58", "192.168.0.59", "192.168.0.60"]
#discovery.zen.minimum_master_nodes: 2
http.cors.enabled: true
http.cors.allow-origin: "*"
http.cors.allow-credentials: true
http.cors.allow-headers: Authorization,X-Requested-With,Content-Length,Content-Type
6、切换到elasticsearch用户启动elasticsearch
su - elasticsearch
/opt/elasticsearch/bin/elasticsearch -d
7、用浏览器测试是否正常http://192.168.0.58:9200
五、安装elasticsearch-head插件
1、下载elasticsearch-head-master.zip包
wget https://github.com/mobz/elasticsearch-head/archive/master.zip
unzip master.zip
mv elasticsearch-head-master /opt/
2、安装node
由于head插件本质上还是一个nodejs的工程,因此需要安装node,使用npm来安装依赖的包。
wget https://nodejs.org/dist/v10.15.0/node-v10.15.0-linux-x64.tar.xz
xz -d node-v10.15.0-linux-x64.tar.xz
tar -xf node-v10.15.0-linux-x64.tar
mv node-v10.15.0-linux-x64 /opt/
添加node环境变量
vim /etc/profile
添加:
export NODE_HOME=/opt/node-v10.15.0-linux-x64
export PATH=$PATH:$NODE_HOME/bin
source /etc/profile
测试node是否安装成功
3、安装grunt(grunt是基于Node.js的项目构建工具,可以进行打包压缩、测试、执行等等工作,elasticsearch-head插件就是通过grunt启动的)
cd /opt/elasticsearch-head-master/
npm install -g grunt-cli
grunt -version测试是否安装成功
修改elasticsearch-head-master下Gruntfile.js配置文件,添加hostname: '*',
vim Gruntfile.js
更换npm源
npm install -g cnpm --registry=https://registry.npm.taobao.org
使用cnpm安装
cnpm install
安装完成后没有报错的话启动elasticsearch-head-master
grunt server &
通过浏览器测试是否正常
http://192.168.0.58:9100/


