word2vec python实现
这里先实现skip-gram,本文也是对于该篇文章的翻译,并添加个人的理解与感悟。
整体的流程如下:
- 数据准备 —— 数据获取、清洗、使标准化、分词
- 超参数 —— 学习率、迭代次数、窗口大小、词向量维度
- 生成训练数据 —— 创建字典、为每个词生成one-hot编码、生成word2dic和dic2word的索引
- 建立模型 —— 通过前向传播先对词做编码,计算错误率,通过反向传播和梯度下降不断降低loss
- 推理 —— 创建词向量并找到相似的单词
- 进一步提升 —— 用来加速的方法,层次softmax和负采样
1. 数据准备
首先,我们使用如下语料:
natural language processing and machine learning is fun and exciting
简单起见,我们没有对语料做统一大小写和去标点符号的操作,当然,上述的句子也没有以上两个问题。此外,我们也没有去停用词操作。
但是,在实际场景中,文本数据是非结构化数据,而且是很“脏”的数据。一般拿到数据我们要对其做一定的清洗,比如去停用词、去标点符号、将文本全部用小写表示(当然要根据你的场景决定,转成大写也可以),去掉数字等操作,有一篇文章将数据的预处理工作描绘的淋漓尽致,后序有时间也要整理一下。python的官方库Gensim 提供了一个API(gensim.utils.simple_preprocess)可以对数据做简单的处理,主要的操作有小写数据、忽略太长或者太短的token。
text = "natural language processing and machine learning is fun and exciting"

# Note the .lower() as upper and lowercase does not matter in our implementation
# [['natural', 'language', 'processing', 'and', 'machine', 'learning', 'is', 'fun', 'and', 'exciting']]
corpus = [[word.lower() for word in text.split()]]
处理过程略,通过空格分词之后,我们得到分词结果如下:
[“natural”, “language”, “processing”, “ and”, “ machine”, “ learning”, “ is”, “ fun”, “and”, “ exciting”]
2. 超参数
在进入真正的实现之前,我们定义一些超参数:
settings = {
	'window_size': 2	# context window +- center word
	'n': 10,	    	# dimensions of word embeddings, also refer to size of hidden layer
	'epochs': 50,		# number of training epochs
	'learning_rate': 0.01	# learning rate
}
-
window_size:窗口大小,skip-gram的目的就是根据中心词预测上下文,那这个window_sixe指的就是上下文单词的个数,如果window_size=2,那就是要预测中心词上下个2个token。具体的可以看图:

-
n: 就是词向量的维度,一般把词向量的维度设置为100~300之间,如果超过300,增益的效果不大,这个可以看论文实验(page 1538 Figure 2 (a))。词向量的维度也就是隐藏层的维度。
-
epochs: 训练迭代次数,这里定义的是一个epoch就遍历一次整个数据集,BGD的思想,可能是数据不够多吧。
-
learning_rate: 学习率
3. 数据生成
先生成每个词的one-hot编码
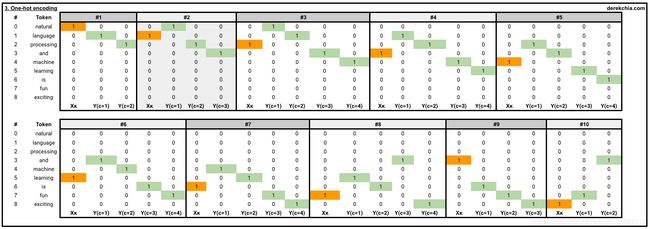
举两个栗子:
#1 [Target (natural)], [Context (language, processing)]
   [list([1, 0, 0, 0, 0, 0, 0, 0, 0])
    list([[0, 1, 0, 0, 0, 0, 0, 0, 0], [0, 0, 1, 0, 0, 0, 0, 0, 0]])]
#10 [Target (exciting)], [Context (fun, and)]
    [list([0, 0, 0, 0, 0, 0, 0, 0, 1])
     list([[0, 0, 0, 0, 0, 0, 0, 1, 0], [0, 0, 0, 1, 0, 0, 0, 0, 0]])]
这里调用了一个generate_training_data函数:
# Initialise object
w2v = word2vec()
# Numpy ndarray with one-hot representation for [target_word, context_words]
training_data = w2v.generate_training_data(settings, corpus)
在这个函数里我们实现了如下几个操作:
- self.v_count: 字典长度(由唯一的词组成的字典)
- self.words_list: 字典列表
- self.word_index: 字典中每个词对应的索引(词,索引)
- self.index_word: 字典中每个索引对应的词(索引,词)
- for 循环生成每一个one-hot向量
具体细节,这个函数函数相当重要的,最终得到的每个样本是一个核心词和其对应的上下文词的one-hot表示:
class word2vec():
  def __init__(self):
    self.n = settings['n']
    self.lr = settings['learning_rate']
    self.epochs = settings['epochs']
    self.window = settings['window_size']

  def generate_training_data(self, settings, corpus):
    # Find unique word counts using dictonary
    word_counts = defaultdict(int)
    for row in corpus:
      for word in row:
        word_counts[word] += 1
    ## How many unique words in vocab? 9
    self.v_count = len(word_counts.keys())
    # Generate Lookup Dictionaries (vocab)
    self.words_list = list(word_counts.keys())
    # Generate word:index
    self.word_index = dict((word, i) for i, word in enumerate(self.words_list))
    # Generate index:word
    self.index_word = dict((i, word) for i, word in enumerate(self.words_list))

    training_data = []
    # Cycle through each sentence in corpus
    for sentence in corpus:
      sent_len = len(sentence)
      # Cycle through each word in sentence
      for i, word in enumerate(sentence):
        # Convert target word to one-hot
        w_target = self.word2onehot(sentence[i])
        # Cycle through context window
        w_context = []
        # Note: window_size 2 will have range of 5 values
        for j in range(i - self.window, i + self.window+1):
          # Criteria for context word
          # 1. Target word cannot be context word (j != i)
          # 2. Index must be greater or equal than 0 (j >= 0) - if not list index out of range
          # 3. Index must be less or equal than length of sentence (j <= sent_len-1) - if not list index out of range
          if j != i and j <= sent_len-1 and j >= 0:
            # Append the one-hot representation of word to w_context
            w_context.append(self.word2onehot(sentence[j]))
            # print(sentence[i], sentence[j])
            # training_data contains a one-hot representation of the target word and context words
        training_data.append([w_target, w_context])
    return np.array(training_data)

def word2onehot(self, word):
    # word_vec - initialise a blank vector
    word_vec = [0 for i in range(0, self.v_count)] # Alternative - np.zeros(self.v_count)
    # Get ID of word from word_index
    word_index = self.word_index[word]
    # Change value from 0 to 1 according to ID of the word
    word_vec[word_index] = 1
    return word_vec
4. 模型构建
图已经诠释了一切
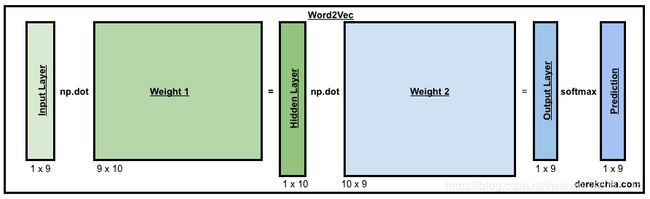
Word2Vec模型包含2个比较重要的矩阵w1(9 * 10)和w2(10 * 9),在实际的训练过程中,需要使用np.random.uniform()函数将矩阵随机初始化。
# Training
w2v.train(training_data)

class word2vec():
  def train(self, training_data):
  # Initialising weight matrices
  # Both s1 and s2 should be randomly initialised but for this demo, we pre-determine the arrays (getW1 and getW2)
  # getW1 - shape (9x10) and getW2 - shape (10x9)
  self.w1 = np.array(getW1)
  self.w2 = np.array(getW2)
  # self.w1 = np.random.uniform(-1, 1, (self.v_count, self.n))
  # self.w2 = np.random.uniform(-1, 1, (self.n, self.v_count))
4.1 Training — Forward Pass
通过forward函数,w1和wt(就是word target)点乘(dot)得到了h。然后w2和h点乘得到了u,通过对u做softmax得到了y_pre。具体实现如下:
class word2vec():
  def train(self, training_data):
  ##Removed##

    # Cycle through each epoch
    for i in range(self.epochs):
      # Intialise loss to 0
      self.loss = 0

      # Cycle through each training sample
      # w_t = vector for target word, w_c = vectors for context words
      for w_t, w_c in training_data:
        # Forward pass - Pass in vector for target word (w_t) to get:
        # 1. predicted y using softmax (y_pred) 2. matrix of hidden layer (h) 3. output layer before softmax (u)
        y_pred, h, u = self.forward_pass(w_t)

        ##Removed##

  def forward_pass(self, x):
    # x is one-hot vector for target word, shape - 9x1
    # Run through first matrix (w1) to get hidden layer - 10x9 dot 9x1 gives us 10x1
    h = np.dot(self.w1.T, x)
    # Dot product hidden layer with second matrix (w2) - 9x10 dot 10x1 gives us 9x1
    u = np.dot(self.w2.T, h)
    # Run 1x9 through softmax to force each element to range of [0, 1] - 1x8
    y_c = self.softmax(u)
    return y_c, h, u

  def softmax(self, x):
    e_x = np.exp(x - np.max(x)) # 这里为什么要减去np.max?是为了防止上溢和下溢。减去这个数的计算结果不变。
    return e_x / e_x.sum(axis=0)

4.2 Training — Error, Backpropagation and Loss
Error—— 我们可以根据target词的上下文词context,计算error,这里的做法是将y_pre和wc的one-hot编码相减,使用np.substract。

Backpropagation—— 接下来,我们使用反向传播函数,backprop,根据target产生的error EI,反向更新w1和w2。
class word2vec():
  ##Removed##

  for i in range(self.epochs):
    self.loss = 0
    for w_t, w_c in training_data:
    ##Removed##

      # Calculate error
      # 1. For a target word, calculate difference between y_pred and each of the context words
      # 2. Sum up the differences using np.sum to give us the error for this particular target word
      EI = np.sum([np.subtract(y_pred, word) for word in w_c], axis=0)

      # Backpropagation
      # We use SGD to backpropagate errors - calculate loss on the output layer
      self.backprop(EI, h, w_t)

      # Calculate loss
      # There are 2 parts to the loss function
      # Part 1: -ve sum of all the output +
      # Part 2: length of context words * log of sum for all elements (exponential-ed) in the output layer before softmax (u)
      # Note: word.index(1) returns the index in the context word vector with value 1
      # Note: u[word.index(1)] returns the value of the output layer before softmax
      self.loss += -np.sum([u[word.index(1)] for word in w_c]) + len(w_c) * np.log(np.sum(np.exp(u)))
    print('Epoch:', i, "Loss:", self.loss)

  def backprop(self, e, h, x):
    # https://docs.scipy.org/doc/numpy-1.15.1/reference/generated/numpy.outer.html
    # Column vector EI represents row-wise sum of prediction errors across each context word for the current center word
    # Going backwards, we need to take derivative of E with respect of w2
    # h - shape 10x1, e - shape 9x1, dl_dw2 - shape 10x9
    # np.outer 计算两个向量的外积
    dl_dw2 = np.outer(h, e)
    # x - shape 1x8, w2 - 5x8, e.T - 8x1
    # x - 1x8, np.dot() - 5x1, dl_dw1 - 8x5
    dl_dw1 = np.outer(x, np.dot(self.w2, e.T))
    # Update weights
    self.w1 = self.w1 - (self.lr * dl_dw1)
    self.w2 = self.w2 - (self.lr * dl_dw2)
说明一下这里为什么要用np.outer这个求外积向量的函数。首先,温习一下forward的公式:
h = W 1 T ∗ W t h = W_1^T * W_t h=W1T∗Wt
u = W 2 T ∗ h u = W_2^T * h u=W2T∗h
y = s o f t m a x ( u ) y = softmax(u) y=softmax(u)
e r r o r = y − l a b e l error = y - label error=y−label
下面求梯度:
∂ e r r o r ∂ W 2 T = ∂ e r r o r ∂ u ∗ ∂ u ∂ W 2 T = ∂ e r r o r ∂ u ∗ h \frac{\partial error}{\partial W_2^T} = \frac{\partial error}{\partial u} * \frac{\partial u}{\partial W_2^T} = \frac{\partial error}{\partial u} * h ∂W2T∂error=∂u∂error∗∂W2T∂u=∂u∂error∗h
∂ e r r o r ∂ W 1 T = ∂ e r r o r ∂ u ∗ ∂ u ∂ h ∗ ∂ h ∂ W 1 T = ∂ e r r o r ∂ u ∗ W 2 T ∗ W t \frac{\partial error}{\partial W_1^T} = \frac{\partial error}{\partial u} * \frac{\partial u}{\partial h} * \frac{\partial h}{\partial W_1^T} = \frac{\partial error}{\partial u} * W_2^T * W_t ∂W1T∂error=∂u∂error∗∂h∂u∗∂W1T∂h=∂u∂error∗W2T∗Wt
关于error对u的求导,这里还没搞明白。
如果按照代码中所写的那样的话,就是预测值和真实值的diff。
根据公式,np.outer就是解释的清楚了。如下图所示:

下面的图详细的介绍了,梯度下降的过程。

Loss —— word2vec的损失函数是交叉熵,这里的error和loss是不是有点重复,error就用了diff,是为了方便理解。真正的loss函数其实是用来交叉熵损失函数。关于损失函数,还需要去细细品味XinRong大佬的论文(to do)。
5. 推理
W1和W2矩阵都可以用来获得词向量。 (阿里面试题中问过)
5.1 获得词向量
使用W1获取:
# Get vector for word
vec = w2v.word_vec("machine")

class word2vec():
  ## Removed ##

  # Get vector from word
  def word_vec(self, word):
    w_index = self.word_index[word]
    v_w = self.w1[w_index]
    return v_w
使用W2获取,其实就是将W2的矩阵转置:
# 尝试使用w2获取词向量
def word_vec_from_w2(self, word):
    w_index = self.word_index[word]
    v_w = self.w2.T[w_index]
    return v_w
两个矩阵产生的词向量如下,其实没什么差别:
generate form w1: machine [ 0.68446157 -1.87386609 0.7427968   0.51310448 -0.93068805 -1.35561852 0.3866901   0.54829494 -0.03770957 -0.43191822]
generate form w2: machine [ 0.01590458  0.97756578 -0.68646307  0.2469964   0.37108001 -0.19995699 0.49584826 -1.84341305 -1.30515012 -0.22626334]
5.2 找到相似的词
这里使用余弦相似度计算:
# Find similar words
w2v.vec_sim("machine", 3)

class word2vec():
  ## Removed##

  # Input vector, returns nearest word(s)
  def vec_sim(self, word, top_n):
    v_w1 = self.word_vec(word)
    word_sim = {}

    for i in range(self.v_count):
      # Find the similary score for each word in vocab
      v_w2 = self.w1[i]
      theta_sum = np.dot(v_w1, v_w2)
      theta_den = np.linalg.norm(v_w1) * np.linalg.norm(v_w2)
      theta = theta_sum / theta_den

      word = self.index_word[i]
      word_sim[word] = theta

    words_sorted = sorted(word_sim.items(), key=lambda kv: kv[1], reverse=True)

    for word, sim in words_sorted[:top_n]:
      print(word, sim)
结果:
> w2v.vec_sim("machine", 3)

machine 1.0
fun 0.6223490454018772
and 0.5190154215400249
6. 进一步提升
todo list:
- 对加速word2vec的计算过程提出了两个方法:
- Negative Sampling(负采样)
- Hierarchical Softmax(层次softmax)
- 实现CBOW
- glove、fasttext、elmo、doc2vec、code2vec的原理解析
- XinRong 论文的解析