AngularJs学习笔记-第一章-指令(1)

AngularJs是一款来自Google的前端JS框架,该框架已经被应用到Google的多款产品中。这款框架最核心的特性有:MVC,模块化,自动化双向数据绑定,语义化标签,依赖注入,等等。AngularJS 不仅仅是一个类库,而是提供了一个完整的框架。它避免了和多个类库交互,需要熟悉多套接口的繁琐工作。它由Google Chrome的开发人员设计,引领着下一代Web应用开发。从现在开始本人逐渐开始从了解并且计划深刻的理解学习angularJs,并且把学习心得一点点的积累下来。

**1,如何自定义标签**

index.html


为了让浏览器能够认识这mike个标签,我们需要使用Angular来定义一个mike指令

(本质上说就是自己来把这种玩意儿替换成浏览器能识别的那些标准HTML标签)。 
mike.js 
 var APP = angular.module('app', []); 
        APP.directive('mike',function() {   
          return {
           restrict:'E',
           template:'
Hi angularjs
', replace:true }; });

如果路径没问题的话,用浏览器打开index.html就可以看到 Hi angularjs. 可以看到这个标签已经被

Hi angularjs
这个标签替换掉了,这也是以上mike.js代码里面replace:true这行配置的作用使其发生了替换,代码里面的template配置就是我们需要的div标签或者是内容,至于指令restrict:'E'这个配置项的含义,详情请看下面:

E:元素 element 常用
A:属性 attribute 默认

C:样式 class 不常用
M:注释 comment 不常用

下面是分别演示的代码:
dir.html


dir.js

var APP = angular.module('app', []);
     APP.directive('mike', function() {
    return {
        restrict: 'AEMC',
        template: '
Hi angularjs
', replace: true }; })

上面的demo出来的就是页面上显示4个不同的 Hi angularjs

templateUrl可以来替代template,目的是为了能够让显示的内容是来自一个Url而不是像上面一样,这样显示的内容非常的有限,而且会使得字符串累加,页面相当的繁琐.从而可以把模板写到一个独立的HTML文件中。

2,如何处理标签中的子标签
指令的作用是把我们自定义的语义化标签替换成浏览器能够认识的HTML标签。那好,如果我们自定义的标签内部出现了子标签,应该如何去处理呢?很显然,transclude就是用来处理这种情况的。
transclude.html


the first mike
the second mike the third mike

p 标签显示,这个标签定义在在span里面

a标签是定义在p标签内部,同样可以通过ng-transclude显示 h标签自定义在a标签内部,同样可以显示在页面上面

   transclude.js 
var APP = angular.module('app', []);
       APP.directive('mike',function() {
       return {
       restrict: 'E',
       template: '
Hi angularjs

', //自定义的标签内部出现了子标签div里面有个span,可以用ng-transclude解决这个问题. transclude: true }; });

transclude的作用可以简化地理解成:把标签替换成我们所编写的HTML模板但是标签内部的内容Hi angularjs保持不变。指令有时候会嵌套,所以加上transclude指令可以保证每一个指令的内容不会被替换掉。
3,怎样使用templateUrl加载html模板
templateUrl.html


templateUrl.js

var APP = angular.module('app', []);
     APP.directive('mike', function() {
    return {
        restrict: 'AEMC',
        templateUrl: 'hello.html'
    };
})

hello.html


The content from hello.html

页面上显示:The content from hello.html
4,怎样缓存模板,使其可以让其他指令使用
$templateCache.put和get分别可以将模板保存和取出
templateCache.html


templateCache.js

var APP = angular.module('app', []);
//注射器加载完所有的模块时,run方法只执行一次
    APP.run(function($templateCache){
        $templateCache.put("hello1.html","
Hi Angularjs
") //angular 内置的templateCache将hello1.html模板缓存起来,可以让多个指令使用它 }) APP.directive('mike', function($templateCache) { return { restrict: 'AEMC', template: $templateCache.get("hello1.html"), replace:true } })

hello1.js


This is the content from hello1.html

5,指令执行过程
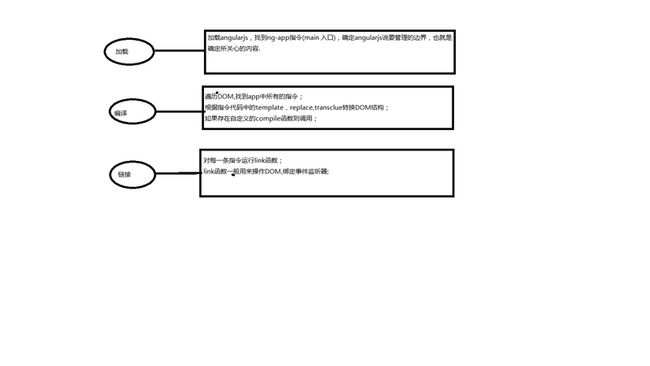
compile和link
AngularJs学习笔记-第一章-指令(1)_第1张图片


compile函数用来对模板自身进行转换,而link函数负责在模型和视图之间进行动态关联;
作用域在链接阶段才会被绑定到编译之后的link函数上面;

compile函数仅仅在编译阶段运行一次,而对于指令的每一个实例,link函数都会执行一次;
compile可以返回preLink和postLink函数,而link函数只会返回postLink函数;
如果需要修改DOM结构,应该在postLink中来做这件事情,如果在preLink中做这件事情会导致错误;
大多数的时候我们只要编写link函数就可以;

link指令,link函数负责在模型和视图之间进行动态关联,下面的demo模拟鼠标滑动,angular加载后台数据
load.html


滑动鼠标,加载数据

load.js

var APP = angular.module('app', []);
    APP.controller('ctrl',['$scope',function($scope){
        $scope.loading = function(){
            console.log("loading data,please wait...")
        }
    }])
    APP.directive('load', function() {
    return {
        restrict: 'AE',
        //link函数一般有总共有4个参数
        link:function(scope,element,attr){//link函数监听事件,鼠标滑动
            element.bind("mouseenter",function(){//给元素绑定事件,当鼠标进入的时候,加载数据loading data,在控制台打印console.log("loading data,please wait...")
                scope.loading()//指令调用方法,加载数据
            })
        }
    }
})
也可以使用$apply调用到上面的loading方法:
var APP = angular.module('app', []);
    APP.controller('ctrl',['$scope',function($scope){
        $scope.loading = function(){
            console.log("loading data,please wait...")
        }
    }])
    APP.directive('load', function() {
    return {
        restrict: 'AE',
        //link函数一般有总共有4个参数
        link:function(scope,element,attr){//link函数监听事件,鼠标滑动
            element.bind("mouseenter",function(){//给元素绑定事件,当鼠标进入的时候,加载数据loading data,在控制台打印console.log("loading data,please wait...")
                //scope.loading()//指令调用方法,加载数据
                scope.$apply("loading()")
            })
        }
    }
})

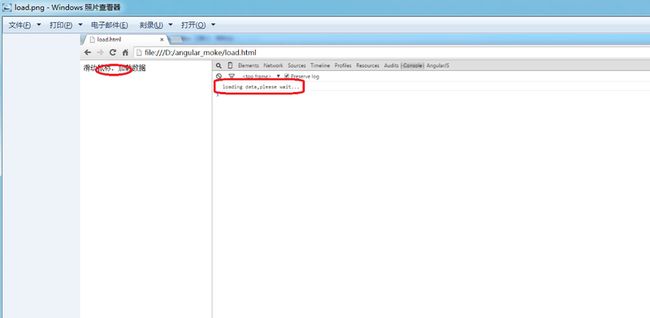
页面显示如图所示:
AngularJs学习笔记-第一章-指令(1)_第2张图片

如果有多个controller调用多个方法的时候,这个时候就必须在指令中定义属性了,注意link函数中,属性的定义一定是小写的,如果是大写的字母或是单词会报错(loa):
load.html


滑动鼠标,加载数据1111111
滑动鼠标,加载数据2222222

load.js

var APP = angular.module('app', []);
    APP.controller('ctrl1',['$scope',function($scope){
        $scope.loading1 = function(){
            console.log("loading1 data,please wait...11111111111111111111111")
        }
    }])
    APP.controller('ctrl2',['$scope',function($scope){
        $scope.loading2 = function(){
            console.log("loading2 data,please wait...222222222222222222222222")
        }
    }])
    APP.directive('load', function() {
    return {
        restrict: 'AE',
        //link函数一般有总共有4个参数
        link:function(scope,element,attrs){//link函数监听事件,鼠标滑动
            element.bind("mouseenter",function(event){//给元素绑定事件,当鼠标进入的时候,加载数据loading data,在控制台打印console.log("loading data,please wait...")
                scope.$apply(attrs.loa)
            })
        }
    }
})
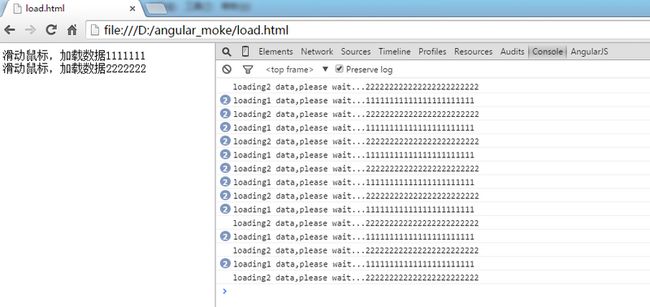
AngularJs学习笔记-第一章-指令(1)_第3张图片
6,怎样实现独立的scope,使得指令绑定互不影响
一般实现双向数据绑定的时候,由于scope没有独立就会出现下面的情况:

scope.html


scope.js
 var APP = angular.module('app', []); 
        APP.directive('mike',function() {   
          return {
           restrict:'AE',
           template:'
{{username}}
', replace:true }; });

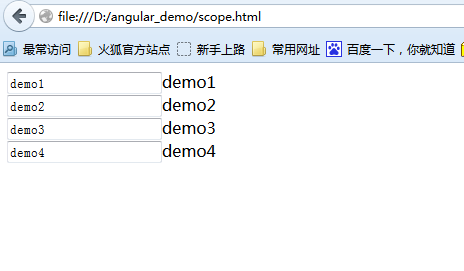
页面显示如下:
AngularJs学习笔记-第一章-指令(1)_第4张图片
为了实现独立的scope,我们需要在scope.js里面加上scope:{},以实现独立绑定,使得双向数据绑定时互补影响

 var APP = angular.module('app', []); 
        APP.directive('mike',function() {   
          return {
           restrict:'AE',
           scope:{},//在这个地方加一个独立的scope,可以实现独立绑定,使得双向数据绑定时互补影响
           template:'
{{username}}
', replace:true }; });

页面显示如下:
AngularJs学习笔记-第一章-指令(1)_第5张图片
scope绑定策略

  • @ 把当前属性作为字符串传递,还可以绑定来自外层scope的值,在属性值中插入{{}}即可

  • = 与父scope中的属性进行双向绑定

  • & 传递一个来自父scope的函数,稍后调用.

@:

scope.html


scope.js
 var APP = angular.module('app', []); 
     APP.controller('ctrl',['$scope',function($scope){
            $scope.msg = "apple is now very famous for its good looking";
        }])
     APP.directive("mike",function() {   
          return {
           restrict:'AE',
           scope:{
             phone:'@'//这里加上一个@,angularjs自动帮助绑定。
           },
           template:'

{{phone}}

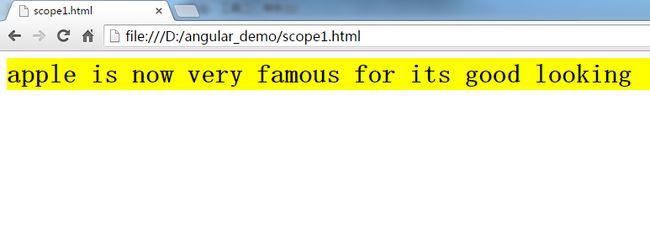
' }; });

AngularJs学习笔记-第一章-指令(1)_第6张图片

=:

scope.html


ctrl


directive

 var APP = angular.module('app', []); 
     APP.controller('ctrl',['$scope',function($scope){
            $scope.msg = "apple";
        }])
     APP.directive('mike',function() {   
          return {
           restrict:'AE',
           scope:{
             phone:'='//这里改成=,可以双向数据绑定,可以将phone的内容自动绑定到scope上面的msg上面。
           },
           template:''
        }
    });

页面显示如下图所示:
AngularJs学习笔记-第一章-指令(1)_第7张图片

&:

scope.html


scope.js
  var APP = angular.module('app', []); 
     APP.controller('ctrl',['$scope',function($scope){
            $scope.saySomething = function (name){
                alert("Hi, "+name);
            }
        }])
     APP.directive('mike',function() {//定义mike指令 
          return {
           restrict:'AE',
           scope:{
             say:'&'//这里改成&,say自动绑定
           },
           template:'
'+''//button调用函数 } });

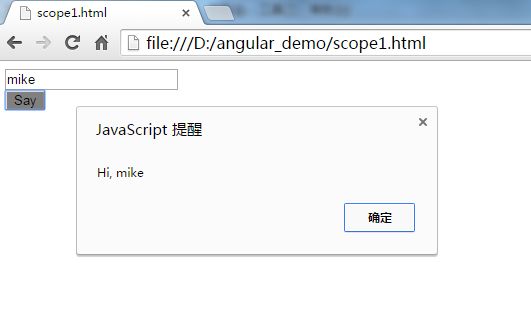
页面显示效果,如下图所示:
AngularJs学习笔记-第一章-指令(1)_第8张图片
7,form表单验证
ng-submit:用来提交动作的处理,在controller里面定义了函数来处理提交后的验证动作。dditionally it prevents the default action (which for form means sending the request to the server and reloading the current page), but only if the form does not contain action, data-action, or x-action attributes.请参考ngSubmit
ng-class:The ngClass directive allows you to dynamically set CSS classes on an HTML element by databinding an expression that represents all classes to be added.一般里面是一个表达式,请参考ngClass
$pristine:是一个boolean值,如果为true,说明user没有和form进行交互,也就是说form没有被修改,参考:$pristine
完整登录代码:


    //引入bootstrap.css样式文件


//在controller.js里面定义一个控制器ProListCtrl,方便angularjs管理界定范围

管理员登录系统
//submitForm是在controller里面定义的一个函数,用来验证loginForm提交的。
//$pristine是一个boolean,提示form中的属性emailName是否被用户修改,True if user has not interacted with the form yet.这里的意思就是说 //emailForm被用户修改且email不是合法的就提示报错。
//user是在controller中定义的一个函数,定于email,pwd,和autoLogin的值

您输入的邮箱地址不符合要求,请重新输入您的登录邮箱。

//class="alert alert-danger"是boostrap里面的一个样式,提示危险信息。
//ng-minlength和maxlength是定义密码的最大和最小长度

密码长度不够,请重新输入您的登录密码。

//ng-show 如果密码输入不符合要求报错.

密码太长,请重新输入您的登录密码。

//注册弹出的框的内容也是bootstrap提供的 //reset()是controller里面定义的一个函数,用来清空form表单 //recover是controller里面定义的一个函数,用来填充注册的内容

页面效果演示:

-邮件地址不符合要求
AngularJs学习笔记-第一章-指令(1)_第9张图片
-密码输入不符合要求
AngularJs学习笔记-第一章-指令(1)_第10张图片
-注册用户框
AngularJs学习笔记-第一章-指令(1)_第11张图片
-登录成功提示框
AngularJs学习笔记-第一章-指令(1)_第12张图片
8,如何自定义指令mikeaction
需求:我想自定义一个指令mikeaction,可以实现text的show和hide

mike.html


{{text}}
mike.js
var APP=angular.module('app', []);
APP.directive('mike', function() {
    return {
        restrict : 'EA',
        replace : true,
        transclude : true,
        scope : {
            title : '=mikeaction'//这里是固定写法,实现等值绑定
        },
        template : '
' + '
{{title}}
' + '
' + '
', link : function(scope, element, attrs) { scope.showMe = false; scope.click = function() {//click内部方法,内部才能调到 scope.showoff = !scope.showoff;//点击事件,实现收缩 } } } }); APP.controller('ctrl',function($scope) { $scope.title = 'my name is mike,and I can show and hide'; $scope.text = 'Hi,I can show,can you see me'; });

页面显示结果:
点击页面前
AngularJs学习笔记-第一章-指令(1)_第13张图片
点击页面后
AngularJs学习笔记-第一章-指令(1)_第14张图片
9,指令嵌套
需求:我想利用嵌套指令实现点击按钮列表,实现show和hide

mike.html


{{mike.text}}
mike.js
var APP=angular.module('app', []);
APP.directive('mk', function() {//定义mk指令
    return {
        restrict : 'EA',
        replace : true,
        transclude : true,
        template : '
', controller : function() { var mikes = [];//定义数组 this.open = function(selected_m) {//对选中项进行angular操作,方便与里面的指令进行交互 angular.forEach(mikes, function(mike) {//angular遍历 if (selected_m!= mike) { mike.showoff = false;//不显示 } }); } this.add = function(mike) { mikes.push(mike); } } } }); APP.directive('mike', function() {//定义mike指令 return { restrict : 'EA', replace : true, transclude : true, require : '^?mk',//require表示mike依赖外面的mk scope : { title : '=mikeaction'//等值绑定mikeaction指令 }, template : '
' + '
{{title}}
' + '
' + '
', link : function(scope, element, attrs, ctrl) {//ctrl是link的第四个参数,可以自定义,这个ctrl可以根据外层的指令mk进行交互 scope.showoff = false; ctrl.add(scope);//调用外层mkadd指令的函数方法 scope.click = function click() { scope.showoff = !scope.showoff; ctrl.open(scope);//调用外层mk指令open方法 } } } }); APP.controller("sctrl",function($scope) { $scope.mikes = [{ title : 'what is your name?', text : 'My name is mike,and I like learning AngularJs' }, { title : 'Click this and you will find something interesting', text : 'Interesting one,and Interesting two,what is the interesting three' }, { title : 'Last but not least,Do not forget to learn something new everyday,I hope we can grow more rapidly', text :'I like learning something new' }]; });

页面结果显示:
页面one
AngularJs学习笔记-第一章-指令(1)_第15张图片
页面two
AngularJs学习笔记-第一章-指令(1)_第16张图片
页面three
AngularJs学习笔记-第一章-指令(1)_第17张图片
10,利用angular ui封装的指令实现show和hide
引入控件ui-bootstrap-tpls, 和bootstrap样式文件

accordion.html


我叫 mike. {{group.content}}

添加商品的细节

{{beer}}
娱乐 游戏,动漫,电影,ktv...
Accordion.js
var APP = angular.module('app', ['ui.bootstrap']);
APP.controller('ctrl', ['$scope',
    function($scope) {

        $scope.oneAtATime = true;

        $scope.groups = [{
            title: '饮料',
            content: 'beer,flavor,pure water'
        }, {
            title: '食物',
            content: 'bread,rice,meat'
        }];

        $scope.products = ['beer1', 'beer2', 'beer3'];//定义只有3个元素的数组

        $scope.add = function() {
            var no = $scope.products.length + 1;//实现每点击一次长度自动加1
            $scope.products.push('beer ' + no);
        };

       // $scope.status = {//status可以自己定义,也可以使用angular ui内部封装定义
            //isOpen: true,
            //isDisabled: true
       // };
    }
])

页面显示:
默认页面
AngularJs学习笔记-第一章-指令(1)_第18张图片
点击打开娱乐
AngularJs学习笔记-第一章-指令(1)_第19张图片
点击获取权限-"你叫什么名字"变成灰色,不可选
AngularJs学习笔记-第一章-指令(1)_第20张图片
AngularJs学习笔记-第一章-指令(1)_第21张图片
AngularJs学习笔记-第一章-指令(1)_第22张图片
11,单指令解析
ng-submit和ng-click
ng-submit在上面的form表单提交中已经提到过了,我在这里写了一个小demo来演示ng-submit和ng-click的作用

submit.html


    ngSubmit demo


把mk加到数组mikes里面去:
mikes集合里面的内容:{{mikes}}
mk输入的内容: {{mk}}
每次累乘324:{{i}}
submit.js
var APP = angular.module('app', [])
   APP.controller('ctrl', ['$scope', function($scope) {
      $scope.mikes = [];//定义数组
      $scope.mk = '';//将这个mk利用ng-model绑定到html输入框中,设定默认值
      $scope.submit = function() {
        if ($scope.mk) {
          $scope.mikes.push(this.mk);
          $scope.mk = '';
        }
      };
    }]);

页面样式:
AngularJs学习笔记-第一章-指令(1)_第23张图片
11.1,表单错误验证
需求:表单错误的验证input.$valid,input.$error,$valid,$error.required

form.html


    ngSubmit demo


输入验证: 这是必填内容,请重新输入

用户输入记录 = {{who}}

判断是否有用户输入

myForm.input.$valid = {{myForm.input.$valid}}

判断用户输入是否有错误出现

myForm.input.$error = {{myForm.input.$error}}

判断用户输入form表单是否有效

myForm.$valid = {{myForm.$valid}}

判断用户输入是否有错误表单验证

myForm.$error.required = {{!!myForm.$error.required}}
form.js
var APP = angular.module('app', [])
    APP.controller('ctrl', ['$scope', function($scope) {
      $scope.who = 'mike';//定义表单的默认输入项
    }]);

页面显示展示:
当有内容输入的时候:
AngularJs学习笔记-第一章-指令(1)_第24张图片
当没有内容输入的时候:
AngularJs学习笔记-第一章-指令(1)_第25张图片
11.2 input元素相关指令
type="error" $error.minlength $error.maxlength $error.required

input.html


    input demo


用户名为必填项,请输入用户名。
公司名字输入太短 公司名字输入太长

user = {{user}}
mikeForm.userName.$valid = {{mikeForm.userName.$valid}}
mikeForm.userName.$error = {{mikeForm.userName.$error}}
mikeForm.lastName.$valid = {{mikeForm.lastName.$valid}}
mikeForm.lastName.$error = {{mikeForm.lastName.$error}}
mikeForm.$valid = {{mikeForm.$valid}}
mikeForm.$error.required = {{!!mikeForm.$error.required}}
mikeForm.$error.minlength = {{!!mikeForm.$error.minlength}}
mikeForm.$error.maxlength = {{!!mikeForm.$error.maxlength}}

input.js

var APP = angular.module('app', [])
     APP.controller('ctrl', ['$scope', function($scope) {
       $scope.user = {name: 'mike', com: 'ibm'};
     }]);

11.3 checkbox相关指令
ng-true-value="'YES'" ng-false-value="'NO'"

checkbox.html


    checkBox demo


value1 = {{checkBox.value1}}
value2 = {{checkBox.value2}}
checkbox.js
var APP = angular.module('app', [])
    APP.controller('ctrl', ['$scope', function($scope) {
      $scope.checkBox = {//定义默认值
       value1 : true,
       value2 : 'YES'
     };
    }]);

页面演示效果:
AngularJs学习笔记-第一章-指令(1)_第26张图片
11.4 日期控件
min和max不起作用
input.$error.date验证不起作用

date.html


    Date demo


您输入日期不符合要求,请重新输入
value = {{mDate.value | date: "yyyy/MM/dd"}}
mikeForm.input.$valid = {{mikeForm.input.$valid}}
mikeForm.input.$error = {{mikeForm.input.$error}}
mikeForm.$valid = {{mikeForm.$valid}}
mikeForm.$error.required = {{!!mikeForm.$error.required}}
date.js
var APP = angular.module('app', [])
     APP.controller('ctrl', ['$scope', function($scope) {
       $scope.mDate = {
         value: new Date()//设定时间
       };
     }]);

页面效果演示:
AngularJs学习笔记-第一章-指令(1)_第27张图片
日期格式报错:
AngularJs学习笔记-第一章-指令(1)_第28张图片
11.5,邮件格式的输入


type="email"

11.6 月份的输入


11.7 数值的输入

11.8 radio 的输入

radio伪代码
$scope.specialValue = {
        "id": "12345",
        "value": "green"
      };


11.9 正则表达式验证输入
ng-trim="false":字符空格控制;
ng-pattern="example.word":正则表达式验证输入

validation.html


    validation demo


Required! 只有没有空格的英文单词才被允许!
text = {{example.text}}
myForm.input.$valid = {{myForm.input.$valid}}
myForm.input.$error = {{myForm.input.$error}}
myForm.$valid = {{myForm.$valid}}
myForm.$error.required = {{!!myForm.$error.required}}
validation.js
var APP = angular.module('app', [])
    APP.controller('ctrl', ['$scope', function($scope) {
      $scope.example = {
        text: 'word',
        word: /^\s*\w*\s*$/
      };
    }]);

页面演示:
正确输入:
AngularJs学习笔记-第一章-指令(1)_第29张图片
错误输入:
AngularJs学习笔记-第一章-指令(1)_第30张图片

11.10 时间的输入


11.11 URL 的输入

11.12 week的输入

11.13,ngBind
The ngBind attribute tells Angular to replace the text content of the specified HTML element with the value of a given expression, and to update the text content when the value of that expression changes.ngBind告诉angular去实时替换html中text内容。

ngBind.html


    ngBind demo


Hi,
ngBind.js
var APP = angular.module('app', [])
    APP.controller('ctrl', ['$scope', function($scope) {
      $scope.name = 'AngularJs';//设定默认值
    }]);

页面显示结果:
AngularJs学习笔记-第一章-指令(1)_第31张图片

aliyun 开发的公共指令
公共头(topbar)
公共导航(navbar)
truncateText(文本省略,处理特殊字符)
placeHolder
loading
wrapper for high charts
listSelector
simpleGrid(repeat,bindonce,searchBar,tableSearch,loading pagination,noDataInfo)
simpleForm
aliyunConsoleSpm
aliyunConsoleAside
numberRange
clipCopy
tableFixed

补充:
模式匹配(正则表达式)
使用ng-pattern="/PATTERN/"来确保输入能够匹配指定的正则表达式:


url输入匹配
验证输入内容是否是URL,将input的类型设置为 url:

大家有问题欢迎进入群讨论:487768805

你可能感兴趣的:(AngularJs学习笔记-第一章-指令(1))