偶然间发现QQ的消息挺好玩的,应用内收到新消息,红色的提醒圆圈可以拉伸并拖动。很有意思,决定自己试一下。
先上效果图:
接下来,我们一步一步来实现之。
我们在拖动过程中,已知哪些信息:
初始的半圆心位置A,半径R。
接下来我们可以通过用户触摸的位置获取以下信息:
拖动的半圆形位置B。
(注:并不是触摸的点就是新的圆点,需要进行加工。开始触摸的点为Touch,触摸变化的点为Touch',新的圆点为A+(Touch'-Touch))。
我们根据当前拖动的距离与最大拖动距离进行求比率,再乘以初始半径R得到拖动半径R'。
我们先取一个中间状态来分析一下:
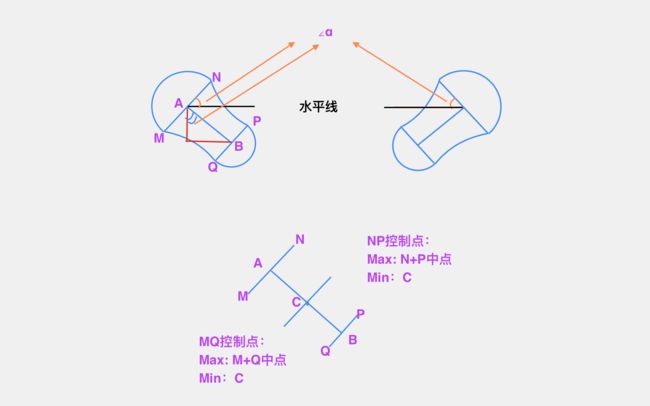
我们在拖动时,小球会被分为两个部分,两个半圆圆心的连线与水平线的夹角为α。
最关键的一步是:计算出α的值。
根据同角的余角相等,以及三角函数能的到:
sinα = (B.x-A.x) / AB的长度
然后通过反正弦函数,可以得到角α的值。
(注:虽然使用正切函数在数值计算时很方便,但是反正切函数在0位置会发生突变,无法满足我们拖动时渐变的效果,故舍弃。数学不行,在这个坑里困了好久。。)
计算出角α就能开始绘图了。
我们一一计算出图中M、N、P、Q四个点的坐标,然后开始操作:
1 从M点开始,A为圆心,N为终点,绘制半圆。(使用α角)
2 从N点开始,P点为终点,绘制贝塞尔曲线。
3 从P点开始,B为圆心,Q为终点,绘制半圆。(使用α角)
4 从Q点开始,M点为终点,绘制贝塞尔曲线。
绘制时,会发现步骤2和4的控制点不好确定,但是如果不确定的话,没法绘制。如果使用两个圆心的中点为控制点,会发现初始拖动时两个半圆中间缝隙很大,不够平滑。
此时我们精简一下模型,看下部的图:
C是AB中点,过C点作MN的平行线。
NP的控制点位于C点的右上侧。
MQ的控制点位于C点点左下侧。
两个控制点是根据拖动的距离变化的。取极限即可得到两个点对应的一次比率关系。
这样就能够完成步骤2和4了。
此时我们就完成了拖动时的效果了。
- (void)updateCircleWithOriginCenter:(CGPoint)originCenter withNewCenter:(CGPoint)newCenter
{

     //拖拽的距离,等于两个圆心的距离
   double moveDistance = (double)sqrt((newCenter.y-originCenter.y)*(newCenter.y-originCenter.y) + (newCenter.x-originCenter.x)*(newCenter.x-originCenter.x));
   if (moveDistance == 0) {
       return;
   }
   //移动的水平角度(两圆心连线与水平面夹角)
   //反正切函数很方便,但因为反正切函数在0的位置突变,从-M_PI/2变为 M_PI/2,无法满足我们拖动时的渐变需求,故舍弃。我们使用反正弦函数。
   //正弦函数=对边/斜边  两个圆心之间的连线为斜边,对边是Y轴的垂直距离
   double sinValue = (double)(newCenter.y-originCenter.y)/(double)sqrt((newCenter.y-originCenter.y)*(newCenter.y-originCenter.y) + (newCenter.x-originCenter.x)*(newCenter.x-originCenter.x));
   //获取弧度
   double angle = asin(sinValue);

   double rate = moveDistance/self.pullDis;

   if (rate >= 1) {
       rate = 1;

       //如果拖拽结束了,那就不做操作,否则会死循环。因为拖拽结束,会进行恢复绘制,恢复绘制方法中会调用本方法,然后本方法再调用恢复绘制方法。。。
       if (self.isEnding) {
           return;
       }

       //达到最大值,断开
       self.isEnding = YES;

       //如果有回调,则触发
       if (self.pullBlock) {
           self.pullBlock();
       }

       if (self.needAnimation) {

           //将原始位置的圆进行恢复绘制,就是把原始位置的小圆拉过来。在手指触摸的位置合二为一
           [self backCircleWithTotal:100 withCurrent:0 withTotalTime:0.05 withOriginCenter:newCenter withEndCenter:originCenter];
       }else{

           //拉伸到最大值时,如果不需要动画,且是用户设置的类型,那么隐藏layer
           if (self.circleType == CircleTypeSet) {
               self.isSetMaxValue = YES;
               [self resetOriginCircle];
               self.pointLayer.hidden = YES;
           }

       }

       //如果有文本,隐藏文本
       if (self.contentString) {
           self.contentTextLayer.hidden = YES;
       }
       return;
   }

   CGFloat bigCircleRate = self.bigChangeRate > 0 ? self.bigChangeRate:1/3;
   CGFloat smallCircleRate = self.smallChangeRate > 0 ? self.smallChangeRate:1;

   //新的半径
   CGFloat newRadius = 0;
   switch (self.pullType) {
       case PullTypeLeaveBig:
       {
           //如果是拉到最大值,结束绘制,合二为一的过程,那么起始圆和目标圆半径互换
           //比如说:大半径留在原地,小半径被拖拽走的这种情况
           //当我向外拉的时候:拖动的圆半径较小,小圆移动
           //当我未拉到最大值,小圆回去,小圆移动
           //当我拉到最大值,大圆向小圆合并。大圆移动
           if (self.isEnding) {
               self.circleR = self.originR*((1-rate*smallCircleRate)>self.minRate?(1-rate*smallCircleRate):self.minRate);
               newRadius = self.originR*((1-rate*bigCircleRate)>self.minRate?(1-rate*bigCircleRate):self.minRate);

           }else{
               newRadius = self.originR*((1-rate*smallCircleRate)>self.minRate?(1-rate*smallCircleRate):self.minRate);
               self.circleR = self.originR*((1-rate*bigCircleRate)>self.minRate?(1-rate*bigCircleRate):self.minRate);
           }
       }
           break;

       case PullTypeMoveBig:
       {
           if (self.isEnding) {
               newRadius = self.originR*((1-rate*smallCircleRate)>self.minRate?(1-rate*smallCircleRate):self.minRate);
               self.circleR = self.originR*((1-rate*bigCircleRate)>self.minRate?(1-rate*bigCircleRate):self.minRate);

           }else{
               self.circleR = self.originR*((1-rate*smallCircleRate)>self.minRate?(1-rate*smallCircleRate):self.minRate);
               newRadius = self.originR*((1-rate*bigCircleRate)>self.minRate?(1-rate*bigCircleRate):self.minRate);
           }

       }
           break;
       default:
           break;
   }

   //创建新的BezierPath
   UIBezierPath *path = [UIBezierPath bezierPath];
   if (newCenter.x-originCenter.x < 0) {

       //圆的中心对称轴,左侧与右侧的计算不一样

       //初始圆的底部的点
       CGPoint originBottomPoint = CGPointMake(originCenter.x+sin(angle)*self.circleR, originCenter.y+cos(angle)*self.circleR);
       //初始圆的顶部的点
       CGPoint originTopPoint = CGPointMake(originCenter.x-sin(angle)*self.circleR, originCenter.y-cos(angle)*self.circleR);

       //新圆心的左上角的点
       CGPoint newTopPoint = CGPointMake(newCenter.x-sin(angle)*newRadius, newCenter.y-cos(angle)*newRadius);
       //新圆心的下部的点
       CGPoint newBottomPoint = CGPointMake(newCenter.x+sin(angle)*newRadius, newCenter.y+cos(angle)*newRadius);

       //两圆心连线中点
       CGPoint controlPoint = CGPointMake(originCenter.x+(newCenter.x-originCenter.x)/2, originCenter.y+(newCenter.y-originCenter.y)/2);

       //初始圆顶部点与新圆的顶部点连线的中点
       CGPoint topMiddlePoint = CGPointMake((newTopPoint.x+originTopPoint.x)/2, (newTopPoint.y+originTopPoint.y)/2);

       //上部控制点的X坐标,与拉伸比例有关,未拉伸时,取顶部点连线中点,拉伸最大时,取两圆心连线中点
       CGFloat topX = topMiddlePoint.x + (controlPoint.x-topMiddlePoint.x)*rate;
       //上部控制点的Y坐标,与拉伸比例有关
       CGFloat topY = topMiddlePoint.y + (controlPoint.y-topMiddlePoint.y)*rate;

       //拉伸时,上部的控制点。不断变化的
       CGPoint topControlPoint = CGPointMake(topX, topY);

       //两个圆下部点连线的中点
       CGPoint bottomMiddlePoint = CGPointMake((newBottomPoint.x+originBottomPoint.x)/2, (newBottomPoint.y+originBottomPoint.y)/2);
       //下部点的x,随比例变化
       CGFloat bottomX = bottomMiddlePoint.x + (controlPoint.x-bottomMiddlePoint.x)*rate;
       //下部点的y,随比例变化
       CGFloat bottomY = bottomMiddlePoint.y + (controlPoint.y-bottomMiddlePoint.y)*rate;
       //拉伸时,下部控制点
       CGPoint bottomControlPoint = CGPointMake(bottomX, bottomY);

        //移动到初始圆的下部点
       [path moveToPoint:originBottomPoint];

       //原始的圆,右半侧,逆时针画圆
       [path addArcWithCenter:originCenter radius:self.circleR startAngle:M_PI/2-angle endAngle:M_PI*3/2-angle clockwise:NO];

       //从原始圆的顶部,连线到新圆的顶部,上部点为控制点
       [path addQuadCurveToPoint:newTopPoint controlPoint:topControlPoint];

       //新圆的左侧,逆时针画圆
       [path addArcWithCenter:newCenter radius:newRadius startAngle:M_PI*3/2-angle endAngle:M_PI*5/2-angle clockwise:NO];

        //从新圆的底部,连接到初始圆的底部点,下部点为控制点
       [path addQuadCurveToPoint:originBottomPoint controlPoint:bottomControlPoint];

        }else{

       //初始圆的下部点
       CGPoint originBottomPoint = CGPointMake(originCenter.x-sin(angle)*self.circleR, originCenter.y+cos(angle)*self.circleR);

       CGPoint originTopPoint = CGPointMake(originCenter.x+sin(angle)*self.circleR, originCenter.y-cos(angle)*self.circleR);

       //新圆心的左上角的点
       CGPoint newTopPoint = CGPointMake(newCenter.x+sin(angle)*newRadius, newCenter.y-cos(angle)*newRadius);
       CGPoint newBottomPoint = CGPointMake(newCenter.x-sin(angle)*newRadius, newCenter.y+cos(angle)*newRadius);

       //两圆心连线中点
       CGPoint controlPoint = CGPointMake(originCenter.x+(newCenter.x-originCenter.x)/2, originCenter.y+(newCenter.y-originCenter.y)/2);


       //初始圆顶部点与新圆的顶部点连线的中点
       CGPoint topMiddlePoint = CGPointMake((newTopPoint.x+originTopPoint.x)/2, (newTopPoint.y+originTopPoint.y)/2);

       //上部控制点的X坐标,与拉伸比例有关,未拉伸时,取顶部点连线中点,拉伸最大时,取两圆心连线中点
       CGFloat topX = topMiddlePoint.x + (controlPoint.x-topMiddlePoint.x)*rate;
       //上部控制点的Y坐标,与拉伸比例有关
       CGFloat topY = topMiddlePoint.y + (controlPoint.y-topMiddlePoint.y)*rate;

       //拉伸时,上部的控制点。不断变化的
       CGPoint topControlPoint = CGPointMake(topX, topY);

       //两个圆下部点连线的中点
       CGPoint bottomMiddlePoint = CGPointMake((newBottomPoint.x+originBottomPoint.x)/2, (newBottomPoint.y+originBottomPoint.y)/2);
       //下部点的x,随比例变化
       CGFloat bottomX = bottomMiddlePoint.x + (controlPoint.x-bottomMiddlePoint.x)*rate;
       //下部点的y,随比例变化
       CGFloat bottomY = bottomMiddlePoint.y + (controlPoint.y-bottomMiddlePoint.y)*rate;
       //拉伸时,下部控制点
       CGPoint bottomControlPoint = CGPointMake(bottomX, bottomY);

       [path moveToPoint:originBottomPoint];

       //原始的圆,左半侧,顺时针画圆
       [path addArcWithCenter:originCenter radius:self.circleR startAngle:M_PI/2+angle endAngle:M_PI*3/2+angle clockwise:YES];

       //添加曲线到新圆的顶部
       [path addQuadCurveToPoint:newTopPoint controlPoint:topControlPoint];

       //新圆的右侧,顺时针画圆
       [path addArcWithCenter:newCenter radius:newRadius startAngle:M_PI*3/2+angle endAngle:M_PI*5/2+angle clockwise:YES];

       //添加曲线到新圆的底部点
       [path addQuadCurveToPoint:originBottomPoint controlPoint:bottomControlPoint];

       }


   //更新layer
   self.pointLayer.path = path.CGPath;

}
接下来就是要处理拖动到一半,松手的处理了。
我们需要拉动的那一部分按照拖动出去的效果,反过来合并到初始圆中。
这里,我们已知这些信息:
初始圆心A,半径R。
松手时圆心B,半径R'。
接下来我们需要做这些操作:
1 计算出直线AB的关系式,然后按比率进行缩小。
2 更新当前的图形。可使用拖动时的函数,只需要
把起始点和结束点调整一下即可。
3 会到初始位置后,反弹动画。
- (void)backCircleWithTotal:(NSInteger)total withCurrent:(NSInteger)current withTotalTime:(CGFloat)totalTime withOriginCenter:(CGPoint)originCenter withEndCenter:(CGPoint)endCenter
{
    NSTimeInterval duration = totalTime/total;

    __block NSInteger value = current;

    //采用递归处理帧
    if (current <= total) {

        dispatch_after(dispatch_time(DISPATCH_TIME_NOW, (int64_t)(duration * NSEC_PER_SEC)), dispatch_get_main_queue(), ^{

            //比率
            CGFloat rate = value*1.f/total*1.f;

            //X,Y值的变化率
            CGFloat xChangeValue = endCenter.x-originCenter.x;
            CGFloat yChangeValue = endCenter.y-originCenter.y;

            //回弹时,不同时刻的圆心位置
            CGPoint backCenter = CGPointMake(endCenter.x-xChangeValue*rate, endCenter.y-yChangeValue*rate);
            //绘制曲线
            [self updateCircleWithOriginCenter:originCenter withNewCenter:backCenter];

            //递归调用,继续更新
            [self backCircleWithTotal:total withCurrent:value+1 withTotalTime:totalTime withOriginCenter:originCenter withEndCenter:endCenter];

            if (value == total) {
                //当完成整个回弹时,设置属性,重置圆的位置
                self.isEndAnimation = YES;
            }
        });

    }else{
        //如果本次拖拽到最大值了,不需要回弹动画了
        if (self.isEnding) {

            return;
        }

        //未拉到最大值,放手的动画处理
        CGFloat rate = 0.1;

        //X,Y的变化值
        CGFloat xChangeValue = endCenter.x-originCenter.x;
        CGFloat yChangeValue = endCenter.y-originCenter.y;

        //初始位置的左上侧
        CGPoint backCenter = CGPointMake(originCenter.x-xChangeValue*rate-self.originR, originCenter.y-yChangeValue*rate-self.originR);
        //初始位置的右下侧
        CGPoint foreCenter = CGPointMake(originCenter.x+xChangeValue*rate/2-self.originR, originCenter.y+yChangeValue*rate/2-self.originR);
        //初始位置的左上侧,较靠近圆心
        CGPoint backTwoCenter = CGPointMake(originCenter.x-xChangeValue*rate/3-self.originR, originCenter.y-yChangeValue*rate/3-self.originR);

        //动画
        CAKeyframeAnimation *animation = [CAKeyframeAnimation animationWithKeyPath:@"position"];
        animation.calculationMode = kCAAnimationLinear;

        CGMutablePathRef path = CGPathCreateMutable();
        //移动到圆心
        CGPathMoveToPoint(path, NULL,originCenter.x-self.originR, originCenter.y-self.originR);
        //圆心左上侧
        CGPathAddLineToPoint(path, NULL, backCenter.x, backCenter.y);
        //圆心的右下侧
        CGPathAddLineToPoint(path, NULL, foreCenter.x, foreCenter.y);
        //圆心的左上侧,近圆心
        CGPathAddLineToPoint(path, NULL, backTwoCenter.x, backTwoCenter.y);
        //圆心的右下侧,近圆心
        CGPathAddLineToPoint(path, NULL, originCenter.x-self.originR, originCenter.y-self.originR);
        animation.path = path;
        animation.duration = 0.35;
        [self.pointLayer addAnimation:animation forKey:@"pointBackAnimation"];


    }
}
至此,我们就能实现动感的小球了。
有什么意见或者建议请留言哈,共同进步~
代码在这里
