2016年,与我而言是不平凡的一年,甚至是煎熬的一年,个中滋味,唯有自己体会.
2017如期而至,和过去的自己告别,开始新的生活.
关于项目(代码下载链接,最底部点击GitHub)
本次开源项目为Flappy Bird升级版,支持单人游戏,双人对战游戏,死亡复活,以及多种样式的水管.大大增加了游戏的可玩性.
开发难度也相对简单,适合对cocos2d-x以及C++有一定了解的朋友.
项目使用c++,基于cocos2d-x-x引擎开发,开发工具为Xcode8.1,支持Android,iOS以及wp系统.
项目导入方式:创建一个大于3.0版本的cocos工程,将Class目录以及Resources目录替换为下载代码里的俩个文件夹.
除了Xcode以使用其他开发工具开会报错,将项目里俩个.mm后缀的文件改为.cpp并且删除#if (CC_TARGET_PLATFORM == CC_PLATFORM_IOS)后的代码即可.
cocos2d-x号称一套代码可多平台运行,但实际开发中,还是会针对不同平台做相应的处理,如调用各平台自带的api等,iOS里的GameCenter以及按需求调用不同平台的控件等等,笔者采用Xcode开发的,为了调用iOS的api做了相应的修改,使用其他开发工具的同学修改回来即可.
选择游戏模式场景(SelectPlayer)
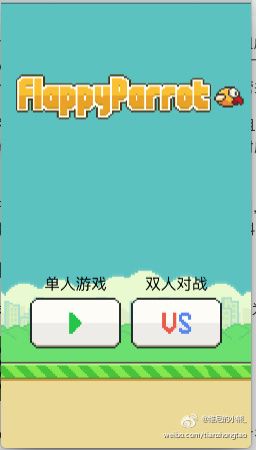
这个场景比较简单,由俩个Button,背景Sprite,移动的陆地,标题以及小鸟构成.效果如下图:
Button的创建
由于Button是cocos GUI中扩展的类,使用前需导入ui/CocosGUI.h,并且引入using namespace ui的命名空间.
    // 设置button的图片
    auto btn = Button::create(pressImageName, "", "", TextureResType::PLIST);
    auto btnW = btn->getContentSize().width;
    auto margin = kWinSizeWidth * 0.02;
    btn->setAnchorPoint(Vec2(0, 0));
    btn->setTag(tag);
    btn->cocos2d::Node::setPosition(tag == 10 ? kWinSizeWidth * 0.5 - btnW -margin : kWinSizeWidth * 0.5 + margin, postion.y);
    btn->addTouchEventListener(CC_CALLBACK_2(SelectPlayer::buttonTouchCallback, this));
    addChild(btn);
TextureResType作用
- 在游戏开发过程中,对于图片的需求量会很大.为了解决大量图片造成安装包过大的问题.UI人员通常都会将很多张图片合成一张pvr.ccz格式或者png格式的图片,并配有一个与之对应的Plist文件用于读取不同图片的Rect.如果图片采用了上面的方式,需要将TextureResType设置为PLIST.如果是单独的一张图片,设为LOCAL即可.
给Button添加点击事件,并且设置Button的Tag,以便在Button的点击事件中判断进入单人模式还是对战模式.代码如下
void SelectPlayer::buttonTouchCallback(Ref *sender, Widget::TouchEventType type)
{
if (type == Widget::TouchEventType::ENDED) {
CocosDenshion::SimpleAudioEngine::getInstance()->playEffect("swoosh.caf");
auto btn = static_cast标题和Bird以及陆地的动画效果
标题与Bird都是采用Sprite加载的图片缓存,放到对应的位置,Land为单独封装的类,重写Layer的onEnterTransitionDidFinish,实现以下代码执行对应的动画.
void SelectPlayer::onEnterTransitionDidFinish()
{
    Layer::onEnterTransitionDidFinish();

    // floor move animation
    float durtion = 4;
    auto move = MoveTo::create(durtion, Vec2(-kWinSizeWidth, 0));
    auto moveEnd = CallFuncN::create([this](Node *){
        land->setPosition(Vec2(0, 0));
    });
    land->runAction(RepeatForever::create(Sequence::create(move, moveEnd, NULL)));

    // bird fly anim
    float durtion1 = 1.5;
    auto moveUp = MoveTo::create(durtion1, Vec2(title->getPosition().x, title->getPosition().y + 15));
    auto moveDown = MoveTo::create(durtion1, Vec2(title->getPosition().x, title->getPosition().y - 15));
    title->runAction(RepeatForever::create(Sequence::create(moveUp, moveDown, NULL)));

    auto birdMoveUp = MoveTo::create(durtion1, Vec2(bird->getPosition().x, bird->getPosition().y + 15));
    auto bireMoveDown = MoveTo::create(durtion1, Vec2(bird->getPosition().x, bird->getPosition().y - 15));
    auto birdMove = Sequence::create(birdMoveUp, bireMoveDown, NULL);

    cocos2d::Vectorframs;
    for (int i = 0; i < 3; i++) {
        char name[30];
        sprintf(name, "fly_0_%d.png", i);
        auto sf = SpriteFrameCache::getInstance()->getSpriteFrameByName(name);
        frams.pushBack(sf);
    }
    Animation *birdA = Animation::createWithSpriteFrames(frams);
    birdA->setDelayPerUnit(0.1);
    birdA->setRestoreOriginalFrame(true);
    Animate *anma = Animate::create(birdA);

    bird->runAction(RepeatForever::create(anma));
    bird->runAction(RepeatForever::create(birdMove));
}
场景切换的动画效果
cocos2d-x中提供了30多种场景切换的动画,使用起来非常方便,文档中注释的也很清楚,这里就不一一介绍动画效果了,开发者可根据项目的需求自行选择.
当然,有时候框架内自带的转场效果会无法满足需求.也是可以自定义转场动画效果的.需要自定义一个继承至Scene的类当做中间的动画即可,如有需求的朋友随意点开一个场景切换的源代码进行阅读,原理比较简单.如有问题可以私信我交流.
游戏场景(Game)
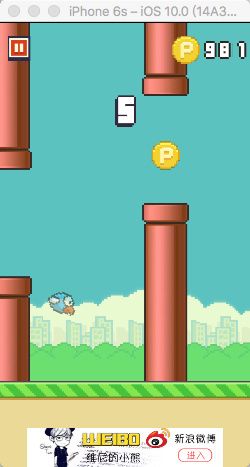
Game场景中提供了俩种游戏模式,一种是单人游戏,场景效果如下图
对战模式,场景效果如下图
通过图像可以对比出,俩种模式有许多相同元素,定义一个游戏模式枚举PlayerType,并且给在创建场景的时传入.
通过判断不同游戏模式,区分添加不同的元素.逻辑并不复杂,这里对UI的布局就不仔细讲了.有兴趣的朋友可通过阅读源码研究.(为了方便小伙伴阅读,项目布局使用纯代码开发,实际开发过程中可以使用CocosStudio或者CocosCreator来进行布局,简单快速)
物理引擎的使用
项目中物理引擎使用的是cocos2d-x自带的PhysicsWord,对比Box2D使用更加简单,唯一的缺点是当物体与刚体碰撞速度过快时,有时候物体会穿透刚体,解决的办法目前是在update方法里,手写代码来对位置进行判断.这里Box2D做的相对好一些,可以设置刚体的bullet属性.
物理世界的添加也非常简单,在创建Scene时候调用createWithPhysics就好,代码如下
Scene* Game::createScene(PlayerType playerType)
{
    // 添加物理引擎
    Scene *scene = Scene::createWithPhysics();
    // 设置PhysicsBody的边缘可见,调试用
    scene->getPhysicsWorld()->setDebugDrawMask(PhysicsWorld::DEBUGDRAW_ALL);
    // set Gravity acceleration
    scene->getPhysicsWorld()->setGravity(Vec2(0, -1400));

    auto gameLayer = Game::createGameLayer(playerType);
    if (gameLayer) {
        scene->addChild(gameLayer);
    }

    // addPhysicsEdge
    auto edge = PhysicsEdge::create();

    scene->addChild(edge);

    return scene;
}
小鸟类的封装(Bird)
小鸟作为游戏的重要元素,为了方便场景内的调用,把小鸟单独封装起来,并且提供下列方法
typedef std::function AnimEnd;

enum BirdColor{
    Red = 0,
    Blue,
    Yellow,
    Random
};

class Bird:public Sprite {

public:
    BirdColor color;

    static Bird* createBird(BirdColor ExcludeColor = Random);

    void startFlyAnimation();
    void stopFlyAnimation();
    void stopFlyAndRotatoAnimation();
    void stopRatatoAnimation();
    AnimEnd _end;

    void startFallAnimation(AnimEnd animEnd);
    void startShakeAnimation(int birdNum);
    void click();
    void birdResurrection(Vec2 position);

private:
    void stopShakeAnimation();
    bool isShakeing;

};
需要注意的是,在init方法里,给Bird类直接绑定上一个PhysicsBody,并且设置setDynamic为true,以便检测后面与其他游戏元素的碰撞.
小鸟有三种颜色,每次游戏随机颜色,当双人对战模式时,为了保证俩只鸟颜色的不同,需将第一只鸟的颜色排除.具体代码如下.
Bird* Bird::createBird(BirdColor ExcludeColor)
{
    auto bird = new Bird();

    auto randColor = BirdColor(BirdColor(arc4random_uniform(3)));

    while (randColor == ExcludeColor) {
        randColor = BirdColor(BirdColor(arc4random_uniform(3)));
    }

    char name[30];
    sprintf(name, "fly_%d_0.png", randColor);

    if (bird && bird->initWithSpriteFrameName(name)) {
        bird->color = randColor;
        bird->addComponent(PhysicsBody::createBox(bird->getContentSize()));
        bird->getPhysicsBody()->setDynamic(true);
        bird->getPhysicsBody()->setEnabled(false);
        bird->getPhysicsBody()->setRotationEnable(false);
        bird->getPhysicsBody()->setVelocityLimit(500);
        bird->getPhysicsBody()->addMoment(-1);
        bird->getPhysicsBody()->setContactTestBitmask(1);
        bird->autorelease();
    } else {
        delete bird;
        bird = nullptr;
    }

    return bird;
}
水管(WaterPipe)
为了增加游戏的可玩性,这里将水管分为三种类型,定义一个枚举,如下代码
enum WaterPipeType {
    Normal = 0,
    Move,
    Plant,
};
- Normal : 正常样式的水管,由上下俩个水管组成,中间还有一个金币构成.出现几率为80%.
- Move : 与Normal相同,不含有金币图片,会上下移动的水管.出现几率为10%.
- Plant : 含有一棵食人花的水管,只有一个水管并且方向随机,食人花会上下移动.出现几率为10%.
在水管的初始化方法里,随机生成水管的类型,并且根据不同类型,添加不同的水管元素.如果是Move或者Plant类型的,需要在水管的onEnterTransitionDidFinish方法内,执行对应元素的动画.同样,给水管以及食人花都绑定刚体,并且设置setContactTestBitmask,用于检测与小鸟的碰撞.
- 关于PhysicsBody的
setCollisionBitmask,setContactTestBitmask,setCategoryBitmask三个属性是用于设置哪个刚体可以和哪个刚体发生碰撞的.这里就不过多介绍,网上资料很多并且很详细,喜欢深入研究的小伙伴可自己查阅.
数字图片文字(LabelAtlas)
游戏开发中,经常会使用一些由UI给的数字图片做为字体的文字样式,如图所示
这种Label使用图片作为文字,该类直接使用图片初始化文字对象。比如以下代码:
        auto numTexture = TextureCache().addImage("small_number_iphone.png");
        auto picH = numTexture->getContentSize().height;
        auto picW = numTexture->getContentSize().width;
        int coinCount = GameDataManager::getInstance()->getAllCoinCount();

        _goldCoinCount = LabelAtlas::create(to_string(coinCount), "small_number_iphone.png", picW * 0.1, picH, '0');
        _goldCoinCount->setAnchorPoint(Vec2(0, 0.5));
        _goldCoinCount->setPosition(_goldCoin->getPosition().x + 10, _goldCoin->getPosition().y);
        addChild(_goldCoinCount, 4);
需要注意的是,这种样式的图片是有要求的,图片中的十个数字要按照ASCII顺序排列,我们要设置第一个字符的ASCII编码,这样,Cocos2d-x就可以直接计算出不同字符对应的图形了。
自此,游戏内的相关元素都已添加完毕.
游戏逻辑代码
点击事件的监听:在Game类的init方法中,添加对屏幕点击以及刚体碰撞的监听事件.并且设置监听的回调方法
    // add onTouchLisner
    auto lisner = EventListenerTouchAllAtOnce::create();
    lisner->onTouchesBegan = CC_CALLBACK_2(Game::onTouchesBegan, this);
    _eventDispatcher->addEventListenerWithSceneGraphPriority(lisner, this);
- 点击事件的回调,根据不同的游戏类型,做不同的处理,当是双人模式的时候,判断点击位置处于屏幕的哪一边,并且执行对应Bird的click()方法.
这里需要注意一点的是,cocos2d-x中,iOS默认是将多点触控关闭的,需要在AppController.mm类中,将[eaglView setMultipleTouchEnabled:YES];
void Game::onTouchesBegan(const std::vector &touches, cocos2d::Event *event)
{
    if (_gameOver) return;

    CocosDenshion::SimpleAudioEngine::getInstance()->playEffect("flap.caf");

    if (!_gameIsStarting) {
        _gameIsStarting = true;
        startGame();

        if (_playerType == PlayerType::TwoPlayer) {
            _bird1->click();
            _bird2->click();
            return;
        }
    }

    if (_playerType == PlayerType::OnePlayer) {
        _bird1->click();
    } else {
        // 对战模式 判断点击的点在屏幕哪边
        for (int i = 0; i < touches.size(); i++) {
            auto touch = touches[i];
            if (touch->getLocation().x <= kWinSizeWidth * 0.5) {
                _bird1->click();
            } else {
                _bird2->click();
            }
        }
    }
}
Bird的click方法里,给bird一个向上的速度,并且执行鸟头向上旋转然后又向下旋转的动画.如代码所示:
void Bird::click()
{
    stopShakeAnimation();

    getPhysicsBody()->setVelocity(Vec2(0, 600));

    // click bird rotate action
    stopActionByTag(kBirdRotatoTag);
    auto rotaUp = RotateTo::create(0.1, -40);
    auto rotaDown = RotateTo::create(2.5, 80);
    auto seqe = Sequence::create(rotaUp, rotaDown, NULL);
    seqe->setTag(kBirdRotatoTag);
    this->runAction(seqe);
}
水管的出现:为了方便代码的管理,这里将水管,陆地等元素添加到了GameElement中,并将GameElement添加到Game上.当游戏开始时候,会出现等待动画,如图
当玩家点击屏幕后,调用GameElement的addWaterPipe()方法,开启定时器,每隔一段时间添加一个新的水光.并且将其放到一个容器里,并且判断水管的位子,如果超过小鸟,隐藏金币,播放音乐,增加用户金币数并且将超出屏幕的水管移除.代码如下
void GameElement::update(float dt)
{
    if (_birdUnrivalled) {
        _unrivalledIndex--;
        if (_unrivalledIndex <= 0) {
            _birdUnrivalled = false;
            _unTimeEnd();
        }
    }

    _index++;

    if (_index == 135) {
        // add water pipe
        _index = 0;
        auto wp = WaterPipe::createWaterPipe(_wpColor, _wpHeight, playType == OnePlayer);
        wp->setPosition(kWinSizeWidth, 0);
        addChild(wp);
        _waterPipes.pushBack(wp);
    }

    for (auto it = _waterPipes.begin(); it != _waterPipes.end(); it ++) {
        WaterPipe *wp = *it;

        if (_birdUnrivalled) {
            wp->setChildPhysicsBodyEnabled(false);
        } else {
            wp->setChildPhysicsBodyEnabled(true);
        }

        // move wp
        wp->setPosition(Vec2(wp->getPosition().x - 3, wp->getPosition().y));

        if (wp->_coin->isVisible()) {
            // remove coin
            if (wp->getPosition().x < _birdX) {
                wp->_coin->setVisible(false);

                // play sound effect
                if (playType == OnePlayer) {
                    GameDataManager::getInstance()->addCoin();
                    _goldCoinCount->setString(to_string(GameDataManager::getInstance()->getAllCoinCount()));
                }
                _passNum->setString(to_string(++_passIndex));
                 CocosDenshion::SimpleAudioEngine::getInstance()->playEffect("coin.aif");
            }
        }

        if (wp->getPosition().x < 0 - wp->getContentSize().width) {
            // remove wp
            _waterPipes.eraseObject(wp);
            wp->removeFromParent();
        }
    }
}
碰撞事件的检测:同样也在Game类的init方法中,添加刚体碰撞的监听事件.并且设置监听的回调方法
    // add Contact listener
    auto contactLisner = EventListenerPhysicsContact::create();
    contactLisner->onContactBegin = CC_CALLBACK_1(Game::onContactBegan, this);
    _eventDispatcher->addEventListenerWithSceneGraphPriority(contactLisner, this);
碰撞Action,需要注意参与碰撞的元素需要设置setContactTestBitmask.
bool Game::onContactBegan(cocos2d::PhysicsContact &cat)
{
    if (_gameOver || _birdUnrivalled) return true;

    // 判断是不是鸟
    if (_playerType == OnePlayer) {
        if (!(cat.getShapeA()->getBody()->getNode()->getTag() == kBird1Tag || cat.getShapeB()->getBody()->getNode()->getTag() == kBird1Tag)) {
            return true;
        }
    } else {
        if (!(cat.getShapeA()->getBody()->getNode()->getTag() == kBird1Tag || cat.getShapeB()->getBody()->getNode()->getTag() == kBird1Tag || cat.getShapeB()->getBody()->getNode()->getTag() == kBird2Tag || cat.getShapeB()->getBody()->getNode()->getTag() == kBird2Tag)) {
            return true;
        }
    }

    _gameOver = true;

    CocosDenshion::SimpleAudioEngine::getInstance()->playEffect("hit.caf");
    showFlashLightAnimation();

    // Contact object stopGame
    if (_playerType == OnePlayer) {
        // stop Fly and rota
        _bird1->stopFlyAndRotatoAnimation();
        // start Fall
        _bird1->startFallAnimation([this](){
            // show revival view

            auto tipsLayer = TipsLayer::createTipsLayer(_resCount);
            this->addChild(tipsLayer, 4);
            tipsLayer->showResurrectionTipsView([this](){
                // Resurrection
                _bird1->birdResurrection(Vec2(kWinSizeWidth * 0.25, kWinSizeHeight * 0.5));
                _bird1->click();
                _elementLayer->_goldCoinCount->setString(to_string(GameDataManager::getInstance()->getAllCoinCount()));
                _elementLayer->birdResurrection([this](){
                    _birdUnrivalled = false;
                    _bird1->setOpacity(255);
                });
                _resCount++;
                _gameOver = false;
                _birdUnrivalled = true;
            }, [this](){
                _elementLayer->hiddenAllLabel();
            }, _elementLayer->getPassScore(), [](){
                // player again
                Director::getInstance()->replaceScene(TransitionFade::create(0.25, Game::createScene(OnePlayer), Color3B(255, 255, 255)));

            }, [](){
                // share
#if (CC_TARGET_PLATFORM == CC_PLATFORM_IOS)
                [[UIApplication sharedApplication] openURL:[NSURL URLWithString:@"https://github.com/ZhongTaoTian"]];
#endif
            });
        });
    } else {
        bool firstWin = false;
        // 判断是哪一个鸟被撞了
        if (cat.getShapeA()->getBody()->getNode()->getTag() == kBird1Tag || cat.getShapeB()->getBody()->getNode()->getTag() == kBird1Tag) {
            _bird1->stopFlyAndRotatoAnimation();
            _bird2->stopRatatoAnimation();
        } else if (cat.getShapeB()->getBody()->getNode()->getTag() == kBird2Tag || cat.getShapeB()->getBody()->getNode()->getTag() == kBird2Tag) {
            _bird2->stopFlyAndRotatoAnimation();
            _bird1->stopRatatoAnimation();
            firstWin = true;
        }

        _bird1->getPhysicsBody()->removeFromWorld();
        _bird2->getPhysicsBody()->removeFromWorld();

        auto fallBird = firstWin ? _bird2 : _bird1;
        fallBird->startFallAnimation([this, firstWin](){
            _elementLayer->hiddenAllLabel();

            auto tipsLayer = TipsLayer::createTipsLayer(0, false);
            this->addChild(tipsLayer, 4);
            tipsLayer->showVsResultTipsView([](){
                // player again
                Director::getInstance()->replaceScene(TransitionFade::create(0.25, Game::createScene(TwoPlayer), Color3B(255, 255, 255)));
            }, [](){

            }, _elementLayer->getPassScore(), firstWin);
        });
    }

    _elementLayer->stopGame();
    _bird1->getPhysicsBody()->setEnabled(false);

    return true;
}
首先判断碰撞的元素是否含有小鸟,如果两个物体都不是,直接return,反之,停止游戏,这时候会出现两种情况,如果是单人模式,进入是否选择复活界面,如果是双人对战模式,直接显示哪一边赢了.如图
单人模式时,当玩家点击复活,会出现几秒的无敌模式,此刻将水管以及陆地的刚体可编辑属性取消,无敌时间到了,再添加回来就可以了.
所有的提示都单独封装了一个TipsLayer类,提供以下接口方便调用.
typedef std::function Callback;

class TipsLayer:public Layer {

public:
    virtual bool init(int resCount, bool isOnePlayer);
    static TipsLayer* createTipsLayer(int resCount, bool isOnePlayer = true);

    void showResurrectionTipsView(Callback yesBtnClick, Callback noBtnClick, int score, Callback playAgain, Callback share);
    void showVsResultTipsView(Callback okBtnClick, Callback shareBtnClick, int score, bool isLeftWin);
至此,项目的主要逻辑已经没什么了,其他细节功能,如暂停,如何调用iOS和Java的API等功能,对项目有兴趣的朋友可下载代码研究下.如有问题,可留言或者私信我.
代码下载地址(如果觉得有帮助,请点击Star★)
代码下载地址,记得Star★和Follow
小熊的技术博客
点击链接我的博客,欢迎关注
小熊的新浪微博
我的新浪微博,欢迎关注


