亿级 ELK 日志平台构建实践

本篇主要讲具体怎么落地实践,手把手建立一套亿级 ELK 日志平台。
废话不多说,老司机们座好了,我们准备发车了~~~
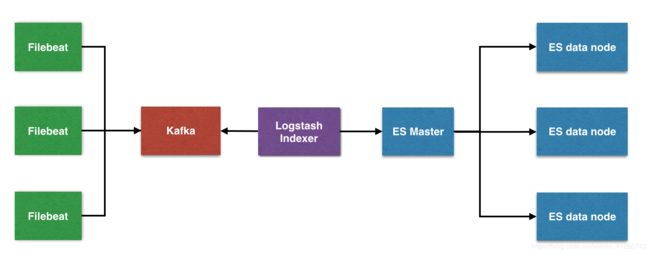
整体架构
Filebeat:轻量级数据收集引擎。基于原先 Logstash-fowarder 的源码改造出来。换句话说:Filebeat就是新版的 Logstash-fowarder,也会是 ELK Stack 在 shipper 端的第一选择。
Kafka: 数据缓存。作为消息队列解耦了处理过程,同时提高了可扩展性。具有峰值处理能力,使用消息队列能够使关键组件顶住突发的访问压力,而不会因为突发的超负荷的请求而完全崩溃。
Logstash :数据收集处理引擎。支持动态的从各种数据源搜集数据,并对数据进行过滤、分析、丰富、统一格式等操作,然后存储以供后续使用。
Elasticsearch :分布式搜索引擎。具有高可伸缩、高可靠、易管理等特点。可以用于全文检索、结构化检索和分析,并能将这三者结合起来。Elasticsearch 基于 Lucene 开发,现在使用最广的开源搜索引擎之一,Wikipedia 、StackOverflow、Github 等都基于它来构建自己的搜索引擎。
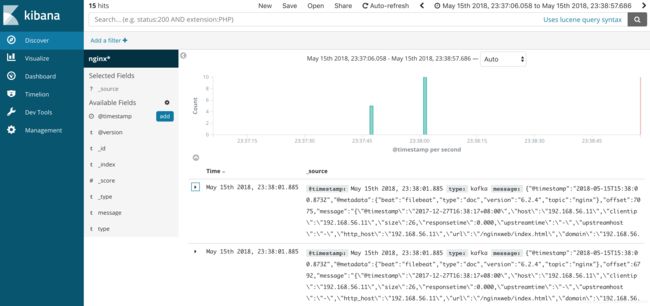
Kibana :可视化化平台。它能够搜索、展示存储在 Elasticsearch 中索引数据。使用它可以很方便的用图表、表格、地图展示和分析数据。
具体实践
我们就以比较常见的 Nginx 日志来举例说明下。日志内容是 JSON 格式
{"@timestamp":"2017-12-27T16:38:17+08:00","host":"192.168.56.11","clientip":"192.168.56.11","size":26,"responsetime":0.000,"upstreamtime":"-","upstreamhost":"-","http_host":"192.168.56.11","url":"/nginxweb/index.html","domain":"192.168.56.11","xff":"-","referer":"-","status":"200"}
{"@timestamp":"2017-12-27T16:38:17+08:00","host":"192.168.56.11","clientip":"192.168.56.11","size":26,"responsetime":0.000,"upstreamtime":"-","upstreamhost":"-","http_host":"192.168.56.11","url":"/nginxweb/index.html","domain":"192.168.56.11","xff":"-","referer":"-","status":"200"}
{"@timestamp":"2017-12-27T16:38:17+08:00","host":"192.168.56.11","clientip":"192.168.56.11","size":26,"responsetime":0.000,"upstreamtime":"-","upstreamhost":"-","http_host":"192.168.56.11","url":"/nginxweb/index.html","domain":"192.168.56.11","xff":"-","referer":"-","status":"200"}
{"@timestamp":"2017-12-27T16:38:17+08:00","host":"192.168.56.11","clientip":"192.168.56.11","size":26,"responsetime":0.000,"upstreamtime":"-","upstreamhost":"-","http_host":"192.168.56.11","url":"/nginxweb/index.html","domain":"192.168.56.11","xff":"-","referer":"-","status":"200"}
{"@timestamp":"2017-12-27T16:38:17+08:00","host":"192.168.56.11","clientip":"192.168.56.11","size":26,"responsetime":0.000,"upstreamtime":"-","upstreamhost":"-","http_host":"192.168.56.11","url":"/nginxweb/index.html","domain":"192.168.56.11","xff":"-","referer":"-","status":"200"}
版本说明
Filebeat: 6.2.4
Kafka: 2.11-1
Logstash: 6.2.4
Elasticsearch: 6.2.4
Kibana: 6.2.4

相应的版本最好下载对应的插件
Filebeat
为什么用 Filebeat ,而不用原来的 Logstash 呢?
原因很简单,资源消耗比较大。
由于 Logstash 是跑在 JVM 上面,资源消耗比较大,后来作者用 GO 写了一个功能较少但是资源消耗也小的轻量级的 Agent 叫 Logstash-forwarder。
后来作者加入 elastic.co 公司, Logstash-forwarder 的开发工作给公司内部 GO 团队来搞,最后命名为 Filebeat。
Filebeat 需要部署在每台应用服务器上,可以通过 Salt 来推送并安装配置。
1.直接到官网下载 Filebeat
https://artifacts.elastic.co/downloads/beats/filebeat/filebeat-6.2.4-darwin-x86_64.tar.gz
2.解压文件并重命名
tar -zxvf filebeat-6.2.4-darwin-x86_64.tar.gz
mv filebeat-6.2.4-darwin-x86_64 filebeat
cd filebeat
3.修改 Filebeat 配置,并输出日志到 Kafka 集群中
$ vim fileat.yml
filebeat.prospectors:
- input_type: log
  paths:
    -  /opt/logs/server/nginx.log
  json.keys_under_root: true
  json.add_error_key: true
  json.message_key: log

output.kafka:
  hosts: ["192.168.0.1:9092,192.168.0.2:9092,192.168.0.3:9092"]
  topic: 'nginx'
Filebeat 6.0 之后一些配置参数变动比较大,比如 document_type 就不支持,需要用 fields 来代替等等。
4.启动 Filebeat
./filebeat -e -c filebeat.yml
Kafka
生产环境中 Kafka 集群中节点数量建议为(2N + 1 )个,这边就以 3 个节点举例
下载 Kafka
直接到官网下载 Kafka
http://mirror.bit.edu.cn/apache/kafka/1.0.0/kafka_2.11-1.0.0.tgz
解压重命名 Kafka
tar -zxvf kafka_2.11-1.0.0.tgz
mv kafka_2.11-1.0.0 kafka
cd kafka
修改 Zookeeper 配置
修改 Zookeeper 配置,搭建 Zookeeper 集群,数量 ( 2N + 1 ) 个
ZK 集群建议采用 Kafka 自带,减少网络相关的因素干扰
$ vim zookeeper.properties

tickTime=2000
dataDir=/opt/zookeeper
clientPort=2181
maxClientCnxns=50
initLimit=10
syncLimit=5

server.1=192.168.0.1:2888:3888
server.2=192.168.0.2:2888:3888
server.3=192.168.0.3:2888:3888
Zookeeper data 目录下面添加 myid 文件,内容为代表 Zooekeeper 节点 id (1,2,3),并保证不重复
$ vim /opt/zookeeper/myid
1
分别启动 3 台 Zookeeper 节点
./zookeeper-server-start.sh -daemon ./config/zookeeper.properties
修改 Kafka 配置
kafka 集群这边搭建为 3 台,可以逐个修改 Kafka 配置,需要注意其中 broker.id 分别 (1,2,3)
$ vim ./config/server.properties
broker.id=1
port=9092
host.name=192.168.0.1
num.replica.fetchers=1
log.dirs=/opt/kafka_logs
num.partitions=3
zookeeper.connect=192.168.0.1: 192.168.0.2: 192.168.0.3:2181
zookeeper.connection.timeout.ms=6000
zookeeper.sync.time.ms=2000
num.io.threads=8
num.network.threads=8
queued.max.requests=16
fetch.purgatory.purge.interval.requests=100
producer.purgatory.purge.interval.requests=100
delete.topic.enable=true
启动 Kafka 集群所有节点
./bin/kafka-server-start.sh -daemon ./config/server.properties
查看是否有 topic 创建
$ bin/kafka-topics.sh --list --zookeeper localhost:2181
nginx
监控 Kafka Manager
Kafka-manager 是 Yahoo 公司开源的集群管理工具。
可以在 Github 上下载安装:https://github.com/yahoo/kafka-manager
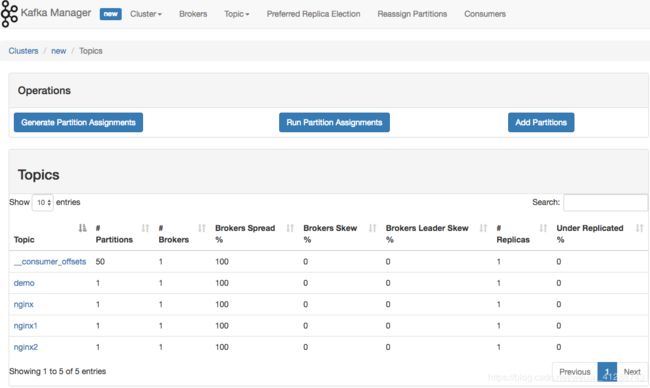
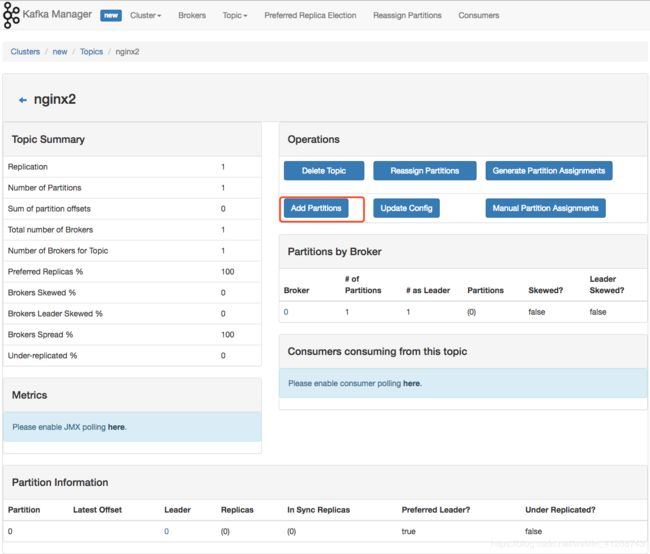
如果遇到 Kafka 消费不及时的话,可以通过到具体 cluster 页面上,增加 partition。Kafka 通过 partition 分区来提高并发消费速度
Logstash
Logstash 提供三大功能
- INPUT 进入
- FILTER 过滤功能
- OUTPUT 出去
1.直接到官网下载 Logstash
https://artifacts.elastic.co/downloads/logstash/logstash-6.2.4.tar.gz
2.解压文件并重命名 Logstash
$ tar -zxvf logstash-6.2.4.tar.gz
$ mv logstash-6.2.4 logstash
3.修改 Logstash indexer 配置,将数据投递到 Elasticsearch 集群中
$ vim nginx.conf

input {
  kafka {
    type => "kafka"
    bootstrap_servers => "192.168.0.1:2181,192.168.0.2:2181,192.168.0.3:2181"
    topics => "nginx"
    group_id => "logstash"
    consumer_threads => 2
  }
}

output {
  elasticsearch {
    host => ["192.168.0.1","192.168.0.2","192.168.0.3"]
    port => "9300"
    index => "nginx-%{+YYYY.MM.dd}"
  }
}
4.启动 Indexer 进程,转发数据到 ES 集群中
./bin/logstash -f nginx.conf
Elasticsearch
1.直接到官网下载 Elasticsearch
https://artifacts.elastic.co/downloads/elasticsearch/elasticsearch-6.2.4.tar.gz
2.解压文件并重命名 Elasticsearch
$ tar -zxvf elasticsearch-6.2.4.tar.gz
$ mv elasticsearch-6.2.4.tar.gz elasticsearch
3.修改 ES 配置
vim config/elasticsearch.yml

cluster.name: es
node.name: es-node1
network.host: 192.168.0.1
discovery.zen.ping.unicast.hosts: ["192.168.0.1"]
discovery.zen.minimum_master_nodes: 1
4.打开网页 http://192.168.0.1:9200/, 如果出现下面信息说明配置成功
{
	name: "es-node1",
	cluster_name: "es",
	cluster_uuid: "XvoyA_NYTSSV8pJg0Xb23A",
	version: {
		number: "6.2.4",
		build_hash: "ccec39f",
		build_date: "2018-04-12T20:37:28.497551Z",
		build_snapshot: false,
		lucene_version: "7.2.1",
		minimum_wire_compatibility_version: "5.6.0",
		minimum_index_compatibility_version: "5.0.0"
	},
	tagline: "You Know, for Search"
}
控制台
Cerebro 这个名字大家可能觉得很陌生,其实过去它的名字叫 kopf !因为 Elasticsearch 5.0 不再支持 site plugin,所以 kopf 作者放弃了原项目,另起炉灶搞了 cerebro,以独立的单页应用形式,继续支持新版本下 Elasticsearch 的管理工作。

注意点
- Master 与 Data 节点分离,当 Data 节点大于 3 个的时候,建议责任分离,减轻压力
- Data Node 内存不超过 32G ,建议设置成 31 G ,具体原因可以看上一篇文章
- discovery.zen.minimum_master_nodes 设置成 ( total / 2 + 1 ),避免脑裂情况
- 最重要的一点,不要将 ES 暴露在公网中,建议都安装 X-PACK ,来加强其安全性
kibana
1.直接到官网下载 Kibana
https://artifacts.elastic.co/downloads/kibana/kibana-6.2.4-darwin-x86_64.tar.gz
2.解压文件并重命名 Kibana
$ tar -zxvf kibana-6.2.4-darwin-x86_64.tar.gz
$ mv kibana-6.2.4-darwin-x86_64.tar.gz kibana
3.修改 Kibana 配置
$ vim config/kibana.yml

server.port: 5601
server.host: "192.168.0.1"
elasticsearch.url: "http://192.168.0.1:9200"
4.启动 Kibana
nohup ./bin/kibana &
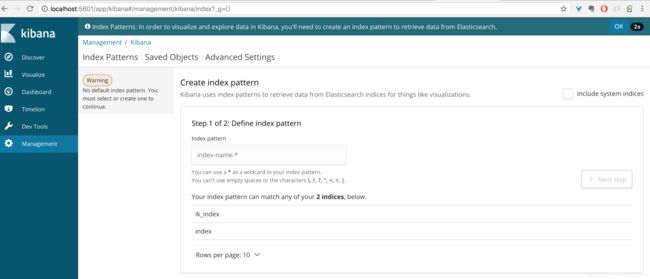
5.界面展示
创建索引页面 需要到 Management -> Index Patterns 中通过前缀来指定
总结
综上,通过上面部署命令来实现 ELK 的整套组件,包含了了日志收集、过滤、索引和可视化的全部流程,基于这套系统实现分析日志功能。同时,通过水平扩展 Kafka、Elasticsearch 集群,可以实现日均亿级的日志实时处理。
