利用迁移学习训练自己的数据
什么是/为什么要迁移学习?
迁移学习(Transfer learning) 顾名思义就是就是把已学训练好的模型参数迁移到新的模型来帮助新模型训练。考虑到大部分数据或任务是存在相关性的,所以通过迁移学习我们可以将已经学到的模型参数(也可理解为模型学到的知识)通过某种方式来分享给新模型从而加快并优化模型的学习效率不用像大多数网络那样从零学习(starting from scratch,tabula rasa)。
开始第一个迁移学习
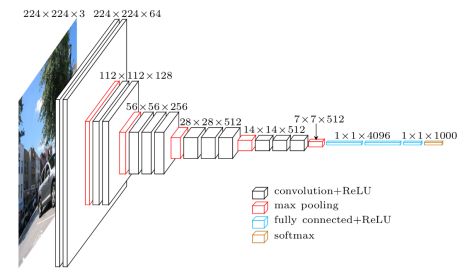
迁移VGG16模型:
1.模型结构:
2.代码:
根据莫凡python的迁移学习代码改动所得。
一、准备自己数据:我自己准备的用于分类的数据。数据很简单,就是单纯的手写的判断题的分类。数据一共有三类:勾、叉,半勾。实际数据一共有九千多张,首先把数据分为两部分(其实按正常来分应该是三类:训练集(train)、验证集(validation)、测试集(test))。因为数据较少并且用于学习迁移学习,这里就没有过多的细分这几个数据集。这里将数据分为了训练集和验证集。比例为7:2。接下来,把数据存储成tf.records 的形式,方便读取。
import tensorflow as tf
import os
import random

from PIL import Image


trainimg_path="/Users/wywy/Desktop/train_chioce"  #图片路径
train_filename = './train.tfrecords'  #bytes存储路径

#图片数据和lable 数据存储
def saver_lables(img_path,train_filename,img_size):
    writer = tf.python_io.TFRecordWriter(train_filename)

    all_filename=[]
    for file in os.listdir(img_path):
        if file =='.DS_Store':
            os.remove(img_path+'/'+file)
        else:
            all_filename.append(file)
    random.shuffle(all_filename)
    for f in all_filename:
        label=float(f.split('.')[0].split('_')[-1])
        img=Image.open(os.path.join(img_path,f))
        img = img.resize(img_size, Image.ANTIALIAS)
        img=img.convert('RGB')
        image = img.tobytes()

        example = tf.train.Example(features=tf.train.Features(feature={
            'lables': tf.train.Feature(float_list=tf.train.FloatList(value=[label])),
            'images': tf.train.Feature(bytes_list=tf.train.BytesList(value=[image])),
            'file_name':tf.train.Feature(bytes_list=tf.train.BytesList(value=[str.encode(f)]))
        }))

        writer.write(example.SerializeToString())
    writer.close()


#图片数据和lable 数据的读取
def read_data_for_file(file, capacity,image_size):
    filename_queue = tf.train.string_input_producer([file], num_epochs=None, shuffle=False, capacity=capacity)
    reader = tf.TFRecordReader()
    _, serialized_example = reader.read(filename_queue)
    features = tf.parse_single_example(
        serialized_example,
        features={
            'lables': tf.FixedLenFeature([], tf.float32),
            'images':tf.FixedLenFeature([], tf.string),
            'file_name':tf.FixedLenFeature([], tf.string)
        }
    )
    img = tf.decode_raw(features['images'], tf.uint8)
    img=tf.reshape(img,image_size)
    img = tf.cast(img, tf.float32)
    setoff_lables=features['lables']
    file_name= tf.cast(features['file_name'], tf.string)


    return img, setoff_lables,file_name


#图片数据和lable数据的打乱读取
def train_shuffle_batch(train_file_path,image_size, batch_size, capacity=7000, num_threads=3):
    images, setoff_lables ,file_name= read_data_for_file(train_file_path, 10000,image_size)

    images_,  setoff_lables_,file_name_ = tf.train.shuffle_batch([images,setoff_lables,file_name], batch_size=batch_size, capacity=capacity,
                                               min_after_dequeue=1000,
                                               num_threads=num_threads)

    return images_, setoff_lables_,file_name_


if __name__=='__main__':
    init = tf.global_variables_initializer()
    saver_lables(trainimg_path,train_filename,(224,224))
    # read_data_for_file(train_filename,100,[16,168,3])
    a=train_shuffle_batch(train_filename,[224,224,3],100)
    with tf.Session() as sess:
        coord = tf.train.Coordinator()  # 创建一个协调器,管理线程
        threads = tf.train.start_queue_runners(coord=coord,sess=sess)

        sess.run(init)
        aa,bb,cc=sess.run(a)
        print(aa[0])
        print(bb[0])
        print(cc[0])
测试集数据存储是一样的方式。改一下路径即可。
二、自己的数据处理完了,在网上查询下载VGG16训练好的权重,作为我们新模型权重。
VGG16权重百度网盘下载:链接:https://pan.baidu.com/s/1MJ_NXbnTmByvNP1ukZZe6Q 密码:zaz7
下载完毕之后把权重文件(vgg16.npy)copy放在当前目录下。接下来,开始写主代码。
import inspect
import os

import numpy as np
import tensorflow as tf
import time

from modle1.train_sample import *
from modle1.test_sample import *
from tool.crop_img import one_hot

VGG_MEAN = [103.939, 116.779, 123.68]
class Vgg16:
    def __init__(self,vgg16_npy_path=None):
        """ 判断当前文件上一级目录下面是否有vgg16_npy_path,
            如果存在则加载VGG16与训练权重。
            """
        if vgg16_npy_path is None:
            path=inspect.getfile(Vgg16)   #返回Vgg16所在的文件夹的路径
            path = os.path.abspath(os.path.join(path, os.pardir))   #os.pardir文件上一级目录
            path = os.path.join(path, "vgg16.npy")
            vgg16_npy_path=path

        self.data_dict = np.load(vgg16_npy_path, encoding='latin1').item()

        print('npy file loaded')

        self.x=tf.placeholder(dtype=tf.float32,shape=[None,224,224,3])
        self.y_=tf.placeholder(dtype=tf.float32,shape=[None,3])
        self.dp=tf.placeholder(dtype=tf.float32)


    def avg_pool(self, bottom, name):   #平均池化

        """ bottom:输入
            name:变量名称
                    """
        return tf.nn.avg_pool(bottom, ksize=[1, 2, 2, 1], strides=[1, 2, 2, 1], padding='SAME', name=name)

    def max_pool(self, bottom, name):    #最大池化
        """ bottom:输入
            name:变量名称
                    """
        return tf.nn.max_pool(bottom, ksize=[1, 2, 2, 1], strides=[1, 2, 2, 1], padding='SAME', name=name)

    def get_conv_filter(self, name):
        return tf.constant(self.data_dict[name][0], name="filter")   #获取卷积核的权重

    def get_bias(self, name):
        return tf.constant(self.data_dict[name][1], name="biases")   #获取偏值

    def get_fc_weight(self, name):
        return tf.constant(self.data_dict[name][0], name="weights")   #获取全联接的权重


    def conv_layer(self, bottom, name):
        with tf.variable_scope(name):
            filt = self.get_conv_filter(name)

            conv = tf.nn.conv2d(bottom, filt, [1, 1, 1, 1], padding='SAME')

            conv_biases = self.get_bias(name)
            bias = tf.nn.bias_add(conv, conv_biases)

            relu = tf.nn.relu(bias)
            return relu

    def fc_layer(self, bottom, name):
        with tf.variable_scope(name):
            shape = bottom.get_shape().as_list()
            dim = 1
            for d in shape[1:]:
                dim *= d
            x = tf.reshape(bottom, [-1, dim])  #把卷积输出的数组flat成二维数组【batch_size,H*W*C】

            weights = self.get_fc_weight(name)
            biases = self.get_bias(name)

            fc = tf.nn.bias_add(tf.matmul(x, weights), biases)

            return fc

    def build(self):
        """ 加载VGG16的变量
                    """
        start_time = time.time()
        print("build model started")

        rgb_scaled = self.x * 255.0

        # Convert RGB to BGR
        red, green, blue = tf.split(axis=3, num_or_size_splits=3, value=rgb_scaled)
        assert red.get_shape().as_list()[1:] == [224, 224, 1]
        assert green.get_shape().as_list()[1:] == [224, 224, 1]
        assert blue.get_shape().as_list()[1:] == [224, 224, 1]
        bgr = tf.concat(axis=3, values=[
            blue - VGG_MEAN[0],
            green - VGG_MEAN[1],
            red - VGG_MEAN[2],
        ])
        assert bgr.get_shape().as_list()[1:] == [224, 224, 3]

        self.conv1_1 = self.conv_layer(bgr, "conv1_1")
        self.conv1_2 = self.conv_layer(self.conv1_1, "conv1_2")
        self.pool1 = self.max_pool(self.conv1_2, 'pool1')

        self.conv2_1 = self.conv_layer(self.pool1, "conv2_1")
        self.conv2_2 = self.conv_layer(self.conv2_1, "conv2_2")
        self.pool2 = self.max_pool(self.conv2_2, 'pool2')

        self.conv3_1 = self.conv_layer(self.pool2, "conv3_1")
        self.conv3_2 = self.conv_layer(self.conv3_1, "conv3_2")
        self.conv3_3 = self.conv_layer(self.conv3_2, "conv3_3")
        self.pool3 = self.max_pool(self.conv3_3, 'pool3')

        self.conv4_1 = self.conv_layer(self.pool3, "conv4_1")
        self.conv4_2 = self.conv_layer(self.conv4_1, "conv4_2")
        self.conv4_3 = self.conv_layer(self.conv4_2, "conv4_3")
        self.pool4 = self.max_pool(self.conv4_3, 'pool4')

        self.conv5_1 = self.conv_layer(self.pool4, "conv5_1")
        self.conv5_2 = self.conv_layer(self.conv5_1, "conv5_2")
        self.conv5_3 = self.conv_layer(self.conv5_2, "conv5_3")
        self.pool5 = self.max_pool(self.conv5_3, 'pool5')

        self.flatten = tf.reshape(self.pool5, [-1, 7 * 7 * 512])

        self.fc6 = tf.layers.dense(self.flatten, 128, tf.nn.relu, name='fc6')
        self.out = tf.layers.dense(self.fc6, 3, name='out')
        print(("build model finished: %ds" % (time.time() - start_time)))

    def backward(self):
        self.loss = tf.reduce_mean(tf.nn.softmax_cross_entropy_with_logits_v2(logits=self.out, labels=self.y_))
        self.optimizer = tf.train.AdamOptimizer(1e-4).minimize(self.loss)
        self.correct_prediction = tf.equal(tf.argmax(self.out, 1), tf.argmax(self.y_, 1))
        self.rst = tf.cast(self.correct_prediction, "float")
        self.accuracy = tf.reduce_mean(self.rst)
        self.out_argmax = tf.argmax(self.out, 1)
        self.out_argmax1 = tf.reshape(self.out_argmax, [-1], name='output')
整个网络的结构差不多就是这样的。特别注意的是:1.VGG16获取出来的权重是以字典的形式存储的,2.VGG16中获取的数据获取出来要转换成常量而不是变量,常量的话整个网络开始训练的时候VGG16的原始权重不会得到训练,这样的话你可以根据你自己需求来选取你需要改变的网络层。一般改的都是输出层。
三、网络的训练。
初始化变量,按照正常的方式把数据放进去就好了。大概的代码如下:
if __name__=='__main__':
    net = Vgg16(vgg16_npy_path='./vgg16.npy')
    net.build()
    net.backward()
    print('Net built')

    train_data = train_shuffle_batch(train_filename, [224, 224, 3], 100)
    test_data = test_shuffle_batch(test_filename, [224, 224, 3], 500)

    init = tf.global_variables_initializer()
    saver = tf.train.Saver()
    with tf.Session() as sess:
        sess.run(init)
        coord = tf.train.Coordinator()  # 创建一个协调器,管理线程
        threads = tf.train.start_queue_runners(coord=coord, sess=sess)
        # saver.restore(sess, './modle_save/train.dpk')
        for ii in range(10000):
            train_img, train_label1, file_name = sess.run(train_data)
            train_label = one_hot(train_label1.tolist())
            _,train_loss,train_acc=sess.run([net.optimizer,net.loss,net.accuracy],feed_dict={net.x:train_img,net.y_:train_label,net.dp:0.5})
            print(train_loss,train_acc)
自己实现的one-hot编码,tensorflow也有现有的函数实现one-hot。
import numpy as np

#自己手动实现的针对三分类的one-hot编码
def one_hot(data):
    all_data=[]
    for d in data:

        one_hott = [0,0,0]
        one_hott[int(d)]=1

        all_data.append(one_hott)

    return np.array(all_data)
