将hexo博客部署到阿里云服务器上【超级详细】
文章目录
- 一、云服务器配置
- ①建立博客存放的目录
- ②安装nginx
- ③安装Nodejs
- ④安装Git以及配置仓库
- 二、本地主机配置
- ①安装git
- ②安装Node.js
- ③安装Hexo
- ④hexo本地部署
- ⑤连接到远端服务器
- 三、发布文章
- 四、美化博客
写在开头的话: 对于一个刚接触的门外汉来说,搭建博客,到部署到服务器真的让人崩溃,但是在不断地排错过程中,也渐渐弄懂了一些东西。很值得!由于我的域名还在备案中,DNS解析已经停掉了,所以暂时只能用公网IP访问: 123.57.60.151,后期等备案成功后再做修改,并且进一步优化。还想做一点SEO的东西。
一、云服务器配置
①建立博客存放的目录
- 我的目录是:
home/www/blog
cd /home
mkdir www
cd /www
mkdir /blog
②安装nginx
- 搭建服务器环境,以nginx做服务器。
1.安装
yum install -y nginx

2.启动服务器
systemctl start nginx
systemctl enable nginx

3.在浏览器地址栏中输入你的公网ip,如果打开了有内容网页,说明成功了。
- 配置服务器的路由:
通过公网ip访问,这个地址指向的是nginx,得让他指向我们的博客,就要修改配置文件,找到配置文件etc/nginx/nginx.conf,并不建议直接修改配置文件,应该先创建一个新的文件,然后采用include的方式,将这个文件包含进nginx.conf中。
- 新建配置文件
cd /etc/nginx/
mkdir vhost
cd vhost
vim blog.conf
- 编写配置文件
编辑blog.conf 如下:
server{
	listen  80;
	root /home/www/blog;这里填博客目录存放的地址
	server_name 这里填域名如(www.baidu.com) 如果暂时没有域名就填阿里云的公网ip,以后有了再改回来;
	location /{
	}
}
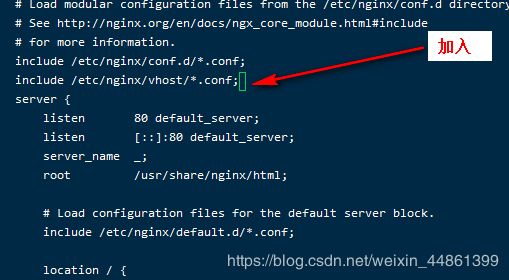
- 用
include插入到nginx.conf中
- 如果以后还想添加新的网站,也可以在vhost目录下新建一个conf配置文件。然后再用
include装入到nginx.conf中。 - (先跳过这一步,等到最后有问题了,再回来)最后可能会出现只能访问centOS的怪相,所以,如果出现那个问题了,请你回到这一步,增加一个操作,就是上图中那个
server里面的root后面的路径,替换成你的博客存放位置:例如我的是/home/www/blog(这是我经验所得,可能你就会卡在这一步)。
③安装Nodejs
1.换源
curl -sL https://rpm.nodesource.com/setup_10.x | bash -

2.安装
yum install -y nodejs

3.检查版本
node -v
npm -v
④安装Git以及配置仓库
- 目的: 使本地主机可以通过
ssh方式连接到云服务器,我们就可以在本地使用git将我们的博客部署到服务器上。
- 安装
git并查看版本。
1.安装
yum install git
2.查看版本
git --version
git version 1.8.3.1
- 新建
git用户,并修改权限
1.新建git用户
adduser -m  git
2.修改用户权限
chmod 740 /etc/sudoers
vi /etc/sudoers
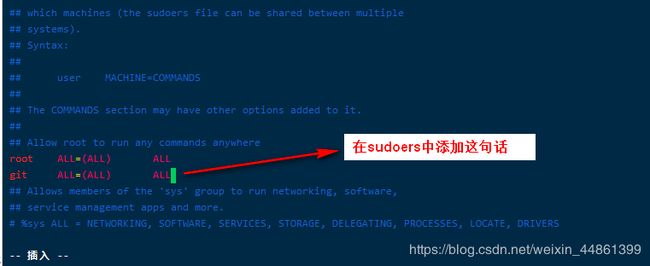
- 添加
Git ALL=(ALL) ALL
- 保存退出后,将权限改回去。
chmod 400 /etc/sudoers
- 设置
git密码
passwd git
- 切换到
git用户,在~目录下,可以看到有一个.ssh文件夹
su git
cd ~
mkdir .ssh
cd /.ssh
- 生成公钥密钥文件
ssh-keygen
此时在目录下就会有两个文件,分别是id_rsa 和 id_rsa.pub
- id_rsa.pub 就是公钥文件,将他复制一份。目录下就会多出一个authorized_keys文件,它和id_rsa.pub一模一样。
cp id_rsa.pub authorized_keys
- 修改权限
chmod 600 ~/.ssh/authorized_keys
chmod 700 ~/.ssh
- 在本地主机上打开
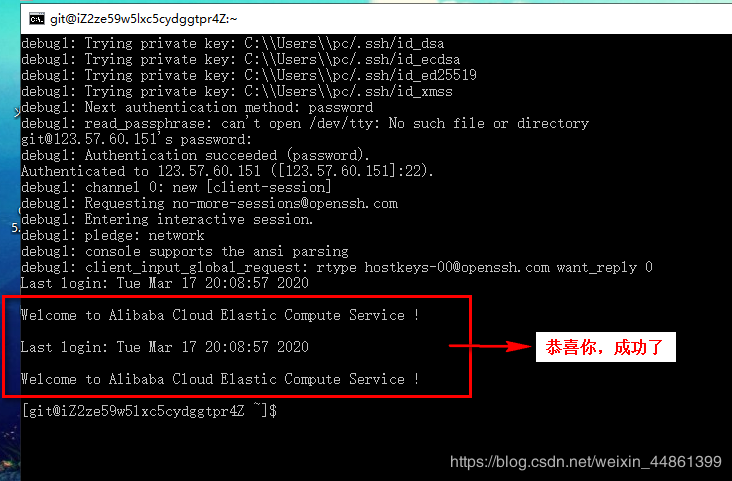
cmd,使用ssh方式连接云服务器。
ssh -v [email protected](这里填的是服务器公网ip)
- 输入密码之后,看到如图,即代表成功!!!!
12. 创建一个git的仓库,并且新建一个post-receive文件。
1.创建并初始化Git仓库
cd ~
git init --bare blog.git

2.新建post—receive文件
vi ~/blog.git/hooks/post-receive

3.输入以下内容:
git --work-tree=/home/www/website --git-dir=/home/git/blog.git checkout -f

4.保存退出之后赋予可执行权限
chmod +x ~/blog.git/hooks/post-receive
至此,服务器端的配置完成!!!!!!!!
二、本地主机配置
说明: 因为我之前没有云服务器的时候,是把博客部署在github仓库中的,所以,在下面的config.yml中会出现两个仓库,这并不影响,他会同时部署到github中和云服务器上,想要了解的话可以去看这篇文章:https://blog.csdn.net/weixin_44861399/article/details/104673527,下面就是正式的,将本地主机与服务器连接起来的具体步骤了。
①安装git
下载地址:https://git-scm.com/download/win
②安装Node.js
下载地址:http://nodejs.org/download/
- 安装的时候,选择
add to path,他会自动配置环境变量。
node -v
npm -v
出现版本号说明安装成功
- 换镜像(亲身体验,可以省去以后好多麻烦)
npm install -g cnpm --registry=https://registry.npm.taobao.org
③安装Hexo
- 用cnpm全局安装,在桌面右键打开
Git bash here输入:
cnpm install -g hexo-cli
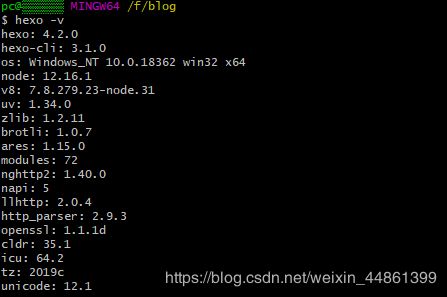
- 安装完成后,在命令行里输入
hexo -v检查是否安装成功。
④hexo本地部署
- 在本地新建一个文件夹,我命名它为blog
- 在这个文件夹下,右键打开
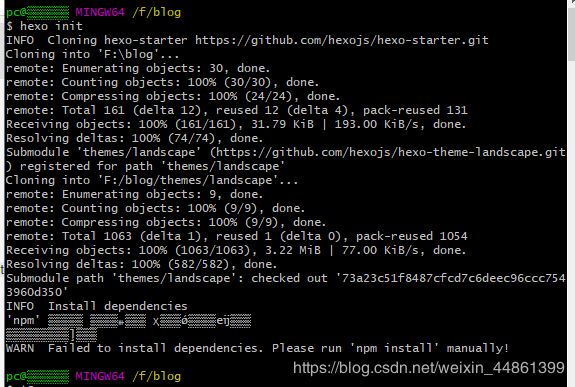
Git Bash here,输入hexo init,我在这个地方出现了一个WARN,暂时不用管它。
- 继续输入
cnpm install可以看到blog文件夹里出现:
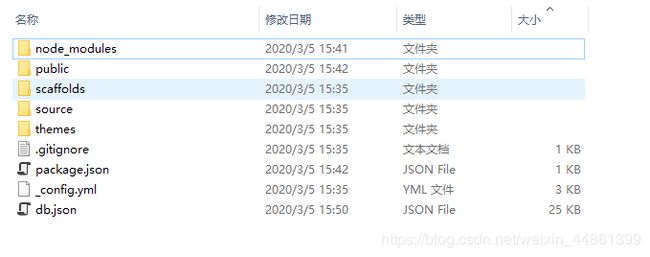
- 输入:
hexo g - 输入:
hexo s
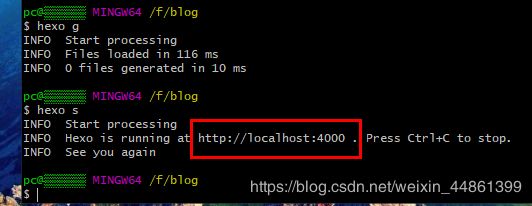
- 打开浏览器输入
localhost:4000,可以看到部署好了,有一篇hello World的博客
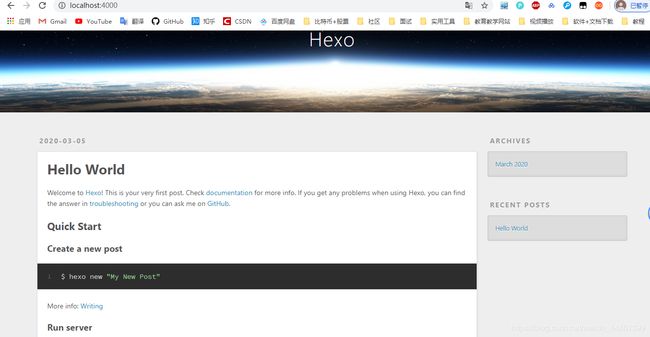
⑤连接到远端服务器
- 安装
deployer插件
cnpm install hexo-deployer-git --save
- 打开
F:\blog\_config.yml,找到deploy。填写你自己的仓库名字。不能同时又相同的repo,需要删除一个。
三、发布文章
- 写一篇文章:
1.新建文章,并编写,如何编写,百度
hexo new "Hello My First Blog"

2. 发布(要在blog文件夹下打开git)
hexo clean && hexo generate --deploy
- 重启服务器的nginx
nginx -s reload
- 浏览器地址栏中输入公网ip查看成果。
四、美化博客
请参考我的这篇文章:https://blog.csdn.net/weixin_44861399/article/details/104646946
