android读取sqlite数据库的数据并用listview显示
android读取sqlite数据库的数据并用listview显示
刚刚接触android,老师给了我了几个班级信息的excel,让我做一个考勤的系统出来,本篇仅记录了真机调试下,读取已有数据库信息并显示在listview中。
准备工作
- 开发工具为Android Studio。
- sqlite可视化软件SQLite Expert Professional 5
- 已将excel表转化为的数据库 student1.db。
- 在AS中创建assets文件夹并将db文件拷贝进去。
- 创建实体类Student。
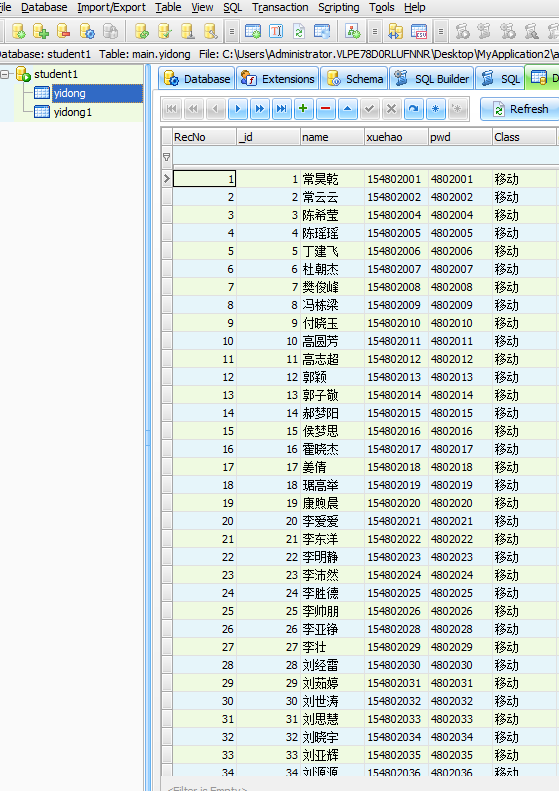
数据库如图
要点
- 读取assets文件夹下已有的数据库文件
在android开发时,很多时候我们会使用可视化界面创建数据库,或者拿到别人的数据库使用,这时就需要我们将db文件手动加入到assets文件是夹中并读取。但是当我们把应用的apk部署到真机上的时候,已经创建好的数据库及其里边的数据是不能随着apk一起安装到真机上的。
解决方法很简单,只需要把assets目录下的db文件复制一份到SDCard中的”/data/data/” + packName + “/”目录下就可以了。代码如下参考http://blog.csdn.net/u010800530/article/details/40192279
public class SQLdm {
    //数据库存储路径
    String filePath = "data/data/kaoqin.xxf.com.kaoqin/student1.db";
    //数据库存放的文件夹 data/data/kaoqin.xxf.com.kaoqin 下面
    String pathStr = "data/data/kaoqin.xxf.com.kaoqin";

    SQLiteDatabase database;
    public  SQLiteDatabase openDatabase(Context context){
        System.out.println("filePath:"+filePath);
        File jhPath=new File(filePath);
        //查看数据库文件是否存在
        if(jhPath.exists()){
            Log.i("test", "存在数据库");
            //存在则直接返回打开的数据库
            return SQLiteDatabase.openOrCreateDatabase(jhPath, null);
        }else{
            //不存在先创建文件夹
            File path=new File(pathStr);
            Log.i("test", "pathStr="+path);
            if (path.mkdir()){
                Log.i("test", "创建成功");
            }else{
                Log.i("test", "创建失败");
            };
            try {
                //得到资源
                AssetManager am= context.getAssets();
                //得到数据库的输入流
                InputStream is=am.open("student1.db");
                Log.i("test", is+"");
                //用输出流写到SDcard上面
                FileOutputStream fos=new FileOutputStream(jhPath);
                Log.i("test", "fos="+fos);
                Log.i("test", "jhPath="+jhPath);
                //创建byte数组  用于1KB写一次
                byte[] buffer=new byte[1024];
                int count = 0;
                while((count = is.read(buffer))>0){
                    Log.i("test", "得到");
                    fos.write(buffer,0,count);
                }
                //最后关闭就可以了
                fos.flush();
                fos.close();
                is.close();
            } catch (IOException e) {
                // TODO Auto-generated catch block
                e.printStackTrace();
                return null;
            }
            //如果没有这个数据库  我们已经把他写到SD卡上了,然后在执行一次这个方法 就可以返回数据库了
            return openDatabase(context);
        }
    }
}- 将数据显示到ListView中
此时问题来了,一个班有60个人,读取到ListView中针对每一个Item都要要求adapter"给我一个视图"(getView),如果一个班有上亿的人要为每一个Item都新建一个视图显然是不可能的。
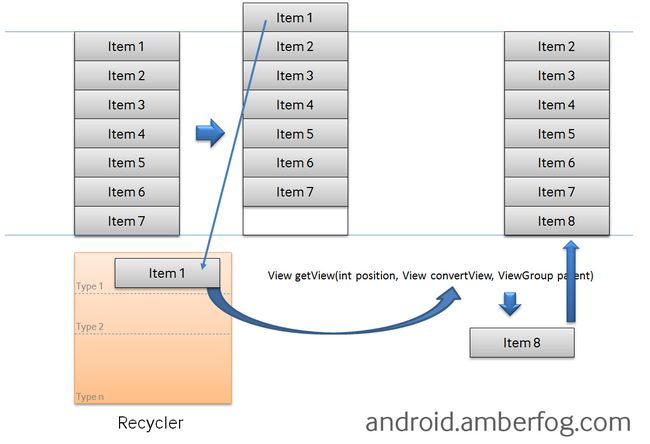
实际上Android为你缓存了视图,Android中有个叫做Recycler的构件,下图是他的工作原理
- 如果你有10亿个项目(item),其中只有可见的项目存在内存中,其他的在Recycler中。
- ListView先请求一个type1视图(getView)然后请求其他可见的项目。convertView在getView中是空(null)的。
- 当item1滚出屏幕,并且一个新的项目从屏幕低端上来时,ListView再请求一个type1视图。convertView此时不是空值了,它的值是item1。你只需设定新的数据然后返回convertView,不必重新创建一个视图。(关于getView原理参考 http://www.cnblogs.com/xiaowenji/archive/2010/12/08/1900579.html )
代码如下
public class MainActivity extends AppCompatActivity {


    private ListView lv;
    private ArrayList studentlist;

    @Override
    protected void onCreate(Bundle savedInstanceState) {
        super.onCreate(savedInstanceState);
        setContentView(R.layout.activity_main);

        studentlist = new ArrayList<>();
        SQLdm s = new SQLdm();
        SQLiteDatabase db = s.openDatabase(getApplicationContext());
        Cursor cursor = db.rawQuery("select * from yidong",null);
        while(cursor.moveToNext()){
            String name = cursor.getString(cursor.getColumnIndex("name"));
            String xuehao = cursor.getString(cursor.getColumnIndex("xuehao"));
            String Class = cursor.getString(cursor.getColumnIndex("Class"));
            Student st = new Student(name,Class,xuehao);
            studentlist.add(st);
        }
        lv = (ListView)findViewById(R.id.student_lv);
        lv.setAdapter(new BaseAdapter() {
            /*
             * 为ListView设置一个适配器
             * getCount()返回数据个数
             * getView()为每一行设置一个条目
             * */
            @Override
            public int getCount() {
                return studentlist.size();
            }

            @Override
            public Object getItem(int position) {
               // return studentlist.get(position);
                return null;
            }

            @Override
            public long getItemId(int position) {

               // return position;
                return 0;
            }

            @Override
            public View getView(int position, View convertView, ViewGroup parent) {


                View view ;
                /**对ListView的优化,convertView为空时,创建一个新视图;
                 * convertView不为空时,代表它是滚出,
                 * 放入Recycler中的视图,若需要用到其他layout,
                 * 则用inflate(),同一视图,用fiindViewBy()
                 * **/
                if(convertView == null )
                {
                    LayoutInflater inflater = MainActivity.this.getLayoutInflater();
                    view = inflater.inflate(R.layout.item,null);
                   //view = View.inflate(getBaseContext(),R.layout.item,null);
                }
                else
                {
                     view = convertView;
                }
                //从studentlist中取出一行数据,position相当于数组下标,可以实现逐行取数据
                Student st = studentlist.get(position);
                //TextView name = (TextView) LayoutInflater.from(MainActivity.this).inflate(R.layout.item, null).findViewById(R.id.stu_name);
                //TextView xuehao = (TextView) LayoutInflater.from(MainActivity.this).inflate(R.layout.item, null).findViewById(R.id.stu_number);
                //TextView Class = (TextView) LayoutInflater.from(MainActivity.this).inflate(R.layout.item, null).findViewById(R.id.stu_age);
                TextView name = (TextView)view.findViewById(R.id.stu_name);
                TextView xuehao  = (TextView)view.findViewById(R.id.stu_number);
                TextView Class = (TextView)view.findViewById(R.id.stu_age);

                xuehao.setText(st.getXuehao());
                name.setText(st.getName());
                Class.setText(st.getclass());

                return view;
            }
        });
    }
}
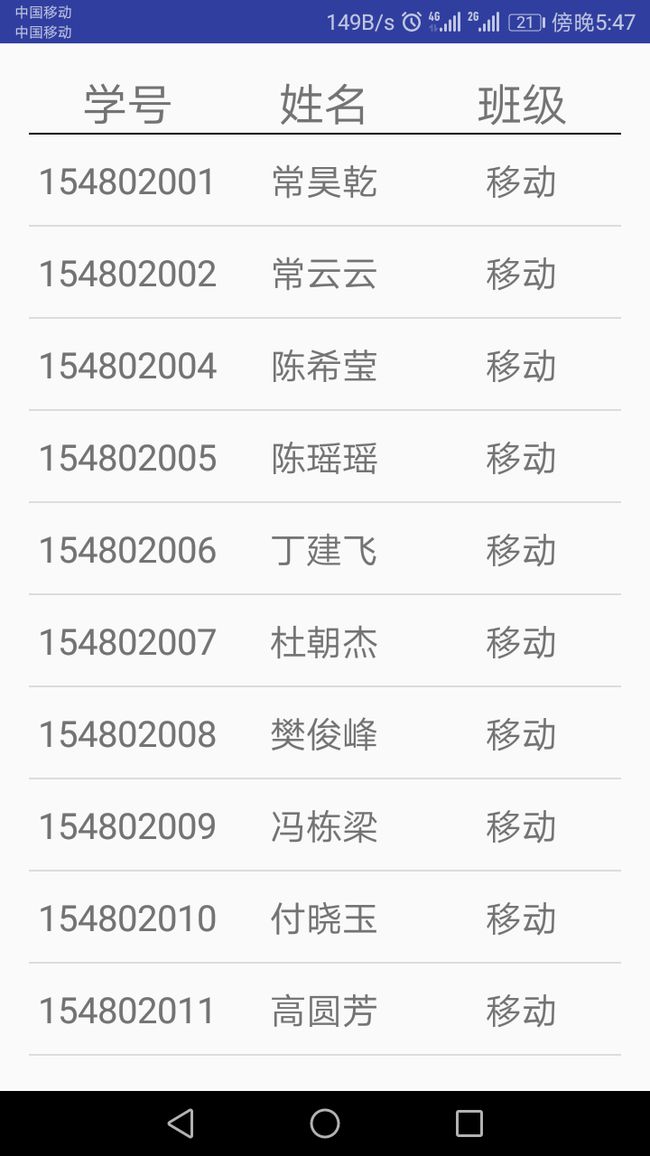
运行结果如图
布局很简单,代码图就不贴了,到此就结束了, 整个系统的后续会陆续记载在笔记中。
完整DEMO下载地址: 点此下载demo


