OpenAirInterface (OAI) Ubuntu 17.04/16.04 All In One 安装教程
OpenAirInterface (OAI) Ubuntu 17.04/16.04 All In One 安装教程
国外有一个大神写了一个基于Ubuntu 17.04安装OAI eNB,UE和EPC一整套系统的教程。原文链接https://open-cells.com/index.php/2017/06/07/openair-single-machine-ubuntu-17-04-after-major-epc-update/ 。笔者在此基础上进行修改后在17.04和16.04上都已搭建成功,实验在USRPB210和一台i5的笔记本上, 5M 带宽下基本能接入2个手机稳定运行。10M/20M特别是双天线会受电脑性能影响而发生丢包。
注意:文中蓝色粗体字都是要执行的命令
安装 Ubuntu
- 关于ubuntu系统:由于17.04 ubuntu已经于2018.1月停止维护,因此17.04安装将无法进行,只能使用16.04 64bits版本的系统。
- 电脑要求: 4 actual cores, no hyper-threading. usb3.0(very important)
- 系统版本: Ubuntu 16.04 64 bits.
- 装好系统后: apt update; apt upgrade.
- 安装 git and configure your identification in git:
sudo apt install git
- 为了每次执行sudo命令后输入密码, 在 /etc/sudoers文件加入下面两行
xxxxxx ALL=(ALL) NOPASSWD: ALL (xxxxxx is your login name)
sudo will not ask anymore for a password
git clone git://github.com/EttusResearch/uhd.git
cd uhd; mkdir host/build; cd host/build
cmake -DCMAKE_INSTALL_PREFIX=/usr ..
make -j4
sudo make install
sudo ldconfig
sudo /usr/lib/uhd/utils/uhd_images_downloader.py
也可以将zip文件download后保存好后,手动解压缩到/sur/share/uhd/image .
或者按照官方文档安装:
https://kb.ettus.com/Building_and_Installing_the_USRP_Open-Source_Toolchain_(UHD_and_GNU_Radio)_on_Linux
安装usrp驱动可能后可能会遇到的问题:
注意:安装UHD驱动后,会出现非root用户权限的问题,使用sudo也能识别USRP,但后面执行程序的时候会出问题。解决方法如下:
cd /usr/lib/uhd/utils 或者:cd /usr/local/lib/uhd/utils 看你默认安装在哪里
sudo cp uhd-usrp.rules /etc/udev/rules.d/
sudo udevadm control --reload-rulessudo udevadm trigger
下载OAI修改补丁
download: patches
然后解压,然后将里面的opencells-mods 文件夹拷贝到后面下载 openairinterface和openair-cn目录里面.
下载&编译 eNB on 16.04
git clone https://gitlab.eurecom.fr/oai/openairinterface5g.git下载是否能成功与网速有关,网速太慢可能很难成功。可以将之前下载的打包备用,以后不用每次下载.
cd openairinterface5g
git checkout develop
git reset --hard 7580d021d
git log
- We tested with commit 7580d021d387cc63fcf6ecbb97a87b816676a06f Tue Jun 6 17:59:32 2017 +0200
- 注意版本号,那一串commit log 数字要对上,否在可能出现问题
- 编译前要使用补丁文件替换对应文件:
- 替换 cmake_targets/tools/build_helper 文件:
- cp opencells-mods/cmake_targets/tools/build_helper cmake_targets/tools/build_helper
- 编译:依赖安装->编译
source oaienv # 设置环境
./cmake_targets/build_oai -I # 安装第三方软件包,直到出现下面界面表示安装完成


CMake Error at /home/nano/openairinterface5g/cmake_targets/CMakeLists.txt:302 (message):
/home/nano/openairinterface5g/cmake_targets/tools/generate_asn1: error
Call Stack (most recent call first):
CMakeLists.txt:19 (include)
-- Configuring incomplete, errors occurred!
build have failed
下载 EPC并打补丁
git clone https://gitlab.eurecom.fr/oai/openair-cn.gitcd openair-cn
git checkout develop
git reset --hard 67180ca07c
git log
(we used: commit 67180ca07c3f543fb6efde13bfdd88ec153185c7 Date: Tue May 30 10:16:31 2017 +0200)
注意版本号,那一串commit log 数字要对上,否在可能出现问题
patch -i opencells-mods/src/common/common_defs.h.patch src/common/common_defs.h
patch -i opencells-mods/src/oai_mme/oai_mme.c.patch src/oai_mme/oai_mme.c (这行patch的时候不成功,直接copy覆盖处理)
patch -i opencells-mods/src/oai_hss/utils/hss_config.c.patch src/oai_hss/utils/hss_config.c
patch -i opencells-mods/src/s6a/s6a_peer.c.patch src/s6a/s6a_peer.c
patch -i opencells-mods/src/gtpv1-u/gtp_mod_kernel.c.patch src/gtpv1-u/gtp_mod_kernel.c
patch -i opencells-mods/src/gtpv1-u/gtp_mod_kernel.h.patch src/gtpv1-u/gtp_mod_kernel.h
patch -i opencells-mods/src/gtpv1-u/gtpv1u_task.c.patch src/gtpv1-u/gtpv1u_task.c
为 EPC 安装第三方软件包
- cd openair-cn
- source oaienv
- cd scripts
- ./build_hss -i
- 安装过程中会提示一些软件是否需要安装,如果没有选择yes,安装过的可选no跳过
- Do you want to install freeDiameter 1.2.0 ?: yes
- set your MySQL password and remember it!
- phpmyadmin:
- choose light or apache as you prefer
- Configure database for phpmyadmin with dbconfig-common: yes
- password: same as MySQL for simplicity
- We don't use phpmyadmin later in this procedure, nevertheless we tested successfully also with it
- Install 3PP SW for mme and spgw
- ./build_mme -i
- 前面安装过的选择no不用重复安装
- Do you want to install freeDiameter 1.2.0: no
- Do you want to install asn1c rev 1516 patched?
: no - Do you want to install libgtpnl ?
: yes - wireshark permissions: as you prefer
- ./build_spgw -i
- Do you want to install libgtpnl ?
: no 
- Do you want to install libgtpnl ?
编译 EPC
cd openair-cnsource oaienv
cd scripts
./build_hss #有error 解决如下
./build_mme #有error 解决如下
./build_spgw #有error 解决如下


Our Network setup description(网络配置说明,跳过)
I’ve made a simple configuration for this all-in-one setup.
Each node is on a separate IP address, this address is used for all it’s interfaces. In our case of all-in-one, we take addresses on the loopback: this will be fine on all your machines.
- HSS is on localhost: 127.0.0.1
- eNB is on 127.0.0.10
- MME is on 127.0.0.20
- SPGW is on 127.0.0.30
The LTE diameter configuration is now isolated fromlinux hostname.
realm for our EPC: “OpenAir5G.Alliance”, so, full distinguish names (FQDN) are: hss.OpenAir5G.Alliance, mme.OpenAir5G.Alliance
Install this configuration for eNB(修改基站参数配置)
We tested with USRP B210 and two parameter files: 10MHz band, 20MHz band, Huawei E3272 UE, a cavity duplexer a simple antenna, about 1 meter distance UE/eNB antenna.
- openairinterface5g/targets/PROJECTS/GENERIC-LTE-EPC/CONF/enb.band7.tm1.50PRB.usrpb210.conf
- openairinterface5g/targets/PROJECTS/GENERIC-LTE-EPC/CONF/enb.band7.tm1.100PRB.usrpb210.conf
In your eNB configuration file, the network is now fixed, as lo interface always exists and our computer internal addresses also:
////////// MME parameters:
 mme_ip_address = ( { ipv4 = "127.0.0.20";
 ipv6 = "192:168:30::17";
 active = "yes";
 preference = "ipv4";
 }
 );

NETWORK_INTERFACES :
 {
 ENB_INTERFACE_NAME_FOR_S1_MME = "lo";
 ENB_IPV4_ADDRESS_FOR_S1_MME = "127.0.0.10/8";

ENB_INTERFACE_NAME_FOR_S1U = "lo";
 ENB_IPV4_ADDRESS_FOR_S1U = "127.0.0.10/8";
 ENB_PORT_FOR_S1U = 2152; # Spec 2152
 };
In the eNB config file, you need also to set the MCC and MNC as per your SIM card:
tracking_area_code = “1”;
mobile_country_code = “208”;
mobile_network_code = “92”;
And obviously, your radio parameters.
Install this configuration for EPC (配置核心网参数)
For the EPC, we install in OAI default directory: /usr/local/etc/oai
- 会用到前面补丁里面的文件
sudo cp -rp opencells-mods/config_epc/* /usr/local/etc/oai
Then, you should generate the cyphering certificates:
cd openair-cn; source oaienv; cd scripts./check_hss_s6a_certificate /usr/local/etc/oai/freeDiameter hss.OpenAir5G.Alliance
./check_mme_s6a_certificate /usr/local/etc/oai/freeDiameter mme.OpenAir5G.Alliance
Only the SGi output to internet need to be configured.(设置外网网卡)
In /usr/local/etc/oai/spgw.conf,
your should set the Ethernet interface that is connected to Internet, and,
to tell to the PGW to implement NAPT for the UE traffic
这里根据自己的外网填写,我的是 wlp5s0
 PGW_INTERFACE_NAME_FOR_SGI = "wlp5s0";
 PGW_MASQUERADE_SGI = "yes";
For the SIM card, you'll have more to do:(根据测试SIM卡配置MCC/MNC/TAC等参数)
- SIM MCC/MNC should be duplicated
- eNB: See above in eNB configuration chapter
- MME
- file: /usr/local/etc/oai/mme.conf to update
- GUMMEI_LIST = ( MCC=”208″ ; MNC=”92″; MME_GID=”4″ ; MME_CODE=”1″; } );
- TAI_LIST = ({MCC=”208″ ; MNC=”92″; TAC = “1”; } );
- file: /usr/local/etc/oai/mme.conf to update
- HSS
- Configure the password for MySQL
- in /usr/local/etc/oai/hss.conf, set password as the password you created during MySQL installation(设置访问数据库的root用户密码)
- A HSS database in text is in: opencells-mods/opencells_db.sql
- It is pre-configured with the mme id
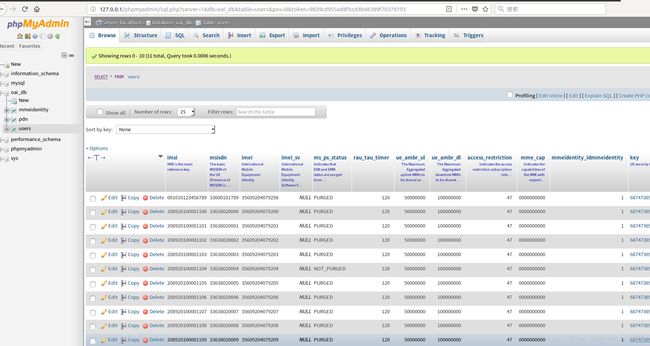
- A SIM user in network 001/01 (the test network defined by 3GGP) is already created.
- 10 users is network 208/92 (a French test network) are also created
- Each time you import this db, it erases the entire database
(example: you set mysql password to “linux”)- ./hss_db_import 127.0.0.1 root linux oai_db opencells-mods/opencells_db.sql
- We use to modify the db by updating this file with regular text editor,
then we re-load the entire database,
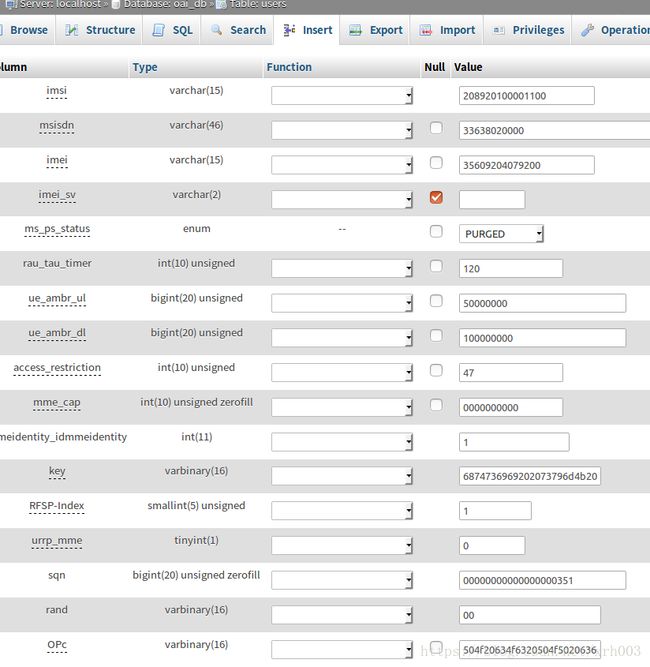
but, if you prefer, usage of http://localhost/phpmyadmin is fine - The important values to set are:
- table pdn:
- all IMSI are listed, with the APN: these values are in UE/USIM
- table users:
- all IMSI, key (Ki) and OPc must be the same inUSIM card
- Sqn increments automatically when the UE authenticate in both USIM and HSS DB: it should be set as per USIM internal incrementation
- table pdn:
- SIM card update
- Open cells UICC and card reader will be supported
- Configure the password for MySQL
可能遇到的问题:
1. 如果报错:error2002:can't connect to local mysql server through socket。
检查后发现mysql-server并没有自动安装。为了避免后续导入数据库出错,重新安装了系统和内核,在执行此步骤前先手动安装mysql-server,问题解决。
2. 在浏览器输入http://127.0.0.1/phpmyadmin,出现not found界面。
需要在Apache配置中添加phpmyadmin
打开apache.conf文件:
vim /etc/apache2/apache2.conf
添加下面语句:
Include /etc/phpmyadmin/apache.conf
重新启动apache服务:
/etc/init.d/apache2 restart
其他可能出现的问题,参见其他博客:
https://blog.csdn.net/wxsdr/article/details/53691763**********************************************************************************************************
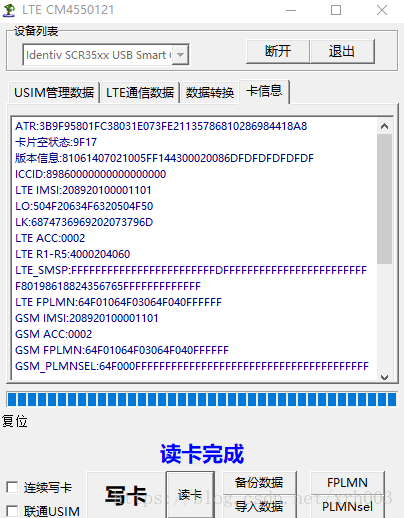
写白卡:
写 http://127.0.0.1/phpmyadmin 里面的参数就可以啦,
里面预设了10个IMSI :208920100001100-208920100001109
Ki:6874736969202073796d4b2079650a73
OPC: 504f20634f6320504f50206363500a4f
R1-R5: 4000204060
短消息中心随便填:
写卡软件:
![]()
连接读卡器


写卡:

读卡:
手机设置:
添加APN。
移动网络->接入点名称(APN)->添加APN(名字随便取),APN为oai.ipv4,其余的都不用填。还要开启数据漫游。
插入白卡,重启手机或者开关飞行模式。
手动扫描网络。
另外,作为测试机可以再安装一款网优分析软件 信号大师,或者网优大师。信号大师可以锁定网锁频段,在测试时锁频段后可以加快接入eNB的速度。
测试验证
测试前最好打开wireshark 抓包,后面启动所有进程后可以抓到S1SetupRequest 和 S1SetupResponse的包,后面如果有UE接入,还会抓到nas信令的包,这些都可以用于调试观察一些过程。善于使用wireshark工具分析是必备技能。
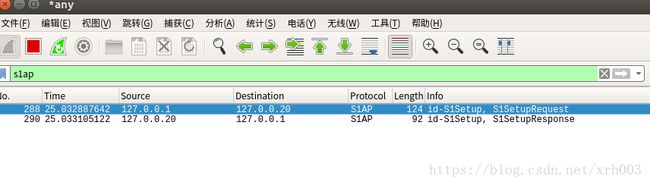
一次正常的联网过程的信令交互流程:

打开4个终端,顺序启动hss, mme, spgw, eNB:
- 启动hss
cd openair-cn; source oaienv; cd SCRIPTS; ./run_hss - 启动mme
cd openair-cn; source oaienv; cd SCRIPTS; ./run_mme - 启动spgw
cd openair-cn; source oaienv; cd SCRIPTS; sudo -E ./run_spgw - 启动eNB
sudo bash
cd openairinterface5g; source oaienv
cd cmake_targets/lte_build_oai/build
sudo ./lte-softmodem -d -O ~/openairinterface5g/targets/PROJECTS/GENERIC-LTE-EPC/CONF/enb.band7.tm1.usrpb210.conf - Connect the UE, it should attach to network and be able to reach internet through OAI networ
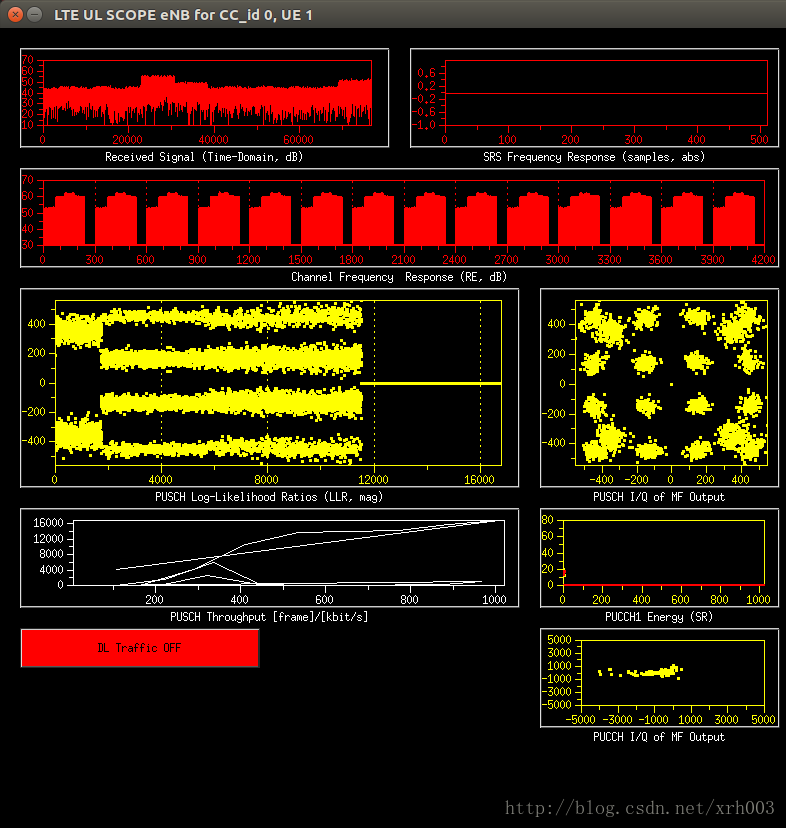
We re-built this procedure from scratch and tested two machines: i5-4570 and i5-6600K.
On the i5-4570, at maximum traffic,the eNB is stable on 10MHz band at full user data speed.
On the i5-6600K, we obtain stable performance at maximum traffic over 20MHz, transmission mode 1 (SISO),one single UE over-the-air 1 meter distance:
我的电脑配置 i5-6700HQ CPU, 5M带宽还算稳定,10M 20M 貌似有点不稳定。截了2张图