linux:使用rsync和inotify-tools实现文件实时同步
首先手头有两台linux服务器
系统为CentOS
1台作为主服务器,另1台作为同步服务器(主服务器上添加/修改/删除文件后将会同步给同步服务器)
首先先检查主服务器是否安装所需的工具
1.检查rsync是否已经安装
rpm -qa | grep rsync
如果没有安装则进行安装
yum -y install rsync
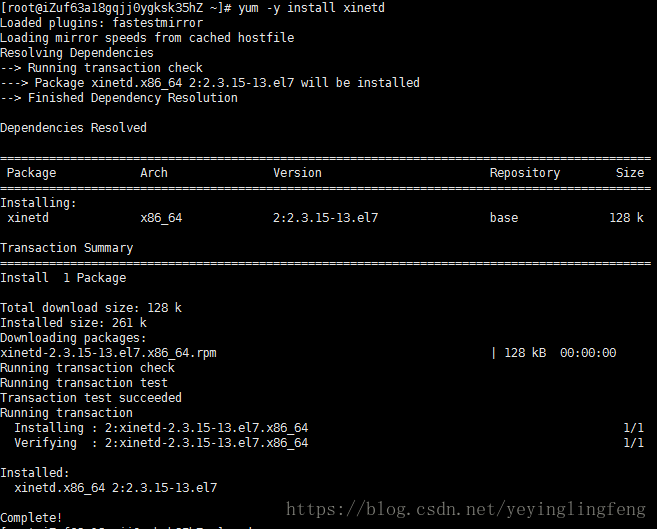
rpm -qa | grep xinetd
yum -y install xinetd

3.安装 inotify-tools
首先需要下载 inotify-tools
http://github.com/downloads/rvoicilas/inotify-tools/inotify-tools-3.14.tar.gz
然后上传到主服务上,我这里放在 /home目录下
解压
tar zxvf inotify-tools-3.14.tar.gz
进入文件夹
cd inotify-tools-3.14
配置(我这里直接安装在 /home/inotify中了)
./configure --prefix=/home/inotify
编译安装
make & make install
4.信任连接配置
登入同步服务器
新建用户 user-rsync , 密码随意
useradd -m user-rsync
passwd user-rsync
然后登入主服务器,生成秘钥文件,注意别漏掉最后的''
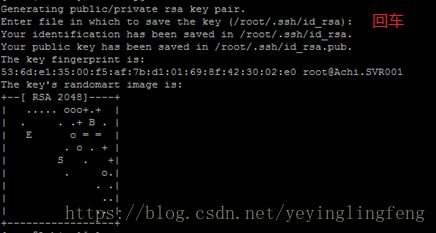
ssh-keygen -t rsa -P ''
然后把生成的id_rsa.pub拷贝到同步服务器上,xx.xx.xx.xx为同步服务器ip
在这之前先在同步服务器上新建user-rsync文件夹,我放在了 /home 目录下
cd /root/
scp .ssh/id_rsa.pub [email protected]:/home/user-rsync/id_rsa.pub
会提示输入密码,输入刚才创建user-rsync用户时的密码。
拷贝完毕后修改用户权限,把秘钥文件输入到authorized_keys中(需要我们先自己在user-rsync下创建.ssh文件夹)
chmod 700 /home/user-rsync/.ssh
cat /home/user-rsync/id_rsa.pub >> /home/user-rsync/.ssh/authorized_keys
chmod 600 /home/user-rsync/.ssh/authorized_keys
然后登录主服务器尝试连接同步服务器,xx.xx.xx.xx为同步服务器
ssh [email protected]
出现如下图就表示连接上了,输入exit退出(我这里用的用户名是bms-rsync)

能够成功连接同步服务器后
5.配置文件同步服务器
在同步服务器上也安装rsync和xinetd
(1) rsync 配置
mkdir /etc/rsyncd         				#创建配置目录
touch /etc/rsyncd/rsyncd.conf         	#创建主配置文件
chmod 600 /etc/rsyncd/rsyncd.conf     #修改用户文件权限
编辑配置文件
vi /etc/rsyncd/rsyncd.conf
内容如下
设置需要同步的目录改成自己需要进行同步的,我这里是 /home/filetest
#pid文件的存放位置
pid file = /var/run/rsync.pid
#日志文件位置,启动rsync后自动产生这个文件,无需提前创建
log file = /var/log/rsync.log
#支持max connections参数的锁文件
lock file=/var/run/rsync.lock
#rsync启动时欢迎信息页面文件位置
motd file = /etc/rsyncd/rsyncd.motd
transfer logging = yes
log format = %t %a %m %f %b
syslog facility = local3
#自定义名称
[filetest]
#设置需要同步的目录
path = /var/filetest/
#模块名称与[case]自定义名称相同
comment = filetest
#默认端口
port = 873
#设置rsync运行权限为root
uid = root
#设置rsync运行权限为root
gid = root
#设置超时时间
timeout = 600
#最大连接数
max connections = 200
#默认为true,修改为no,增加对目录文件软连接的备份
use chroot = no
#设置rsync服务端文件为读写权限
read only = no
#不显示rsync服务端资源列表
list = no
(2)CentOS 默认以 xinetd 方式运行 rsync 服务。rsync 的 xinetd 配置文件在 /etc/xinetd.d/rsync。
要配置以 xinetd 运行的 rsync 服务需要执行如下的命令:
chkconfig rsync on
vim /etc/xinetd.d/rsync
内容如下
service rsync
{
		disable=no
		socket_type=stream
		wait=no
		user=root
		server=/usr/bin/rsync
		server_args=--daemon --config=/etc/rsyncd/rsyncd.conf
log_on_failure += USERID
}
(3)配置rsyncd.motd,开始传送的时候会显示(备份节点)
vi /etc/rsyncd.motd
内容如下
###############################
#   Hello my owner, file is tranfering.
###############################
(4)启动服务
service xinetd restart
然后如果你是用root来创建的需要同步的目录(我这里是/home/filetest)则需要修改该目录的权限,因为我们在同步时是使用刚才创建的user-rsync用户,这样我们在同步时会出现权限不足的问题
cd /home/filetest
chown -R user-rsync .
6.主服务器测试
然后我在主服务 /home目录下也新建了一个filetest文件夹
在主服务器的文件夹 /home/filetest 文件夹中增加文件 test.txt 。
touch /home/filetest/test.txt
测试同步文件到同步服务器
当然文件夹位置可以自己指定
rsync -avH --port=873 --progress --delete /home/filetest/ [email protected]:/home/filetest
7.配置 inotify-tools
当然我们实际使用时不可能上传了一个文件然后还要手动运行rsync命令,都是需要实时自动同步的,这时候就需要 inotify-tools了。
主服务器
(1)修改内核参数(源节点)
vi /etc/sysctl.conf
修改参数,添加:
# inotify queue max length
fs.inotify.max_queued_events=99999999
# includ file directory
fs.inotify.max_user_watches=99999999
# user create max instances
fs.inotify.max_user_instances=65535
(2)编写监控脚本 inotify.sh
mkdir /usr/local/shell
vi /usr/local/shell/inotify.sh
内容如下
/home/inotify/bin/inotifywait为之前安装的 inotify-tools位置
#!/bin/bash
#源服务器同步目录
src=/home/filetest/
#目标服务器rsync同步目录模块名称
dst=/home/filetest/
/home/inotify/bin/inotifywait -mrq --timefmt '%d/%m/%y %H:%M' --format '%T%w%f%e' -e modify,create,delete,attrib $src | while read file
do
rsync -avH --port=873 --progress --delete $src [email protected]:$dst
done
设置脚本权限并启动脚本(源节点)
chmod 777 /usr/local/shell/inotify.sh
设置开机启动(源节点)
echo "/usr/local/shell/inotify.sh &">>/etc/rc.local
重启主服务器后测试(当然也可以不重启,这里重启只是检验下设置的开机启动是否有效)
先把之前传到同步服务器上的test.txt删除
然后主服务器执行
touch /home/filetest/test.txt
再查看下同步服务器上是否同步到了该文件,以后只要往主服务器上的/home/filetest中放文件/修改文件/删除文件都会实时自动同步到同步服务器。我们不需要做其他任何操作。


