EAST自然场景文本检测的实现
一、概述
最近,提取和理解自然场景中包含的文本信息变得越来越重要和受欢迎,ICDAR系列竞赛的前所未有的大量参与者和NIST推出的TRAIT 2016评估证明了这一点。文本检测作为后续过程的先决条件,在文本信息提取和理解的整个过程中起着至关重要的作用。以前文本检测方法已经在各种基准测试中获得了很好的表现这个领域。文本检测的核心是区分文本和背景的功能设计。传统上,功能是手动设计的在深度学习中捕获场景文本的属性基于方法的有效特征是直接从培训数据中学习。但是,现有的方法,无论是常规的还是深的基于神经网络,主要由几个阶段组成组件,可能是次优和耗时的。因此,这样的准确性和效率方法仍然远远不能令人满意。
二、EAST结构
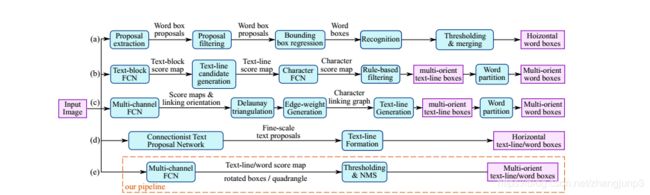
通过下图我们知道,一个文本检测有多个阶段,就以region proposals系的检测算法为例,他们通常包含候选框提取、候选框过滤、bouding box回归、候选框合并等阶段,EAST的作者认为,一个文本检测算法被拆分成多个阶段其实并没有太多好处,实现真正端到端的文本检测网络才是正确之举。所以EAST的pipeline相当优雅,只分为FCN生成文本行参数阶段和局部感知NMS阶段,网络的简洁是的检测的准确性和速度都有了进一步的提高。
EAST的主要优势:
1、提出了一种场景文本检测方法,包括两个阶段:完全卷积网络和NMS合并阶段。 FCN直接生成文本区域,不包括冗余和耗时的中间步骤。
2、管道可灵活生成字级或线级预测,其几何形状可以是旋转框或四边形,具体取决于具体应用。
3、所提出的算法在准确性和速度方面明显优于最先进的方法。
网络结构如下图所示:

由论文可以看出EAST网络分为特征提取层+特征融合层+输出层三大部分:
1、特征提取层: backbone采取PVANet来做特征提取,接下来送入卷积层,而且后面的卷积层的尺寸依次递减(size变为上一层的一半),而且卷积核的数量依次递增(是前一层的2倍)。抽取不同level的feature map,这样可以得到不同尺度的特征图,目的是解决文本行尺度变换剧烈的问题,size大的层可用于预测小的文本行,size小的层可用于预测大的文本行。
2、特征合并层,将抽取的特征进行merge.这里合并的规则采用了U-net的方法,合并规则:从特征提取网络的顶部特征按照相应的规则向下进行合并,这里描述可能不太好理解,具体参见下述的网络结构图。
3、网络输出层:网络的最终输出有5大部分,他们分别是:
- score map:一个参数,表示这个预测框的置信度;
- text boxes: 4个参数,(x,y,w,h),跟普通目标检测任务的bounding box参数一样,表示一个物体的位置;
- text rotation angle: 1个参数,表示text boxe的旋转角度;
- text quadrangle coordinates:8个参数,表示任意四边形的四个顶点坐标,即(x1,y1),(x2,y2),(x3,y3),(x4,y4)。
三、损失函数

文中比例设置为1。
类别损失函数:

其中其中β=反例样本数量/总样本数量:

几何误差:
![]()
对于RBOX,采用IoU loss:

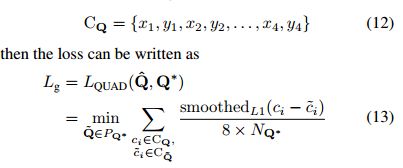
对于QUAD采用smoothed L1 loss,CQ={x1,y1,x2,y2,x3,y3,x4,y4},NQ*指的是四边形最短边的长度:
四、基于opencv实现文本检测
代码如下:
from imutils.object_detection import non_max_suppression
import numpy as np
import argparse
import time
import cv2

# construct the argument parser and parse the arguments
ap = argparse.ArgumentParser()
ap.add_argument("-i", "--image", type=str, default="D:\\Python\\opencv\\Positioning\\frame\\t.jpg",
                help="path to input image")
ap.add_argument("-east", "--east", type=str, default="D:\\Python\\opencv\\east\\frozen_east_text_detection.pb",
                help="path to input EAST text detector")
ap.add_argument("-c", "--min-confidence", type=float, default=0.5,
                help="minimum probability required to inspect a region")
ap.add_argument("-w", "--width", type=int, default=320,
                help="resized image width (should be multiple of 32)")
ap.add_argument("-e", "--height", type=int, default=320,
                help="resized image height (should be multiple of 32)")
args = vars(ap.parse_args())

# load the input image and grab the image dimensions
image = cv2.imread(args["image"])
orig = image.copy()
(H, W) = image.shape[:2]

# set the new width and height and then determine the ratio in change
# for both the width and height
(newW, newH) = (args["width"], args["height"])
rW = W / float(newW)
rH = H / float(newH)

# resize the image and grab the new image dimensions
image = cv2.resize(image, (newW, newH))
(H, W) = image.shape[:2]

# define the two output layer names for the EAST detector model that
# we are interested -- the first is the output probabilities and the
# second can be used to derive the bounding box coordinates of text
layerNames = [
    "feature_fusion/Conv_7/Sigmoid",
    "feature_fusion/concat_3"]

# load the pre-trained EAST text detector
print("[INFO] loading EAST text detector...")
net = cv2.dnn.readNet(args["east"])

# construct a blob from the image and then perform a forward pass of
# the model to obtain the two output layer sets
blob = cv2.dnn.blobFromImage(image, 1.0, (W, H),
                             (123.68, 116.78, 103.94), swapRB=True, crop=False)
start = time.time()
net.setInput(blob)
(scores, geometry) = net.forward(layerNames)
end = time.time()

# show timing information on text prediction
print("[INFO] text detection took {:.6f} seconds".format(end - start))

# grab the number of rows and columns from the scores volume, then
# initialize our set of bounding box rectangles and corresponding
# confidence scores
(numRows, numCols) = scores.shape[2:4]
rects = []
confidences = []

# loop over the number of rows
for y in range(0, numRows):
    # extract the scores (probabilities), followed by the geometrical
    # data used to derive potential bounding box coordinates that
    # surround text
    scoresData = scores[0, 0, y]
    xData0 = geometry[0, 0, y]
    xData1 = geometry[0, 1, y]
    xData2 = geometry[0, 2, y]
    xData3 = geometry[0, 3, y]
    anglesData = geometry[0, 4, y]

    # loop over the number of columns
    for x in range(0, numCols):
        # if our score does not have sufficient probability, ignore it
        if scoresData[x] < args["min_confidence"]:
            continue

        # compute the offset factor as our resulting feature maps will
        # be 4x smaller than the input image
        (offsetX, offsetY) = (x * 4.0, y * 4.0)

        # extract the rotation angle for the prediction and then
        # compute the sin and cosine
        angle = anglesData[x]
        cos = np.cos(angle)
        sin = np.sin(angle)

        # use the geometry volume to derive the width and height of
        # the bounding box
        h = xData0[x] + xData2[x]
        w = xData1[x] + xData3[x]

        # compute both the starting and ending (x, y)-coordinates for
        # the text prediction bounding box
        endX = int(offsetX + (cos * xData1[x]) + (sin * xData2[x]))
        endY = int(offsetY - (sin * xData1[x]) + (cos * xData2[x]))
        startX = int(endX - w)
        startY = int(endY - h)

        # add the bounding box coordinates and probability score to
        # our respective lists
        rects.append((startX, startY, endX, endY))
        confidences.append(scoresData[x])

# apply non-maxima suppression to suppress weak, overlapping bounding
# boxes
boxes = non_max_suppression(np.array(rects), probs=confidences)

# loop over the bounding boxes
for (startX, startY, endX, endY) in boxes:
    # scale the bounding box coordinates based on the respective
    # ratios
    startX = int(startX * rW)
    startY = int(startY * rH)
    endX = int(endX * rW)
    endY = int(endY * rH)

    # draw the bounding box on the image
    cv2.rectangle(orig, (startX, startY), (endX, endY), (0, 255, 0), 2)

# show the output image
cv2.imshow("Text Detection", orig)
cv2.imwrite("D:\\Python\\opencv\\Positioning\\frame\\dst.jpg",orig)
cv2.waitKey(0)
原始图片与检测图片如图所示:


由效果图看,EAST效果还是挺不错的。