日常使用
文章目录
- 1.dagger2配置
- 2.在stuiod3.0下开启Lambda表达式
- 3.一行文字多种颜色
- 4.android js 方法互掉
- 5.studio 中DataBinding使用
- 6.将项目中module变成library引用依赖
- 7.阿里路由框架ARout添加
- 8.浏览器cookie存放位置
- 9.A应用启动B应用
- 10.Kotlin直接使用id,不用findViewById
- 11.通过包名启动另一个应用
- 12.studio 去除版本控制
- 13.getColor过时
- 14.一行文字中多种颜色
- 15.8.0适配 通知栏
- 16. 8.0适配 安装未知来源
- 17.浏览github窗口左边显示目录结构
- 18.studio中报错,运行命令查看详细信息
- 19.快速获取当前类
- 20.运行Release签名进行调试
- 21.共享元素使用
- 22.vivo 手机安装失败
- 23.画中画
- 24.Design添加
- 25.上传github
- 26.删除Git仓库已关联文件
- 27.删除文件名过长
- 28.视频资源链接
- 29.WebView同时加载http和https,图片或视频无法正常加载
- 30.取消对.9图片的检查
- 31.关闭所有Activity,打开一个新Activity
- 32.Studio中无线调试手机
- 33.Git 提交
- 34.忽略NDK版本差异检测
- 35.studio当前编译版本和源码关联映射文件
- 36.序列化和反序列化
- 37.Popwindow在指定控件下方显示
- 38.productFlavors设置不同环境的APK
- 39.remote: HTTP Basic: Access denied
- 40.冷启动耗时统计
- 41.WebView post请求
- 42.Chrome中调试WebView
- 43.Git 文件过大,上传失败
- 44.混淆
1.dagger2配置
- 如果是在2.3上 需要引入插件
1.在根项目 build.gradle中配置
classpath ‘com.neenbedankt.gradle.plugins:android-apt:1.8’
2.module级别下的build.gradle中在最顶部引入插件
apply plugin: ‘com.neenbedankt.android-apt’
3.依赖
compile ‘com.google.dagger2.6’
apt ‘com.google.dagger:dagger-compiler:2.6’ - 如果在3.0下 直接在modlue 级别build.gradle 下 依赖即可
compile ‘com.google.dagger2.11’
annotationProcessor ‘com.google.dagger:dagger-compiler:2.11’
2.在stuiod3.0下开启Lambda表达式
 defaultConfig {
        ···
    }
    compileOptions {
        sourceCompatibility JavaVersion.VERSION_1_8
        targetCompatibility JavaVersion.VERSION_1_8
    }
3.一行文字多种颜色
 SpannableStringBuilder span = new SpannableStringBuilder("我们都是好孩子");
 span.setSpan(new ForegroundColorSpan(ContextCompat.getColor(this,R.color.font_black)), 0, content.length(), Spannable.SPAN_EXCLUSIVE_EXCLUSIVE);
 tvDanger.setText(span);
4.android js 方法互掉
//js调用android
//js  中写  window.android.quit()
//记得  代码中 设置
 WebSettings settings = mWebView.getSettings();
 settings.setJavaScriptEnabled(true);
 //添加js互掉的方法
 mWebView.addJavascriptInterface(new JsInteration(this), "android");
public class JsInteration{

@JavascriptInterface
    public void quit() {

       act.finish();

    }
 }
//android  调用js
mWebView.loadUrl("javascript:pageUp()");
5.studio 中DataBinding使用
android {
	......
    dataBinding {
        enabled = true
    }
    ........
}
6.将项目中module变成library引用依赖
选择你想作为library的module。选择build.gradle文件将最上方的代码apply plugin: 'com.android.application’改为apply plugin: ‘com.android.library’。
并删除defaultConfig下的 applicationId “yy.hao.com.selfview”
依赖module
7.阿里路由框架ARout添加
GitHub地址
1.添加依赖。
android {
    defaultConfig {
	...
	javaCompileOptions {
	    annotationProcessorOptions {
		arguments = [ moduleName : project.getName() ]
	    }
	}
    }
}
//ARouter  依赖
compile 'com.alibaba:arouter-api:1.3.1'
annotationProcessor 'com.alibaba:arouter-compiler:1.1.4'
2.Application中初始化
  ARouter.init(this);
3. ARouter.getInstance().build("/Activity/NewsActivity")
                .navigation();
4.要跳转的NewsActivity设置映射
  下图所示:

8.浏览器cookie存放位置
- 火狐浏览器cookie存放位置
C:\Users\Administrator\AppData\Roaming\Mozilla\Firefox\Profiles\pjajm1nj.default
下cookies.sqlite - Chrome浏览器cookie存放位置
C:\Users\jay\AppData\Local\Google\Chrome\User Data\Default\Cookies
9.A应用启动B应用
Intent intent = new Intent(Intent.ACTION_MAIN);
ComponentName cn = new ComponentName("com.bao","com.bao.MainActivity");
intent.setComponent(cn);
//或者 直接
//intent.setClassName("com.bao","com.bao.MainActivity");
startActivity(intent);
10.Kotlin直接使用id,不用findViewById
- 需要再app Module 下build.gradle中 引入插件
//顶部引入
apply plugin:'kotlin-android-extensions'
11.通过包名启动另一个应用
 PackageManager pm = getPackageManager();
 Intent intent = pm.getLaunchIntentForPackage("hao.wen.zhang.plugin");
 if (intent == null) {

  Toast.makeText(MainActivity.this, "未安装", Toast.LENGTH_SHORT).show();
 } else {

    startActivity(intent);
  }
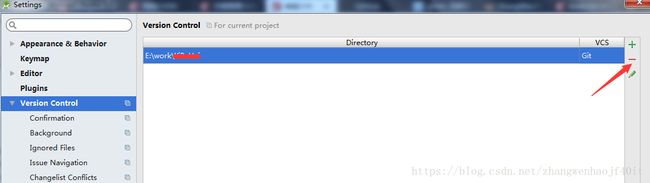
12.studio 去除版本控制
13.getColor过时
ContextCompat.getColor(this,R.color.red)
14.一行文字中多种颜色
SpannableString spann = new SpannableString("恭喜您获得2000元体验金");
spann.setSpan(new ForegroundColorSpan(Color.parseColor("#F35B10")),5,10,Spanned.SPAN_INCLUSIVE_INCLUSIVE);
tv.setText(spann);
![]()
四种Flag值 含义:
Spanned.SPAN_EXCLUSIVE_EXCLUSIVE --- 不包含两端start和end所在的端点
Spanned.SPAN_EXCLUSIVE_INCLUSIVE --- 不包含端start,但包含end所在的端点
Spanned.SPAN_INCLUSIVE_EXCLUSIVE --- 包含两端start,但不包含end所在的端点
Spanned.SPAN_INCLUSIVE_INCLUSIVE--- 包含两端start和end所在的端点
15.8.0适配 通知栏
 @TargetApi(Build.VERSION_CODES.O)
    @Override
    public void notifyAdaper() {
        if (Build.VERSION.SDK_INT >= Build.VERSION_CODES.O) {
            NotificationChannel channel = new NotificationChannel("push_id", getString("推送消息"), NotificationManager.IMPORTANCE_HIGH);
            NotificationManager notificationManager = (NotificationManager) getSystemService(
                    NOTIFICATION_SERVICE);
            if (notificationManager != null) {

                notificationManager.createNotificationChannel(channel);
            }
        }
    }
16. 8.0适配 安装未知来源
清单文件中增加权限: 该权限无需动态申请
跳转打开未知来源开关
 /*
    *
    * 适配8.0
    * 申请未知应用安装
    * */
    @Override
    public void requestPermissions() {

        if (Build.VERSION.SDK_INT >= Build.VERSION_CODES.O) {

            //是否允许  安装未知应用
            boolean isInstallPermission = getPackageManager().canRequestPackageInstalls();
            if (!isInstallPermission) {  //没有 同意 则跳转开启
                Uri packageURI = Uri.parse("package:" + getPackageName());
                Intent intent = new Intent(Settings.ACTION_MANAGE_UNKNOWN_APP_SOURCES, packageURI);
                startActivityForResult(intent, Constant.REQUEST_CODE_INSTALL);
            } else {//更新逻辑
                ...

            }

        } else {   //更新逻辑
            ...
        }


    }
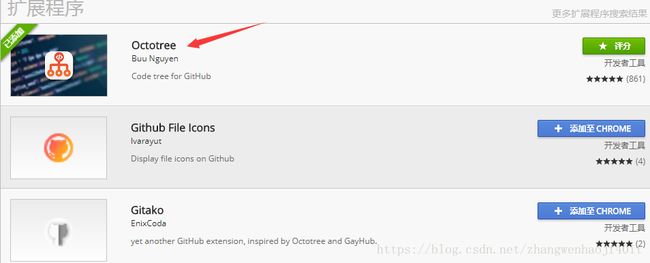
17.浏览github窗口左边显示目录结构
  安装插件OctoTree,
  Chrome商店,中搜索OctoTree
  火狐浏览器同样也可以
18.studio中报错,运行命令查看详细信息
gradlew compileDebugSources --stacktrace -info
19.快速获取当前类
adb shell "dumpsys window | grep mCurrentFocus"
20.运行Release签名进行调试
android {

    signingConfigs {//配置签名信息
        release {
            storeFile file("D:/.......keystore")
            keyAlias .............
            keyPassword  ..........
            storePassword ............
        }
    }
       buildTypes {//引入上面所配置的签名
        debug {
            signingConfig signingConfigs.release
        }
    }
    .........
}
21.共享元素使用
//A   Activity
Intent intent = new Intent(this,BBB.class);
ActivityOptionsCompat activityOptions = ActivityOptionsCompat.makeSceneTransitionAnimation(
                       this,
                        new Pair(findViewById(R.id.imageview_item),
                                BBB.VIEW_NAME_HEADER_IMAGE),
                        new Pair(findViewById(R.id.textview_name),
                                BBB.VIEW_NAME_HEADER_TITLE));
               ActivityCompat.startActivity(this,intent,activityOptions.toBundle());
//B Activity
 public static final String VIEW_NAME_HEADER_IMAGE = "image";
 public static final String VIEW_NAME_HEADER_TITLE = "title";
 TextView title = findViewById(R.id.textview_title);
 ImageView image = findViewById(R.id.imageview_header);
 ViewCompat.setTransitionName(image, VIEW_NAME_HEADER_IMAGE);
 ViewCompat.setTransitionName(title, VIEW_NAME_HEADER_TITLE);
 参考:https://github.com/googlesamples/android-ActivitySceneTransitionBasic
22.vivo 手机安装失败
gradle.properties中加入android.injected.testOnly=false
23.画中画
 PictureInPictureParams.Builder mPictureInPictureParamsBuilder =
                        new PictureInPictureParams.Builder();
                Rational aspectRatio = new Rational(iv.getWidth(), iv.getHeight());
                mPictureInPictureParamsBuilder.setAspectRatio(aspectRatio).build();
                enterPictureInPictureMode(mPictureInPictureParamsBuilder.build());
清单文件:
官方Demo
24.Design添加
implementation 'com.android.support:design:28.0.0'
25.上传github
echo "# WebStudy" >> README.md
git init
git add README.md
git commit -m "first commit"
git remote add origin https://github.com/zhangwenhaojf40/WebStudy.git
git push -u origin master
26.删除Git仓库已关联文件
//比如删除  gradle/wrapper
git rm --cached -r gradle/wrapper
commit 并 push
27.删除文件名过长
// 1 文件夹包含过长文件   同级目录下新建文件夹2    打开CMD命令,执行以下命令
robocopy  2  1  /purge
注意:2是空文件夹,1是要删除的文件夹
删除即可
28.视频资源链接
https://v-cdn.zjol.com.cn/280443.mp4
https://v-cdn.zjol.com.cn/276982.mp4
http://tanzi27niu.cdsb.mobi/wps/wp-content/uploads/2017/05/2017-05-17_17-33-30.mp4
更多视频资源
29.WebView同时加载http和https,图片或视频无法正常加载
场景:webview.load(“https://xxx.xxx.com”),链接里面图片/视频地址为http,则无法加载
   WebSettings webSettings = webview.getSettings();
            if (Build.VERSION.SDK_INT >= Build.VERSION_CODES.LOLLIPOP) {
                webSettings.setMixedContentMode(WebSettings.MIXED_CONTENT_ALWAYS_ALLOW);
            }
参数解释:
//Webview不允许https站点加载http站点内容.5.0之后默认这样
MIXED_CONTENT_NEVER_ALLOW

//允许WebView在Https站点加载Http的内容,不安全,不推荐这样使用,上述就是这样解决的
MIXED_CONTENT_ALWAYS_ALLOW

//WebView会尝试去兼容最新Web浏览器的风格。一些不安全的内容(Http)能被加载到一个安全的站点上(Https),而其他类型的内容将会被阻塞。这些内容的类型是被允许加载还是被阻塞可能会随着版本的不同而改变,并没有明确的定义。这种模式主要用于在App里面不能控制内容的渲染,但是又希望在一个安全的环境下运行。
MIXED_CONTENT_COMPATIBILITY_MODE
30.取消对.9图片的检查
//app build.gradle下添加
aaptOptions.cruncherEnabled = false
aaptOptions.useNewCruncher = false
31.关闭所有Activity,打开一个新Activity
比如token失效,关闭所有界面,跳转到登录界面
     Intent intent = new Intent(this,LoginActivity.class);
     intent.setFlags(Intent.FLAG_ACTIVITY_CLEAR_TASK | Intent.FLAG_ACTIVITY_NEW_TASK);
     startActivity(intent);
如果出现黑屏,可配置LoginActivity主题样式,没有亲测
// - true
主要是这句
32.Studio中无线调试手机
前提:同一局域网内
在命令行输入以下两个命令:
//指定手机端口号,任意
adb tcpip  8888
//查看手机ip,断开数据线,连接手机
adb connect xxx.xx.xx.xx:8888

//如果在手机上找不到ip地址,可执行以下命令,快速查看
adb shell ifconfig wlan0
33.Git 提交
git init
git add .
git commit -m first
git remote add origin https://github.com/zhangwenhaojf40/AddressSample.git
git push -u origin master
34.忽略NDK版本差异检测
gradle.properties中配置 android.useDeprecatedNdk=true
35.studio当前编译版本和源码关联映射文件
C:\Users\用户名\.AndroidStudio3.5\config\options,找到这个文件jdk.table.xml文件
36.序列化和反序列化
 //申请权限
 public void requestPermiss(){
	 if(ActivityCompat.checkSelfPermission(MainActivity.this,Manifest.permission.WRITE_EXTERNAL_STORAGE)!=
                PackageManager.PERMISSION_GRANTED
                ){
                    ActivityCompat.requestPermissions(MainActivity.this, new String[]{Manifest.permission.WRITE_EXTERNAL_STORAGE, Manifest.permission.READ_PHONE_STATE}, 100);
                }else{//文件
                    objectToFile();
                }
}
  //序列化
    public void objectToFile() {
        String  path = Environment.getExternalStorageDirectory().getPath();
        file = new File(path+"/Test","tongtong.txt");

        try (ObjectOutputStream outputStream = new ObjectOutputStream(new FileOutputStream(file))){
            if (!file.exists()) {
                //创建文件夹
                boolean mkdirs = file.getParentFile().mkdirs();
                //创建文件
                boolean newFile = file.createNewFile();
            }
            student = new Student("Tom", 21);
            outputStream.writeObject(student);
            Toast.makeText(this, "写入完毕", Toast.LENGTH_SHORT).show();
        } catch (Exception e) {
            e.printStackTrace();
        }
    }
    //反序列化
    public void fileToObject(){
      ObjectInputStream inputStream = new ObjectInputStream(new FileInputStream(file));
       student.name = "童童";
       Student studentc= (Student) inputStream.readObject();
    }
37.Popwindow在指定控件下方显示
var popupWindow:PopupWindow?=null
    fun initSearchPopupWindow() {
        val linkHashMap = SaveUserUtils.readHistoryUser()
        var ll:ViewGroup?=null
        if (popupWindow==null){
            val view = View.inflate(activity!!,R.layout.popwindow_history_user, null)//自己的弹框布局
             ll= view.findViewById(R.id.llHistoryUserContainer)
            view.isFocusable=true
            view.isFocusableInTouchMode=true
            popupWindow =  PopupWindow(view, RadioGroup.LayoutParams.MATCH_PARENT, RadioGroup.LayoutParams.WRAP_CONTENT);
            popupWindow?.isFocusable=true
            popupWindow?.isOutsideTouchable=true
        }
}
view.setOnClickListener{
popupWindow?.showAsDropDown(ll_view)//PopupWindow在控件ll_view下面
	}
38.productFlavors设置不同环境的APK
flavorDimensions ""
    productFlavors {
        //开发环境
        develop {
            applicationId 'com.dtrt.preventpro.develop'
            buildConfigField("String", "SERVICE_HOST", "\"https://xxxxx\"")
        }
        //生产环境
        product {
            applicationId 'com.dtrt.preventpro'
            buildConfigField("String", "SERVICE_HOST", "\"https://xxxxx\"")
        }
    }
//自定义apk名称(apk文件重命名)
    applicationVariants.all { variant ->
        variant.outputs.all { output ->
            def outputFile = output.outputFile
            def buildName
            def versionName
            def fileName
            variant.productFlavors.each { product ->
                buildName = product.name
                versionName = product.versionName
            }
            if (outputFile != null && outputFile.name.endsWith('.apk')) {
                fileName = "${productFlavors.name}${releaseTime()}.apk"
                outputFileName = fileName
            }

        }
    }
// 显示的时间格式,形如20171110
def releaseTime() {
    return new Date().format("yyyyMMdd", TimeZone.getTimeZone("UTC"))
}

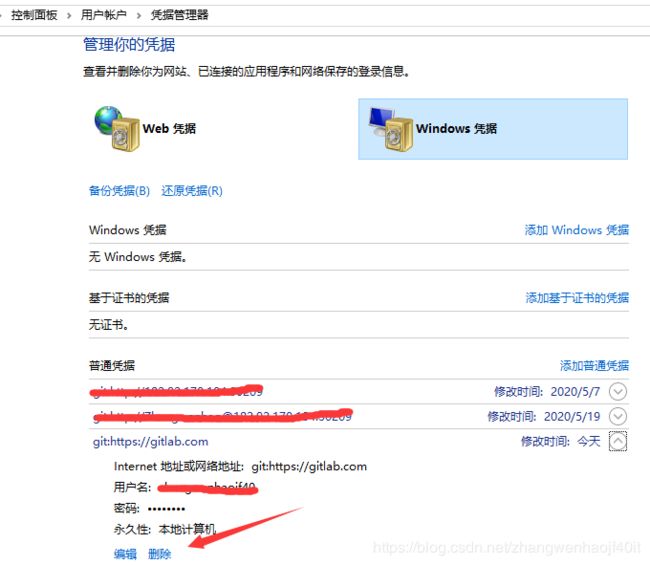
39.remote: HTTP Basic: Access denied
删除凭证,重新输入账号密码
40.冷启动耗时统计
adb shell am start -S -W 包名/类全限定名
41.WebView post请求
 val sb=StringBuffer()
  sb.append("id").append("=").append("xxxxxxx").append("&")
  //处理特殊符号,比如token 包含#符号 会不识别
  .append("token").append("=").append(URLEncoder.encode(token,"utf-8"))
  webView.postUrl(getUrl(),sb.toString().toByteArray())
42.Chrome中调试WebView
1.Android 代码中设置webview
 if (BuildConfig.DEBUG && Build.VERSION.SDK_INT >= Build.VERSION_CODES.KITKAT) {
            WebView.setWebContentsDebuggingEnabled(true)
        }
2.chrome浏览器中访问
chrome://inspect/#devices
43.Git 文件过大,上传失败
git config http.postBuffer 524288000
运行命令后,可看到 .git目录下config文件增加
[http]
postBuffer = 524288000
44.混淆
表现:返回字段为空
-keep class com.xxx.xxx.bean.*{*;}
-keep class com.xxx.xxx.*{*;}  //baseRespons