《ASP.NET MVC 企业级实战》阅读笔记
小应用概述:获取天气预报(9.2)
第一章 MVC开发前奏
1.1 开发环境搭建
1.1.1 操作系统和开发工具
1.操作系统;2.VS;3.SQL SERVER;4.MySQL;5.Git(TortoiseGit/SourceTree);6.Reflector
1.1.2 VS基本配置
- 1.显示行号
“工具---->选项---->文本编辑器---->所有语言”下的“行号”
- 2.设置屏幕保护色
“工具>>>选项>>>环境>>>字体和颜色>>>项背景>>>自定义”设置“R:204,G:232,B:204”
1.2 常用辅助开发工具介绍
Firebug,HttpRequester/Poster。
1.3 知识储备
C#,ADO.Net,SQL,HTML,CSS,JS,JQ,ASP.NET WebForm
第二章 Entity Framework
使用EF的目的就是为了高效地开发,如果项目中对性能要求非常高,业务又十分复杂的话,就不建议使用EF,可以考虑使用一些轻量级ORM框架或者直接使用原生SQL或存储过程。
2.1 Entity Framework简介
Entity Framework 的全称为ADO.NET Entity Framework,简称为EF。
EF(实体框架)是微软以ADO.NET为基础所发展出来的对象关系对应(O/R Mapping)解决方案。
Entity Frmework 的特点:
- 支持多种数据库(MSSQL,Oracle,Mysql和DB2)
- 强劲的映射引擎,能很好地支持储存过程。
- 提供VS集成工具,进行可视化操作
- 能够与ASP.NET、WPF、WCF、WCF Data Services进行很好的集成。
什么是O/R Mapping?
广义上,ORM指的是面向对象的对象模型和关系型数据库的数据结构之间的互相转换。
狭义上,ORM可以被认为是基于关系型数据库的数据存储,实现一个虚拟的面向对象的户数据访问接口。
2.2 Database First 开发方式
DBFirst又叫数据库优先开发方式,是一种比较旧的开发方式,现在越来越多的企业已经不再使用。
2.2.1 创建Database First Demo
第一步:首先准备一张表:
第二步:新建---项目----Windows---控制台程序
第三步:添加“数据实体模型”
这一步,需要自己下载一些插件,让mysql和vs联系起来,例如EF框架,mysql for vs2013/odbc等。
之前的那张表无意删了,又建了张新表:
 static void Main(string[] args)
        {
            studentEntities entity = new studentEntities();
            grade g_grade = new grade() { id = 2,Sid = 1,grade1 = 11 };
            entity.grades.Add(g_grade);
            entity.SaveChanges();
        }
2.2.2 新增
 static int Add()
        {
            using (NorthwindEntities db = new NorthwindEntities())
            {
                Customer customer = new Customer
                {
                    CustomerID = "zzh",
                    Address = "安徽蚌埠",
                    City = "安徽",
                    Phone = "123321123",
                    CompanyName = "网新",
                    ContactName = "中华"

                };
                //方法一
                db.Customers.Add(customer);
                //方法二(此部分报错)
                //DbEntityEntry entry = db.Entry(customer);
                //entry.State = System.Data.EntityState.Added;
               return db.SaveChanges();

            }
        }
突然还是想把刚刚没实现的方法试一下,然后,添加了一个应用,system.data.service.client,然后引入using System.Data.Entity.Infrastructure;起初还是报错,然后调来调去也没调好,然后试了下第一种方法,然后再切换到第二种方法时,就可以插入数据了,问题也没找出来。
贴一下执行的代码:
using System;
using System.Collections.Generic;
using System.Linq;
using System.Text;
using System.Threading.Tasks;
using System.Data.Entity.Infrastructure;


namespace TestOne
{
    class Program
    {
        #region add
        static int Add()
        {
            try
            {
                using (NorthwindEntities db = new NorthwindEntities())
                {
                    Customer customer = new Customer
                    {
                        CustomerID = "an",
                        Address = "安",
                        City = "安ss",
                        Phone = "3321123",
                        CompanyName = "dd网",
                        ContactName = "中dd"

                    };
                    //方法一
                    //db.Customers.Add(customer);
                    //方法二
                    DbEntityEntry entry = db.Entry(customer);
                    entry.State = System.Data.Entity.EntityState.Added;
                    return db.SaveChanges();
                }
            }
            catch (Exception ex)
            {
                Console.WriteLine(ex.Message);
                Console.ReadLine();
                throw;
            }
        }
        #endregion
        #region 查询一
        static void QueryDelay()
        {
            using (NorthwindEntities db = new NorthwindEntities())
            {
                //DbQuery<>
            }
        }
        #endregion
        static void Main(string[] args)
        {
            Add();
        }
    }
}
执行结果:
2.2.3 简单查询和延时加载
为了查看延时加载,要使用SqlProfiler跟踪SQL语句,加断点、加SqlProfiler跟踪事件。
static void QueryDelay()
        {
            using (NorthwindEntities db = new NorthwindEntities())
            {
                DbQuery dbQuery = db.Customers.Where(p => p.ContactName == "中华").OrderBy(p => p.ContactName).Take(1) as DbQuery;
                //获得延迟查询对象后,叼哦那个对象的获取方法,此时,就会根据之前的条件生成SQL语句
                //查询数据库
                Customer customer = dbQuery.FirstOrDefault();
                //或者SingleOrDefault()
                Console.WriteLine(customer.ContactName + customer.Address + customer.CustomerID);

            }
使用SqlProfiler追踪Sql语句:
第九章 分布式技术
9.1 WebService
第一步: 创建一个空项目,WebAppService,.net framework 4.5
第二步:右击项目,添加新项,web服务,命名为“MyWebService.asmx”
第三步:在MyWebService类中默认会添加一个HelloWorld方法,继续添加如下方法:
[WebMethod]
        public string HelloWorld()
        {
            return "Hello World";
        }
        ///
        /// 乘法运算
        ///
        /// 参数a
        /// 参数b
        /// a * b
        [WebMethod]
        [WebMethod(Description = "乘法运算(计算两个数相乘的结果)")]
        public int Multiplier(int a, int b)
        {
            return a * b;
        }
第四步:直接在浏览器中浏览MyWebService.asmx。
第五步:创建web窗体
form id="form1" runat="server">
第六步:添加服务引用
第七步:点击按钮事件代码:
protected void btnGetResult_Click(object sender, EventArgs e)
        {
            ServiceRef.MyWebServiceSoapClient _client = new ServiceRef.MyWebServiceSoapClient();
            txtResult.Text = _client.Multiplier(int.Parse(txtA.Text.Trim()), int.Parse(txtB.Text.Trim())).ToString();
        }
第八步:运行页面
9.2 调用天气预报服务
第一步:百度搜索“天气预报服务”,这里以http://www.webxml.com.cn/WebServices/WeatherWebService.asmx/getWeatherbyCityName这个天气预报为例。
第二步:引入web服务:添加服务引用---》高级--->添加web引用
第三步:从 http://www.webxml.com.cn/images/weather.zip中下载天气预报图标,然后解压,将文件加weather复制到根目录文件夹Content下。
第四步:添加Home控制 器和两个GetWeather方法,实现代码。
HomeControler.cs:
  public ActionResult GetWeather()
        {
            return View();
        }

        [HttpPost]
        public ActionResult GetWeather(String city)
        {
            //把webservice当作一个类操作
            Weather.WeatherWebService client = new Weather.WeatherWebService();
            var s = client.getWeatherbyCityName(city);
            if (s[8] == "")
            {
                ViewBag.Msg = "暂时不支持您查询的城市";
            }
            else
            {
                ViewBag.ImgUrl = @"/Content/weather/" + s[8];
                ViewBag.General = s[1] + " " + s[6];
                ViewBag.Actually = s[10];
            }
            return View();
        }
GetWeather.cshtml
@{
ViewBag.Title = "GetWeather";
}
@using (Html.BeginForm("GetWeather", "Home", FormMethod.Post))
{
请输入查询的城市:@Html.TextBox("city")
天气概况: @ViewBag.General @{
if(!string.IsNullOrEmpty(ViewBag.ImgUrl as string))
{}
}
天气实况:@ViewBag.Actually
@ViewBag.Msg
}
9.3 WCF
WCF(Windows Communication Foundation)是.NET Framework的扩展,它 提供了创建安全的、可靠的、事务服务的统一框架,WCF 整合和扩展了现有分布式系统的开发技术,如Microsoft .NET Remoting、Web Services、Web Services Enhancements (WSE)等等,来开发统一的可靠系统。
SOA:面向服务的架构(SOA[Service-Oriented Architecture])是一个组件模型,它将应用程序的不同功能单元(称为服务)通过这些服务之间定义良好的接口和契约联系起来。接口是采用中立的方式进行定义的,它应该独立于实现服务的硬件平台、操作系统和编程语言。这使得构建在各种各样的系统中的服务可以以一种统一和通用的方式进行交互。
9.3.1 WCF体系架构简介
- 契约[协定]
- 服务运行
- 消息传递
- 宿主和激活
9.3.2 WCF的基础概念
- 地址
- 绑定
- 契约
- 终结点
- 元数据
-
宿主
9.4 创建第一个WCF程序
第一步:新建项目----->类库
第二步:添加System.ServiceModel程序集引用
第三步:新建一个接口IHelloService.cs,引入命名空间using System.ServiceModel
using System;
using System.Collections.Generic;
using System.Linq;
using System.Text;
using System.Threading.Tasks;
using System.ServiceModel;

namespace HelloService
{
    [ServiceContract]
    public interface IHelloService
    {
        [OperationContract]
        string SayHello(string name);
    }
}
第四步:添加HelloService类实现IHelloService接口
using System.Collections.Generic;
using System.Linq;
using System.Text;
using System.Threading.Tasks;

namespace HelloService
{
   public class HelloService : IHelloService
    {
       public string SayHello(string name)
       {
           return "你好,我是" + name;
       }
    }
}
第五步:新建宿主,选择“新建项目---->控制台应用程序”,并命名为HelloSErviceHost
第六步:添加System.ServiceModel引用和项目引用HelloService,应用之前的类库项目。
第七步:在HelloServiceHost项目中,修改Program.cs代码
using System;
using System.Collections.Generic;
using System.Linq;
using System.Text;
using System.Threading.Tasks;
//添加引用
using System.ServiceModel;
using System.ServiceModel.Channels;
namespace HelloServiceHost
{
    class Program
    {
        static void Main(string[] args)
        {
            //using(MyHelloHost host = )
        }


    }
    public class MyHelloHost : IDisposable
    {
        ///
        /// 定义一个服务对象
        ///
        private ServiceHost _myHelloHost;
        public const string BaseAddress = "net.pipe:localhost";//基地址
        public const string HelloServiceAddress = "Hello";//可选地址
        public static readonly Type ServiceType = typeof(HelloService.HelloService);//服务契约实现类型
        public static readonly Type ContractType = typeof(HelloService.HelloService);//服务契约接口
        public static readonly Binding HelloBinding = new NetNamedPipeBinding();//服务定义一个绑定
        ///
        /// 构造方法
        ///
        public MyHelloHost()
        {
            CreateHelloServiceHost();
        }
        protected void CreateHelloServiceHost()
        {
            _myHelloHost = new ServiceHost(ServiceType, new Uri[] { new Uri(BaseAddress) });//创建服务对象
            _myHelloHost.AddServiceEndpoint(ContractType,HelloBinding,HelloServiceAddress);//添加终结点
        }
        ///
        /// 打开服务方法
        ///
        public void Open()
        {
            Console.WriteLine("开始启动服务...");
            _myHelloHost.Open();
            Console.WriteLine("服务已经启动");
        }

        ///
        /// 销毁服务宿主对象实例
        ///
        public void Dispost()
        {
            if (_myHelloHost != null)
            {
                (_myHelloHost as IDisposable).Dispose();
            }
        }
    }
}
第八步:新建客户断调用程序,选择“新建项目--->控制太应用程序”,并命名为HelloClient。
第九步:添加项目引用,HelloService、HelloServiceHost和程序集System.ServiceModel。
第十步:修改HelloClient项目中的Program.cs代码:
using System;
using System.Collections.Generic;
using System.Linq;
using System.Text;
using System.Threading.Tasks;

using System.ServiceModel;
using System.ServiceModel.Channels;
using HelloService;

namespace HelloClient
{
    class Program
    {
        static void Main(string[] args)
        {
            using (HelloProxy proxy = new HelloProxy())
            {
                //利用代理调用方法
                Console.WriteLine(proxy.Say("张中华"));
                Console.ReadLine();
            }
        }
    }
    [ServiceContract]
    interface IService
    {
        [OperationContract]
        string Say(string name);
    }

    class HelloProxy : ClientBase, IService
    {
        public static readonly Binding HelloBinding = new NetNamedPipeBinding();
        //硬编码定义绑定
        //硬编码定义地址,注意这里要和之前服务定义的地址保持一致
        public static readonly EndpointAddress HelloAddress = new EndpointAddress(new Uri("net.pipe://localhost/Hello"));
        public HelloProxy() : base(HelloBinding, HelloAddress) { }//构造方法
        public string Say(string name)
        {
            //使用Channel属性服务进行调用
            return Channel.SayHello(name);
        }
    }
}
第十一步:运行HelloServiceHost
第十二步:运行HelloClient
这个地方采用新实例运行,不然会报错。
当HelloServiceHost没启动时:
当设置启动方案为多启动项时:
9.5 直接创建WCF项目
第一步:新建WCF服务,命名为MyWcfService
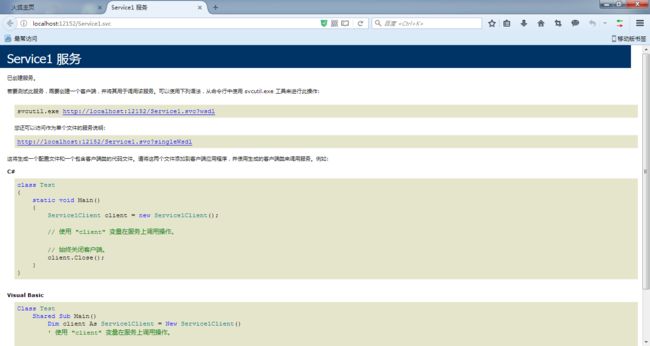
第二步:右击Service1.svc,选择“在浏览器中查看”
第三步:新建控制台程序WcfClient,并添加MyWcfService.Service1.svc服务引用
第四步:修改Program类中的代码
using System;
using System.Collections.Generic;
using System.Linq;
using System.Text;
using System.Threading.Tasks;

namespace WcfClient
{
    class Program
    {
        static void Main(string[] args)
        {
            ServiceRef.Service1Client _client = new ServiceRef.Service1Client();
            Console.WriteLine(_client.GetData(11));
            Console.ReadLine();
        }
    }
}
第五步:运行WcfClient项目
微信公众号:


