九二、node+cheerio爬虫学习
爬虫基础
- 以
http://web.itheima.com/teacher.html网站目标为例,最终目的是下载网站中所有老师的照片:
- 发送http请求,获取整个网页内容
- 通过cheerio库对网页内容进行分析
- 提取img标签的src属性
- 使用download库进行批量图片下载
发送一个HTTP请求
- 发送HTTP请求并获取相应
在爬虫之前,需要对HTTP请求充分了解,因为爬虫的原理就是发送请求到指定URL,获取响应后并处理
node官方api
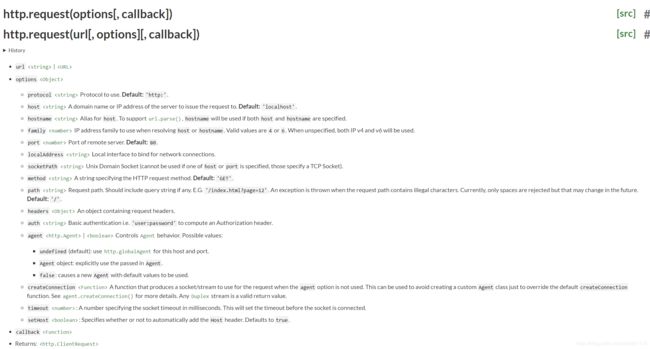
node的核心模块 http模块即可发送请求,摘自node官网api:

由此可见只需要使用http.request()方法即可发送http请求
发送http请求案例
也可以使用axios库来代替
代码如下:
// 引入http模块
const http = require('http')
// 创建请求对象
let req = http.request('http://web.itheima.com/teacher.html', res => {
  // 准备chunks
  let chunks = []
  res.on('data', chunk => {
    // 监听到数据就存储
    chunks.push(chunk)
  })
  res.on('end', () => {
    // 结束数据监听时讲所有内容拼接
    console.log(Buffer.concat(chunks).toString('utf-8'))
  })
})
// 发送请求
req.end()
得到的结果就是整个HTML网页内容
将获取的HTML字符串使用cheerio解析
- 使用cheerio加载HTML
- 回顾jQueryAPI
- 加载所有的img标签的src属性
cheerio库简介
这是一个核心api按照jquery来设计,专门在服务器上使用,一个微小、快速和优雅的实现
简而言之,就是可以再服务器上用这个库来解析HTML代码,并且可以直接使用和jQuery一样的api
官方demo如下:
const cheerio = require('cheerio')
const $ = cheerio.load('Hello world
')
$('h2.title').text('Hello there!')
$('h2').addClass('welcome')
$.html()
//=> Hello there!
同样也可以通过jQuery的api来获取DOM元素中的属性和内容
使用cheerio库解析HTML
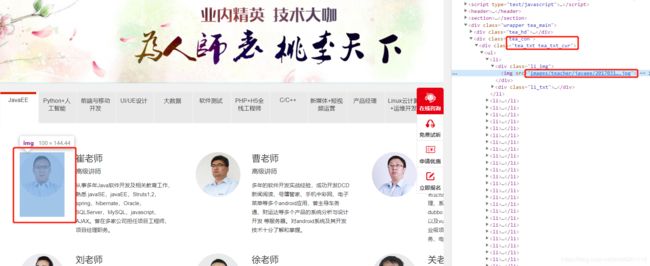
- 分析网页中所有img标签所在结构
- 使用jQuery API获取所有img的src属性
const http = require('http')
const cheerio = require('cheerio')
let req = http.request('http://web.itheima.com/teacher.html', res => {
  let chunks = []
  res.on('data', chunk => {
    chunks.push(chunk)
  })
  res.on('end', () => {
    // console.log(Buffer.concat(chunks).toString('utf-8'))
    let html = Buffer.concat(chunks).toString('utf-8')
    let $ = cheerio.load(html)
    let imgArr = Array.prototype.map.call($('.tea_main .tea_con .li_img > img'), (item) => 'http://web.itheima.com/' + $(item).attr('src'))
    console.log(imgArr)
    // let imgArr = []
    // $('.tea_main .tea_con .li_img > img').each((i, item) => {
    //   let imgPath = 'http://web.itheima.com/' + $(item).attr('src')
    //   imgArr.push(imgPath)
    // })
    // console.log(imgArr)
  })
})

req.end()
使用download库批量下载图片
const http = require('http')
const cheerio = require('cheerio')
const download = require('download')
let req = http.request('http://web.itheima.com/teacher.html', res => {
  let chunks = []
  res.on('data', chunk => {
    chunks.push(chunk)
  })
  res.on('end', () => {
    // console.log(Buffer.concat(chunks).toString('utf-8'))
    let html = Buffer.concat(chunks).toString('utf-8')
    let $ = cheerio.load(html)
    let imgArr = Array.prototype.map.call($('.tea_main .tea_con .li_img > img'), (item) => encodeURI('http://web.itheima.com/' + $(item).attr('src')))
    // console.log(imgArr)

    Promise.all(imgArr.map(x => download(x, 'dist'))).then(() => {
      console.log('files downloaded!');
    });
  })
})

req.end()
注意事项:如有中文文件名,需要使用base64编码
爬取新闻信息
爬取目标:http://www.itcast.cn/newsvideo/newslist.html
大部分新闻网站,现在都采取前后端分离的方式,也就是前端页面先写好模板,等网页加载完毕后,发送Ajax再获取数据,将其渲染到模板中。所以如果使用相同方式来获取目标网站的HTML页面,请求到的只是模板,并不会有数据
此时,如果还希望使用当前方法爬取数据,就需要分析该网站的ajax请求是如何发送的,可以打开network面板来调试
分析得出对应的ajax请求后,找到其URL,向其发送请求即可
代码如下:
// 引入http模块
const http = require('http')

// 创建请求对象 (此时未发送http请求)
const url = 'http://www.itcast.cn/news/json/f1f5ccee-1158-49a6-b7c4-f0bf40d5161a.json'
let req = http.request(url, res => {
  // 异步的响应
  // console.log(res)
  let chunks = []
  // 监听data事件,获取传递过来的数据片段
  // 拼接数据片段
  res.on('data', c => chunks.push(c))

  // 监听end事件,获取数据完毕时触发
  res.on('end', () => {
    // 拼接所有的chunk,并转换成字符串 ==> html字符串
    // console.log(Buffer.concat(chunks).toString('utf-8'))
    let result = Buffer.concat(chunks).toString('utf-8')
    console.log(JSON.parse(result))
  })
})

// 将请求发出去
req.end()
如果遇到请求限制,还可以模拟真实浏览器的请求头:
// 引入http模块
const http = require('http')
const cheerio = require('cheerio')
const download = require('download')

// 创建请求对象 (此时未发送http请求)
const url = 'http://www.itcast.cn/news/json/f1f5ccee-1158-49a6-b7c4-f0bf40d5161a.json'
let req = http.request(url, {
  headers: {
    "Host": "www.itcast.cn",
    "Connection": "keep-alive",
    "Content-Length": "0",
    "Accept": "*/*",
    "Origin": "http://www.itcast.cn",
    "X-Requested-With": "XMLHttpRequest",
    "User-Agent": "Mozilla/5.0 (Windows NT 10.0; Win64; x64) AppleWebKit/537.36 (KHTML, like Gecko) Chrome/75.0.3770.100 Safari/537.36",
    "DNT": "1",
    "Referer": "http://www.itcast.cn/newsvideo/newslist.html",
    "Accept-Encoding": "gzip, deflate",
    "Accept-Language": "zh-CN,zh;q=0.9,en;q=0.8",
    "Cookie": "UM_distinctid=16b8a0c1ea534c-0c311b256ffee7-e343166-240000-16b8a0c1ea689c; bad_idb2f10070-624e-11e8-917f-9fb8db4dc43c=8e1dcca1-9692-11e9-97fb-e5908bcaecf8; parent_qimo_sid_b2f10070-624e-11e8-917f-9fb8db4dc43c=921b3900-9692-11e9-9a47-855e632e21e7; CNZZDATA1277769855=1043056636-1562825067-null%7C1562825067; cid_litiancheng_itcast.cn=TUd3emFUWjBNV2syWVRCdU5XTTRhREZs; PHPSESSID=j3ppafq1dgh2jfg6roc8eeljg2; CNZZDATA4617777=cnzz_eid%3D926291424-1561388898-http%253A%252F%252Fmail.itcast.cn%252F%26ntime%3D1563262791; Hm_lvt_0cb375a2e834821b74efffa6c71ee607=1561389179,1563266246; qimo_seosource_22bdcd10-6250-11e8-917f-9fb8db4dc43c=%E7%AB%99%E5%86%85; qimo_seokeywords_22bdcd10-6250-11e8-917f-9fb8db4dc43c=; href=http%3A%2F%2Fwww.itcast.cn%2F; bad_id22bdcd10-6250-11e8-917f-9fb8db4dc43c=f2f41b71-a7a4-11e9-93cc-9b702389a8cb; nice_id22bdcd10-6250-11e8-917f-9fb8db4dc43c=f2f41b72-a7a4-11e9-93cc-9b702389a8cb; openChat22bdcd10-6250-11e8-917f-9fb8db4dc43c=true; parent_qimo_sid_22bdcd10-6250-11e8-917f-9fb8db4dc43c=fc61e520-a7a4-11e9-94a8-01dabdc2ed41; qimo_seosource_b2f10070-624e-11e8-917f-9fb8db4dc43c=%E7%AB%99%E5%86%85; qimo_seokeywords_b2f10070-624e-11e8-917f-9fb8db4dc43c=; accessId=b2f10070-624e-11e8-917f-9fb8db4dc43c; pageViewNum=2; nice_idb2f10070-624e-11e8-917f-9fb8db4dc43c=20d2a1d1-a7a8-11e9-bc20-e71d1b8e4bb6; openChatb2f10070-624e-11e8-917f-9fb8db4dc43c=true; Hm_lpvt_0cb375a2e834821b74efffa6c71ee607=1563267937"
  }
}, res => {
  // 异步的响应
  // console.log(res)
  let chunks = []
  // 监听data事件,获取传递过来的数据片段
  // 拼接数据片段
  res.on('data', c => chunks.push(c))

  // 监听end事件,获取数据完毕时触发
  res.on('end', () => {
    // 拼接所有的chunk,并转换成字符串 ==> html字符串
    // console.log(Buffer.concat(chunks).toString('utf-8'))
    let result = Buffer.concat(chunks).toString('utf-8')
    console.log(JSON.parse(result))
  })
})

// 将请求发出去
req.end()
注意:请求头的内容,可以先通过真正的浏览器访问一次后获取
封装爬虫基础库
以上代码重复的地方非常多,可以考虑以面向对象的思想进行封装,进一步的提高代码复用率,为了方便开发,保证代码规范,建议使用TypeScript进行封装
以下知识点为扩展内容,需要对面向对象和TypeScript有一定了解!
执行tsc --init初始化项目,生成ts配置文件
TS配置:
{
  "compilerOptions": {
    /* Basic Options */
    "target": "es2015",
    "module": "commonjs",
    "outDir": "./bin",
    "rootDir": "./src",
    "strict": true,
    "esModuleInterop": true
  },
  "include": [
    "src/**/*"
  ],
  "exclude": [
    "node_modules",
    "**/*.spec.ts"
  ]
}
Spider抽象类:
// 引入http模块
const http = require('http')
import SpiderOptions from './interfaces/SpiderOptions'

export default abstract class Spider {
  options: SpiderOptions;
  constructor(options: SpiderOptions = { url: '', method: 'get' }) {
    this.options = options
    this.start()
  }
  start(): void {
    // 创建请求对象 (此时未发送http请求)
    let req = http.request(this.options.url, {
      headers: this.options.headers,
      method: this.options.method
    }, (res: any) => {
      // 异步的响应
      // console.log(res)
      let chunks: any[] = []
      // 监听data事件,获取传递过来的数据片段
      // 拼接数据片段
      res.on('data', (c: any) => chunks.push(c))

      // 监听end事件,获取数据完毕时触发
      res.on('end', () => {
        // 拼接所有的chunk,并转换成字符串 ==> html字符串
        let htmlStr = Buffer.concat(chunks).toString('utf-8')
        this.onCatchHTML(htmlStr)
      })
    })

    // 将请求发出去
    req.end()

  }
  abstract onCatchHTML(result: string): any
}

export default Spider
SpiderOptions接口:
export default interface SpiderOptions {
  url: string,
  method?: string,
  headers?: object
}
PhotoListSpider类:
import Spider from './Spider'
const cheerio = require('cheerio')
const download = require('download')
export default class PhotoListSpider extends Spider {
  onCatchHTML(result: string) {
    // console.log(result)
    let $ = cheerio.load(result)
    let imgs = Array.prototype.map.call($('.tea_main .tea_con .li_img > img'), item => 'http://web.itheima.com/' + encodeURI($(item).attr('src')))
    Promise.all(imgs.map(x => download(x, 'dist'))).then(() => {
      console.log('files downloaded!');
    });
  }
}
NewsListSpider类:
import Spider from "./Spider";

export default class NewsListSpider extends Spider {
  onCatchHTML(result: string) {
    console.log(JSON.parse(result))
  }
}
测试类:
import Spider from './Spider'
import PhotoListSpider from './PhotoListSpider'
import NewsListSpider from './NewsListSpider'

let spider1: Spider = new PhotoListSpider({
  url: 'http://web.itheima.com/teacher.html'
})

let spider2: Spider = new NewsListSpider({
  url: 'http://www.itcast.cn/news/json/f1f5ccee-1158-49a6-b7c4-f0bf40d5161a.json',
  method: 'post',
  headers: {
    "Host": "www.itcast.cn",
    "Connection": "keep-alive",
    "Content-Length": "0",
    "Accept": "*/*",
    "Origin": "http://www.itcast.cn",
    "X-Requested-With": "XMLHttpRequest",
    "User-Agent": "Mozilla/5.0 (Windows NT 10.0; Win64; x64) AppleWebKit/537.36 (KHTML, like Gecko) Chrome/75.0.3770.100 Safari/537.36",
    "DNT": "1",
    "Referer": "http://www.itcast.cn/newsvideo/newslist.html",
    "Accept-Encoding": "gzip, deflate",
    "Accept-Language": "zh-CN,zh;q=0.9,en;q=0.8",
    "Cookie": "UM_distinctid=16b8a0c1ea534c-0c311b256ffee7-e343166-240000-16b8a0c1ea689c; bad_idb2f10070-624e-11e8-917f-9fb8db4dc43c=8e1dcca1-9692-11e9-97fb-e5908bcaecf8; parent_qimo_sid_b2f10070-624e-11e8-917f-9fb8db4dc43c=921b3900-9692-11e9-9a47-855e632e21e7; CNZZDATA1277769855=1043056636-1562825067-null%7C1562825067; cid_litiancheng_itcast.cn=TUd3emFUWjBNV2syWVRCdU5XTTRhREZs; PHPSESSID=j3ppafq1dgh2jfg6roc8eeljg2; CNZZDATA4617777=cnzz_eid%3D926291424-1561388898-http%253A%252F%252Fmail.itcast.cn%252F%26ntime%3D1563262791; Hm_lvt_0cb375a2e834821b74efffa6c71ee607=1561389179,1563266246; qimo_seosource_22bdcd10-6250-11e8-917f-9fb8db4dc43c=%E7%AB%99%E5%86%85; qimo_seokeywords_22bdcd10-6250-11e8-917f-9fb8db4dc43c=; href=http%3A%2F%2Fwww.itcast.cn%2F; bad_id22bdcd10-6250-11e8-917f-9fb8db4dc43c=f2f41b71-a7a4-11e9-93cc-9b702389a8cb; nice_id22bdcd10-6250-11e8-917f-9fb8db4dc43c=f2f41b72-a7a4-11e9-93cc-9b702389a8cb; openChat22bdcd10-6250-11e8-917f-9fb8db4dc43c=true; parent_qimo_sid_22bdcd10-6250-11e8-917f-9fb8db4dc43c=fc61e520-a7a4-11e9-94a8-01dabdc2ed41; qimo_seosource_b2f10070-624e-11e8-917f-9fb8db4dc43c=%E7%AB%99%E5%86%85; qimo_seokeywords_b2f10070-624e-11e8-917f-9fb8db4dc43c=; accessId=b2f10070-624e-11e8-917f-9fb8db4dc43c; pageViewNum=2; nice_idb2f10070-624e-11e8-917f-9fb8db4dc43c=20d2a1d1-a7a8-11e9-bc20-e71d1b8e4bb6; openChatb2f10070-624e-11e8-917f-9fb8db4dc43c=true; Hm_lpvt_0cb375a2e834821b74efffa6c71ee607=1563267937"
  }
})
封装后,如果需要写新的爬虫,则可以直接继承Spider类后,在测试类中进行测试即可,仅需实现具体的爬虫类onCatchHTML方法,测试时传入url和headers即可。
而且全部爬虫的父类均为Spider,后期管理起来也非常方便!
最后推荐一个 js常用的utils合集,帮我点个star吧~
- github
- 文档

