Nginx服务器下面配置php多版本共存
Nginx服务器下面配置php多版本共存
原因
公司搭建了一个织梦的cms,简称:dede。由于cms的php的版本用的是5的,可以还有laravel5.5的项目,laravel5.5必须是php7.2以上。所以就需要在Nginx下面配置php多版本共存:根据以下步骤,可以成功的配置Nginx服务器上面配置php多版本共存
如果已经安装了lnmp环境,则不需要重新安装。我在这里把所有的步骤都罗列以下:
解决方案
一、安装lnmp环境
1,根据图中,安装lnmp环境,根据自己的需求配置选择要安装的项目,要想要我的配置,赋值以下命令即可安装:可以根据图片,找到对应的命令,修改配置。比如:找到命令中的“dbrootpwd oneinstack ”,把“oneinstack ”是默认的数据库的名称,可以修改成自己的进行执行命令:
wget -c http://mirrors.linuxeye.com/oneinstack-full.tar.gz && tar xzf oneinstack-full.tar.gz && ./oneinstack/install.sh --nginx_option 1 --php_option 7 --phpcache_option 1 --phpmyadmin --mphp_ver 56 --db_option 4 --dbinstallmethod 1 --dbrootpwd oneinstack --pureftpd --redis --memcached --iptables --reboot
输入完命令会程序自动执行,不需要操作。等待安装即可。

安装完成
memcached installed successfully!
Starting memcached:                                        [  OK  ]
[xprober.php] found
[ocp.php] found
Starting MySQL.. SUCCESS!
Reload service php-fpm  done
####################Congratulations########################
Total OneinStack Install Time: 38 minutes

Nginx install dir:              /usr/local/nginx

Database install dir:           /usr/local/mysql
Database data dir:              /data/mysql
Database user:                  root
Database password:              设置的数据库密码

PHP install dir:                /usr/local/php56
Opcache Control Panel URL:      http://IP地址/ocp.php

Pure-FTPd install dir:          /usr/local/pureftpd
Create FTP virtual script:      ./pureftpd_vhost.sh

phpMyAdmin dir:                 /data/wwwroot/default/phpMyAdmin
phpMyAdmin Control Panel URL:   http://IP地址/phpMyAdmin

redis install dir:              /usr/local/redis

memcached install dir:          /usr/local/memcached

Index URL:                      http://172.31.197.130/

Broadcast message from root@iZm5e8nyz28v9zr7lhb7moZ
	(/dev/pts/1) at 15:03 ...

The system is going down for reboot NOW!
[root@iZm5e8nyz28v9zr7lhb7moZ ~]# Connection closing...Socket close.

Connection closed by foreign host.

Disconnected from remote host(winner) at 15:03:16.

Type `help' to learn how to use Xshell prompt.
[C:\~]$
Reconnecting in 30 seconds. Press any key to exit local shell.
..............................

Connecting to IP地址:22...
Connection established.
To escape to local shell, press 'Ctrl+Alt+]'.

Last login: Mon Nov 25 13:45:28 2019 from 1.202.114.95

Welcome to Alibaba Cloud Elastic Compute Service !

[root@iZm5e8nyz28v9zr7lhb7moZ ~]# php -v
PHP 7.2.25 (cli) (built: Nov 25 2019 14:47:49) ( NTS )
二、配置PHP多版本共存
解决原理:
- Nginx是通过PHP-FastCGI与PHP交互的。而PHP-FastCGI运行后会通过文件、或本地端口两种方式进行监听,在Nginx中配置相应的FastCGI监听端口或文件即实现Nginx请求对PHP的解释。
- 既然PHP-FastCGI是监听端口和文件的,那就可以让不同版本的PHP-FastCGI同时运行,监听不同的端口或文件,Nginx中根据需求配置调用不同的PHP-FastCGI端口或文件,即可实现不同版本PHP共存了。
配置方式:
Nginx连接fastcgi的方式有2种:unix domain socket和TCP,Unix domain socket 或者 IPC socket是一种终端,可以使同一台操作系统上的两个或多个进程进行数据通信。与管道相比,Unix domain sockets 既可以使用字节流和数据队列,而管道通信则只能通过字节流。Unix domain sockets的接口和Internet socket很像,但它不使用网络底层协议来通信。Unix domain socket 的功能是POSIX操作系统里的一种组件。(我刚开始就是unix domain socket方式连接的)
0,修改php的listen监听端口号所注意事项:
我们在打开“php-fpm.conf”修改listen的时候,我们要先知道我们修改的是哪一个版本php的““php-fpm.conf””,因为在所有安装的php版本里面都会有“php-fpm.conf”,所以要想设置哪一个版本的php,就要对应的打开哪一个版本的php去修改listen端口即可。

根据图中,我们看到,有两个php的文件夹,一个是php,一个是php56,我们想修改哪一个php的端口,就对应的打开哪一个“vim /usr/local/php/etc/php-fpm.conf”,即可。
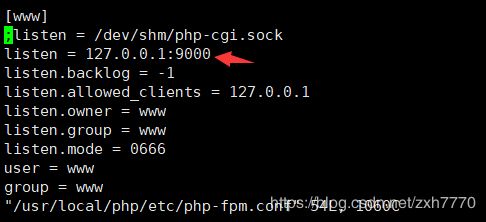
1,修改php文件夹下面的端口号,输入命令“vim /usr/local/php/etc/php-fpm.conf” 把里面的 listen = /dev/shm/php-cgi.sock 改为 127.0.0.1:9000;9000端口监听的是php7.2。以下为修改后的代码
[www]
;listen = /dev/shm/php-cgi.sock
listen = 127.0.0.1:9000
listen.backlog = -1
listen.allowed_clients = 127.0.0.1
listen.owner = www
listen.group = www
listen.mode = 0666

; 代表注释的意思。注释掉的那个个listen就是默认的,如果想要执行默认的就把listen = 127.0.0.1:9000注释掉即可。只能存在一个listen。
2,修改完成端口号,打开 vim /usr/local/nginx/conf/nginx.conf 把fastcgi_pass 127.0.0.1:9000,如果nginx配置多个站点的情况,大多数是把站点文件给单独写到vhost目录下了,所以根据自己的情况来配置哪个站点需要用哪个版本的PHP,就相应的改端口就行,我自己这里是9000监听的是php7.2的,9001是监听的是php5.6的。
nginx.conf配置项:
 server {
    listen 80;
    server_name _;
    access_log /data/wwwlogs/access_nginx.log combined;
    root /data/wwwroot/default;
    index index.html index.htm index.php;
    #error_page 404 /404.html;
    #error_page 502 /502.html;
    location /nginx_status {
      stub_status on;
      access_log off;
      allow 127.0.0.1;
      deny all;
    }
    location ~ [^/]\.php(/|$) {
      #fastcgi_pass remote_php_ip:9000;
      #fastcgi_pass unix:/dev/shm/php-cgi.sock; //TODO  Nginx配置了php多个版本共存,因为修改了php-fpm.conf里面的listen为"listen:127.0.0.1:9000",以前为“listen:/dev/shm/php-cgi.sock”所以通过“unix:/dev/shm/php-cgi.sock”,访问不到了所以报502网关错误
      #fastcgi_pass找的是\usr\local\php56\etc\php-fpm.conf 里面的listen,现在listen为:127.0.0.1:9000,所以fastcgi_pass也要对应的修改。
      fastcgi_pass 127.0.0.1:9000;
      fastcgi_index index.php;
      include fastcgi.conf;
    }
    location ~ .*\.(gif|jpg|jpeg|png|bmp|swf|flv|mp4|ico)$ {
      expires 30d;
      access_log off;
    }
    location ~ .*\.(js|css)?$ {
      expires 7d;
      access_log off;
    }
    location ~ ^/(\.user.ini|\.ht|\.git|\.svn|\.project|LICENSE|README.md) {
      deny all;
    }
  }
########################## vhost #############################
  include vhost/*.conf;
}
注意:
- fastcgi_pass unix:/dev/shm/php-cgi.sock; //TODO
Nginx配置了php多个版本共存,因为修改了php-fpm.conf里面的listen为"listen:127.0.0.1:9000",以前为“listen:/dev/shm/php-cgi.sock”所以通过“unix:/dev/shm/php-cgi.sock”,访问不到了所以报502网关错误
- fastcgi_pass找的是\usr\local\php56\etc\php-fpm.conf 里面的listen,现在listen为:127.0.0.1:9000,所以fastcgi_pass也要对应的修改为:127.0.0.1:9000;否则就会报502网关错误。
3,一般我们的网站都会设置在vhost文件夹下面的vhost.conf配置文件里面。想要哪一个虚拟主机执行哪一个php版本,直接设置“fastcgi_pass”监听端口即可。下面的站点要访问php5.6版本才可以正常执行,所以设置 fastcgi_pass为 127.0.0.1:9001,9001端口是php5.6版本。
server {
    listen       80;
    server_name  域名;

    #charset koi8-r;

    #access_log  logs/host.access.log  main;
    root    "/data/wwwroot/shidong";
    location / {
        index  index.html index.htm index.php l.php;
        try_files $uri $uri/ /index.php?$query_string;
       autoindex  off;
    }

    #error_page  404              /404.html;

    # redirect server error pages to the static page /50x.html
    #
    error_page   500 502 503 504  /50x.html;
    location = /50x.html {
        root   html;
    }

    # proxy the PHP scripts to Apache listening on 127.0.0.1:80
    #
    #location ~ \.php$ {
    #    proxy_pass   http://127.0.0.1;
    #}

    # pass the PHP scripts to FastCGI server listening on 127.0.0.1:9000
    #
    # fastcgi_pass   127.0.0.1:9001; 9001端口是php5.6版本的。
    location ~ \.php(.*)$  {
        fastcgi_pass   127.0.0.1:9001;
        fastcgi_index  index.php;
        fastcgi_split_path_info  ^((?U).+\.php)(/?.+)$;
        fastcgi_param  SCRIPT_FILENAME  $document_root$fastcgi_script_name;
        fastcgi_param  PATH_INFO  $fastcgi_path_info;
        fastcgi_param  PATH_TRANSLATED  $document_root$fastcgi_path_info;
        include        fastcgi_params;
    }
重启服务
1,重启php服务:/etc/init.d/php-fpm restart
[root@iZm5e8nyz28v9zr7lhb7moZ local]# /etc/init.d/php-fpm restart
Gracefully shutting down php-fpm . done
Starting php-fpm  done
[root@iZm5e8nyz28v9zr7lhb7moZ local]#
2,重启nginx服务器:/etc/init.d/nginx restart
[root@iZm5e8nyz28v9zr7lhb7moZ local]# /etc/init.d/nginx restart
nginx: the configuration file /usr/local/nginx/conf/nginx.conf syntax is ok
nginx: configuration file /usr/local/nginx/conf/nginx.conf test is successful
Stopping nginx:                                            [  OK  ]
Starting nginx:                                            [  OK  ]
[root@iZm5e8nyz28v9zr7lhb7moZ local]#
通过以上步骤就设置好了nginx下面php多版本共存的问题了。