跨平台跨数据库的面向对象存储方案
目录
1. 面向对象存储
2. ODB简介
3. 下载和安装
3.1 ODB安装
3.2 编译odb核心库
3.3 编译ODB的sqlite库
4. 示例代码
1. 面向对象存储
我想把一个c++对象直接存到数据库而不写任何sql语句有办法吗?比如我写了一个student类如下:
class student

{

public:

       student (const std::string& name, unsigned short age)

       : name _( name), age_(age){}


public:

       const std::string& name () const { return name _; }

       unsigned short age() const { return age_; }


private:

       std::string name _;

       unsigned short age_;

};


Auto student1 = std::make_shared< student >(“Tom”, 18);
我需要把student1直接存入数据库,不写任何sql语句,并且数据库支持mysql、sqlite、oracle等,平台支持windows、ios、android等有办法吗?
其实这就是面向对象的存储技术,我会分两篇博客重点介绍两种方案,其中一种是基于现有的开源软件ODB,另一种是自己设计实现的,本文先介绍基于开源的实现。
2. ODB简介
ODB是应用于C++的一个开源、跨平台、跨数据库的对象关系映射(ORM)系统。
它可以让你持久化C++对象到关系数据库,而不必处理表、列或者SQL,无需手动编写任何映射代码。
ODB支持MySQL,SQLite,PostgreSQL,Oracle和微软SQL Server关系数据库以及C ++98/03和C ++11语言标准。
它还配备了用于Boost和Qt可选的配置文件,让你可以无缝地使用这些库持久化C++类的值类型、容器和智能指针。
它有易用性,简洁的代码,安全,数据库可移植性,优良的性能,可维护性等优点。
ODB不是框架。 它并没有规定您应该如何编写应用程序。 相反,它仅通过处理C ++对象的持久性而不干扰任何其他功能而设计为适合您的样式和体系结构。只需进行少量修改就可以使现有类持久化。 特别是,可以在没有默认构造函数的情况下声明持久类,可以自动使用现有的访问器和修饰符函数来访问数据成员,并且可以将ODB编译指示移出该类并移到单独的头中,从而使对象关系 映射完全是非侵入性的。 对自动数据库模式演变的支持还使您可以像对待应用程序中的任何其他C ++类一样对待ODB持久对象。
比如以上的student类想要用odb存储只需做如下小改动:
#pragma db object        //告诉编译器这是一个 persistent class

class student

{

public:

       student (const std::string& name, unsigned short age)

              : name _( name), age_(age){}


public:

       const std::string& name () const { return name _; }

       unsigned short age() const { return age_; }


private:

       friend class odb::access;// 让默认的构造函数和其他类成员能够访问access类

       person() {}    // 这个构造函数在实例化一个persistent class时会用到


       #pragma db id auto  // 用来指定一个id, auto指明这个id的值是由数据库自动分配的

       std::string name _;

       unsigned short age_;

};
3. 下载和安装
以开发环境为windows 编译器vs2010 数据库为sqlite为例(ps:这些都可以根据自己实际情况选择。)
Sqlite3下载地:https://download.csdn.net/download/GWB_superman/12553692
odb下载地址:https://www.codesynthesis.com/products/odb/download.xhtml
需要以下几项:
- odb-2.4.0-i686-windows //odb的执行文件
- libodb-2.4.0 //odb的核心库
- libodb-sqlite-2.4.0 //与sqlite交互时要用到的
- odb-examples-2.4.0 //使用示例
3.1 ODB安装
1、解压odb-2.4.0-i686-windows。2、把bin目录加到环境变量中,再编辑Path这个变量将 ODB_PATH写入。3、命令行输入odb --version看是否安装成功。详细的可以看README里面写的。
3.2 编译odb核心库
将下载好的 libodb-2.4.0 解压到某个目录下,进入该目录下的libodb-2.4.0 打开文件libodb-vc10.sln 用vs2010打开, 直接编译会生成对应的dll文件 和 .lib文件
3.3 编译ODB的sqlite库
将下载好的libodb-mysql-2.4.0解压到某个目录下,进入该目录下的libodb-mysql-2.4.0打开文件libodb-mysql-vc10.sln
在工程中去掉LIBODB_SQLITE_HAVE_UNLOCK_NOTIFY宏。
在c/c++->常规->附加包含目录 加上核心库所在目录以及sqlite代码所在目录比如:
在链接器->常规->附加库目录 加上odb-d.lib所在目录和sqlite3.lib所在目录比如:
然后编译,会在lib目录下生成odb-sqlite-d.lib,在bin目录下生成odb-sqlite-d-2.4-vc10.dll。
注意:sqlite3.lib需要编译生成:生成方法如下:
解压下载下来的sqlite后,将sqlite3.def、sqlite3.dll、sqlite3.exe文件拷贝到同一个目录,如 D:\zl\sqlite_code\dll
打开vs2010,点工具->visual studio 命令提示,依次输入
cd D:\zl\sqlite_code\dll
lib /def:sqlite3.def /machine:ix86
即可在D:\zl\sqlite_code\dll看到生成sqlite3.lib文件
4. 示例代码
前期的工作已经做好了,直接解压odb-examples-2.4.0,打开examples-sqlite-vc10.sln。
我选的是employee程序。employee.hxx文件里有我们需要存储的对象。如下:
#pragma db object pointer(std::shared_ptr) session

class employer

{

public:

  employer (const std::string& name)

      : name_ (name)

  {

  }


  const std::string&

  name () const

  {

    return name_;

  }


  // Employees of this employer.

  //

  typedef std::vector> employees_type;


  const employees_type&

  employees () const

  {

    return employees_;

  }


  employees_type&

  employees ()

  {

    return employees_;

  }


private:

  friend class odb::access;


  employer () {}


  #pragma db id

  std::string name_;


  #pragma db value_not_null inverse(employer_)

  employees_type employees_;

};


#pragma db object pointer(std::shared_ptr) session

class employee

{

public:

  typedef ::employer employer_type;


  employee (const std::string& first,

            const std::string& last,

            std::shared_ptr employer)

      : first_ (first), last_ (last), employer_ (employer)

  {

  }


  // Name.

  //

  const std::string&

  first () const

  {

    return first_;

  }


  const std::string&

  last () const

  {

    return last_;

  }


  // Emails.

  //

  typedef std::unordered_set emails_type;


  const emails_type&

  emails () const

  {

    return emails_;

  }


  emails_type&

  emails ()

  {

    return emails_;

  }


  // Employer.

  //

  std::shared_ptr

  employer () const

  {

    return employer_;

  }


  void

  employer (std::shared_ptr employer)

  {

    employer_ = employer;

  }


private:

  friend class odb::access;


  employee () {}


  #pragma db id auto

  unsigned long id_;


  std::string first_;

  std::string last_;

  emails_type emails_;


  #pragma db not_null

  std::shared_ptr employer_;

};
用ODB编译器生成employee-odb.hxx、employee-odb.ixx和employee-odb.cxx方法如下:输入以下指令
odb -d sqlite --std c++11 --generate-schema --generate-query employee.hxx
执行完毕就会出现以上三个文件。
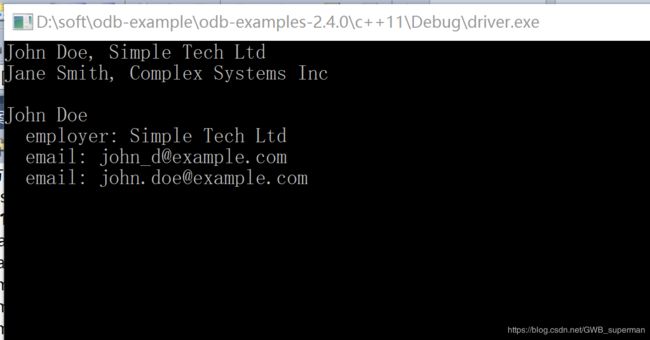
driver.cxx是main函数,演示了如何使用odb存储对象和查询对象,如下:
main (int argc, char* argv[])

{

  try

  {

    unique_ptr db (create_database (argc, argv));


    // Create a few persistent objects.

    //

    {

      pension_fund bf ("Bright Future");


      // Simple Tech Ltd.

      //

      {

        shared_ptr er (new employer ("Simple Tech Ltd"));


        shared_ptr john (new employee ("John", "Doe", er));

        shared_ptr jane (new employee ("Jane", "Doe", er));


        john->emails ().insert ("[email protected]");

        john->emails ().insert ("[email protected]");


        jane->emails ().insert ("[email protected]");

        jane->emails ().insert ("[email protected]");


        // Set the inverse side of the employee-employer relationship.

        //

        er->employees ().push_back (john);

        er->employees ().push_back (jane);


        transaction t (db->begin ());


        db->persist (er);


        db->persist (john);

        db->persist (jane);


        t.commit ();


        bf.members ().push_back (lazy_shared_ptr (*db, john));

      }


      // Complex Systems Inc.

      //

      {

        shared_ptr er (new employer ("Complex Systems Inc"));


        shared_ptr john (new employee ("John", "Smith", er));

        shared_ptr jane (new employee ("Jane", "Smith", er));


        john->emails ().insert ("[email protected]");

        john->emails ().insert ("[email protected]");


        jane->emails ().insert ("[email protected]");

        jane->emails ().insert ("[email protected]");


        // Set the inverse side of the employee-employer relationship.

        //

        er->employees ().push_back (john);

        er->employees ().push_back (jane);


        transaction t (db->begin ());


        db->persist (er);


        db->persist (john);

        db->persist (jane);


        t.commit ();


        bf.members ().push_back (lazy_shared_ptr (*db, jane));

      }


      transaction t (db->begin ());

      db->persist (bf);

      t.commit ();

    }


    // Load the Bright Future pension fund and print its members.

    //

    {

      session s;

      transaction t (db->begin ());


      unique_ptr bf (db->load ("Bright Future"));


      for (auto i (bf->members ().begin ()); i != bf->members ().end (); ++i)

      {

        lazy_shared_ptr& p (*i);

        p.load ();


        cout << p->first () << ' ' << p->last () << ", " <<

          p->employer ()->name () << endl;

      }


      // Alternative implementation using range-based for-loop.

      //

      /*

      for (lazy_shared_ptr& p: bf->members ())

      {

        p.load ();

        cout << p->first () << ' ' << p->last () << ", " <<

          p->employer ()->name () << endl;

      }

      */


      cout << endl;

    }


    // Load Simple Tech Ltd and print its employees.

    //

    {

      session s;

      transaction t (db->begin ());


      shared_ptr st (db->load ("Simple Tech Ltd"));


      for (auto i (st->employees ().begin ());

           i != st->employees ().end ();

           ++i)

      {

        lazy_weak_ptr& lwp (*i);

        shared_ptr p (lwp.load ()); // Load and lock.


        cout << p->first () << ' ' << p->last () << endl

             << "  employer: " << p->employer ()->name () << endl;


        for (auto j (p->emails ().begin ()); j != p->emails ().end (); ++j)

        {

          cout << "  email: " << *j << endl;

        }


        cout << endl;

      }


      // Alternative implementation using range-based for-loop.

      //

      /*

      for (lazy_weak_ptr& lwp: st->employees ())

      {

        shared_ptr p (lwp.load ()); // Load and lock.


        cout << p->first () << ' ' << p->last () << endl

             << "  employer: " << p->employer ()->name () << endl;


        for (const string& e: p->emails ())

          cout << "  email: " << e << endl;


        cout << endl;

      }

      */


      t.commit ();

    }


    // Search for Complex Systems Inc employees with the John first name.

    //

    {

      typedef odb::query query;

      typedef odb::result result;


      session s;

      transaction t (db->begin ());


      result r (db->query (

                  query::employer->name == "Complex Systems Inc" &&

                  query::first == "John"));


      for (auto i (r.begin ()); i != r.end (); ++i)

        cout << i->first () << ' ' << i->last () << endl;


      // Alternative implementation using range-based for-loop.

      //

      /*

      for (const employee& e: r)

        cout << e.first () << ' ' << e.last () << endl;

      */


      t.commit ();

    }

  }

  catch (const odb::exception& e)

  {

    cerr << e.what () << endl;

    return 1;

  }

}
把核心库头文件,libodb-sqlite的头文件及sqlite的头文件目录加到VC的附加包含目录中
把sqlite.lib,odb-sqlite-d.lib,odb-d.lib的目录加到VC的附加库目录中。然后编译运行。可以看到结果如下:


