IPL+pytesseract识别带干扰验证码
我也曾在茫茫搜索中浪费大量宝贵时间
为了不浪费您的时间,说明一下,本篇博客是用IPL+pytessearct识别验证码
不包括神经网络,识别效果只有20%左右,不过我的需求是自动登陆,能够满足
b站视频:https://www.bilibili.com/video/BV13T4y137Q9/
代码获取:【辣鱼编程】公众号回复【验证码】可以获取ppt、整套代码
一、写在前面
最近想写一个自动登陆网页的脚本,但是发现目标网页有验证码,所以就需要写一个东西去识别验证码
二、一开始用的是pytesseract
一开始使用的是pytesseract,可是这个pytesseract对于简单的验证码识别还可以,但是对于这种带干扰线的验证码就无能为力了。
(ps. 简单的验证码就是字符跟字符之间没有粘在一起,然后角度都是正的,分割出来,一句话说就是想打印的字体)
上图其实是tesseract,不过pytessract也是python对tesseract的api封装而已
在使用tesseract的时候,发现一些参数是十分重要的,比如 --psm
tesseract your_picture.png your_output_file_name --psm 10
# 10 表示识别单一字符,对于图片只有一个字符的时候很有效还有像config目录下面可以自定义自己想要输出的字符,比如你想识别身份证,可以限制输出的字符是0123456789X,这样也能提高准确率。反正就是多看文档!多看文档!多看文档!
文档里啥都有,不要用了发现没识别出来,就说人家的软件不行,实在不行,我们还能进行一些预处理
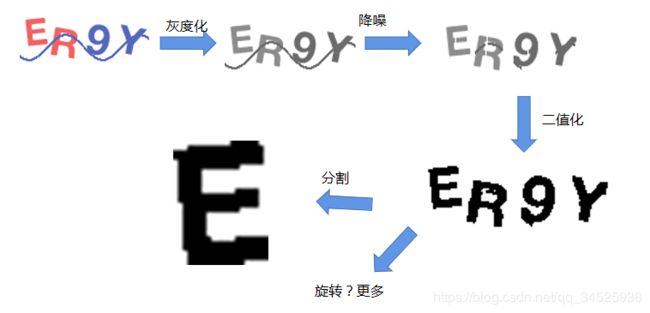
二、后面用IPL先预处理
后面就用IPL进行了预处理,包括降噪、灰度化、二值化、切割等:
这里由于篇幅有限,贴上部分代码,完整代码可以去公众号拿(【辣鱼编程】公众号回复【验证码】可以获取整套代码)
import numpy as np
from PIL import Image


# 展示验证码
def show_captcha(file_path):
    img = Image.open(file_path)
    img.show()


# 灰度化
def to_gray(img):
    img_gray = img.convert('L')
    return img_gray


# 二值化
def to_binary(img, threshold=200):
    table = []
    for i in range(256):
        if i < threshold:
            table.append(0)
        else:
            table.append(1)
    img_binary = img.point(table, '1')
    return img_binary


# 降噪
def reduce_noise(img):
    img_data = np.array(img, dtype=np.uint8)
    row, col = img_data.shape
    for i in range(row):
        for j in range(col):
            count = 0
            if img_data[i, j] != 255:  # 255 white
                # up search
                up_i = i - 1
                while up_i - 1 >= 0 and img_data[up_i, j] != 255:
                    count += 1
                    up_i -= 1
                # down search
                down_i = i + 1
                while down_i + 1 <= row - 1 and img_data[down_i, j] != 255:
                    count += 1
                    down_i += 1
                # clean
                if count <= 3:
                    for tmp_i in range(up_i, down_i):
                        img_data[tmp_i, j] = 255
    img_reduce_noise = Image.fromarray(img_data.astype('uint8'))
    return img_reduce_noise


# 修复图片
def fix(img):
    img_data = np.array(img, dtype=np.uint8)
    row, col = img_data.shape
    for i in range(row):
        for j in range(col):
            if img_data[i, j] == 255:
                up_j = j - 1
                down_j = j + 1
                if up_j >= 0 and down_j <= col - 1 and img_data[i, up_j] != 255 and img_data[i, down_j] != 255:
                    # fix
                    img_data[i, j] = 0
    img_fix = Image.fromarray(img_data.astype('uint8'))
    return img_fix


def crop(img):
    img_data = np.array(img, dtype=np.uint8)
    row, col = img_data.shape
    visited = {}

    for j in range(col):
        for i in range(row):
            if img_data[i, j] == 0:
                dfs(img_data, i, j, visited)
                break
        else:
            continue
        break
    fx, fy = list(visited.keys())[0]
    print(fx, fy)
    up, down, left, right = fx, fx, fy, fy
    for x, y in visited:
        if y > right:
            right = y
        if y < left:
            left = y
        if x < up:
            up = x
        if x > down:
            down = x
    print(left, up, right, down)
    img_crop = img.crop((left, up, right, down))
    return img_crop


"""
img_data 二维数组
visited  {}
"""


def dfs(img_data, i, j, visited):
    # find first point
    row, col = img_data.shape
    visited[(i, j)] = 1
    if j - 1 >= 0 and img_data[i, j-1] == 0 and (i, j-1) not in visited:
        dfs(img_data, i, j-1, visited)
    if j + 1 <= col - 1 and img_data[i, j+1] == 0 and (i, j+1) not in visited:
        dfs(img_data, i, j+1, visited)
    if i - 1 >= 0 and img_data[i-1, j] == 0 and (i-1, j) not in visited:
        dfs(img_data, i-1, j, visited)
    if i + 1 <= row - 1 and img_data[i+1, j] == 0 and (i+1, j) not in visited:
        dfs(img_data, i+1, j, visited)


