XML——建模的作用,思路以及练习
XML——建模
上一次博客写的xml解析引发的问题?
通过获取资源文件xml,可以拿到指定的xml字符串, 那么不同的人,有不同的需求,那么是不是意味着每一个人都需要对 指定xml字符串进行解析呢?
建模的由来
就是将指定的xml字符串当作对象来操作
如果说当对一个指定的xml格式字符串完成了建模操作, 好处在于,只需要调用指定的方法就可以完成预定的字符串获取;
建模的思路
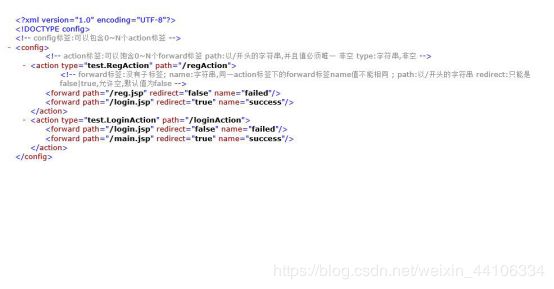
1、分析需要被建模的文件中有那几个对象
2、每个对象拥有的行为以及属性
3、定义对象从小到大(从里到外)
4、通过23种的设计模式中的工厂模式,解析xml生产出指定对象 好处: 提高代码的复用性
建模分两步: 1、以面向对象的编程思想,描述xml资源文件 2、将xml文件中内容封装进model实体对象。
.准备1
准备2
之前说到用java的面向对象思想,分析这个xml的标签从里至外,所有建java实体类顺序为
(ForwardModel——ActionModel——ConfigModel——ConfigModelFactory)
《ForwardModel》
package xml.model;
public class ForwardModel {
// 《ActionModel 》
package xml.model;
import java.util.HashMap;import java.util.Map;
public class ActionModel {
//
//
private String path;
private String type;
private Map fmap=new HashMap<>();
public String getPath() {
return path;
}
public void setPath(String path) {
this.path = path;
}
public String getType() {
return type;
}
public void setType(String type) {
this.type = type;
}
/** * 压栈
* @param forwardModel
* */
public void push(ForwardModel forwardModel) {
fmap.put(forwardModel.getName(), forwardModel);
}
/**
* 弹栈
* @return */
public ForwardModel pop(String name) {
return fmap.get(name);
}
}
《ConfigModel 》
package xml.model;
import java.util.HashMap;i
mport java.util.Map;
public class ConfigModel {
private Map aMap=new HashMap();
/**
* 压栈
 * @param forActionModelwardModel
 *  */
 * public void push(ActionModel actionModel) {
 * aMap.put(actionModel.getPath(), actionModel);
 * }
 * /**
 * * 弹栈
 * * @return	 */
 *public ActionModel pop(String path) {
 return aMap.get(path);
 }
 }
《ConfigModelFactory 》
package xml.model;
 import java.io.InputStream;
 import java.util.List;
  import org.dom4j.Document;
  import org.dom4j.DocumentException;
  import org.dom4j.Element;
  import org.dom4j.io.SAXReader;
  /** * java中有23中设计模式
   * 工厂模式:
   * * 		why:
   * * 			能够提高代码的复用性
   * * 		how:只要建立一个方法,去生产指定的你需要的对象
   * * 		where:去生产指定的你需要的对象,以便重复使用
   * *  * 	反复操作xml文件,反复解析xml字符串 * 	xml文件-->ConfigModel * 	那么意味着我们需要反复操作configMode
   * l * @author 2019071003 * */
    public class ConfigModelFactory {
    /**
   * 默认资源文件mvc.xml是放在建模类的同包下
   *  @return
   * @throws DocumentException
    */
    public static ConfigModel build() throws DocumentException {		return build("mvc.xml");	}
    /**
   *  当资源文件,需要手动改变位置的情况下,那么需要调以下方法	 * @param xmlPath
    * @return
     * @throws DocumentException
   */
   public static ConfigModel build(String xmlPath) throws DocumentException {
   ConfigModel configModel = new ConfigModel();		ActionModel actionModel = null;
   ForwardModel forwardModel = null;				InputStream in = ConfigModelFactory.class.getResourceAsStream(xmlPath);		SAXReader reader = new SAXReader();
   Document doc = reader.read(in);
   List actionEles = doc.selectNodes("config/action");		for (Element actionEle : actionEles) {			actionModel = new ActionModel();
   //			填充actionModel
   actionModel.setPath(actionEle.attributeValue("path"));			actionModel.setType(actionEle.attributeValue("type"));			List forwardEles = actionEle.selectNodes("forward");	for (Element forwardEle : forwardEles) {				forwardModel = new ForwardModel();
   //				填充forwardModel				forwardModel.setName(forwardEle.attributeValue("name"));		forwardModel.setPath(forwardEle.attributeValue("path"));			forwardModel.setRedirect(!"false".equals(forwardEle.attributeValue("redirect")));				actionModel.push(forwardModel);
   }
   configModel.push(actionModel);
   }
   return configModel;
   }
   public static void main(String[] args) throws DocumentException {		ConfigModel configModel = ConfigModelFactory.build();		ActionModel actionModel = configModel.pop("/loginAction");		System.out.println(actionModel.getType());		System.out.println(actionModel.pop("success").getPath());
   }
   }
效果
练习:
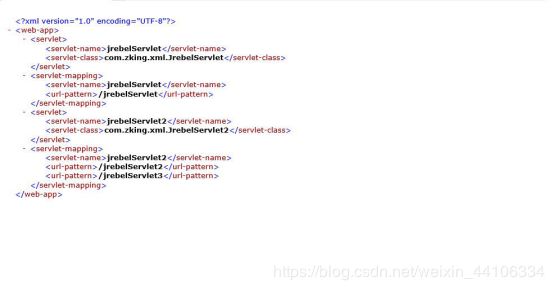
1、对web.xml进行建模
2、写一个servlet
3、通过url-pattern读取到servlet-class的值
jrebelServlet
com.zking.xml.JrebelServlet


jrebelServlet
/jrebelServlet


jrebelServlet2
com.zking.xml.JrebelServlet2


jrebelServlet2
/jrebelServlet2
/jrebelServlet3
package xml.model.work;
public class UrlPatternModel {
private String context;
public String getContext() {
return context;
}
public void setContext(String context) {
this.context = context;
}
}
《ServletNameModel 》
package xml.model.work;
 public class ServletNameModel {
 private String context;
 public String getContext() {
 return context;
 }
 public void setContext(String context) {
 this.context = context;
 }
 }
《ServletMappingModel 》
package xml.model.work;
import java.util.ArrayList;
import java.util.List;
public class ServletMappingModel {
private ServletNameModel servletNameModel;
private List urlPatternModels=new ArrayList<>();  public ServletNameModel getServletNameModel() {
return servletNameModel;
}
public void setServletNameModel(ServletNameModel servletNameModel) {
this.servletNameModel = servletNameModel;
}
public void pushUrlPatternModel(UrlPatternModel urlPatternModel) {	urlPatternModels.add(urlPatternModel);
}
public List getUrlPatternModels() {
return urlPatternModels;
}
}
《ServletClassModel 》
package xml.model.work;
public class ServletClassModel {
private String context;
public String getContext() {
return context;
}
public void setContext(String context) {
this.context = context;
}
 }
《ServletNameModel 》
package xml.model.work;
 public class ServletNameModel {
  private String context;
  public String getContext() {
  return context;
  }
  public void setContext(String context) {
  his.context = context;
  }
  }
《ServletModel 》
package xml.model.work;
public class ServletModel {
private ServletNameModel servletNameModel;
private ServletClassModel servletClassModel;
public ServletNameModel getServletNameModel() {
return servletNameModel;
}
public void setServletNameModel(
ServletNameModel servletNameModel) {
this.servletNameModel = servletNameModel;}
public ServletClassModel getServletClassModel() {
return servletClassModel;
}
public void setServletClassModel(
ServletClassModel servletClassModel) {
this.servletClassModel = servletClassModel;
}
}
《WebAppModelFactory 》工厂类
package xml.model.work;
import java.io.InputStream;
import java.util.List;
import javax.servlet.Servlet;
import org.dom4j.Document;
import org.dom4j.DocumentException;
import org.dom4j.Element;
import org.dom4j.io.SAXReader;
public class WebAppModelFactory {
public static WebAppModel buildWebAppModel() {
String xmlPath="web.xml";
return buildWebAppModel(xmlPath);
}
/** * 建模 * @param xmlPath * @return */
private static WebAppModel buildWebAppModel(String xmlPath) {	InputStream in=WebAppModel.class.getResourceAsStream(xmlPath);
SAXReader saxReder=new SAXReader();
WebAppModel webAppModel=new WebAppModel();
try {
Document doc=saxReder.read(in);
/**		 * 将servlet的标签内容填进webapp		 */		List servletEles=doc.selectNodes("/web-app/servlet");		for (Element servletEle : servletEles) {			ServletModel servletModel=new ServletModel();		/**
* 给ServletModel填充xml的内容
*  */
Element servletNameEle=(Element) servletEle.selectSingleNode("servlet-name");
Element servletClassEle=(Element) servletEle.selectSingleNode("servlet-class");
ServletNameModel servletNameModel=new ServletNameModel();	ServletClassModel servletClassModel=new ServletClassModel();			servletNameModel.setContext(servletNameEle.getText());			servletClassModel.setContext(servletClassEle.getText());			servletModel.setServletNameModel(servletNameModel);			servletModel.setServletClassModel(servletClassModel);									webAppModel.pushServletModel(servletModel);
}
/**
* 将servlet-mapping的标签内容填充进webapp
* */
List servletMappingEles=doc.selectNodes("/web-app/servlet-mapping");
for (Element servletMappingEle : servletMappingEles) {			ServletMappingModel servletMappingModel=new ServletMappingModel();
/**
 * 给ServletMappingModel填充xml的内容
 * */
  Element servletNameEle=(Element) servletMappingEle.selectSingleNode("servlet-name");			ServletNameModel  servletNameModel=new ServletNameModel();
  servletNameModel.setContext(servletNameEle.getText());			servletMappingModel.setServletNameModel(servletNameModel);
  List urlPatternEles=servletMappingEle.selectNodes("url-pattern");
  for (Element urlPatternEle : urlPatternEles) {				UrlPatternModel urlPatternModel=new UrlPatternModel();				urlPatternModel.setContext(urlPatternEle.getText());				servletMappingModel.pushUrlPatternModel(urlPatternModel);
  }						webAppModel.pushServletMappingModel(servletMappingModel);
  }
  } catch (DocumentException e) {
  e.printStackTrace();
  }
  return webAppModel;
  }
  /** * 通过浏览器输入的网址自动找到对应的后台处理类 *  * @param webAppModel 建模的实体类 * @param url 浏览器访问的网址 * @return */p
  ublic static String getServletClassByUrl(WebAppModel webAppModel,String url) {
  String servletClass="";
  	/**
  	 * 找到浏览器网址对应的servlet-name
  	 * */
  	 String servletName="";
  	List servletMappingModels=webAppModel.getServletMappingModels();	for (ServletMappingModel servletMappingModel : servletMappingModels) {
  	List urlPatternModels=servletMappingModel.getUrlPatternModels();
  	for (UrlPatternModel urlPatternModel : urlPatternModels) {			if(url.equals(urlPatternModel.getContext())) {				ServletNameModel servletNameModel=servletMappingModel.getServletNameModel();				servletName=servletNameModel.getContext();
  	}
  	}
  	}
  	/**	 * 找到servlet-name对应的后台处理类	 */	List servletModels=webAppModel.getServletModels();
  	for (ServletModel servletModel : servletModels) {		ServletClassModel servletClassModel=servletModel.getServletClassModel();		servletClass=servletClassModel.getContext();
  	}
  	return servletClass;
  	}
  	static void main(String[] args) {
  	WebAppModel webAppModel=WebAppModelFactory.buildWebAppModel();
  	String res=getServletClassByUrl(webAppModel, "/jrebelServlet");	String res2=getServletClassByUrl(webAppModel, "/jrebelServlet2");
  		String res3=getServletClassByUrl(webAppModel, "/jrebelServlet3");
  		System.out.println(res);
  		System.out.println(res2);
  		System.out.println(res3);
  		 }
  		}
效果如下


