使用 Python 的 itchat 模块爬取微信好友信息
偶然间听闻 itchat 模块可以用于实现微信好友信息采集、消息收发管理,于是闲来无事玩一玩,只是简单实现了好友性别统计、地域分布统计、个性签名爬取展示以及头像的爬取拼接,还有很多更强大的功能,有兴趣的读者可以通过模块官方文档深入探索。
0、读取数据,搞懂数据
因为获取好友信息需要手机授权登录网页版,所以为了避免频繁扫码登录,我们在一次登录后把好友列表信息在本地持久化保存,以下是这段功能的代码:
import itchat
import pickle

itchat.login()  # 会自动弹出一个二维码,手机微信扫描授权网页版登录后方可爬取相关信息

my_friends = itchat.get_friends(update=True)[0:]    # 获取通讯录好友的信息,返回一个好友信息的字典

# 持久化保存数据,统计好友相关信息时无需再次扫码登录
with open('../data/my_friends.pickle', 'wb') as e:
    pickle.dump(my_friends, e)
这里保存的 my_friends 是好友列表,列表的元素是每个好友的信息,信息由字典表示,具体来说 my_friends = [ {好友1},{好友2},·····,{好友n} ],每一个好友字典的 key 如下表(给出了部分注解,还有一些没搞明白):
| key | 注解 |
|---|---|
| MemberList | 不明 |
| Uin | 不明 |
| UserName | 微信系统内的用户编码标识 |
| NickName | 好友昵称 |
| HeadImgUrl | 微信系统内的头像URL |
| ContactFlag | 不明 |
| MemberCount | 不明 |
| RemarkName | 你给好友的备注名 |
| HideInputBarFlag | 不明 |
| Sex | 性别 |
| Signature | 个性签名 |
| VerifyFlag | 不明 |
| OwnerUin | 不明 |
| PYInitial | 昵称的简拼 |
| PYQuanPin | 昵称的全拼 |
| RemarkPYInitial | 备注名的简拼 |
| RemarkPYQuanPin | 备注名的全拼 |
| StarFriend | 是否星标好友 |
| AppAccountFlag | 不明 |
| Statues | 不明 |
| AttrStatus | 不明 |
| Province | 省份 |
| City | 城市 |
| Alias | 不明 |
| SnsFlag | 不明 |
| UniFriend | 不明 |
| DisplayName | 不明 |
| ChatRoomId | 不明 |
| KeyWord | 不明 |
| EncryChatRoomId | 不明 |
| IsOwner | 不明 |
搞清楚了返回结果的数据结构,接下来的事情就很简单了。
1、好友的性别统计
我将统计性别的代码统一在一个 statistic_friends_dict 函数中:
def statistic_friends_sex(friends_dict):
    """
    该函数功能为实现 friends_dict 中性别统计
    :param friends_dict: itchat.get_friends()返回的好友字典
    :return: 男、女、性别未填写的人数 [#male, #female, #unknown]
    """
    result = [0, 0, 0]
    for friend in friends_dict[1:]:
        # 好友列表第一个是自己,所以统计真正好友要从第二个开始
        sex = friend['Sex']
        if sex == 1:
            result[0] += 1
        elif sex == 2:
            result[1] += 1
        else:
            result[2] += 1

    return result
同样的,将画图代码写成函数 sex_pie_chart():
def sex_pie_chart(sex_num):
    """
    该函数功能为实现画出性别统计的饼图
    :param sex_num: 统计好的性别数据, [#male, #female, #unknown]
    """
    labels = ['男', '女', '不明']
    colors = ['green', 'pink', 'yellow']
    plt.pie(sex_num, colors=colors, labels=labels, autopct='%1.1f%%', pctdistance=0.8)
    plt.title('蓝皮小猪的微信好友性别情况', bbox={'facecolor': '0.8', 'pad': 5})
    plt.show()
有了上述两个函数以后,运行如下代码段,便可以输出统计结果及画出相应的饼图了
代码段:
with open('../data/my_friends.pickle', 'rb') as e:
    my_friends = pickle.load(e)

statistic_result = statistic_friends_sex(my_friends)

print("男性好友人数:", statistic_result[0], "\n" +
      "女性好友人数:", statistic_result[1], "\n" +
      "不明性别好友:", statistic_result[2])

sex_pie_chart(statistic_result)
结果:
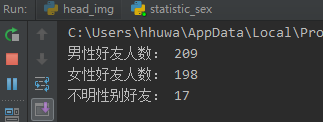

看来笔者的男女性别还是基本平衡的,作为一个本硕都在工科院校读工学专业的理工男来说,实属不易啊,然而这并不妨碍我依然是个单身汪(微笑脸)
2、地域分布统计
同样地,先将统计功能放在函数 statistic_area()中:
def statistic_area(Province_or_City, friends_data):
    """
    该函数功能为实现按省份或城市进行地域统计
    :param province_or_city: string,‘Province'、'City' 两类枚举型数据,指定统计方式
    :param friends_data: itchat.get_friend()返回的好友列表
    :return: area_dict,{'area_name': num,····}
    """
    area_dict = {}
    try:
        for friend in friends_data[1:]:
            area = friend[Province_or_City]
            if area == '':
                pass
            elif area not in area_dict.keys():
                area_dict[area] = 1
            else:
                area_dict[area] += 1
        return area_dict
    except:
        print('请输入正确参数:“Province” 或 “City”!')
然后是统计图绘图函数,本次采用条形统计图进行绘图:
def bar_chart(area_dict, chart_title):
    """
    该函数功能为实现画出地域统计的条形统计图
    :param area_dict: 统计的地域分布结果,dict数据格式:{area_name: quantity, ····}
    :param chart_title: 统计图的图题,string类型
    """

    # 获取对地域统计结果字典按值逆序排序后的前 10 名
    name, quantity = [], []
    for item in sorted(area_dict.items(), key=lambda item: item[1], reverse=True)[0:10]:
        name.append(item[0])
        quantity.append(item[1])

    # 设定条形图的颜色
    colors = ['orange', 'blueviolet', 'green', 'blue', 'skyblue']

    # 绘图
    plt.bar(range(len(quantity)), quantity, color=colors, width=0.35, align='center')

    # 添加 x 轴刻度标签
    plt.xticks(range(len(name)), name)

    # 在条形上方显示数据
    for x, y in enumerate(quantity):
        plt.text(x, y + 0.5, '%s' % round(y, 1), ha='center')

    # 设置纵坐标标签
    plt.ylabel('好友人数')

    # 设置标题
    plt.title(chart_title, bbox={'facecolor': '0.8', 'pad': 2})

    # 显示
    plt.show()
由于省份和城市特别多,且排序靠后的人数基本都是一个两个,所以我整理是选取了前10名,读着有兴趣的只需改动一下代码便可以全部输出绘图。
结果:
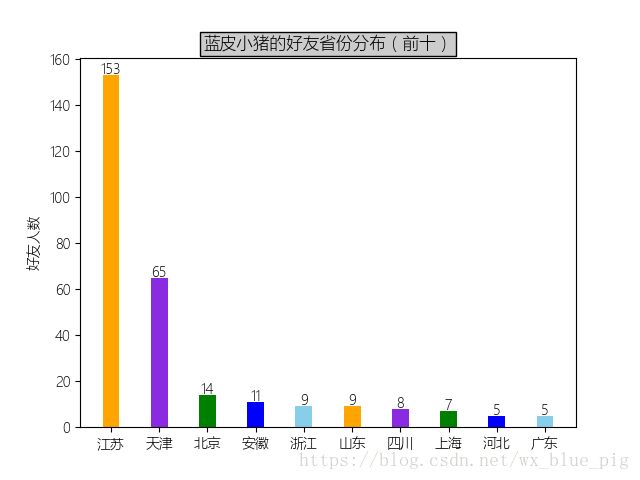
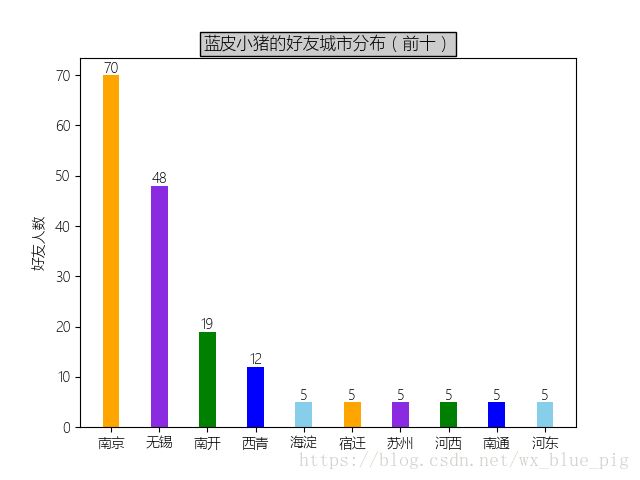
作为一个在天津上过学的江苏人,好友分布果然是在这两个地方最多,其实我们的圈子还是挺小的。
3、好友个性签名的词云展示
这一块需要导入的模块较多,重点是中文分词模块 jieba 和词云模块 wordcloud,读者可能未安装过这两个模块,那么需要先安装一下,所有需要导入的包如下所示:
import pickle
import re
import io
import jieba
import numpy as np
import matplotlib.pyplot as plt
from wordcloud import WordCloud, ImageColorGenerator
from PIL import Image
同样是两个函数,一个是抽取出个性签名分词后存储函数scrapy_signagure():
def scrapy_signature(friends_data, file_path):
    """
    该函数功能为实现抽取朋友
    :param friends_data: itchat.get_friend()返回的好友列表
    :param file_path: 文件存储路径
    """
    signature_list = []
    # 将个性签名中可能包含的表情及符号替换
    for friend in friends_data[1:]:
        signature = friend["Signature"].replace("span", "").replace("class", "").replace("emoji", "")
        rep = re.compile("1f\d+\w*|[<>/=]")
        signature = rep.sub("", signature)
        signature_list.append(signature)

    signature_text = "".join(signature_list)

    # 通过中文分词工具 jieba 将文本分词后存储
    with io.open(file_path, 'a', encoding='utf-8') as e:
        wordlist = jieba.cut(signature_text, cut_all=True)
        word_space_split = " ".join(wordlist)
        e.write(word_space_split)
        e.close()
一个函数是展示词云函数 draw_word_cloud():
def draw_word_cloud(file_path, back_pic):
    """
    该函数功能为实现将分词后的文本以某一图片为背景制作词云并展示
    :param file_path: 文本路径
    :param back_pic: 词云背景图片路径
    """
    text = open(file_path, encoding='utf-8').read()
    coloring = np.array(Image.open(back_pic))
    my_wordcloud = WordCloud(background_color="white", max_words=2000,
                             mask=coloring, max_font_size=60, random_state=42,
                             scale=2, font_path='simkai.ttf').generate(text)
    image_colors = ImageColorGenerator(coloring)
    plt.imshow(my_wordcloud.recolor(color_func=image_colors))
    plt.imshow(my_wordcloud)
    plt.axis("off")
    plt.show()
然后是运行:
file_path = '../data/signature.txt'
back_pic_path = '../data/1.jpg'

scrapy_signature(my_friends, file_path)
draw_word_cloud(file_path, back_pic_path)
背景图片和词云结果图分别如下所示:
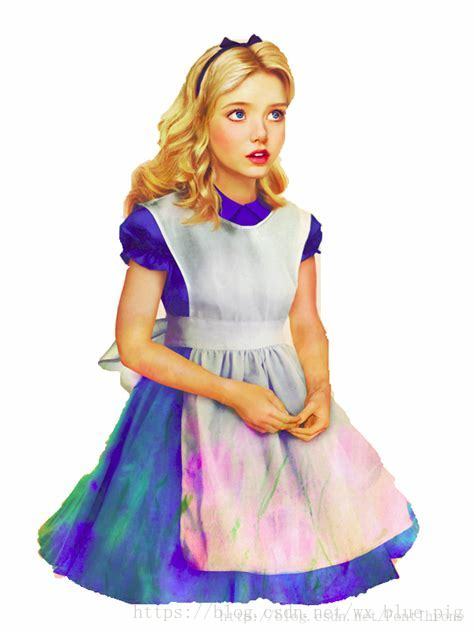
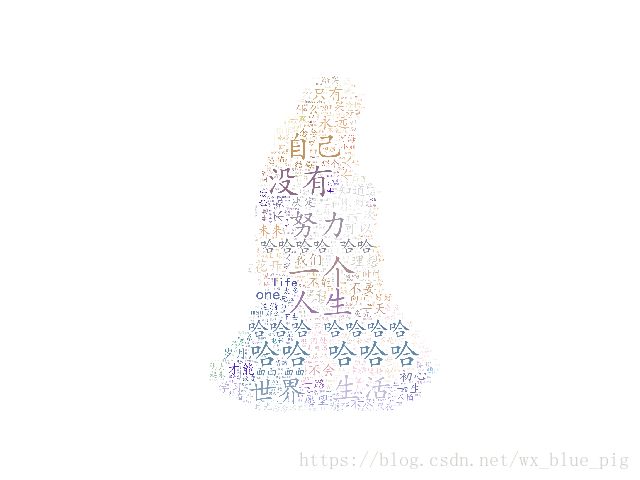
看来我的小伙伴们还是很正能量的啊,重点关键词是:人生、世界、生活、努力,还有哈哈哈的生活态度。
4、头像下载和拼接
首先我们需要把好友的头像下载下来,然后进行拼接。
因为下载头像需要用到 itchat 模块中的 get_head_img() 函数,这需要在微信网页版保持登录的状态下才可以运行完成,所以这里无法使用之前持久化保存的数据,需要手机授权登录网页版微信:
def download_headimg(save_path):
    """
    该函数功能为下载所有好友头像
    :param save_path: 头像存储路径
    """

    itchat.auto_login()
    my_friends = itchat.get_friends(update=True)[0:]

    for friend in my_friends:
        head = itchat.get_head_img(userName=friend["UserName"])
        img_file = open(save_path + friend['RemarkName'] + '.jpg', 'wb')
        img_file.write(head)
        img_file.close()
下载完成后,可以用下面这个拼接函数 splice_imgs() 进行:
def splice_imgs(file_path, save_path):
    """
    该函数功能为拼接图片
    :param file_path: 源图片存储路径
    :param save_path: 拼接完成的图片存储路径
    """

    # 将所有头像的路径提取出来
    path_list = []
    for item in os.listdir(file_path):
        img_path = os.path.join(file_path, item)
        path_list.append(img_path)

    # 为拼凑成一个正方形图片,每行头像个数为总数的开平方取整
    line = int(sqrt(len(path_list)))

    # 新建待拼凑图片
    New_Image = Image.new('RGB', (128 * line, 128 * line))

    x, y = 0, 0

    # 进行拼图
    for item in path_list:
        try:
            img = Image.open(item)
            img = img.resize((128, 128), Image.ANTIALIAS)
            New_Image.paste(img, (x * 128, y * 128))
            x += 1
        except IOError:
            print("第%d行,%d列文件读取失败!IOError:%s" % (y, x, item))
            x -= 1
        if x == line:
            x = 0
            y += 1
        if (x + line * y) == line * line:
            break

    # 将拼好的图片存储起来
    New_Image.save(save_path)
依次运行上面两个函数即可得到最终的好友头像拼接了,需要说明的是,在download_headimg() 中是逐个下载好友头像,如果你的好友特别多的话,那么将需要一段时间,在我的代码中因为没有给出运行过程中输出,所以程序在这时会保持一段时间的“静止”,你可以添加一些输出来提示自己程序正在运行,并未宕机。蓝皮小猪的好友头像拼图如下所示:
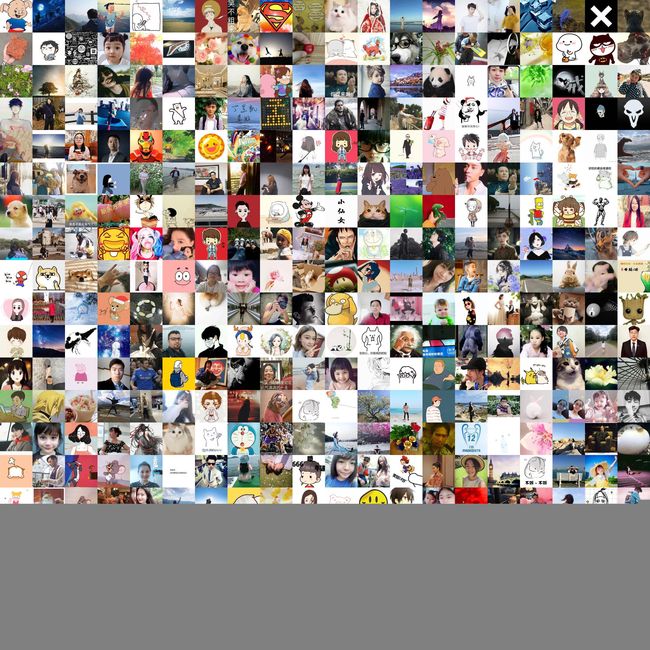
本人一共425个好友,这里只拼了400个,我一定被剩余的那25个好友记恨了。
其实可以在程序中微调参数,不一定让最终的拼图是方形,自己根据好友个数设计合理的行列个数来尽可能多地囊括好友们。