iOS界面布局的几种方式
iOS界面布局之一——使用代码进行布局
一、这是最简单的布局方式,在UI控件初始化时通过- (void)initWithFrame进行设置,或者在init之后在进行设置
- (void)viewDidLoad {
    [super viewDidLoad];
    // Do any additional setup after loading the view, typically from a nib.
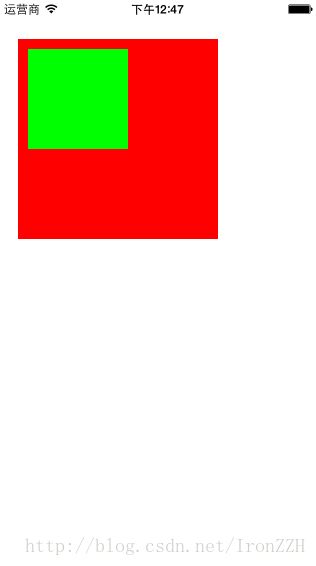
    UIView * view1 = [[UIView alloc]initWithFrame:CGRectMake(20, 40, 200, 200)];
    view1.backgroundColor=[UIColor redColor];
    UIView * view2 = [[UIView alloc]initWithFrame:CGRectMake(10, 10, 100, 100)];
    view2.backgroundColor=[UIColor greenColor];
    [view1 addSubview:view2];
    [self.view addSubview:view1];
}当然了,这种情况下我们应该怎样做适配呢,在autoLayout没有出现之前,Apple提供的方法主要是autoresizing(在现在的xib/storyBoard里也能找到相应的设置)。
typedef NS_OPTIONS(NSUInteger, UIViewAutoresizing) {
    UIViewAutoresizingNone                 = 0,//默认
    UIViewAutoresizingFlexibleLeftMargin   = 1 << 0,//与父视图右边间距固定,左边可变
    UIViewAutoresizingFlexibleWidth        = 1 << 1,//视图宽度可变
    UIViewAutoresizingFlexibleRightMargin  = 1 << 2,//与父视图左边间距固定,右边可变
    UIViewAutoresizingFlexibleTopMargin    = 1 << 3,//与父视图下边间距固定,上边可变
    UIViewAutoresizingFlexibleHeight       = 1 << 4,//视图高度可变
    UIViewAutoresizingFlexibleBottomMargin = 1 << 5//与父视图上边间距固定,下边可变
};
二、使用AutoLayout进行页面布局
AutoLayout是Apple在iOS6之后提出的概念,和之前的autoresizing相比功能更加强大,也是Apple为了适配更多屏幕给出的解决方案,但是当时使用的人不是很多。在iOS7之后,AutoLayout更加完善,也逐渐被大家广为使用,现在,随着iPhone6,6Plus,7,7Plus的推出,AutoLayout布局方式也是大家的首选布局方式。
AutoLayout主要是通过原生枚举和一些属性设置来创建NSLayoutConstraint对象,主要使用NSLayoutConstraint类的如下方法:
+(instancetype)constraintWithItem:(id)view1 attribute:(NSLayoutAttribute)attr1 relatedBy:(NSLayoutRelation)relation toItem:(nullable id)view2 attribute:(NSLayoutAttribute)attr2 multiplier:(CGFloat)multiplier constant:(CGFloat)c;下面给大家看一下原生的AutoLayout布局代码
UILabel * label = [[UILabel alloc]init];
    //使用代码布局 需要将这个属性设置为NO
    label.translatesAutoresizingMaskIntoConstraints = NO;
    label.backgroundColor = [UIColor redColor];
    //创建x居中的约束
    NSLayoutConstraint * constraintx = [NSLayoutConstraint constraintWithItem:label attribute:NSLayoutAttributeCenterX relatedBy:NSLayoutRelationEqual toItem:self.view attribute:NSLayoutAttributeCenterX multiplier:1 constant:0];
    //创建y居中的约束
    NSLayoutConstraint * constrainty = [NSLayoutConstraint constraintWithItem:label attribute:NSLayoutAttributeCenterY relatedBy:NSLayoutRelationEqual toItem:self.view attribute:NSLayoutAttributeCenterY multiplier:1 constant:0];
    //创建宽度约束
    NSLayoutConstraint * constraintw = [NSLayoutConstraint constraintWithItem:label attribute:NSLayoutAttributeWidth relatedBy:NSLayoutRelationEqual toItem:nil attribute:NSLayoutAttributeNotAnAttribute multiplier:1 constant:100];
    //创建高度约束
    NSLayoutConstraint * constrainth = [NSLayoutConstraint constraintWithItem:label attribute:NSLayoutAttributeHeight relatedBy:NSLayoutRelationEqual toItem:nil attribute:NSLayoutAttributeNotAnAttribute multiplier:1 constant:100];
    //添加约束之前,必须将视图加在父视图上
    [self.view addSubview:label];
    [self.view addConstraints:@[constraintx,constrainty,constrainth,constraintw]];
view:要添加约束的视图对象。
attr:要约束的对象属性,这个就是一些枚举,如
typedef NS_ENUM(NSInteger, NSLayoutAttribute) {
    NSLayoutAttributeLeft = 1,//左
    NSLayoutAttributeRight,//右
    NSLayoutAttributeTop,//上
    NSLayoutAttributeBottom,//下
    NSLayoutAttributeLeading,//起始边,类似左,只在某些从右向左排列的语言中和NSLayoutAttributeLeft有大区别
    NSLayoutAttributeTrailing,//结束边
    NSLayoutAttributeWidth,//宽度
    NSLayoutAttributeHeight,//高度
    NSLayoutAttributeCenterX,//x中心
    NSLayoutAttributeCenterY,//y中心
    NSLayoutAttributeBaseline,//基线
    NSLayoutAttributeLastBaseline = NSLayoutAttributeBaseline,
    NSLayoutAttributeFirstBaseline NS_ENUM_AVAILABLE_IOS(8_0),

    //下面的属性是设置的边距 意义和上面类似 对应左,右等边距
    NSLayoutAttributeLeftMargin NS_ENUM_AVAILABLE_IOS(8_0),
    NSLayoutAttributeRightMargin NS_ENUM_AVAILABLE_IOS(8_0),
    NSLayoutAttributeTopMargin NS_ENUM_AVAILABLE_IOS(8_0),
    NSLayoutAttributeBottomMargin NS_ENUM_AVAILABLE_IOS(8_0),
    NSLayoutAttributeLeadingMargin NS_ENUM_AVAILABLE_IOS(8_0),
    NSLayoutAttributeTrailingMargin NS_ENUM_AVAILABLE_IOS(8_0),
    NSLayoutAttributeCenterXWithinMargins NS_ENUM_AVAILABLE_IOS(8_0),
    NSLayoutAttributeCenterYWithinMargins NS_ENUM_AVAILABLE_IOS(8_0),
    //无,后面会说应用场景
    NSLayoutAttributeNotAnAttribute = 0
};
大家可以看的出来,AutoLayout的原生代码是不是看着有点长(或者直接说有段乱),一眼根本看不出来当前的视图是加了哪些约束,哪种约束,何况在实际开发中,这样的代码我们可能会写很多很多。
所以,有一位国外的大神觉得这样写布局有点太难受了,根本不能给程序员最完美的体验,所以他决定自己写一个AutoLayout布局库,不仅让大家在几行代码下就能完成对UI控件的约束,而且还要简单易读,并且功能强大,之后——-一个在iOS开发界无人不知无人不晓的名字出现了,Masonry。
Masonry布局库轻量、简便、功能强大,可以满足任意布局的开发,而且到现在也一直在维护。
下面给大家看看代码:
- (void)viewDidLoad {
    [super viewDidLoad];
    // Do any additional setup after loading the view, typically from a nib.
    UILabel * label = [[UILabel alloc]init];
    [self.view addSubview:label];
    [label mas_makeConstraints:^(MASConstraintMaker *make) {
        make.center.equalTo(self.view);
        make.height.equalTo(@50);
        make.width.equalTo(@50);
    }];
    label.backgroundColor = [UIColor redColor];
}
大家看见了吗,你只需要在block里写上三局代码就可以是当前的label居中,设置宽度高度,并且一眼就能看出来你给的约束是什么,是给谁的约束。在开发中,我们需要删减约束,重置约束,更新约束等,这些在Masonry布局库中都有体现,也同样是非常简洁明了。
更新约束
[label mas_updateConstraints:^(MASConstraintMaker *make) {
        make.height.equalTo(@100);
        make.width.equalTo(@100);
    }];
重置约束
[label mas_remakeConstraints:^(MASConstraintMaker *make) {
        make.left.equalTo(self.view.mas_left).offset(10);
        make.top.equalTo(self.view.mas_top).offset(100);
        make.height.equalTo(@100);
        make.width.equalTo(@100);
    }];
在添加具体约束的时候,我们不仅可以设置约束值的绝对相等关系,还可以设置一些值域的关系,具体如下:
//绝对相等
- (MASConstraint * (^)(id attr))equalTo;
//大于等于
- (MASConstraint * (^)(id attr))greaterThanOrEqualTo;
//小于等于
- (MASConstraint * (^)(id attr))lessThanOrEqualTo;
优先级
//手动设置一个优先级参数
- (MASConstraint * (^)(MASLayoutPriority priority))priority;
//优先级低
- (MASConstraint * (^)())priorityLow;
//优先级中等
- (MASConstraint * (^)())priorityMedium;
//优先级高
- (MASConstraint * (^)())priorityHigh;
运用中代码如下
[label mas_remakeConstraints:^(MASConstraintMaker *make) {
        make.left.equalTo(self.view.mas_left).offset(10);
        make.top.equalTo(self.view.mas_top).offset(100);
        make.height.equalTo(@100).priority(1000);
        make.width.equalTo(@100).priorityHigh();
    }];
在Masonry的使用中,介绍几个容易出问题的地方
1、首先为控件添加约束时,一定要先添加到父视图上,否则程序会崩溃。
2、在平时的使用中,Masonry中设置左边约束时,一般有make.left.equalTo(self.view.mas_left).offset(10);
或者make.leading.equalTo(self.view.mas_leading).offset(10);
同样右边约束时,有make.right.equalTo(self.view.mas_right).offset(10);
和make.trailing.equalTo(self.view.mas_trailng).offset(10);
有一点需要记住,在使用leading的时候对应的设置右边约束时一定要使用trailing,同样在使用left时,也要使用right来设置右边约束,相反也是一样,否则程序会进入崩溃,而且异常断点进入的地方也不会显示这个问题,很难发现是这个问题。
