Android 开发--多渠道打包实现
文章目录
- 背景
- 多渠道是什么
- 为什么要做多渠道打包
- 多渠道打包原理
- 怎么实现渠道信息的统计
- 打包实现
- 清单配置文件添加 meta-data 标签
- 密钥生成
- 签名配置
- 创建风味维度与 Product 风味
- 风味配置项的一些优化
- 使用 gradle 的build tasks 进行打包
- 多渠道包查看
- 渠道信息验证
背景
学习多渠道打包,用的 demo 来做一个简单的演示。
多渠道是什么
渠道就是指不同的安装包发布平台:有应用宝、百度、小米、360、豌豆荚等应用发布平台。你打包后的 app 就可以发布在这些平台上供用户自行下载体验。
为什么要做多渠道打包
方便后台统计 app 在各个平台上的下载次数。
多渠道打包原理
一般,我们在清单配置文件中声明一个 meta-data 标签,里面设置对应的 name 和 value 属性,我们可以在代码中根据 name 获取到对应的 value,这个 value 就是我们需要的渠道信息。
怎么实现渠道信息的统计
这里简单说一下实现:例如用户从豌豆荚市场下载了 app ,安装后并打开使用。这个时候我们在代码中就能获取到 wandoujia 这个渠道信息,然后把这个信息通过调用接口统计到后台。
不过目前有很多开发者平台都提供了对应的 sdk 供我们集成使用,比如 友盟 这个大家族,集成友盟统计的功能我会在下期文章中提供。通过集成友盟的统计功能,我们可以很方便的在友盟开发者平台上看到我们发布后的 app 的一个下载使用情况,很实用的一个功能。
打包实现
清单配置文件添加 meta-data 标签
<meta-data android:value="${MY_CHANNEL_VALUE}" android:name="MY_CHANNEL"/>
如下:
<?xml version="1.0" encoding="utf-8"?>
<manifest xmlns:android="http://schemas.android.com/apk/res/android"
    package="com.example.fragmentdemo">

    <uses-permission android:name="android.permission.ACCESS_NETWORK_STATE"/>
    <uses-permission android:name="android.permission.ACCESS_WIFI_STATE"/>
    <uses-permission android:name="android.permission.READ_PHONE_STATE"/>
    <uses-permission android:name="android.permission.INTERNET"/>

    <application
        android:name=".application.MyApplication"
        android:allowBackup="true"
        android:icon="@mipmap/ic_launcher"
        android:label="@string/app_name"
        android:roundIcon="@mipmap/ic_launcher_round"
        android:supportsRtl="true"
        android:theme="@style/AppTheme">

        <meta-data android:value="${MY_CHANNEL_VALUE}" android:name="MY_CHANNEL"/>

        <activity android:name=".activity.MainActivity"
            android:configChanges="orientation|screenSize|keyboardHidden">
            <intent-filter>
                <action android:name="android.intent.action.MAIN" />

                <category android:name="android.intent.category.LAUNCHER" />
            </intent-filter>
        </activity>
    </application>

</manifest>
这里简单说明一下:value 值用了占位符来表示,方便一次性打多个渠道包。
密钥生成
使用签名密钥来生成 release 版 apk,这才是正式生产使用的安装包。所以我们需要先来生产签名密钥。
密钥生成我在上一篇文章 Warning:JKS 密钥库使用专用格式。建议使用 “keytool -importkeystore -srckeystore…pkcs12” 迁移到行业标准格式 PKCS12 中有详细的介绍,供同学们参考。
签名配置
我们有了签名密钥,可以用来配置一个 release 版的签名,方便打包,如下:

配置好后,app 模块下的 build.gradle 文件会多出签名信息配置,如下图:

我这里还用到了一个 keystore.properties 文件,如下图示:

内容如下图示:

app 模块下 build.gradle 文件完整内容如下:
apply plugin: 'com.android.application'

def keystorePropertiesFile = rootProject.file("keystore.properties")
def keystoreProperties = new Properties()
keystoreProperties.load(new FileInputStream(keystorePropertiesFile))

android {

    compileSdkVersion 28
    buildToolsVersion "29.0.3"

    defaultConfig {
        applicationId "com.example.fragmentdemo"
        minSdkVersion 19
        targetSdkVersion 28
        versionCode 1
        versionName "1.0"

        testInstrumentationRunner "androidx.test.runner.AndroidJUnitRunner"
    }

    signingConfigs {
        release {
            storeFile file(keystoreProperties['storeFile'])
            storePassword keystoreProperties['storePassword']
            keyAlias keystoreProperties['keyAlias']
            keyPassword keystoreProperties['keyPassword']
        }
    }

    buildTypes {
        release {
            minifyEnabled false // 不启用混淆
            proguardFiles getDefaultProguardFile('proguard-android-optimize.txt'), 'proguard-rules.pro'
            signingConfig signingConfigs.release
        }
    }

}


dependencies {
    implementation fileTree(dir: 'libs', include: ['*.jar'])

    implementation 'androidx.appcompat:appcompat:1.1.0'
    implementation 'androidx.constraintlayout:constraintlayout:1.1.3'
    implementation 'androidx.legacy:legacy-support-v4:1.0.0'
    testImplementation 'junit:junit:4.12'
    androidTestImplementation 'androidx.test.ext:junit:1.1.1'
    androidTestImplementation 'androidx.test.espresso:espresso-core:3.2.0'

}
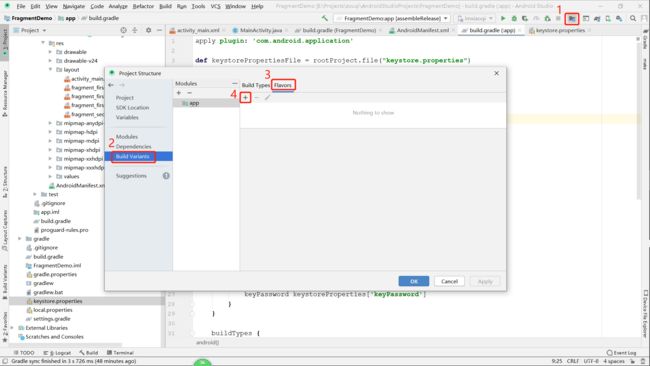
创建风味维度与 Product 风味
什么是风味维度,这里暂不作说明,同学们可参考文章 Android Studio3.0 flavorDimensions多维度理解(版本差异化打包) 自行了解。
-
打开
风味维度创建窗口,如下图示:
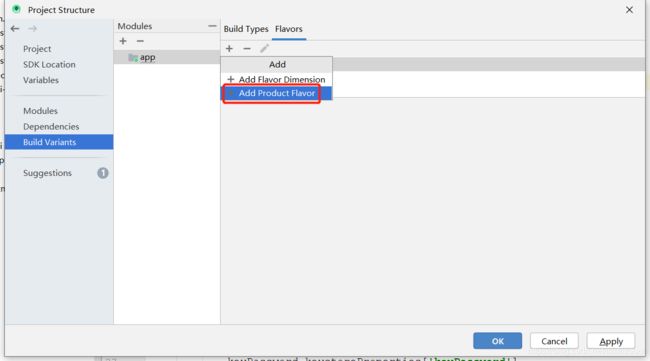
-
首先添加一个
风味维度,如下图示:

-
输入
风味维度名称,如下图示:

-
风味维度创建完成后如下图示:

-
Add Product Flavor
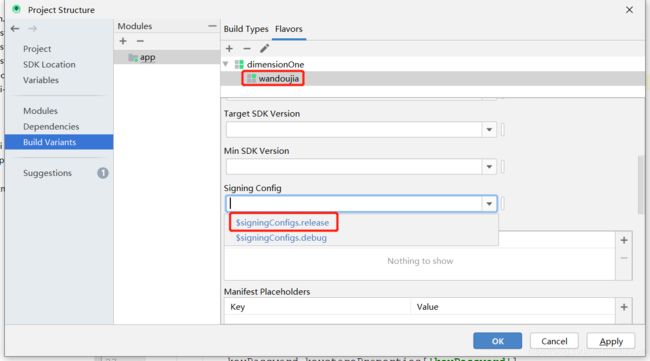
-
输入 product flavor 名称,如下图示:

-
product flavor 名称创建完成后,选择 release 签名配置,如下图示:
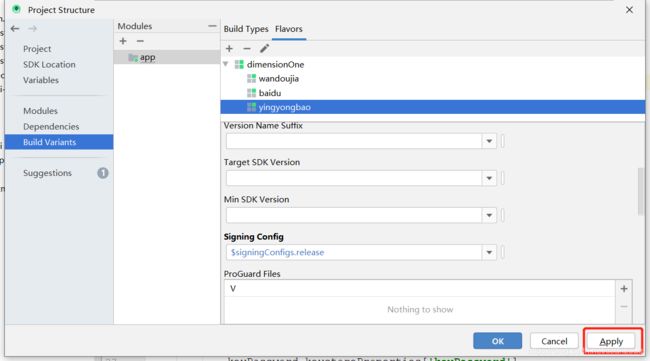
-
依次添加 baidu 和 yingyongbao 渠道,并点击 apply ,如下图示:
-
等待 gradle 同步完成后,我们再看 app 模块下的 build.gradle 文件多出的风味配置项如下图示:

风味配置项的一些优化
-
占位符使用,减少重复配置

-
可自定义打包后的 apk 名称
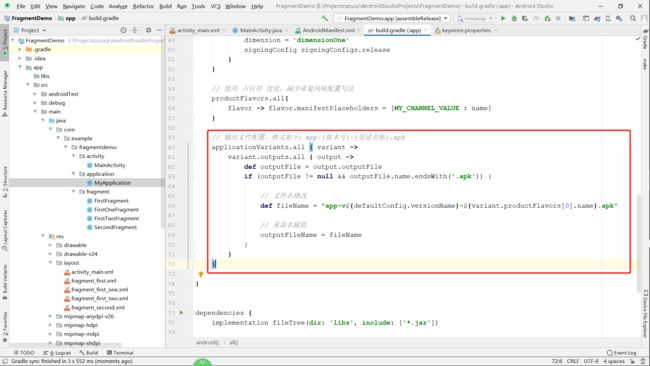
最后给出完整的 build.gradle 文件内容,如下:
apply plugin: 'com.android.application'

def keystorePropertiesFile = rootProject.file("keystore.properties")
def keystoreProperties = new Properties()
keystoreProperties.load(new FileInputStream(keystorePropertiesFile))

android {

    compileSdkVersion 28
    buildToolsVersion "29.0.3"

    defaultConfig {
        applicationId "com.example.fragmentdemo"
        minSdkVersion 19
        targetSdkVersion 28
        versionCode 1
        versionName "1.0"

        testInstrumentationRunner "androidx.test.runner.AndroidJUnitRunner"
    }

    signingConfigs {
        release {
            storeFile file(keystoreProperties['storeFile'])
            storePassword keystoreProperties['storePassword']
            keyAlias keystoreProperties['keyAlias']
            keyPassword keystoreProperties['keyPassword']
        }
    }

    buildTypes {
        release {
            minifyEnabled false // 不启用混淆
            proguardFiles getDefaultProguardFile('proguard-android-optimize.txt'), 'proguard-rules.pro'
            signingConfig signingConfigs.release
        }
    }
    flavorDimensions 'dimensionOne'
    productFlavors {
        wandoujia {
            dimension = 'dimensionOne'
            signingConfig signingConfigs.release
        }
        baidu {
            dimension = 'dimensionOne'
            signingConfig signingConfigs.release
        }
        yingyongbao {
            dimension = 'dimensionOne'
            signingConfig signingConfigs.release
        }
    }

    // 使用 占位符 优化,减少重复风味配置写法
    productFlavors.all{
        flavor -> flavor.manifestPlaceholders = [MY_CHANNEL_VALUE : name]
    }

    // 输出文件配置,格式如下:app-{版本号}-{渠道名称}.apk
    applicationVariants.all { variant ->
        variant.outputs.all { output ->
            def outputFile = output.outputFile
            if (outputFile != null && outputFile.name.endsWith('.apk')) {

                // 文件名修改
                def fileName = "app-v${defaultConfig.versionName}-${variant.productFlavors[0].name}.apk"

                // 重命名赋值
                outputFileName = fileName
            }
        }
    }

}


dependencies {
    implementation fileTree(dir: 'libs', include: ['*.jar'])

    implementation 'androidx.appcompat:appcompat:1.1.0'
    implementation 'androidx.constraintlayout:constraintlayout:1.1.3'
    implementation 'androidx.legacy:legacy-support-v4:1.0.0'
    testImplementation 'junit:junit:4.12'
    androidTestImplementation 'androidx.test.ext:junit:1.1.1'
    androidTestImplementation 'androidx.test.espresso:espresso-core:3.2.0'

}
使用 gradle 的build tasks 进行打包
- 如下图示:

- 打包成功后如下图示:

多渠道包查看
- 我们打完多渠道包后,可在如下图示位置查看一次性生成的多渠道包:

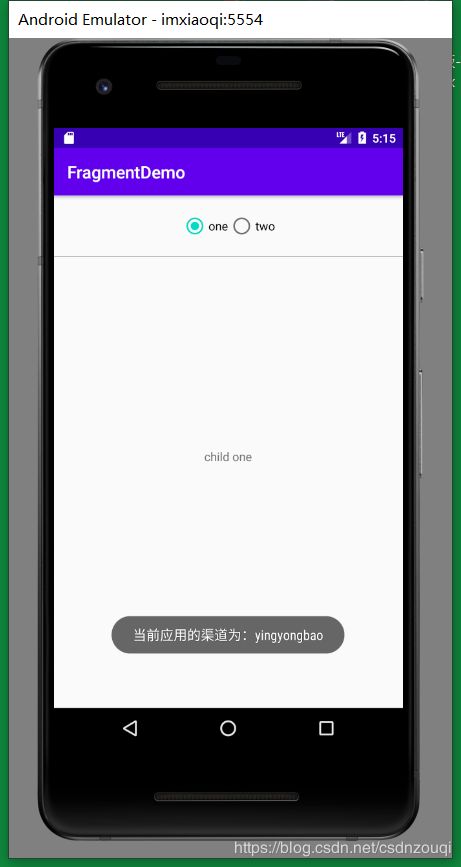
渠道信息验证
- 获取渠道信息代码如下:
// 获取渠道信息
        try {
            ApplicationInfo applicationInfo = MainActivity.this.getPackageManager().getApplicationInfo(
                    MainActivity.this.getPackageName(), PackageManager.GET_META_DATA
            );

            String channel = applicationInfo.metaData.getString("MY_CHANNEL");
            Log.e("TAG", "metaData value is :" + channel);

            Toast.makeText(MainActivity.this, "当前应用的渠道为:" + channel,
                    Toast.LENGTH_LONG).show();

        } catch (PackageManager.NameNotFoundException e) {
            e.printStackTrace();
        }
- 我们依次安装,打开获取渠道信息如下图示:


到此,我们就实现了多渠道打包。
技术永不眠,我们下期见!