1.从Application启动定时任务
(1)描述:定时任务跟随Application启动类一起启动并执行
(2)启动类代码:Application.java
package com.test;

import org.springframework.boot.SpringApplication;
import org.springframework.boot.autoconfigure.SpringBootApplication;
import org.springframework.context.annotation.ComponentScan;
import org.springframework.scheduling.annotation.EnableScheduling;

@SpringBootApplication
@ComponentScan({"com.vsked.autostart","com.vsked.task"})
@EnableScheduling
public class Application{
    public static void main(String[] args) {
        SpringApplication.run(Application.class, args);
    }
}
(3)定时器代码:TimeTask.java
package com.test.config;

import java.util.Date;

import org.slf4j.Logger;
import org.slf4j.LoggerFactory;
import org.springframework.scheduling.annotation.Scheduled;
import org.springframework.stereotype.Component;

@Component
public class TimeTask {

    private static final Logger log = LoggerFactory.getLogger(TimeTask.class);

    @Scheduled(cron = "0 */1 * * * ?") // 定时:每一分钟执行一次
    public void cleanLog1DataTask() {
        log.info("one minute----------->|"+new Date()+"|");
    }
}
2.从yaml文件中配置定时任务时间
(1)描述:从yaml文件中配置定时任务的时间,当Application启动类启动的时候定时任务跟随一起启动。
(2)配置文件:application.yaml
job:
  schedules:
    - 1 * * * * *
备注:1分钟执行一起定时任务
(3)定时任务的Bean:CronConfig.java
package com.jcdz.hbdservice.config; import org.springframework.boot.context.properties.ConfigurationProperties; import org.springframework.context.annotation.Bean; import org.springframework.context.annotation.Configuration; import org.springframework.context.annotation.PropertySource; import java.util.List; @Configuration @ConfigurationProperties(prefix="job") @PropertySource("classpath:application.yml") public class CronConfig { private Listschedules; @Bean public List schedules() { return this.schedules; } public List getSchedules() { return schedules; } public void setSchedules(List schedules) { this.schedules = schedules; } }
(4)定时任务执行代码:TimeTask.java
package com.jcdz.hbdservice.config;

import org.springframework.stereotype.Component;

@Component
public class TimeTask implements Runnable {

    @Override
    public void run() {
        System.out.println("执行中!!!!!!!!!");
    }
}
备注:需要定时任务的代码就放在这
(5)ScheduledTasks.java
package com.jcdz.hbdservice.config;

import org.slf4j.Logger;
import org.slf4j.LoggerFactory;
import org.springframework.beans.factory.annotation.Autowired;
import org.springframework.scheduling.TaskScheduler;
import org.springframework.scheduling.support.CronTrigger;
import org.springframework.stereotype.Component;

@Component
public class ScheduledTasks {

    @Autowired
    private TaskScheduler taskScheduler;

    @Autowired
    private CronConfig cronConfig;

    @Autowired
    private TimeTask timeTask;

    private static final Logger log = LoggerFactory.getLogger(ScheduledTasks.class);

    public void scheduleAllCrons() {

        cronConfig.getSchedules().forEach( cron -> taskScheduler.schedule(timeTask, new CronTrigger(cron)) );
    }
}
(6)启动类:Application.java
import com.jcdz.hbdservice.config.ScheduledTasks;

import org.springframework.boot.SpringApplication;
import org.springframework.boot.autoconfigure.SpringBootApplication;
import org.springframework.context.ApplicationContext;
import org.springframework.context.annotation.Bean;
import org.springframework.context.annotation.ComponentScan;
import org.springframework.scheduling.TaskScheduler;
import org.springframework.scheduling.annotation.EnableAsync;
import org.springframework.scheduling.concurrent.ConcurrentTaskScheduler;

@SpringBootApplication
@ComponentScan({"com.jcdz.hbdservice.config"})
@EnableAsync
public class Application{

    @Bean
    public TaskScheduler taskScheduler() {
        return new ConcurrentTaskScheduler();
    }


    public static void main(String[] args) throws Exception {
        ApplicationContext ctx = SpringApplication.run(Application.class);

        ScheduledTasks scheduledTasks = ctx.getBean(ScheduledTasks.class);

        scheduledTasks.scheduleAllCrons();
    }
}
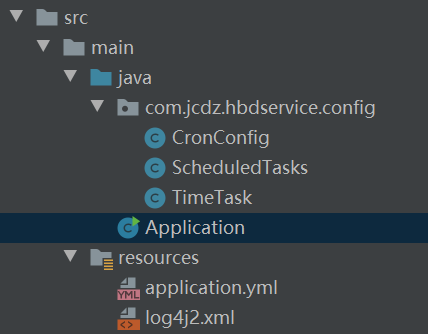
(7)目录结构
(8)总结:如果想要通过配置文件来控制多个定时任务,那就在配置文件里配置多个job,其他代码对应的写多个就行了。
参考:http://www.chinaoc.com.cn/p/1277431.html
