一、涉及软件
- python:RF是基于python 的,所以需要有python环境
-
wxPython:是Python语言的一套优秀的GUI图形库。允许Python程序员很方便的创建完整的、功能键全的GUI用户界面。 RIDE 是基于这个库开发的,所以这个必须安装,python和wxpython的版本是需要对应的。
- Robot Famework:是一款python编写的功能自动化测试框架。具备良好的可扩展性,支持关键字驱动,可以同时测试多种类型的客户端或者接口,可以进行分布式测试执行。主要用于轮次很多的验收测试和验收测试驱动开发(ATDD)。
- Robot Framework-Ride:是Robot Famework的图形操作前端,用于创建、组织、运行测试;
- Selenium:自动化测试工具,它主要是用于 Web 应用程序的自动化测试,但并不只局限于此,同时支持所有基于 web 的管理任务自动化。
- Robot Framework-selenium2library:是Robot Framework的Web测试库,它在内部使用Selenium工具。
- Browser drivers:浏览器驱动,安装库之后,您仍需要为要在测试中使用的所有浏览器安装浏览器和特定于操作系统的浏览器驱动程序。
- decorator:Python 装饰器。
- Pycharm:一种Python IDE,带有一整套可以帮助用户在使用Python语言开发时提高其效率的工具,比如调试、语法高亮、Project管理、代码跳转、智能提示、自动完成、单元测试、版本控制。此外,该IDE提供了一些高级功能,以用于支持Django框架下的专业Web开发。
- IntelliBot :Robot Framework的Pycharm 插件,可使编辑器识别robotframework的脚本文件。
二、安装步骤
1、Python 3.7.4
官网下载:http://www.python.org/download
安装:建议使用安装包形式安装
配置环境变量
验证:控制台输入 python –V
2、wxPython
pip命令安装:pip install wxPython
验证:控制台输入 python import wxPython
3、Robot Framework
pip install robotframework
4、Robot Framework-Ride
pip install robotframework-ride
5、Selenium
pip install selenium
此步骤可省略,直接进入下一步,下一步的安装包包含此内容。
6、Robot Framework-seleniumlibrary
pip install robotframework-selenium2library
升级使用最新的库 SeleniumLibrary
pip install --upgrade robotframework-seleniumlibrary
7、Browser drivers
1)手动下载
下载地址:https://seleniumhq.github.io/selenium/docs/api/py/index.html#drivers
下载完毕后解压至特定目录,并添加路径至path变量中。
2)pip命令下载
使用名为WebdriverManager的工具,它可以找到最新版本或在需要时为您找到任何版本的相应Web驱动程序,然后下载并链接/复制到正确的位置。工具可以在所有主要操作系统上运行,并支持下载Chrome,Firefox,Opera和Edge网络驱动程序。举例如下:
pip install webdrivermanager
webdrivermanager firefox chrome --linkpath / usr / local / bin
8、decorator
pip install decorator
9、Pycharm
官网:https://www.python.org/ 下载安装,本文中使用版本为2019.1.3
10、IntelliBot
IntelliBot是Pycharm的插件,通过Pycharm进行安装
1)、安装IntelliBot
File—>settings—>Plugins—>搜索 IntelliBot—>install
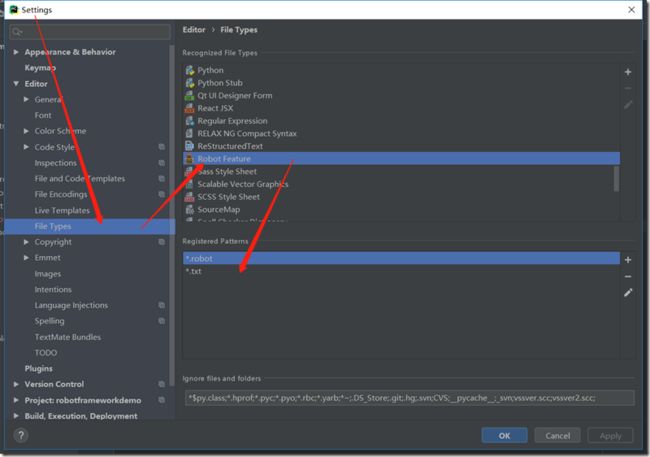
2)、配置robotframework的文件类型识别
File—>settings—>Editor—>File Types -->Robot Feature –>在Registered Patterns 中添加两种类型:*.txt,*.robot
点击保存
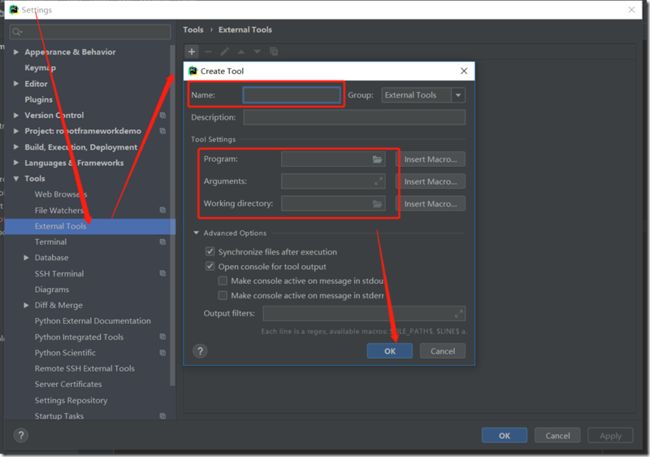
3)、运行配置
File—>settings—>Tools—>External Tools –>添加两个运行配置。
The robot script is new in Robot Framework 3.0. Prior to that, there were pybot, jybot and ipybot scripts that executed tests using Python, Jython and IronPython, respectively. These scripts were removed in Robot Framework 3.1 and nowadays robot must be used regardless the interpreter.
Robot Framework 3.0 后,pybot、jybot、ipybot 被移除,仅支持robot使用。
a、suite 运行时配置
name: Robot Run TestSuite
Program: D:\Python37\Scripts\pybot.bat (python安装目录下面pybot.bat的路径,如果“D:\Python36\Scripts\”有加环境变量,这里可以直接写pybot.bat)
Arguments: -d results $FileName$ (-d results 意思是生成的结果放到results 目录下面,$FilePath$是执行测试套件或者单条用例的路径)
Working directory: $FileDir$ (工作目录,上面一个参数的results 目录会创建在这个目录的下一级)
name: Robot Run TestSuite
Program: D:\Python\Python37\Scripts\robot.exe
Arguments: -d results $FileName$
Working directory: $FileDir$
b、case 运行时配置
name: Robot Run SingleTestCase
Program: D:\Python37\Scripts\pybot.bat
Arguments: -d results -t "$SelectedText$" ./
Working directory: $FileDir$
以上配置导致用例执行失败,替换为如下配置
name: Robot Run SingleTestCase
Program: D:\Python\Python37\Scripts\robot.exe
Arguments: -d results "$SelectedText$"
Working directory: $FileDir$
4)、robot 脚本运行验证
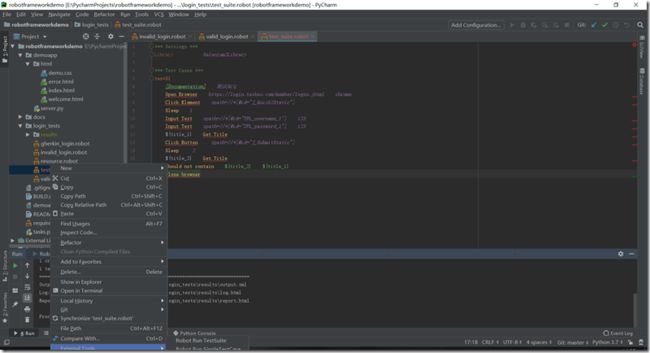
测试脚本如下:
*** Settings ***
Library           Selenium2Library

*** Test Cases ***
test01
    [Documentation]    测试淘宝
    Open Browser    https://login.taobao.com/member/login.jhtml    chrome
    Click Element    xpath=//*[@id="J_Quick2Static"]
    Sleep    1
    Input Text    xpath=//*[@id="TPL_username_1"]    123
    Input Text    xpath=//*[@id="TPL_password_1"]    123
    ${title_1}    Get Title
    Click Button     xpath=//*[@id="J_SubmitStatic"]
    Sleep     2
    ${title_2}    Get Title
    should not contain    ${title_2}    ${title_1}
    Close browser
选中脚本,右键—>External Tools –>Robot Run TestSuite
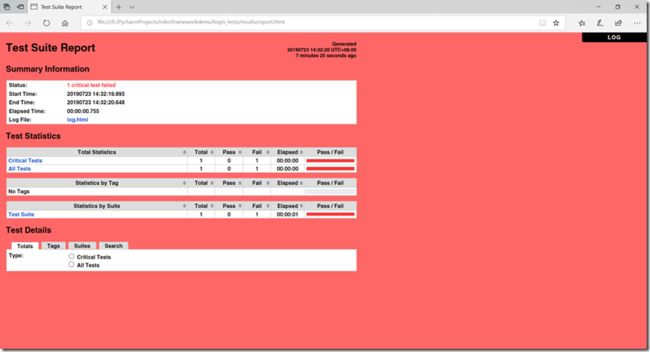
执行结果:
测试报告如下:
三、可能遇到的问题
在设置robot 运行配置时,可能会发现自己的Python安装路径中找不到pybot.bat文件,解决办法如下:
1.打开目录:D:\Python37\Scripts\
2.新建一个pybot.txt的文本
3.文本内容输入:
@Echo off

python -m robot.run %*
4.保存文件,修改文件后缀为.bat
5.大功告成!
![clip_image001[7] clip_image001[7]](http://img.e-com-net.com/image/info8/3a953d118e3a460b86b78de6d6234bda.jpg)

![clip_image001[5] python3+Robot Framework+PyCharm 环境部署_第2张图片](http://img.e-com-net.com/image/info8/e279c5ef2efd415bbda8b5f458f67b3f.jpg)


