springboot启动源码学习
一、springboot-Helloworld入门
第一个注解:@SpringBootApplication springboot 主配置类
具体如下:
@·····
@SpringBootConfiguration //表示这是一个springboot的配置类
@EnableAutoConfiguration
@ComponentScan(excludeFilters = {
		@Filter(type = FilterType.CUSTOM, classes = TypeExcludeFilter.class),
		@Filter(type = FilterType.CUSTOM, classes = AutoConfigurationExcludeFilter.class) })
public @interface SpringBootApplication {```}
进入@SpringBootConfiguration 注解?
@Target(ElementType.TYPE)
@Retention(RetentionPolicy.RUNTIME)
@Documented
@Configuration //配置类上来标注这个注解;表示配置类--配置文件
public @interface SpringBootConfiguration {

}
配置类也是一个组件@component, 如下:
@Target(ElementType.TYPE)
@Retention(RetentionPolicy.RUNTIME)
@Documented
@Component//spring 组件
public @interface Configuration {
第二个注解:@EnableAutoConfiguration :开启自动配置功能
两个组合注解
Ⅰ.@AutoconfigurationPackage
    @AutoConfigurationPackage
    @Import(AutoConfigurationImportSelector.class)
    public @interface EnableAutoConfiguration {
1).@AutoConfigurationPackage自动配置包 里面有一个 import
    @Documented
    @Inherited
    @Import(AutoConfigurationPackages.Registrar.class)
    public @interface AutoConfigurationPackage {
    //@import给容器中倒入一个组件,由XXX.class决定
    }
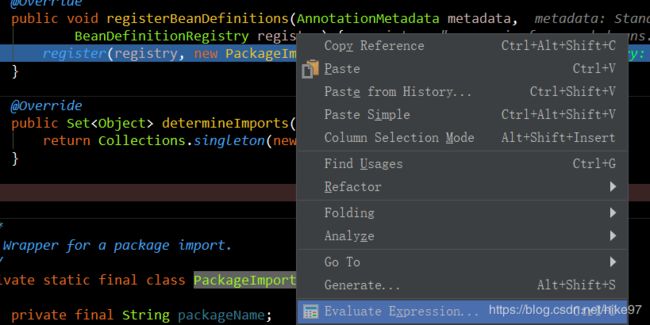
2).打开Registrar.class类 里面有一个方法导入元数据
    @Override
    public void registerBeanDefinitions(AnnotationMetadata metadata,BeanDefinitionRegistry registry) {
    			register(registry, new PackageImport(metadata).getPackageName());
    		}

debug模式下获取元数据信息:annotations 是springbootApplication
introspectedClass(内省类) 自己命名的启动类
进行计算得到你定义的包名

综上所述,@autoconfiguration的作用就是:
将主配置类(@springbootApplication标注的类)的包及下面所有组件扫描到spring容器
Ⅱ、@Import(AutoConfigurationImportSelector.class)
给容器中导入组件 :AutoConfigurationImportSelector.class 中有一个selectImports方法
    //将所需要的导入的组件以全类名的方式返回;这些组件就会被添加到容器中;
    //会给容器中导入非常多的自动配置类(xxxAutoConfiguration);
    //给容器中导入这个场景所需要的所有组件,并配置好这些组件;
    @Override
    public String[] selectImports(AnnotationMetadata annotationMetadata) {
    		if (!isEnabled(annotationMetadata)) {
    			return NO_IMPORTS;
    		}
    		AutoConfigurationMetadata autoConfigurationMetadata = AutoConfigurationMetadataLoader
    				.loadMetadata(this.beanClassLoader);
    		AutoConfigurationEntry autoConfigurationEntry = getAutoConfigurationEntry(
    				autoConfigurationMetadata, annotationMetadata);
    		return StringUtils.toStringArray(autoConfigurationEntry.getConfigurations());
    	}
web-starter需要的21个组件
0 = "org.springframework.boot.autoconfigure.admin.SpringApplicationAdminJmxAutoConfiguration"
1 = "org.springframework.boot.autoconfigure.cache.CacheAutoConfiguration"
2 = "org.springframework.boot.autoconfigure.context.ConfigurationPropertiesAutoConfiguration"
3 = "org.springframework.boot.autoconfigure.context.MessageSourceAutoConfiguration"
4 = "org.springframework.boot.autoconfigure.context.PropertyPlaceholderAutoConfiguration"
5 = "org.springframework.boot.autoconfigure.http.HttpMessageConvertersAutoConfiguration"
6 = "org.springframework.boot.autoconfigure.http.codec.CodecsAutoConfiguration"
7 = "org.springframework.boot.autoconfigure.info.ProjectInfoAutoConfiguration"
8 = "org.springframework.boot.autoconfigure.jackson.JacksonAutoConfiguration"
9 = "org.springframework.boot.autoconfigure.jmx.JmxAutoConfiguration"
10 = "org.springframework.boot.autoconfigure.task.TaskExecutionAutoConfiguration"
11 = "org.springframework.boot.autoconfigure.task.TaskSchedulingAutoConfiguration"
12 = "org.springframework.boot.autoconfigure.validation.ValidationAutoConfiguration"
13 = "org.springframework.boot.autoconfigure.web.client.RestTemplateAutoConfiguration"
14 = "org.springframework.boot.autoconfigure.web.embedded.EmbeddedWebServerFactoryCustomizerAutoConfiguration"
15 = "org.springframework.boot.autoconfigure.web.servlet.DispatcherServletAutoConfiguration"
16 = "org.springframework.boot.autoconfigure.web.servlet.ServletWebServerFactoryAutoConfiguration"
17 = "org.springframework.boot.autoconfigure.web.servlet.error.ErrorMvcAutoConfiguration"
18 = "org.springframework.boot.autoconfigure.web.servlet.HttpEncodingAutoConfiguration"
19 = "org.springframework.boot.autoconfigure.web.servlet.MultipartAutoConfiguration"
20 = "org.springframework.boot.autoconfigure.web.servlet.WebMvcAutoConfiguration"
21 = "org.springframework.boot.autoconfigure.websocket.servlet.WebSocketServletAutoConfiguration"
有了自动配置类,免去手动编写注入功能组件 如何配置?
方法跟踪 getAutoConfigurationEntry()?
    @Override
    	public String[] selectImports(AnnotationMetadata annotationMetadata) {
    		//··········
    		AutoConfigurationEntry autoConfigurationEntry = getAutoConfigurationEntry(
    				autoConfigurationMetadata, annotationMetadata);
            //~~~~~~~~~~~~
    	}
中有以下代码:?
loadFactoryNames(EnableAutoConfiguration.class,this.beanClassLoader)

    List<String> configurations = SpringFactoriesLoader.loadFactoryNames(
    				getSpringFactoriesLoaderFactoryClass(), getBeanClassLoader());
中有两个参数:?
    //1.EnableAutoConfiguration.class
    protected Class<?> getSpringFactoriesLoaderFactoryClass() {
    		return EnableAutoConfiguration.class;
    }
    //2.类加载器 this.beanClassLoader
    protected ClassLoader getBeanClassLoader() {
    		return this.beanClassLoader;
    }
下面看一下loadFactoryNames()方法
public static List<String> loadFactoryNames(Class<?> factoryClass, @Nullable ClassLoader classLoader) {
    String factoryClassName = factoryClass.getName();
return loadSpringFactories(classLoader).getOrDefault(factoryClassName, Collections.emptyList());
}
?
/**
loadSpringFactories方法
*/
	private static Map<String, List<String>> loadSpringFactories(@Nullable ClassLoader classLoader) {
		MultiValueMap<String, String> result = cache.get(classLoader);
		if (result != null) {
			return result;
		}

		try {
			Enumeration<URL> urls = (classLoader != null ?
					classLoader.getResources(FACTORIES_RESOURCE_LOCATION) :
					ClassLoader.getSystemResources(FACTORIES_RESOURCE_LOCATION));
            //````省略后续代码
//打开FACTORIES_RESOURCE_LOCATION
public static final String FACTORIES_RESOURCE_LOCATION = "META-INF/spring.factories";
/**根据路径找到spring.factories文件
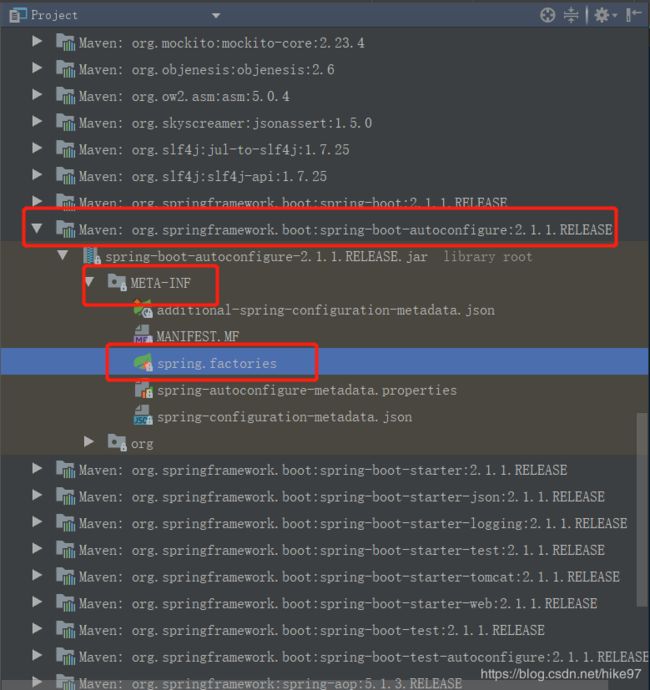
综上所述:springboot 在启动的时候从类路径下的META-INF/spring.factories中获取
EnableAutoConfiguration指定的值并作为自动配置类导入容器中,进行自动配置工作。
例如:WebMvcAutoConfiguration中的一些配置:?
package org.springframework.boot.autoconfigure.web.servlet;
//rest风格中的方法过滤器
@Bean
@ConditionalOnMissingBean(HiddenHttpMethodFilter.class)
@ConditionalOnProperty(prefix = "spring.mvc.hiddenmethod.filter", name = "enabled", matchIfMissing = true)
public OrderedHiddenHttpMethodFilter hiddenHttpMethodFilter() {
    return new OrderedHiddenHttpMethodFilter();
}
//视图解析器
@Bean
@ConditionalOnBean(ViewResolver.class)
@ConditionalOnMissingBean(name = "viewResolver", value = ContentNegotiatingViewResolver.class)
public ContentNegotiatingViewResolver viewResolver(BeanFactory beanFactory) {
			ContentNegotiatingViewResolver resolver = new ContentNegotiatingViewResolver();
			resolver.setContentNegotiationManager(
					beanFactory.getBean(ContentNegotiationManager.class));
			// ContentNegotiatingViewResolver uses all the other view resolvers to locate
			// a view so it should have a high precedence
			resolver.setOrder(Ordered.HIGHEST_PRECEDENCE);
			return resolver;
}
小结:三个注解
@SpringBootConfiguration 实际上是@configuration 实际上是一个component-->配置类
@EnableAutoConfiguration
	@AutoConfigurationPackage() ?@Import(AutoConfigurationPackages.Registrar.class)-->定位配置包,加载用户写的组件

    @Import(AutoConfigurationImportSelector.class)-->自动装配默认组件
javaEE 整体整合解决方案和自动配置都在spring-boot-autoconfigure:X.X.XRELEASE中
二、springbootMVC自动配置及拓展原理
官方文档
https://docs.spring.io/spring-boot/docs/2.1.1.RELEASE/reference/htmlsingle/#boot-features-developing-web-applications
28.1.1 Spring MVC Auto-configuration
Spring Boot provides auto-configuration for Spring MVC that works well with most applications.
The auto-configuration adds the following features on top of Spring’s defaults:
- Inclusion of ContentNegotiatingViewResolver and BeanNameViewResolver beans.
- 自动配置了ViewResolver(视图解析器:根据方法的返回值得到视图对象(View),视图对象决定如何渲染(转发?重定向?))
 -     @Bean
       @ConditionalOnBean(ViewResolver.class)
       @ConditionalOnMissingBean(name = "viewResolver", value = ContentNegotiatingViewResolver.class)
       public ContentNegotiatingViewResolver viewResolver(BeanFactory beanFactory) {
       ContentNegotiatingViewResolver resolver = new ContentNegotiatingViewResolver();
       resolver.setContentNegotiationManager(					beanFactory.getBean(ContentNegotiationManager.class));
       resolver.setOrder(Ordered.HIGHEST_PRECEDENCE);
       return resolver
       }

       ?
-     //ContentNegotiatingViewResolver中的resolveViewName()方法
      @Override
      @Nullable
      public View resolveViewName(String viewName, Locale locale) throws Exception {
      		//~~~~~省略~~~~~~~
      		if (requestedMediaTypes != null) {
                  //第一步:获取备选视图对象
      			List<View> candidateViews = getCandidateViews(viewName, locale, requestedMediaTypes);
                  //第二步:选择最适合的视图对象
      			View bestView = getBestView(candidateViews, requestedMediaTypes, attrs);
      			if (bestView != null) {
      				return bestView;
      			}
      		}
      		//~~~~~省略~~~~~~~
      	}
      /*进入getCandidateViews()方法*/
-     /**
       *	作用:组合所有视图解析器 关键字this.viewResolver
       */
     private List<View> getCandidateViews(String viewName, Locale locale, List<MediaType> requestedMediaTypes)
     			throws Exception {
     		List<View> candidateViews = new ArrayList<>();
     		if (this.viewResolvers != null) {
     			for (ViewResolver viewResolver : this.viewResolvers) {
     				View view = viewResolver.resolveViewName(viewName, locale);
     				if (view != null) {
     					candidateViews.add(view);
     				}
     		/*~~~~~~~~~~~~~~~~~~~~~~~~~~~~~省略~~~~~~~~~~~~~~~~*/
     		return candidateViews;
     	}
  -     /**
          初始化方法,容器工厂类获取所有的视图解析器
        */
        @Override
        protected void initServletContext(ServletContext servletContext) {
        Collection<ViewResolver> matchingBeans =				BeanFactoryUtils.beansOfTypeIncludingAncestors(obtainApplicationContext(),ViewResolver.class).values();
         /*~~~~~~~~~~~~~~~~~~~~~~~~~~~~~省略~~~~~~~~~~~~~~~~*/
        }
- 如何定制:我们可以自己给容器中添加一个视图解析器
 -     /**在配置类下注入一个视图解析器*/
       @SpringBootApplication
       public class SpringbootLearnApplication {

       	public static void main(String[] args) {
       		SpringApplication.run(SpringbootLearnApplication.class, args);
       	}

       	@Bean
       	public ViewResolver myViewResolver(){
       		return new MyViewResolver ();
       	}

       	public static class MyViewResolver implements ViewResolver{

       		@Nullable
       		@Override
       		public View resolveViewName (String viewName, Locale locale) throws Exception {
       			return null;
       		}
       	}
       }
- 开启debug模式:位置:dispatcherServlet的doDispatch()方法

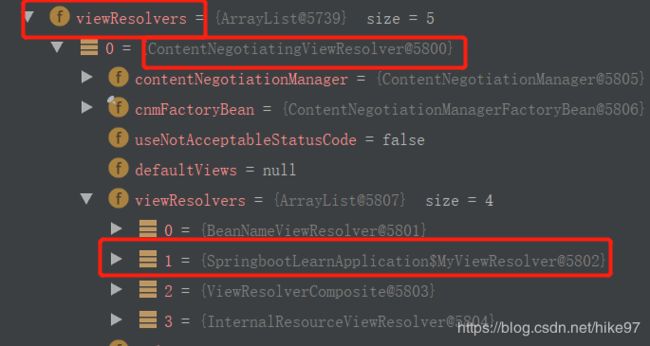
- 发现确实注入了自定义的视图解析器
- Support for serving static resources, including support for WebJars (covered later in this document)).
- 静态资源文件夹路径,webjars
- Automatic registration of Converter, GenericConverter, and Formatter beans.
- Converter➡转换器:将页面提交的文本转换成实体类的相关属性
- Formatter➡格式化器:2017/12/17===Date;
-
@Bean
    @Override
    public FormattingConversionService mvcConversionService() {
        WebConversionService conversionService = new WebConversionService(
            this.mvcProperties.getDateFormat());
        addFormatters(conversionService);
        return conversionService;
    }
    //自己添加的格式化转换器,我们只需放在容器中即可 ?


@Override
    public void addFormatters(FormatterRegistry registry) {
        for (Converter<?, ?> converter : getBeansOfType(Converter.class)) {
            registry.addConverter(converter);
        }
        for (GenericConverter converter : getBeansOfType(GenericConverter.class)) {
            registry.addConverter(converter);
        }
        for (Formatter<?> formatter : getBeansOfType(Formatter.class)) {
            registry.addFormatter(formatter);
        }
    }
- Support for HttpMessageConverters (covered later in this document).
- springmvc 用来转换Http请求和响应的;User-json
- messageConverters从容器中确定:获取所有的HttpMessageConverters`;
- 自己给容器中添加HttpMessageConverter,只需将自己的组件注册容器中
- (@Bean,@Component)
- Automatic registration of MessageCodesResolver (covered later in this document).
-
- @Override public MessageCodesResolver getMessageCodesResolver() { if (this.mvcProperties.getMessageCodesResolverFormat() != null) { DefaultMessageCodesResolver resolver = new DefaultMessageCodesResolver(); resolver.setMessageCodeFormatter( this.mvcProperties.getMessageCodesResolverFormat()); return resolver; } return null; } 进入getMessageCodesResolverFormat()方法? - public DefaultMessageCodesResolver.Format getMessageCodesResolverFormat() { return this.messageCodesResolverFormat; } 点击Format? - public enum Format implements MessageCodeFormatter { /** * Prefix the error code at the beginning of the generated message code. e.g.: * {@code errorCode + "." + object name + "." + field} */ PREFIX_ERROR_CODE { @Override public String format(String errorCode, @Nullable String objectName, @Nullable String field) { return toDelimitedString(errorCode, objectName, field); } }, /** * Postfix the error code at the end of the generated message code. e.g.: * {@code object name + "." + field + "." + errorCode} */ POSTFIX_ERROR_CODE { @Override public String format(String errorCode, @Nullable String objectName, @Nullable String field) { return toDelimitedString(objectName, field, errorCode); } }; - 可见MessageCodesResolver用于生成错误代码生成规则的 - Static index.html support. 静态首页访问
- Custom Favicon support (covered later in this document).
- Automatic use of a ConfigurableWebBindingInitializer bean (covered later in this document).
       protected ConfigurableWebBindingInitializer getConfigurableWebBindingInitializer() {
           try {
               //由此代码可见:我们可以配置一个ConfigurableWebBindingInitializer来替换默认的;
               return           this.beanFactory.getBean(ConfigurableWebBindingInitializer.class);
           }
           catch (NoSuchBeanDefinitionException ex) {
               //如果找不到会调用父类方法?
               return super.getConfigurableWebBindingInitializer();
           }
       }
 -     /**
       	 * Return the {@link ConfigurableWebBindingInitializer} to use for
       	 * initializing all {@link WebDataBinder} instances.
       	 初始化web绑定数据的实例
       	 */
       protected ConfigurableWebBindingInitializer getConfigurableWebBindingInitializer() {
           ConfigurableWebBindingInitializer initializer = new ConfigurableWebBindingInitializer();
           initializer.setConversionService(mvcConversionService());
           initializer.setValidator(mvcValidator());
           MessageCodesResolver messageCodesResolver = getMessageCodesResolver();
           if (messageCodesResolver != null) {
               initializer.setMessageCodesResolver(messageCodesResolver);
           }
           return initializer;
       }
- webDataBinder的作用:请求数据转换为javaBean;
If you want to keep Spring Boot MVC features and you want to add additional MVC configuration (interceptors, formatters, view controllers, and other features), you can add your own @Configuration class of type WebMvcConfigurer but without @EnableWebMvc.
If you wish to provide custom instances of RequestMappingHandlerMapping, RequestMappingHandlerAdapter, or ExceptionHandlerExceptionResolver, you can declare a WebMvcRegistrationsAdapter instance to provide such components.
If you want to take complete control of Spring MVC, you can add your own @Configuration annotated with @EnableWebMvc.
拓展springmvc:既保留了原来的配置 也用于我们拓展的配置
 @Configuration
 public class MyMvcConfig implements WebMvcConfigurer {

     @Override
     public void addViewControllers (ViewControllerRegistry registry) {
         registry.addViewController ("/hello").setViewName ("success");

     }
 }
原理:为什么能拓展?
1)、WebMvcAutoConfiguration是SpringMVC的自动配置类
    /**
    	该类中有一个静态类WebMvcAutoConfigurationAdapter
    	--注意与WebMvcConfigurerAdapter(2.X已经废弃)的区别
    	此类也是实现了webMVcConfiger,进行了webmvc方法的自动装配,
    	这不是重点,我们来查看Import的类:EnableWebMvcConfiguration.class
    */
    @Configuration
    @Import(EnableWebMvcConfiguration.class)
    @EnableConfigurationProperties({ WebMvcProperties.class, ResourceProperties.class })
    @Order(0)
    public static class WebMvcAutoConfigurationAdapter
        implements WebMvcConfigurer, ResourceLoaderAware {
    /*继承了DelegatingWebMvcConfiguration*/
    @Configuration
    public static class EnableWebMvcConfiguration extends DelegatingWebMvcConfiguration {
    ?

    //该类中有如下方法:
    //Autowired标注在方法上就意味着:从容器中获取所有的WebMvcConfigurer
    private final WebMvcConfigurerComposite configurers = new WebMvcConfigurerComposite();
    @Autowired(required = false)
    public void setConfigurers(List<WebMvcConfigurer> configurers) {
        if (!CollectionUtils.isEmpty(configurers)) {
            //赋值到configures中
            this.configurers.addWebMvcConfigurers(configurers);
        }
    }
    // 点进 (configurers)类

    class WebMvcConfigurerComposite implements WebMvcConfigurer {
    private final List<WebMvcConfigurer> delegates = new ArrayList<>();
        //一个参考实现;将所有的WebMvcConfigurer相关配置都来一起调用;
        @Override
        public void addViewControllers(ViewControllerRegistry registry) {
            for (WebMvcConfigurer delegate : this.delegates) {
                delegate.addViewControllers(registry);
            }
        }
        3)、容器中所有的WebMvcConfigurer都会一起起作用;
        4)、我们的配置类也会被调用;
        效果:SpringMVC的自动配置和我们的扩展配置都会起作用;
3、全面接管SpringMVC;
SpringBoot对SpringMVC的自动配置不需要了,所有都是我们自己配置;所有的SpringMVC的自动配置都失效了
我们需要在配置类中添加@EnableWebMvc即可;
为什么全面接管,自动配置会失效?
    @Import(DelegatingWebMvcConfiguration.class)
    public @interface EnableWebMvc {
    }

    @Configuration
    public class DelegatingWebMvcConfiguration extends WebMvcConfigurationSupport {


    @Configuration
    @ConditionalOnWebApplication(type = Type.SERVLET)
    @ConditionalOnClass({ Servlet.class, DispatcherServlet.class, WebMvcConfigurer.class })
    //容器中没有这个组件的时候,这个自动配置类才生效
    //配置了EnableWebMvc会导入 DelegatingWebMvcConfiguration 他是属于【WebMvcConfigurationSupport.class】范畴的 所以自动配置失效
    @ConditionalOnMissingBean(WebMvcConfigurationSupport.class)
    @AutoConfigureOrder(Ordered.HIGHEST_PRECEDENCE + 10)
    @AutoConfigureAfter({ DispatcherServletAutoConfiguration.class,
    		TaskExecutionAutoConfiguration.class, ValidationAutoConfiguration.class })
    public class WebMvcAutoConfiguration {
综上所述,@EnableWebMvc将WebMvcConfigurationSupport组件导入进来,导入的WebMvcConfigurationSupport只是SpringMVC最基本的功能;
三、如何修改SpringBoot的默认配置模式:
	1)、SpringBoot在自动配置很多组件的时候,先看容器中有没有用户自己配置的(@Bean @Component)如果有就用用户配置的,如果没有,才自动配置;如果有些组件可以有多个(ViewResolver)将用户配置的和自己默认的组合起来;
	2)、在SpringBoot中会有非常多的xxxConfigurer帮助我们进行扩展配置
	3)、在SpringBoot中会有很多的xxxCustomizer帮助我们进行定制配置)
四、springboot的启动运行流程
Ⅰ.启动流程:DEBUG–SpringApplication.run方法


1、创建springApplication对象
//run方法 执行了SpringApplication()的有参构造对象的run方法方法跟踪如下:
    public SpringApplication(Class<?>... primarySources) {
        this(null, primarySources);
    }
public SpringApplication(ResourceLoader resourceLoader, Class<?>... primarySources) {
this.resourceLoader = resourceLoader;
Assert.notNull(primarySources, "PrimarySources must not be null");
//1.先将主配置类中添加到primarySource中
this.primarySources = new LinkedHashSet<>(Arrays.asList(primarySources));
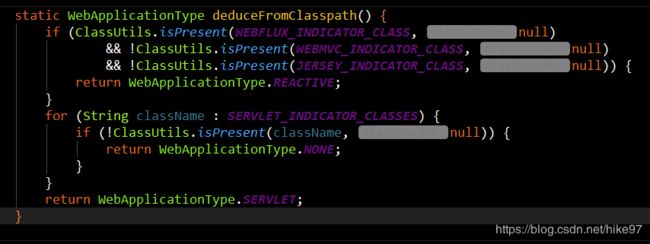
//2.决定web应用环境 因为springboot 2.X 加入了react编程
this.webApplicationType = WebApplicationType.deduceFromClasspath();
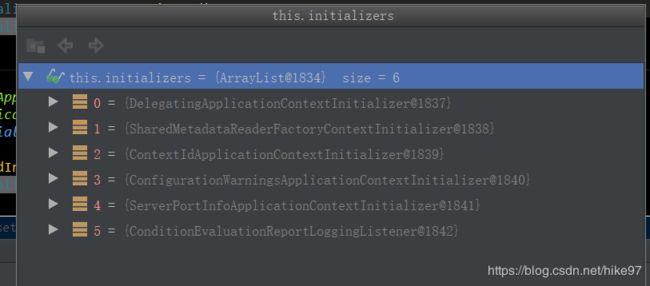
//3.从类路径下找到META‐INF/spring.factories配置的所有ApplicationContextInitializer;然后保存起来
setInitializers((Collection) getSpringFactoriesInstances(
ApplicationContextInitializer.class));
//4.从类路径下找到META‐INF/spring.factories配置的所有ApplicationListener;然后保存起来
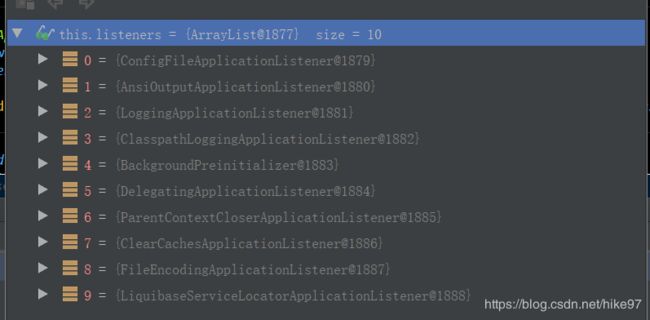
setListeners((Collection) getSpringFactoriesInstances(ApplicationListener.class));
//5.从多个配置类中找到有main方法的主配置类
this.mainApplicationClass = deduceMainApplicationClass();
}
、、、、、、、、、、、、、、、、、代码如下、、、、、、、、、、、、、、、、、、、、、、、、、、、、、、、
private Class<?> deduceMainApplicationClass() {
try {
StackTraceElement[] stackTrace = new RuntimeException().getStackTrace();
for (StackTraceElement stackTraceElement : stackTrace) {
if ("main".equals(stackTraceElement.getMethodName())) {
return Class.forName(stackTraceElement.getClassName());
}
}
}
catch (ClassNotFoundException ex) {
// Swallow and continue
}
return null;
}
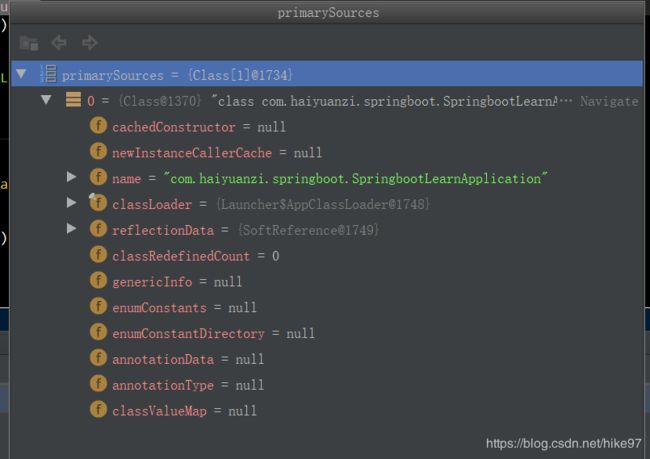
1️⃣。primarysource截图
2️⃣。webApplicationType
3️⃣。this.initiallizers
4️⃣。this.listener
2、运行run方法
一:环境准备
二:创建IOC容器
几个重要的事件回调机制
配置在META-INF/spring.factories
ApplicationContextInitializer
SpringApplicationRunListener
只需要放在ioc容器中
ApplicationRunner
CommandLineRunner
     public ConfigurableApplicationContext run(String... args) {
            //1.开启停止的监听
            StopWatch stopWatch = new StopWatch();
            stopWatch.start();
            //2.声明ioc容器
            ConfigurableApplicationContext context = null;
            Collection<SpringBootExceptionReporter> exceptionReporters = new ArrayList<>();
            //3.awt相关配置
            configureHeadlessProperty();
            //4.获取SpringApplicationRunListener;从类路径下META‐INF/spring.factories(见详细分析)
           SpringApplicationRunListeners listeners = getRunListeners(args);
            //5.回调所有的获取SpringApplicationRunListener.starting()方法
            listeners.starting();
详细分析一:获取SpringApplicationRunListener。
    private SpringApplicationRunListeners getRunListeners(String[] args) {
        Class<?>[] types = new Class<?>[] { SpringApplication.class, String[].class };
        return new SpringApplicationRunListeners(logger, getSpringFactoriesInstances(
            SpringApplicationRunListener.class, types, this, args));
    }
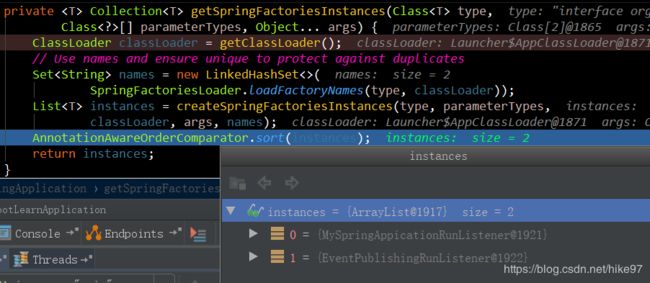
如上图,通过反射机制获取到EventPublishingRunListener的实例(MySpringApplicationRunListner为本人编写 ,可忽略)
然后调用listeners.run()方法
循环遍历listener的starting()方法
try {
//6.封装命令行参数
ApplicationArguments applicationArguments = new DefaultApplicationArguments(
args);
//7.准备环境
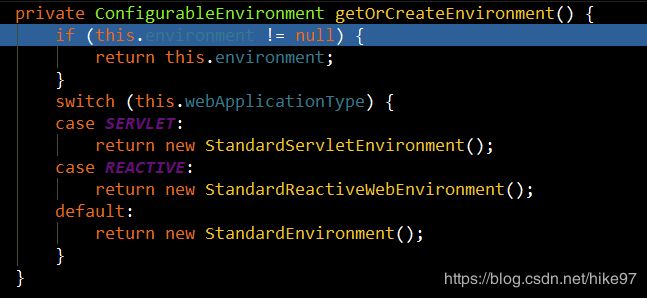
ConfigurableEnvironment environment = prepareEnvironment(listeners,
applicationArguments);
–prepareEnvirenment()方法
    private ConfigurableEnvironment prepareEnvironment(
    			SpringApplicationRunListeners listeners,
    			ApplicationArguments applicationArguments) {
    		// Create and configure the environment
    		ConfigurableEnvironment environment = getOrCreateEnvironment();//SERVLET REACT
    		//配置这些环境
        	configureEnvironment(environment, applicationArguments.getSourceArgs());
        	//7.1 创建环境完成后回调SpringApplicationRunListener.environmentPrepared();表示环境准备完成
    		listeners.environmentPrepared(environment);
        	//2.X多的方法
    		bindToSpringApplication(environment);
        	//1.5.6为isWebEnvironment 可能由于加入react的原因
    		if (!this.isCustomEnvironment) {
    			environment = new EnvironmentConverter(getClassLoader())
    					.convertEnvironmentIfNecessary(environment, deduceEnvironmentClass());
    		}
    		ConfigurationPropertySources.attach(environment);
    		return environment;
    	}

    		//2.0新增
    		configureIgnoreBeanInfo(environment);
            //8.打印springBoot的图标
            Banner printedBanner = printBanner(environment);
            //9.创建applicationContext上下文;
            context = createApplicationContext();

     //10.异常报告
            exceptionReporters = getSpringFactoriesInstances(
                SpringBootExceptionReporter.class,
                new Class[] { ConfigurableApplicationContext.class }, context);
            //11.准备上下文环境;
                //11.1 将environment保存到ioc中;而且applyInitializers();
                //11.2 applyInitializers():回调之前保存的所有的ApplicationContextInitializer的initialize方法
                //11.3 回调所有的SpringApplicationRunListener的contextPrepared();
            prepareContext(context, environment, listeners, applicationArguments,
                           printedBanner);
            	//11.4 prepareContext运行完成以后回调所有的SpringApplicationRunListener的contextLoaded();
–prepareContext()方法 ?
    private void prepareContext(ConfigurableApplicationContext context,
                                ConfigurableEnvironment environment, SpringApplicationRunListeners listeners,
                                ApplicationArguments applicationArguments, Banner printedBanner) {
        //保存之前准备的环境
        context.setEnvironment(environment);
        //ioc容器后置处理 注册小组件
        postProcessApplicationContext(context);
        applyInitializers(context);
        //applyInitializers方法执行完,监听器调用contextPrepared方法(),和之前的start() prepreparedEnvironment()一样循环调用
        listeners.contextPrepared(context);
        if (this.logStartupInfo) {
            logStartupInfo(context.getParent() == null);
            logStartupProfileInfo(context);
        }
        // Add boot specific singleton beans
        ConfigurableListableBeanFactory beanFactory = context.getBeanFactory();
        //注册命令行主类
        beanFactory.registerSingleton("springApplicationArguments", applicationArguments);
        if (printedBanner != null) {
            //banner注册
            beanFactory.registerSingleton("springBootBanner", printedBanner);
        }
        if (beanFactory instanceof DefaultListableBeanFactory) {
            ((DefaultListableBeanFactory) beanFactory)
            .setAllowBeanDefinitionOverriding(this.allowBeanDefinitionOverriding);
        }
        // Load the sources
        //获取所有资源
        Set<Object> sources = getAllSources();
        Assert.notEmpty(sources, "Sources must not be empty");
        load(context, sources.toArray(new Object[0]));
        //paredContext方法,进行完毕 调用listener的contextLoaded()方法
        listeners.contextLoaded(context);
    }
–applyInitializers()方法 将之前初始化的springApplicatio对象中的initializers进行循环遍历回调initialize()方法
     //12.刷新容器;ioc容器初始化(如果是web应用还会创建嵌入式的Tomcat);Spring注解版
            	//扫描,创建,加载所有组件的地方;
            refreshContext(context);
            ?
–refresh()方法 ioc容器初始化
    @Override
    public void refresh() throws BeansException, IllegalStateException {
        synchronized (this.startupShutdownMonitor) {
            // Prepare this context for refreshing.
            prepareRefresh();

            // Tell the subclass to refresh the internal bean factory.
            ConfigurableListableBeanFactory beanFactory = obtainFreshBeanFactory();

            // Prepare the bean factory for use in this context.
            prepareBeanFactory(beanFactory);

            try {
                // Allows post-processing of the bean factory in context subclasses.
                postProcessBeanFactory(beanFactory);

                // Invoke factory processors registered as beans in the context.
                invokeBeanFactoryPostProcessors(beanFactory);

                // Register bean processors that intercept bean creation.
                registerBeanPostProcessors(beanFactory);

                // Initialize message source for this context.
                initMessageSource();

                // Initialize event multicaster for this context.
                initApplicationEventMulticaster();

                // Initialize other special beans in specific context subclasses.
                onRefresh();

                // Check for listener beans and register them.
                registerListeners();

                // Instantiate all remaining (non-lazy-init) singletons.
                //初始化单实例bean
                finishBeanFactoryInitialization(beanFactory);

                // Last step: publish corresponding event.
                finishRefresh();
            }

            catch (BeansException ex) {
                if (logger.isWarnEnabled()) {
                    logger.warn("Exception encountered during context initialization - " +
                                "cancelling refresh attempt: " + ex);
                }

                // Destroy already created singletons to avoid dangling resources.
                destroyBeans();

                // Reset 'active' flag.
                cancelRefresh(ex);

                // Propagate exception to caller.
                throw ex;
            }

            finally {
                // Reset common introspection caches in Spring's core, since we
                // might not ever need metadata for singleton beans anymore...
                resetCommonCaches();
            }
        }
    }


    		//13.从ioc容器中获取所有的ApplicationRunner和CommandLineRunner进行回调
            //14.ApplicationRunner先回调,CommandLineRunner再回调(1.5.9源码)
    /*
     *2.X版本改变了已经:在后边回调
     */
            afterRefresh(context, applicationArguments);


    		 stopWatch.stop();
            if (this.logStartupInfo) {
                new StartupInfoLogger(this.mainApplicationClass)
                    .logStarted(getApplicationLog(), stopWatch);
            }
    		//finish(1.5.9) 改为started()
            listeners.started(context);
    		//回调 ApplicationRunner先回调,CommandLineRunner再回调
            callRunners(context, applicationArguments);
        }
        catch (Throwable ex) {
            handleRunFailure(context, ex, exceptionReporters, listeners);
            throw new IllegalStateException(ex);
        }

        ?
–callRunners()方法
    private void callRunners(ApplicationContext context, ApplicationArguments args) {
    		List<Object> runners = new ArrayList<>();
    		runners.addAll(context.getBeansOfType(ApplicationRunner.class).values());
    		runners.addAll(context.getBeansOfType(CommandLineRunner.class).values());
    		AnnotationAwareOrderComparator.sort(runners);
    		for (Object runner : new LinkedHashSet<>(runners)) {
    			if (runner instanceof ApplicationRunner) {
    				callRunner((ApplicationRunner) runner, args);
    			}
    			if (runner instanceof CommandLineRunner) {
    				callRunner((CommandLineRunner) runner, args);
    			}
    		}
    	}
    try {
            //springboot 2.x 多了一个回调listeners的running()方法
            listeners.running(context);
        }
        catch (Throwable ex) {
            handleRunFailure(context, ex, exceptionReporters, null);
            throw new IllegalStateException(ex);
        }
        //所有的listeners回调完毕
        //15.整个SpringBoot应用启动完成以后返回启动的ioc容器;
        return context;
    }
五、自定义starter
自定义starter的一些问题:
1、这个场景需要使用到的依赖是什么?

2、如何编写自动配置
@Configuration //指定这个类是一个配置类
@ConditionalOnXXX //在指定条件成立的情况下自动配置类生效
@AutoConfigureAfter //指定自动配置类的顺序
@Bean //给容器中添加组件
@ConfigurationPropertie结合相关xxxProperties类来绑定相关的配置
@EnableConfigurationProperties //让xxxProperties生效加入到容器中
自动配置类要能加载
将需要启动就加载的自动配置类,配置在META‐INF/spring.factories
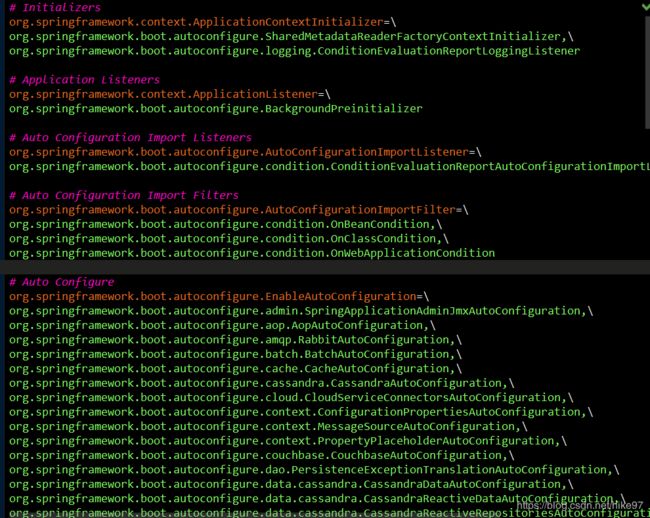
org.springframework.boot.autoconfigure.EnableAutoConfiguration=\
org.springframework.boot.autoconfigure.admin.SpringApplicationAdminJmxAutoConfiguration,\
org.springframework.boot.autoconfigure.aop.AopAutoConfiguration,\
3、模式:
启动器只用来做依赖导入;
专门来写一个自动配置模块;
启动器依赖自动配置;别人只需要引入启动器(starter)
mybatis-spring-boot-starter;自定义启动器名-spring-boot-starter
4.步骤
4.1创建starter(普通maven工程)
pom.xml
    <project xmlns="http://maven.apache.org/POM/4.0.0"
             xmlns:xsi="http://www.w3.org/2001/XMLSchema-instance"
             xsi:schemaLocation="http://maven.apache.org/POM/4.0.0 			http://maven.apache.org/xsd/maven-4.0.0.xsd">
        <modelVersion>4.0.0modelVersion>

        <groupId>com.atguigu.startergroupId>
        <artifactId>atguigu-spring-boot-starterartifactId>
        <version>1.0-SNAPSHOTversion>

        <dependencies>

            <dependency>
                <groupId>com.atguigu.startergroupId>
                <artifactId>atguigu-spring-boot-autoconfigurerartifactId>
                <version>0.0.1-SNAPSHOTversion>
            dependency>
        dependencies>
    project>
4.2创建spring-boot基础工程 --atguigu-spring-boot-autoconfigurer
pom.xml
    <project xmlns="http://maven.apache.org/POM/4.0.0" xmlns:xsi="http://www.w3.org/2001/XMLSchema-instance"
    	xsi:schemaLocation="http://maven.apache.org/POM/4.0.0 http://maven.apache.org/xsd/maven-4.0.0.xsd">
    	<modelVersion>4.0.0modelVersion>
    	<parent>
    		<groupId>org.springframework.bootgroupId>
    		<artifactId>spring-boot-starter-parentartifactId>
    		<version>2.1.1.RELEASEversion>
    		<relativePath/>
    	parent>
    	<groupId>com.atguigu.startergroupId>
    	<artifactId>atguigu-spring-boot-autoconfigurerartifactId>
    	<version>0.0.1-SNAPSHOTversion>
    	<name>atguigu-spring-boot-autoconfigurername>
    	<description>Demo project for Spring Bootdescription>

    	<properties>
    		<java.version>1.8java.version>
    	properties>

    	<dependencies>

    		<dependency>
    			<groupId>org.springframework.bootgroupId>
    			<artifactId>spring-boot-starterartifactId>
    		dependency>

    		<dependency>
    			<groupId>org.projectlombokgroupId>
    			<artifactId>lombokartifactId>
    		dependency>
    	dependencies>
    project>
4.3 创建 helloService 组件 引入了helloProperties
   package com.atguigu.starter;

    import lombok.Data;

    /**
     * @author hike97 許せ サスケ これで最後だ
     * @create 2019-01-02 16:25
     * @desc
     **/
    @Data
    public class HelloService {

        private HelloProperties properties;

        public String sayHello(String msg){

            return properties.getPrefix ()+":"+msg+":"+properties.getSuffix ();
        }
    }
    ?
    package com.atguigu.starter;

    import lombok.Data;
    import org.springframework.boot.context.properties.ConfigurationProperties;

    /**
     * @author hike97 許せ サスケ これで最後だ
     * @create 2019-01-02 16:26
     * @desc
     **/
    @ConfigurationProperties(prefix = "spring.hello")
    @Data
    public class HelloProperties {

    	private String prefix;

    	private String suffix;


    }
4.4创建自动装配类HelloServiceAutoConfiguration
    package com.atguigu.starter;

    import org.springframework.beans.factory.annotation.Autowired;
    import org.springframework.boot.autoconfigure.condition.ConditionalOnWebApplication;
    import org.springframework.boot.context.properties.EnableConfigurationProperties;
    import org.springframework.context.annotation.Bean;
    import org.springframework.context.annotation.Configuration;

    /**
     * @author hike97 許せ サスケ これで最後だ
     * @create 2019-01-02 16:36
     * @desc
     **/
    @Configuration
    @ConditionalOnWebApplication//web环境下有效
    @EnableConfigurationProperties(HelloProperties.class)
    public class HelloServiceAutoConfiguration {

    	@Autowired
    	HelloProperties helloProperties;

    	@Bean
    	public HelloService helloService(){
    		HelloService service = new HelloService ();
    		service.setProperties (helloProperties);
    		return service;
    	}
    }
META-INF/spring.factories
# Auto Configure
org.springframework.boot.autoconfigure.EnableAutoConfiguration=\
com.atguigu.starter.HelloServiceAutoConfiguration
maven操作:打包autoconfigures 打包starters
应用:在springboot web 项目中添加自定义starters 依赖
    com.atguigu.starter
    atguigu-spring-boot-starter
    1.0-SNAPSHOT
在控制层 引入 service
package com.haiyuanzi.springboot.controller;
import com.atguigu.starter.HelloService;
import org.springframework.beans.factory.annotation.Autowired;
import org.springframework.web.bind.annotation.GetMapping;
import org.springframework.web.bind.annotation.RestController;
/**
* @author hike97 許せ サスケ これで最後だ
* @create 2019-01-02 16:46
* @desc
**/
@RestController
public class TestStartController {
@Autowired
HelloService helloService;
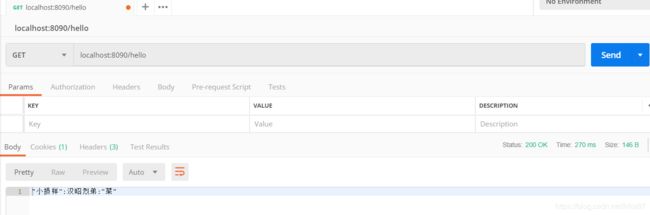
@GetMapping(value = "/hello" ,produces="text/plain;charset=UTF-8")
public String sayHello(){
return helloService.sayHello ("汉昭烈弟");
}
}
在配置文件中引用properties
server.port=8090
spring.hello.prefix="小损样"
spring.hello.suffix="菜"
效果如下