Rendermonkey 软件实现模型描边效果
对选中物品的高亮描边效果,利用rendermonkey软件实现模拟,主要部分即是:获取法线放大后的模型,单色填充,并渲染到target; 然后对该target进行模糊处理。具体重要的几个步骤如下:
1.右键新建一个Directx effect,选择一个model
2.双击 Steam Mapping,在编辑框中初始化需要传递的变量,这些信息会被导入到Vertex Shader 的输入寄存器
3.编写法线放大程序
shader书写阶段分为Vertex-shader Stage, Geometry-shader Stage,Pix-shader Stage:
Vertex-Shader Stage 处理 input传进来的顶点,比如皮肤处理,坐标转换,形状变化,以及逐个顶点光照等。每个vertex shader 都要最少有一个输入和一个输出。
Geometry-Shader Stage: 不同于Vertex Shader仅对单个顶点处理,Geometry shader 输入全部的顶点
Pixel-shader Stage: 可以逐像素照亮和后期处理,结合常量,纹理数据,等数据生成输出。输出为颜色,深度信息等,但是不可输出模板信息
首先需要定义一个 float4X4 view_proj_matix, 作为后面变换需要。然后定义一个变量,作为法线放大参数;
struct VS_OUTPUT 结构,用于传递到 pixel shader的信息。
可得到如下的vertex shader 程序
float4x4 view_proj_matrix;
float   flBiggerFactor;

struct VS_OUTPUT
{
   float4 Position : POSITION0;
};

VS_OUTPUT vs_main(float3 Position:POSITION0, float3 normal:NORMAL0)
{
   VS_OUTPUT Out = (VS_OUTPUT) 0;
   // turn bigger
   float3 pos = Position + normal * flBiggerFactor;
   //transform matrix
   Out.Position = mul(float4(pos, 1), view_proj_matrix);

   return Out ;
}
4.因为需要把法线放大部分渲染到纹理,在工程中需要添加renderable texture,如下所示
5.写模糊pass
vertex shader 部分,同理用mul运算作下 position 的变换,很简单。
VS_OUTPUT vs_main(float4 Pos: POSITION)
{
   VS_OUTPUT Out;

   // this is half a pixel with and height because
   // the screen-aligned quad has a width and height of 2
   float2 halfPixelSize = 0.5 * float2( viewport_inv_width, viewport_inv_height);

   // Clean up inaccuracies
   Out.Pos = float4(Pos.xy, 0, 1);

   Out.texCoord = float2(0.5f, 0.5f) + float2(0.5f, -0.5f) * Pos.xy;

   return Out;
}
接下来,用高斯模糊box,对刚才渲染纹理进行模糊
const float4 samples[9] = {
-3.0, -3.0, 0, 1.0/16.0,
-3.0, 3.0, 0, 1.0/16.0,
3.0, -3.0, 0, 1.0/16.0,
3.0, 3.0, 0, 1.0/16.0,
-3.0, 0.0, 0, 2.0/16.0,
3.0, 0.0, 0, 2.0/16.0,
0.0, -3.0, 0, 2.0/16.0,
0.0, 2.0, 0, 2.0/16.0,
0.0, 0.0, 0, 4.0/16.0
};
float4 ps_main(float2 texcoord: TEXCOORD0) : COLOR
{
   //return float4(1,0,1,1);
   float4 col = float4(0,0,0,0);
   //Sample and output the averaged colors
    for(int i=0;i<9;i++)
     col += samples[i].w * tex2D(sceneTex,texcoord+
        float2(samples[i].x * viewport_inv_width,samples[i].y * viewport_inv_height));
    return col;

   //return tex2D(Texture0Map,texcoord);
}
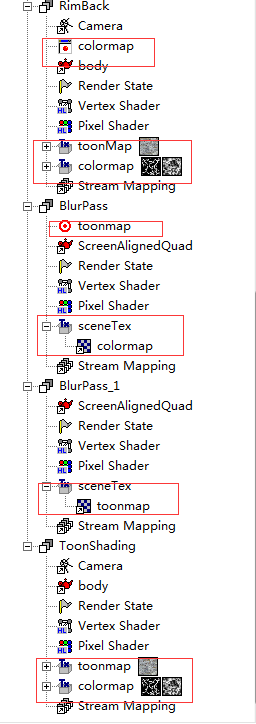
该部分要注意几个 render的设置如下, Blur Pass 中吧 前一个target colormap 作为输入,输出到 toonmap,blurPass——1 就把toonmap 再做模糊

6.最后一个贴图pass
vertex shader 主要做工作是计算位置,纹理,法线等,和第一个pass一样,需要设置摄像机。
struct VS_OUTPUT
{
   float4 Position : POSITION0;
   float2 Texcoord:TEXCOORD0;
   float3 normal:TEXCOORD1;
   float2 Texcoord1:TEXCOORD2;

};

VS_OUTPUT vs_main(VS_INPUT Input,float2 Texcoord:TEXCOORD0,float3 normal:NORMAL0)
{
   VS_OUTPUT Out = (VS_OUTPUT)0;
   //tiny little model  give it some size and center it better
   Out.Position = mul(Input.Position, view_proj_matrix);

   Out.Texcoord = Texcoord;
   Out.normal = normal;

   float3 PosW = mul(Input.Position, view_matrix);
   float3 normalV = mul(normal, (float3x3)view_matrix);

   float diffuse = max(0,dot(-lightDir,normalV));
   Out.Texcoord1.x = diffuse;
   Out.Texcoord1.y = 0.0f;
   //Output.Position = mul( Input.Position, matViewProjection );

   return( Out );


}
最后截个效果图
另外提一下,在C++中调用pass 的过程,设置shader文件中参数,设置渲染状态,设置纹理,之后就是设置technique,beginpass,drawRangeIndexPrimitive,endpass了,代码大致如下所示
        postEffect->setFloat("rimback_biggerFactor", rimback_biggerFactor);
            postEffect->setVector4("edgeColor", (Vector4*)(&Stagescenerender->highLights(colorID).color));

            //postEffect->setupAutoParameters(renderable);

            //set texture
            if(appear.material[eMaterial_0].numTextureUnit)
                appear.material[eMaterial_0].setTextureUnit(pRenderSys,0);
            else
                pRenderSys->setTexture(0, 0);

            pRenderSys->setTexture(1, (ITexture*)pRenderSys->getRenderTargetTexture(blurRTT1));

            uint iPass;
            postEffect->setTechnique("FinalBlend");
            postEffect->begin(&iPass);
            postEffect->beginPass(0);
            pRenderSys->drawRangeIndexedPrimitive(PT_TRIANGLES, geo.indexBuffer->getType(),geo.indexStart,geo.indexCount,geo.vertexStart,geo.vertexEnd);
            postEffect->endPass();
            postEffect->end();
            appear.geometry.resetStream(pRenderSys);
project download:
https://github.com/codeAPmind/normal-bigger
Refference:
《shaders for game programs and artists》


