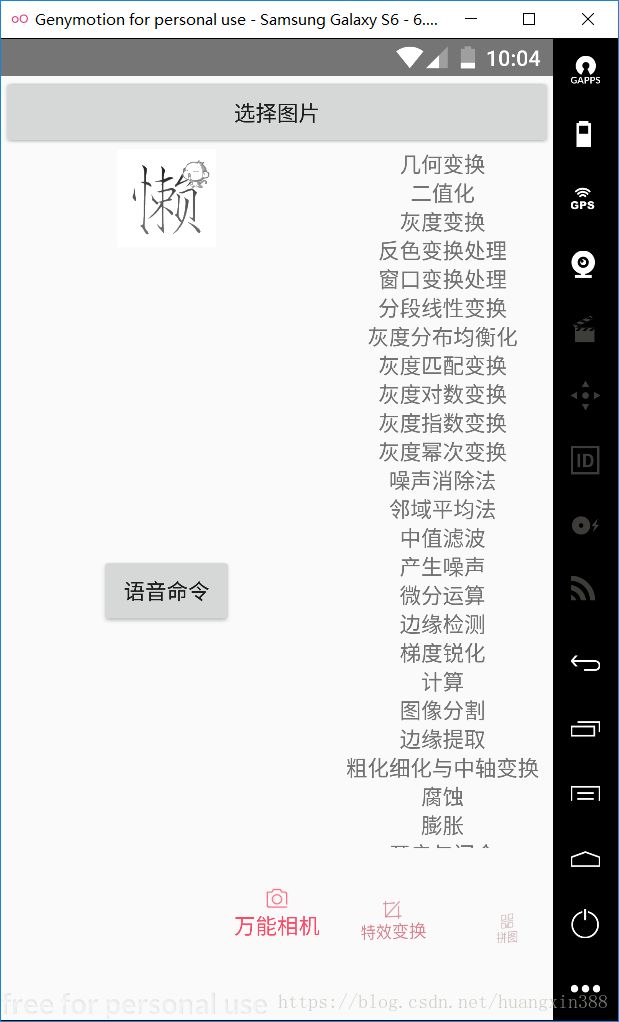
Android数字图像处理之灰度变换
一、窗口灰度变换
当图像中大部分像素的灰度级在[L,U]范围内,少部分像素分布在小于L和大于U的区间内时,可用两端“截取式”的变换使小于灰度级L和大于等于灰度级U的像素强行压缩为0和255,如下图所示。尽管将会造成一小部分信息丢失,不过有时为了某种应用,做这种“牺牲”是值得的,如利用遥感在气象资料中分析降水时,在预处理中去掉非气象信息,既可减少运算量,又可提高分析精度,这种变换叫灰度的窗口变换。灰度的窗口变换也是一种常见的点运算,它的操作和阈值变换相类似。从实现方法上看作是灰度折现变换的特例。它限定一个窗口范围,在窗口中的灰度值保持不变;小于窗口下限的灰度值直接设置为0;大于该窗口上限的灰度值直接设置为255。窗口灰度变换处理结合了双固定阈值法,与其不同之处在于窗口内的灰度值保持不变。
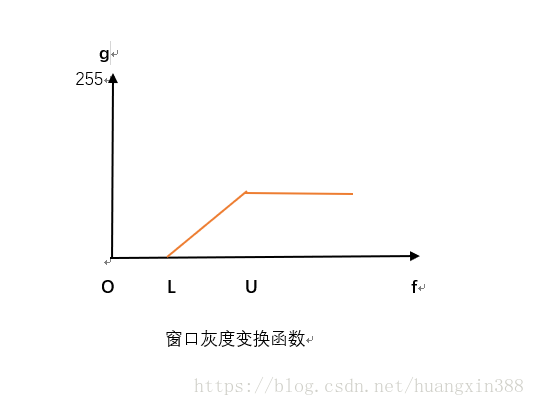
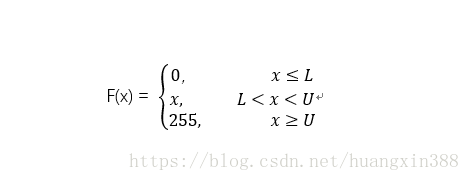
灰度窗口变换的变换函数表达式如下
思路:
- 传入需要处理的图像
- 遍历整个图像取出图像中每个点的像素值存到一个数组中(oldPix)
- 在循环中获取每个像素点的颜色值,并抽取每个像素中的r,g,b,a分量准备处理
- 利用灰度公式计算出每个点的灰度值(范围0-255),并做溢出处理
- 如果某点的灰度值为0则不做处理
- 如果某点的灰度值小于阈值下限则将其灰度值置为0
- 如果某点的灰度值大于阈值上限则将其灰度值置为255
- 将处理后的灰度值合成像素点的颜色值,存到一个新数组中(newPix)
- 创建一个高度、宽度和原图完全一样的新图
- 将新图像返回
用于处理图像的函数如下
private void window(final Bitmap bm) {
AlertDialog.Builder builder = new AlertDialog.Builder(getContext());//创建AlertDialog.Builder
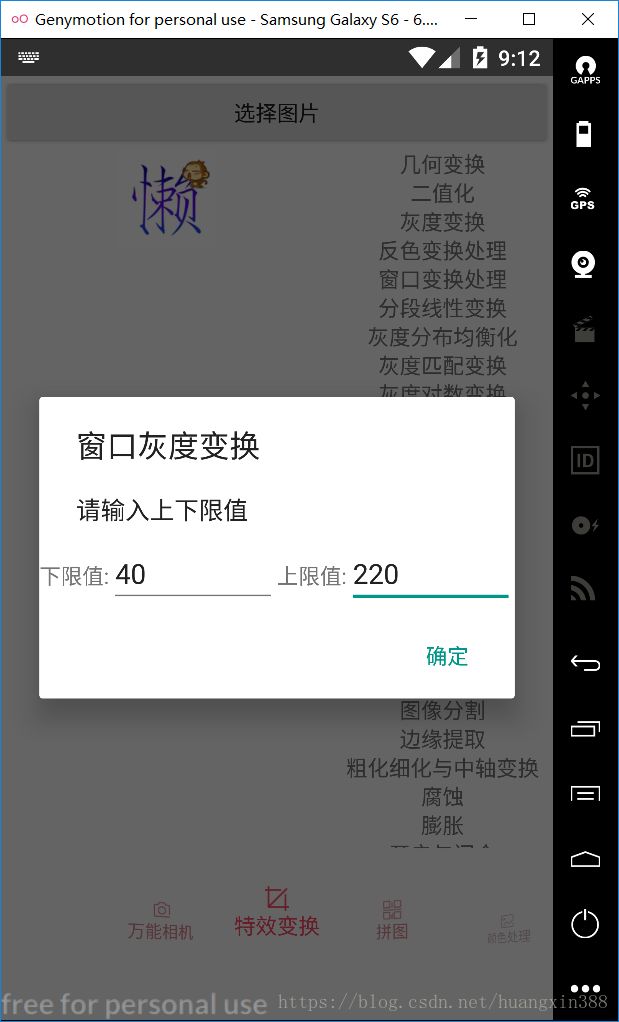
builder.setTitle("窗口灰度变换");//对话框标题
builder.setMessage("请输入上下限值");//对话框内容
View view1 = LayoutInflater.from(getContext()).inflate(R.layout.double_threshold_layout,null);//载入自定义布局
final EditText mLowThresholdEt = view1.findViewById(R.id.low_digit_dialog);//自定义布局中的EditText,用于接收用户输入的下限值
final EditText mHighThresholdEt = view1.findViewById(R.id.heigh_digit_dialog);//自定义布局中的EditText,用于接收用户输入的上限值
builder.setView(view1);//将布局设置到对话框中
builder.setPositiveButton("确定", new DialogInterface.OnClickListener() {//对话框的确定按钮点击事件
@Override
public void onClick(DialogInterface dialogInterface, int i) {
int width = bm.getWidth();//原图像宽度
int height = bm.getHeight();//原图高度
int color;//用来存储某个像素点的颜色值
int r, g, b, a;//红,绿,蓝,透明度
int gray;//用来存储计算得到的灰度值
int lowDigit = 0;//用于存储用户在对话框中输入的下限值
int highDigit = 255;//用于存储用户在对话框中输入的上限值
//创建空白图像,宽度等于原图宽度,高度等于原图高度,用ARGB_8888渲染,这个不用了解,这样写就行了
Bitmap bmp = Bitmap.createBitmap(width, height
, Bitmap.Config.ARGB_8888);
int[] oldPx = new int[width * height];//用来存储原图每个像素点的颜色信息
int[] newPx = new int[width * height];//用来处理处理之后的每个像素点的颜色信息
/**
* 第一个参数oldPix[]:用来接收(存储)bm这个图像中像素点颜色信息的数组//The array to receive the bitmap’s colors
* 第二个参数offset:oldPix[]数组中第一个接收颜色信息的下标值// The first index to write into pixels[]
* 第三个参数width:在行之间跳过像素的条目数,必须大于等于图像每行的像素数//The number of entries in pixels[] to skip between rows (must be >= bitmap’s width). Can be negative.
* 第四个参数x:从图像bm中读取的第一个像素的横坐标 The x coordinate of the first pixel to read from the bitmap
* 第五个参数y:从图像bm中读取的第一个像素的纵坐标The y coordinate of the first pixel to read from the bitmap
* 第六个参数width:每行需要读取的像素个数The number of pixels to read from each row
* 第七个参数height:需要读取的行总数The number of rows to read
*/
bm.getPixels(oldPx, 0, width, 0, 0, width, height);
String str1 = mLowThresholdEt.getText().toString();//获取用户下限值输入的内容
String str2 = mHighThresholdEt.getText().toString();//获取用户上限值输入的内容
if("".equals(str1)) {//如果用户输入的内容为空
lowDigit = 0;//将用户输入的下限值置为0
} else {//否则
lowDigit = Integer.valueOf(str1);//将用户输入的下限值转换为整数
}
if("".equals(str2)) {//如果用户输入的内容为空
highDigit = 255;//将用户输入的上限值置为255
} else {//否则
highDigit = Integer.valueOf(str2);//将用户输入的下限值转换为整数
}
for (int j = 0; j < width * height; j++) {//循环处理图像中每个像素点的颜色值
color = oldPx[j];//取得某个点的像素值
r = Color.red(color);//取得此像素点的r(红色)分量
g = Color.green(color);//取得此像素点的g(绿色)分量
b = Color.blue(color);//取得此像素点的b(蓝色分量)
a = Color.alpha(color);//取得此像素点的a通道值
//此公式将r,g,b运算获得灰度值,经验公式不需要理解
gray = (int)((float)r*0.3+(float)g*0.59+(float)b*0.11);
if(gray < lowDigit) {//如果某点灰度值小于下限值
gray = 0;//将此点灰度值置为0
} else if(gray > highDigit){//如果某点灰度值大于上限值
gray = 255;//将此点灰度值置为255
}
//如果某点灰度值位于上限值与下限值之间则不改变
newPx[j] = Color.argb(a,gray,gray,gray);//将处理后的透明度(没变),r,g,b分量重新合成颜色值并将其存储在数组中
}
/**
* 第一个参数newPix[]:需要赋给新图像的颜色数组//The colors to write the bitmap
* 第二个参数offset:newPix[]数组中第一个需要设置给图像颜色的下标值//The index of the first color to read from pixels[]
* 第三个参数width:在行之间跳过像素的条目数//The number of colors in pixels[] to skip between rows.
* Normally this value will be the same as the width of the bitmap,but it can be larger(or negative).
* 第四个参数x:从图像bm中读取的第一个像素的横坐标//The x coordinate of the first pixels to write to in the bitmap.
* 第五个参数y:从图像bm中读取的第一个像素的纵坐标//The y coordinate of the first pixels to write to in the bitmap.
* 第六个参数width:每行需要读取的像素个数The number of colors to copy from pixels[] per row.
* 第七个参数height:需要读取的行总数//The number of rows to write to the bitmap.
*/
bmp.setPixels(newPx, 0, width, 0, 0, width, height);
mImageView.setImageBitmap(bmp);//将处理后的新图赋给ImageView
}
});
AlertDialog dialog = builder.create();//创建AlertDialog对话框
dialog.show();//显示AlertDialog对话框
}下面是我们在接收用户输入时使用的对话框所引入的自定义布局double_threshold_layout.xml
效果

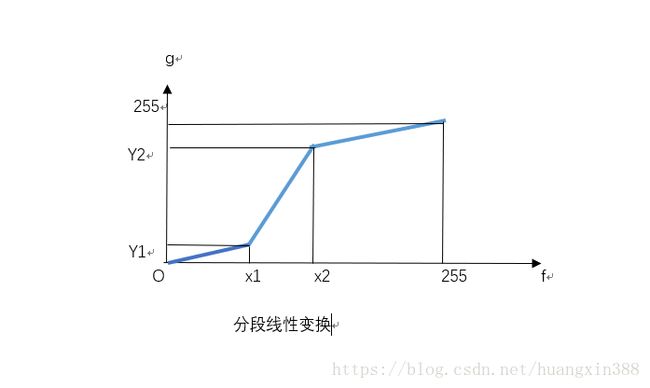
二、分段线性变换
分段线性变换和灰度的线性变换有点类似,都用了灰度的线性变换。但不同之处在于分段线性变换不是完全的线性变换,而是分段进行的线性变换。将图像灰度区间分成两段乃至更多段分别做线性变换,称之为分段线性变换。下图所示是分三段的现行变换示意图。分段线性变换的优点是可以根据用户的需要,拉伸特征物体的灰度细节,相对抑制不感兴趣的灰度级。下图中的(0,x1),(x1,x2),(x2,255)等变换区间边界能通过键盘随时做变换式输入,因此,分段线性是非常灵活的。
它的灰度变换函数的函数表达式如下
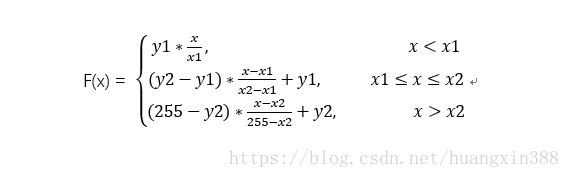
该变换的运算结果是将原图x1和x2之间的灰度拉伸到y1和y2之间。通过有选择地拉伸某段灰度区间,能够更加灵活地控制图像灰度直方图的分布,以改善输出图像的质量。如果一幅图像灰度集中在较暗的区域而导致图像偏暗,可以用灰度拉伸功能来拉伸(斜率>1)物体灰度区间以改善图像质量;同样如果图像灰度集中在较亮的区域而导致图像偏亮,也可以用灰度拉伸功能来压缩(斜率<1)物体灰度区间以改善图像质量。
tips:以上举例为分三段线性变换,用户可以根据需要分任意段来处理。
用于处理图像的函数如下:
private void partLinearity(final Bitmap bm) {

        AlertDialog.Builder builder = new AlertDialog.Builder(getContext());//创建AlertDialog.Builder
        builder.setTitle("分段线性变换");//对话框标题
        builder.setMessage("灰度拉伸参数");//对话框内容
        View view1 = LayoutInflater.from(getContext()).inflate(R.layout.dialog_part_linearity_layout,null);//载入自定义布局
        final EditText mFirstXEt = view1.findViewById(R.id.first_x_dialog);//自定义布局中的EditText,用于接收用户输入的第一个点横坐标
        final EditText mFirstYEt = view1.findViewById(R.id.first_y_dialog);//自定义布局中的EditText,用于接收用户输入的第一个点纵坐标
        final EditText mSecondtXEt = view1.findViewById(R.id.second_x_dialog);//自定义布局中的EditText,用于接收用户输入的第二个点横坐标
        final EditText mSecondYEt = view1.findViewById(R.id.second_y_dialog);//自定义布局中的EditText,用于接收用户输入的第二个点纵坐标
        builder.setView(view1);//将布局设置到对话框中


        builder.setPositiveButton("确定", new DialogInterface.OnClickListener() {//对话框的确定按钮点击事件
            @Override
            public void onClick(DialogInterface dialogInterface, int i) {

                int width = bm.getWidth();//原图像宽度
                int height = bm.getHeight();//原图高度
                int color;//用来存储某个像素点的颜色值
                int r, g, b, a;//红,绿,蓝,透明度
                //创建空白图像,宽度等于原图宽度,高度等于原图高度,用ARGB_8888渲染,这个不用了解,这样写就行了
                Bitmap bmp = Bitmap.createBitmap(width, height
                        , Bitmap.Config.ARGB_8888);

                int[] oldPx = new int[width * height];//用来存储原图每个像素点的颜色信息
                int[] newPx = new int[width * height];//用来处理处理之后的每个像素点的颜色信息
                /**
                 * 第一个参数oldPix[]:用来接收(存储)bm这个图像中像素点颜色信息的数组//The array to receive the bitmap’s colors
                 * 第二个参数offset:oldPix[]数组中第一个接收颜色信息的下标值// The first index to write into pixels[]
                 * 第三个参数width:在行之间跳过像素的条目数,必须大于等于图像每行的像素数//The number of entries in pixels[] to skip between rows (must be >= bitmap’s width). Can be negative.
                 * 第四个参数x:从图像bm中读取的第一个像素的横坐标 The x coordinate of the first pixel to read from the bitmap
                 * 第五个参数y:从图像bm中读取的第一个像素的纵坐标The y coordinate of the first pixel to read from the bitmap
                 * 第六个参数width:每行需要读取的像素个数The number of pixels to read from each row
                 * 第七个参数height:需要读取的行总数The number of rows to read
                 */
                bm.getPixels(oldPx, 0, width, 0, 0, width, height);

                String str1 = mFirstXEt.getText().toString();//获取用户第一个点横坐标输入的内容
                String str2 = mFirstYEt.getText().toString();//获取用户第一个点纵坐标输入的内容
                String str3 = mSecondtXEt.getText().toString();//获取用户第二个点横坐标输入的内容
                String str4 = mSecondYEt.getText().toString();//获取用户第二个点纵坐标输入的内容
                if("".equals(str1)) {//如果用户输入的第一个点横坐标为空
                    firstX = 1;//将用户输入的第一个横坐标置为1
                } else {//否则
                    firstX = Integer.valueOf(str1);//将用户输入的第一个点横坐标转换为整数
                }

                if("".equals(str2)) {//如果用户输入的第一个点纵坐标为空
                    firstY = 1;//将用户输入的第一个横坐标置为1
                } else {//否则
                    firstY = Integer.valueOf(str2);//将用户输入的第一个点纵坐标转换为整数
                }

                if("".equals(str3)) {//如果用户输入的第二个点横坐标为空
                    secondX = 255;//将用户输入的第二个横坐标置为255
                } else {//否则
                    secondX = Integer.valueOf(str1);//将用户输入的第二个点横坐标转换为整数
                }

                if("".equals(str4)) {//如果用户输入的第二个点纵坐标为空
                    firstY = 255;//将用户输入的第二个纵坐标置为255
                } else {//否则
                    firstY = Integer.valueOf(str4);//将用户输入的第二个点纵坐标转换为整数
                }

                for (int j = 0; j < width * height; j++) {//循环处理图像中每个像素点的颜色值
                    color = oldPx[j];//取得某个点的像素值
                    r = Color.red(color);//取得此像素点的r(红色)分量
                    g = Color.green(color);//取得此像素点的g(绿色)分量
                    b = Color.blue(color);//取得此像素点的b(蓝色分量)
                    a = Color.alpha(color);//取得此像素点的a通道值
                    //此公式将r,g,b运算获得灰度值,经验公式不需要理解
                    int gray = (int)((float)r*0.3+(float)g*0.59+(float)b*0.11);

                    //防止出现分母为0
                    if(firstX == 0) {
                        firstX = 1;
                    }
                    if(firstX == secondX) {
                        secondX = secondX + 1;
                    }
                    if(secondX == 255) {
                        secondX = 254;
                    }

                    if(gray > 0 && gray < firstX) {
                        gray = (int)(gray * firstY / firstX);
                    } else if(gray > firstX && gray < secondX) {
                        gray = (int)((secondY - firstY)*(gray - firstX) / (secondX -firstX) + firstY);
                    } else {
                        gray = (int)((255 - secondY) * (gray - secondX) / (255 - secondX) + secondY);
                    }
                    newPx[j] = Color.argb(a,gray,gray,gray);//将处理后的透明度(没变),r,g,b分量重新合成颜色值并将其存储在数组中
                }
                /**
                 * 第一个参数newPix[]:需要赋给新图像的颜色数组//The colors to write the bitmap
                 * 第二个参数offset:newPix[]数组中第一个需要设置给图像颜色的下标值//The index of the first color to read from pixels[]
                 * 第三个参数width:在行之间跳过像素的条目数//The number of colors in pixels[] to skip between rows.
                 * Normally this value will be the same as the width of the bitmap,but it can be larger(or negative).
                 * 第四个参数x:从图像bm中读取的第一个像素的横坐标//The x coordinate of the first pixels to write to in the bitmap.
                 * 第五个参数y:从图像bm中读取的第一个像素的纵坐标//The y coordinate of the first pixels to write to in the bitmap.
                 * 第六个参数width:每行需要读取的像素个数The number of colors to copy from pixels[] per row.
                 * 第七个参数height:需要读取的行总数//The number of rows to write to the bitmap.
                 */
                bmp.setPixels(newPx, 0, width, 0, 0, width, height);
                mImageView.setImageBitmap(bmp);//将处理后的新图赋给ImageView
            }
        });


        AlertDialog dialog = builder.create();//创建AlertDialog对话框
        dialog.show();//显示AlertDialog对话框
    }
下面是我们在接收用户输入时使用的对话框所引入的自定义布局dialog_part_linearity_layout.xml
效果:


三、反色变换
将图像的灰度值反转,使亮的部分变暗,暗的部分变亮即为反色变换。
思路:
- 传入需要处理的图像
- 遍历整个图像取出图像中每个点的像素值存到一个数组中(oldPix)
- 在循环中获取每个像素点的颜色值,并抽取每个像素中的r,g,b,a分量准备处理
- 利用灰度公式计算出每个点的灰度值(范围0-255),并做溢出处理
- 将每个点的灰度值gray变为255-gray
- 将处理后的灰度值合成像素点的颜色值,存到一个新数组中(newPix)
- 创建一个高度、宽度和原图完全一样的新图
- 将存新数组中的颜色值赋给新图
- 将新图像返回
用于处理图像的函数如下:
private Bitmap contraty(Bitmap bm) {
        int width = bm.getWidth();//原图像宽度
        int height = bm.getHeight();//原图像高度
        int color;//用来存储某个像素点的颜色值
        int gray;//用来存储计算得到的灰度值
        int r, g, b, a;//红,绿,蓝,透明度
        //创建空白图像,宽度等于原图宽度,高度等于原图高度,用ARGB_8888渲染,这个不用了解,这样写就行了
        Bitmap bmp = Bitmap.createBitmap(width, height
                , Bitmap.Config.ARGB_8888);

        int[] oldPx = new int[width * height];//用来存储原图每个像素点的颜色信息
        int[] newPx = new int[width * height];//用来处理处理之后的每个像素点的颜色信息
        /**
         * 第一个参数oldPix[]:用来接收(存储)bm这个图像中像素点颜色信息的数组//The array to receive the bitmap’s colors
         * 第二个参数offset:oldPix[]数组中第一个接收颜色信息的下标值// The first index to write into pixels[]
         * 第三个参数width:在行之间跳过像素的条目数,必须大于等于图像每行的像素数//The number of entries in pixels[] to skip between rows (must be >= bitmap’s width). Can be negative.
         * 第四个参数x:从图像bm中读取的第一个像素的横坐标 The x coordinate of the first pixel to read from the bitmap
         * 第五个参数y:从图像bm中读取的第一个像素的纵坐标The y coordinate of the first pixel to read from the bitmap
         * 第六个参数width:每行需要读取的像素个数The number of pixels to read from each row
         * 第七个参数height:需要读取的行总数The number of rows to read
         */
        bm.getPixels(oldPx, 0, width, 0, 0, width, height);

        for (int i = 0; i < width * height; i++) {//循环处理图像中每个像素点的颜色值
            color = oldPx[i];//取得某个点的像素值
            r = Color.red(color);//取得此像素点的r(红色)分量
            g = Color.green(color);//取得此像素点的g(绿色)分量
            b = Color.blue(color);//取得此像素点的b(蓝色分量)
            a = Color.alpha(color);//取得此像素点的a通道值
            //此公式将r,g,b运算获得灰度值,经验公式不需要理解
            gray = (int)((float)r*0.3+(float)g*0.59+(float)b*0.11);

            gray = 255 -gray;//将该点灰度值取反,

            newPx[i] = Color.argb(a,gray,gray,gray);//将处理后的透明度(没变),r,g,b分量重新合成颜色值并将其存储在数组中
        }
        /**
         * 第一个参数newPix[]:需要赋给新图像的颜色数组//The colors to write the bitmap
         * 第二个参数offset:newPix[]数组中第一个需要设置给图像颜色的下标值//The index of the first color to read from pixels[]
         * 第三个参数width:在行之间跳过像素的条目数//The number of colors in pixels[] to skip between rows.
         * Normally this value will be the same as the width of the bitmap,but it can be larger(or negative).
         * 第四个参数x:从图像bm中读取的第一个像素的横坐标//The x coordinate of the first pixels to write to in the bitmap.
         * 第五个参数y:从图像bm中读取的第一个像素的纵坐标//The y coordinate of the first pixels to write to in the bitmap.
         * 第六个参数width:每行需要读取的像素个数The number of colors to copy from pixels[] per row.
         * 第七个参数height:需要读取的行总数//The number of rows to write to the bitmap.
         */
        bmp.setPixels(newPx, 0, width, 0, 0, width, height);
        return bmp;
    }
效果


代码已上传到github,点击这里可以下载体验