移植u-boot到树莓派
u-boot:官网下载的u-boot-2014.4(ftp://ftp.denx.de/pub/u-boot/)
单板:树莓派b
1、 添加自己的单板
首先解压uboot源码,进入根目录,在帮助文档README中有如何添加单板的说明:
If the system board that you have is not listed, then you will need
to port U-Boot to your hardware platform. To do this, follow these
steps:
- Add a new configuration option for your board to the toplevel
“boards.cfg” file, using the existing entries as examples.
Follow the instructions there to keep the boards in order.- Create a new directory to hold your board specific code. Add any
files you need. In your board directory, you will need at least
the “Makefile”, a “.c”, “flash.c” and “u-boot.lds”.- Create a new configuration file “include/configs/.h” for
your board- If you’re porting U-Boot to a new CPU, then also create a new
directory to hold your CPU specific code. Add any files you need.- Run “make _config” with your new name.
- Type “make”, and you should get a working “u-boot.srec” file
to be installed on your target system.- Debug and solve any problems that might arise.
[Of course, this last step is much harder than it sounds.]
1)首先在顶层目录下的boards.cfg文件中添加树莓派单板的配置信息,我这里仿造rpi_b:
Status,Arch,CPU:SPLCPU,SoC,Vendor,Board name,Target,Options, Maintainers
Active arm arm1176 bcm2835 raspberrypi rpi_zy rpi_zy - zhangyi
这里从左到右分别表示:
Status : 配置使能状态
Arch:体系架构
CPU:SPLCPU:CPU名称
SoC:SOC芯片名称
Vendor:厂商
Board name:单板名称
Target:配置目标
Options:选项
Maintainers:维护者
2)在顶层board创建一个用于存储单板相关代码文件的目录,这里我直接拷贝board/raspberrypi/rpi_b 目录然后修改里面的文件名和Makefile文件:
$ cp -r /board/raspberrypi/rpi_b  /board/raspberrypi/rpi_b
$ mv /board/raspberrypi/rpi_b/rpi_b.c
/board/raspberrypi/rpi_b/rpi_zy.c
然后修改Makefile文件:
- - - obj-y := rpi_b.o
+++ obj-y := rpi_zy.o
3)为自己的单板创建配置文件include/configs/xxxx.h, 我这里也是直接拷贝rpi_b的配置文件:
cp include/configs/rpi_b.h include/configs/rpi_zy.h
4)精简使用不到的uboot源码结构:
(1)在arch目录下只保留arm目录:
[apple@apple u-boot-2014.04]$ cd arch/
[apple@apple arch]$ ls
arm
(2)在arch/arm/目录下只保留如下内容:
[apple@apple arch]$ cd arm/
[apple@apple arm]$ ls
config.mk  cpu  dts  imx-common  include  lib
(3)在arch/arm/cpu目录下只保留如下内容:
[apple@apple arm]$ cd cpu/
[apple@apple cpu]$ ls
arm1176  built-in.o  Makefile  u-boot.lds  u-boot-spl.lds
(4)在arch/arm/include/asm目录下以arch开头的只保留arch-bcm2835
(5)u-boot-2014.04/board 目录下只保留raspberrypi:
[apple@apple u-boot-2014.04]$ cd board
[apple@apple board]$ ls
raspberrypi
(6)u-boot-2014.04/board/raspberrypi目录下只保留rpi_zy:
[apple@apple board]$ cd raspberrypi/
[apple@apple raspberrypi]$ ls
rpi_zy
(7)u-boot-2014.04/include/configs 目录下只保留rpi_zy.h
[apple@apple u-boot-2014.04]$ cd include/configs/
[apple@apple configs]$ ls
rpi_zy.h
5)修改顶层Makefile文件,添加交叉编译器支持:
318 # Make variables (CC, etc...)
319 CROSS_COMPILE = arm-linux-gnueabihf-
320 AS      = $(CROSS_COMPILE)as
321 # Always use GNU ld
6) 在顶层目录下编写简单的编译脚本文件,执行编译工作:
#!/bin/sh

make distclean
make rpi_zy_config
make all
运行该脚本文件即可在uboot根目录下生成u-boot.bin二进制文件。
7) 安装与运行
将编译出来的u-boot.bin拷贝到SD卡的FAT分区下,然后修改config.txt文件,添加(或修改)以下配置项:
kernel=u-boot.bin同时需要保证SD卡FAT分区中包含以下文件:bootcode.bin、config.txt、start.elf和u-boot.bin(这些文件的作用见《树莓派的启动引导方式》)。
上电启动,uboot正常启动并能够在终端打印信息。

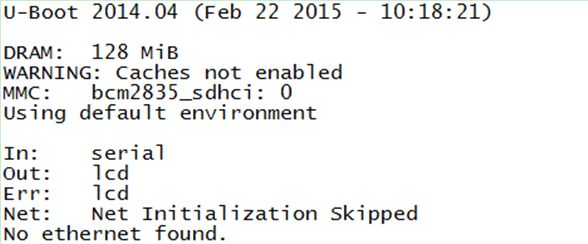
但是此时的uboot尚不能正常读写SD卡、USB和Ethernet(树莓派的Ethernet网络芯片是基于USB的)。
2、 修改并支持SD卡读写
参见http://people.freebsd.org/~gonzo/arm/patches/u-boot-pi-sdhci-hs-workaround.diff
修改drivers/mmc/bcm2835_sdhci.c的182行:
添加SDHCI_QUIRK_NO_HISPD_BIT
181 host->quirks = SDHCI_QUIRK_BROKEN_VOLTAGE | SDHCI_QUIRK_BROKEN_R1B | SDHCI_QUIRK_WAIT_SEND_CMD | SDHCI_QUIRK_NO_HISPD_BIT;修改完成后,该uboot即可正常读写树莓派的SD卡。
例如:读取存放在SD卡FAT分区中的uImage文件到ram中的loadaddr位置处。

3、 移植USB-HOST和USB-Ethernet驱动
源文件:https://github.com/gonzoua/u-boot-pi/tree/rpi
这里GitHub上的uboot是国外开发者基于2013.01-rc1版本修改的,并且支持usb和Ethernet。
uboot中usb-host和usb-ethernet的驱动在u-boot-pi-rpi/drivers/usb/eth和u-boot-pi-rpi/drivers/usb/host目录下,树莓派相关的是dwc_otg-hcd.c、dwc_otg.c、dwc_otg_regs.h、dwc_otg_core_if.h和dwc_otg.h这几个host驱动文件以及smsc95xx.c的Ethernet驱动文件。
其中smsc95xx.c在2014.4版的uboot中已经存在了,并且和u-boot-pi-rpi中的并无太大不同,所以主要的工作就在移植usb-host驱动和配置uboot添加usb和ethernet相关的commond。
1)首先将dwc_otg-hcd.c、dwc_otg.c、dwc_otg_regs.h、dwc_otg_core_if.h和dwc_otg.h这几个文件拷贝到u-boot-2014.04/drivers/usb/host目录下,同时修改Makefile:
    [apple@apple host]$ cp dwc* ~/raspberry/build/u-boot-2014.04/drivers/usb/host
    [apple@apple host]$ vim ~/raspberry/build/u-boot-2014.04/drivers/usb/host/Makefile

+++ obj-$(CONFIG_USB_DWC_OTG) += dwc_otg.o dwc_otg-hcd.o
2)修改u-boot-2014.04/include/configs/rpi_zy.h,修改如下:
+++ /* USB Networking options */
+++ #define CONFIG_USB_HOST_ETHER
+++ #define CONFIG_USB_ETHER_SMSC95XX
+++ #define CONFIG_USB_DWC_OTG
+++ #define CONFIG_USB_STORAGE

+++ #define CONFIG_CMD_USB
+++ #define CONFIG_CMD_NET
+++ #define CONFIG_CMD_PING
+++ #define CONFIG_CMD_DHCP

--- #undef CONFIG_CMD_NET
--- #undef CONFIG_CMD_DHCP
--- #undef CONFIG_CMD_NET
--- #undef CONFIG_CMD_PING
3)修改完成后,重新编译并运行
这里有遇到一个问题,在执行usb start时,当uboot检测到ethernet时会出现failed to set MAC address的WARNING,当然后续也无法使用了。

通过比较2分smsc95xx.c文件,发现在获取Mac地址的smsc95xx_init_mac_address函数中,会尝试调用smsc95xx_read_eeprom函数从eeprom中获取MAC地址。
287 static int smsc95xx_read_eeprom(struct ueth_data *dev, u32 offset, u32 length,
288             u8 *data)
289 {
290     u32 val;
291     int i, ret;
292
293     ret = smsc95xx_eeprom_confirm_not_busy(dev);
294     if (ret)
295         return ret;
296
297     for (i = 0; i < length; i++) {
298         val = E2P_CMD_BUSY_ | E2P_CMD_READ_ | (offset & E2P_CMD_ADDR_);
299         smsc95xx_write_reg(dev, E2P_CMD, val);
300
301         ret = smsc95xx_wait_eeprom(dev);
302         if (ret < 0)
303             return ret;
304
305         smsc95xx_read_reg(dev, E2P_DATA, &val);
306         data[i] = val & 0xFF;
307         offset++;
308     }
309     return 0;
400 }
其中在smsc95xx_eeprom_confirm_not_busy函数中增加了如下代码片段:
257     do {
258         smsc95xx_read_reg(dev, E2P_CMD, &val);
259 +++     if (!(val & E2P_CMD_LOADED_)) {
260 +++         debug("No EEPROM present\n");
261 +++         return -1;
262 +++     }
如果smsc95xx_read_reg发现不存在EEPROM,则直接返回失败,同时为了安全起见不会随机生成MAC地址。
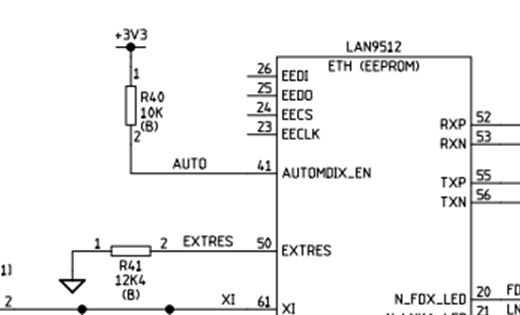
将以上代码移植到2014.04的代码段中,同时打开uboot的debug模式,就会打印出No EEPROM present,显然uboot无法从EEPROM中获取到Mac地址,因为在树莓派的9512芯片上并没有接EEPROM。

解决方式是手动添加环境变量usbethaddr,同时在uboot的preboot命令为:
#define CONFIG_PREBOOT \
    "if load mmc 0:1 ${loadaddr} /uEnv.txt; then " \
        "env import -t ${loadaddr} ${filesize}; " \
    "fi"
在uboot启动main loop前会执行这条命令从uEnv.txt文件中倒入环境变量,所以在SD卡的FAT分区中添加uEnv.txt文件,同时向里面写入:
usbethaddr=b8:27:eb:b7:b5:2e
ipaddr=192.168.1.25
serverip=192.168.1.17参考文献:
1、《嵌入式Linux学习笔记(基于S5PV210、TQ210).pdf》
2、http://blog.sina.com.cn/s/blog_7cedb56d0102uzye.html
3、http://my.oschina.net/funnky/blog/141982?p=1
