使用OpenCv+ENet实现语义分割
使用OpenCv+ENet实现语义分割
转载自 https://www.pyimagesearch.com/2018/09/03/semantic-segmentation-with-opencv-and-deep-learning/
介绍
在本教程中,您将学习如何使用OpenCV,深度学习和ENet架构执行语义分割。阅读本教程后,您将能够使用OpenCV对图像和视频应用语义分割。深度学习有助于增加计算机视觉的前所未有的准确性,包括图像分类,对象检测,现在甚至是分割。传统分割涉及将图像分割成若干模块(Normalized Cuts, Graph Cuts, Grab Cuts, superpixels,等); 但是,算法并没有真正理解这些部分代表什么。
另一方面,语义分割算法会作如下的工作:
- 1、分割图像划分成有意义的部分
- 2、同时,将输入图像中的每个像素与类标签(即人,道路,汽车,公共汽车等)相关联。
语义分割算法很强大,有很多用例,包括自动驾驶汽车 - 在今天的文章中,我将向您展示如何将语义分割应用于道路场景图像以及视频!
OpenCV和深度学习的语义分割
在这篇文章中,我们将讨论ENet深度学习框架,并且演示如何使用ENet对图像和视频流进行语义分割。
ENet语义分割框架
在本教程中我们将使用的语义分割框架是ENet,他是基于Paszke等人的2016年的论文Net:ENet: A Deep Neural Network Architecture for Real-Time Semantic Segmentation:
Abstract: ...In this paper, we propose a novel deep neural network architecture named ENet (efficient neural network), created specifically for tasks requiring low latency operation. ENet is up to 18× faster, requires 75× less FLOPs, has 79× less parameters, and provides similar or better accuracy to existing models. ...(大概就是速度提高了18倍,参数减少了79倍,然后精度更高速度更快)。
一个正向传播在我的(垃圾)笔记本CPU(i5-6200)上花费了0.5S左右的时间,如果使用GPU将更快。Paszke等人在The Cityscapes Dataset训练了他们的数据集,你可以根据需求选择你需要的数据集进行训练。并且这个数据集还带有用于城市场景理解的图像示例。
我们使用训练了20种类的模型,包括:
Unlabeled (i.e., background)
Road
Sidewalk
Building
Wall
Fence
Pole
TrafficLight
TrafficSign
Vegetation
Terrain
Sky
Person
Rider
Car
Truck
Bus
Train
Motorcycle
Bicycle
接下来,您将学习如何应用语义分段来提取图像和视频流中每个类别,像素之间的映射关系。如果您有兴趣训练自己的ENet模型以便在自己的自定义数据集上进行分割,可以参考此页面,作者已提供了有关如何进行训练的教程。
工程结构
若需要工程源码可以直接在下方留言邮箱或者公众号留言邮箱。
下面让我们在工程目录下面运行 tree:
.
├── enet-cityscapes
│   ├── enet-classes.txt
│   ├── enet-colors.txt
│   └── enet-model.net
├── images
│   ├── example_01.png
│   ├── example_02.jpg
│   ├── example_03.jpg
│   └── example_04.png
├── output
│   └── massachusetts_output.avi
├── segment.py
├── segment.pyc
├── segment_video.py
└── videos
    ├── massachusetts.mp4
    └── toronto.mp4

4 directories, 13 files
工程包括四个目录:
-
enet-cityscapes/: 包含了训练好了的深度学习模型,颜色列表,颜色labels。 -
images/: 包含四个测试用的图片。 -
output/: 生成的输出视频。 -
videos/: 包含了两个示例视频用于测试我们的程序。
接下来,我们将分析两个python脚本:
-
segment.py: 对单个图片进行深度学习语义分割,我们将首先在单个图像进行测试然后再将其运用到视频中。 -
segment_video.py: 对视频进行语义分割。
使用OpenCv对图像进行语义分割:
# import the necessary packages

import numpy as np
import argparse
import imutils
import time
import cv2

# construct the argument parse and parse the arguments
ap = argparse.ArgumentParser()
ap.add_argument("-m", "--model", required=True,
    help="path to deep learning segmentation model")
ap.add_argument("-c", "--classes", required=True,
    help="path to .txt file containing class labels")
ap.add_argument("-i", "--image", required=True,
    help="path to input image")
ap.add_argument("-l", "--colors", type=str,
    help="path to .txt file containing colors for labels")
ap.add_argument("-w", "--width", type=int, default=500,
    help="desired width (in pixels) of input image")
args = vars(ap.parse_args())
首先我们需要导入相应的包, 并且设置相应的参数:
- numpy Python 科学计算基础包。
- argparse: python的一个命令行解析包。
- imutils: Python图像操作函数库,提供一系列的便利功能。
- time: Time access and conversions。
- cv2 :建议安装3.4+的版本。
接下来让我们解析类标签文件和颜色:
# load the class label names
CLASSES = open(args["classes"]).read().strip().split("\n")

# if a colors file was supplied, load it from disk
if args["colors"]:
    COLORS = open(args["colors"]).read().strip().split("\n")
    COLORS = [np.array(c.split(",")).astype("int") for c in COLORS]
    COLORS = np.array(COLORS, dtype="uint8")

# otherwise, we need to randomly generate RGB colors for each class
# label
else:
    # initialize a list of colors to represent each class label in
    # the mask (starting with 'black' for the background/unlabeled
    # regions)
    np.random.seed(42)
    COLORS = np.random.randint(0, 255, size=(len(CLASSES) - 1, 3),
        dtype="uint8")
    COLORS = np.vstack([[0, 0, 0], COLORS]).astype("uint8")
首先将CLASSES加载到内存中,如果我们提供了每一个类别的标签的COLORS,那么我们就将其加载到内存; 若没有则为每一个标签随机生成 COLORS。
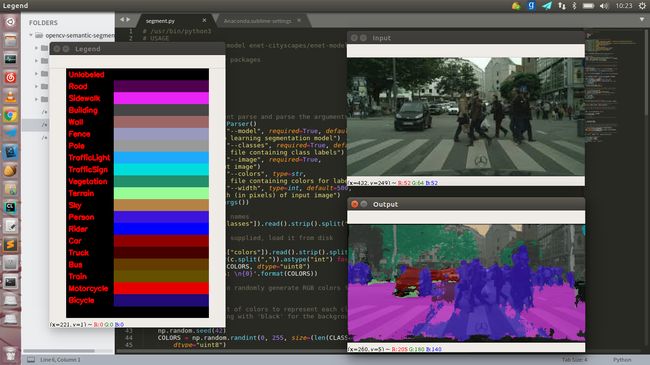
为了更好的可视化,我们使用OpenCv绘制一个颜色和类别的图列(legend):
# initialize the legend visualization
legend = np.zeros(((len(CLASSES) * 25) + 25, 300, 3), dtype="uint8")

# loop over the class names + colors
for (i, (className, color)) in enumerate(zip(CLASSES, COLORS)):
    # draw the class name + color on the legend
    color = [int(c) for c in color]
    cv2.putText(legend, className, (5, (i * 25) + 17),
        cv2.FONT_HERSHEY_SIMPLEX, 0.5, (0, 0, 255), 2)
    cv2.rectangle(legend, (100, (i * 25)), (300, (i * 25) + 25),
        tuple(color), -1)
如图左边所示为所绘制的legend 的效果图:
然后我们将深度学习分割应用于图像:
# load our serialized model from disk
print("[INFO] loading model...")
net = cv2.dnn.readNet(args["model"])

# load the input image, resize it, and construct a blob from it,
# but keeping mind mind that the original input image dimensions
# ENet was trained on was 1024x512
image = cv2.imread(args["image"])
image = imutils.resize(image, width=args["width"])
blob = cv2.dnn.blobFromImage(image, 1 / 255.0, (1024, 512), 0,
    swapRB=True, crop=False)

# perform a forward pass using the segmentation model
net.setInput(blob)
start = time.time()
output = net.forward()
end = time.time()

# show the amount of time inference took
print("[INFO] inference took {:.4f} seconds".format(end - start))
上面这段代码,使用Python和OpenCv对图像进行语义分割:
-
cv2.dnn.readNet(): 记载模型。 - 构建一个
blob: 由于我们训练的ENet模型的输入图像的大小为1024X512因此这里应该使用相同的大小。 - 将
blob输入到网络中,并且通过这个神经网络执行一个forward pass, 并且输出使用的时间。
可视化我们的结果
最后我们需要可视化我们的结果:
在程序的其余行中,我们将生成一个颜色蒙层以覆盖原始图像。 每个像素都有一个相应的类标签索引,使我们可以看到屏幕上的语义分割结果。
# infer the total number of classes along with the spatial dimensions
# of the mask image via the shape of the output array
(numClasses, height, width) = output.shape[1:4]

# our output class ID map will be num_classes x height x width in
# size, so we take the argmax to find the class label with the
# largest probability for each and every (x, y)-coordinate in the
# image

classMap = np.argmax(output[0], axis=0)

# given the class ID map, we can map each of the class IDs to its
# corresponding color

mask = COLORS[classMap]
cv2.imshow("mask", mask)

# resize the mask and class map such that its dimensions match the
# original size of the input image (we're not using the class map
# here for anything else but this is how you would resize it just in
# case you wanted to extract specific pixels/classes)
mask = cv2.resize(mask, (image.shape[1], image.shape[0]),
    interpolation=cv2.INTER_NEAREST)
classMap = cv2.resize(classMap, (image.shape[1], image.shape[0]),
    interpolation=cv2.INTER_NEAREST)

# perform a weighted combination of the input image with the mask to
# form an output visualization
output = ((0.4 * image) + (0.6 * mask)).astype("uint8")

# show the input and output images
cv2.imshow("Legend", legend)
cv2.imshow("Input", image)
cv2.imshow("Output", output)
cv2.waitKey(0)
if cv2.waitKey(1) & 0xFF == ord('q'):
    exit
我们首先是从output中提取出 numClasses, height, width,然后计算 classMap和mask。其中 classMap是output的每个(x,y)坐标的最大概率的类标签索引(class label index)。通过 calssMap作为Numpy的数组索引来找到每个像素相对应的可视化颜色。
之后就是简单的尺寸变换以使得尺寸相同,之后进行叠加。
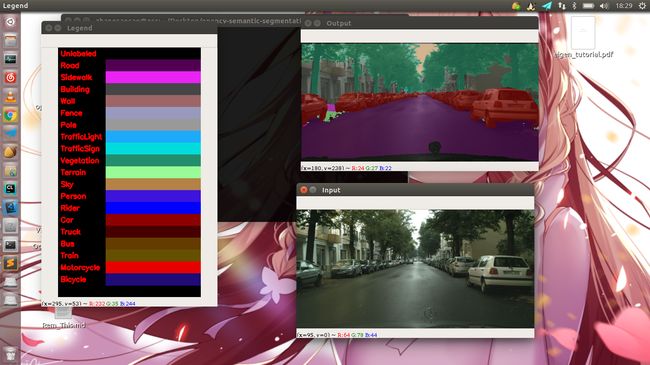
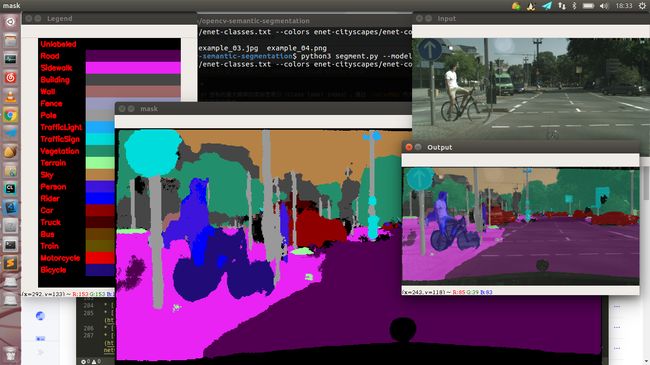
单个图像的结果:
根据用法输入相应的命令行参数,运行程序,以下是一个示例:
python3 segment.py --model enet-cityscapes/enet-model.net --classes enet-cityscapes/enet-classes.txt --colors enet-cityscapes/enet-colors.txt --image images/example_03.jpg
最终得到的结果:
很容易发现,它可以清晰地分类并准确识别人和自行车。确定了道路,人行道,汽车。。
在视频中执行语义分割:
这个部分的代码位于 segment_video.py中, 首先加载模型,初始化视频流:
# load our serialized model from disk
print("[INFO] loading model...")
net = cv2.dnn.readNet(args["model"])

# initialize the video stream and pointer to output video file
vs = cv2.VideoCapture(args["video"])
writer = None

# try to determine the total number of frames in the video file
try:
    prop =  cv2.cv.CV_CAP_PROP_FRAME_COUNT if imutils.is_cv2() \
        else cv2.CAP_PROP_FRAME_COUNT
    total = int(vs.get(prop))
    print("[INFO] {} total frames in video".format(total))

# an error occurred while trying to determine the total
# number of frames in the video file
except:
    print("[INFO] could not determine # of frames in video")
    total = -1
之后读取视频流,并且作为网络的输入,这部分和 segment.py大致相同:
# loop over frames from the video file stream
while True:
    # read the next frame from the file
    (grabbed, frame) = vs.read()

    # if the frame was not grabbed, then we have reached the end
    # of the stream
    if not grabbed:
        break

    # construct a blob from the frame and perform a forward pass
    # using the segmentation model
    frame = imutils.resize(frame, width=args["width"])
    blob = cv2.dnn.blobFromImage(frame, 1 / 255.0, (1024, 512), 0,
        swapRB=True, crop=False)
    net.setInput(blob)
    start = time.time()
    output = net.forward()
    end = time.time()

    # infer the total number of classes along with the spatial
    # dimensions of the mask image via the shape of the output array
    (numClasses, height, width) = output.shape[1:4]

    # our output class ID map will be num_classes x height x width in
    # size, so we take the argmax to find the class label with the
    # largest probability for each and every (x, y)-coordinate in the
    # image
    classMap = np.argmax(output[0], axis=0)

    # given the class ID map, we can map each of the class IDs to its
    # corresponding color
    mask = COLORS[classMap]

    # resize the mask such that its dimensions match the original size
    # of the input frame
    mask = cv2.resize(mask, (frame.shape[1], frame.shape[0]),
        interpolation=cv2.INTER_NEAREST)

    # perform a weighted combination of the input frame with the mask
    # to form an output visualization
    output = ((0.3 * frame) + (0.7 * mask)).astype("uint8")
然后我们将输出的视频流写入到文件中:
    # check if the video writer is None
    if writer is None:
        # initialize our video writer
        fourcc = cv2.VideoWriter_fourcc(*"MJPG")
        writer = cv2.VideoWriter(args["output"], fourcc, 30,
            (output.shape[1], output.shape[0]), True)

        # some information on processing single frame
        if total > 0:
            elap = (end - start)
            print("[INFO] single frame took {:.4f} seconds".format(elap))
            print("[INFO] estimated total time: {:.4f}".format(
                elap * total))

    # write the output frame to disk
    writer.write(output)

    # check to see if we should display the output frame to our screen
    if args["show"] > 0:
        cv2.imshow("Frame", output)
        key = cv2.waitKey(1) & 0xFF

        # if the `q` key was pressed, break from the loop
        if key == ord("q"):
            break
最终的视频演示可以查看下面的视频:
python3 segment_video.py --model enet-cityscapes/enet-model.net \
    --classes enet-cityscapes/enet-classes.txt \
    --colors enet-cityscapes/enet-colors.txt \
    --video videos/massachusetts.mp4 \
    --output output/massachusetts_output.avi
最后如何训练自己的模型:
如果你想训练自己的模型,可以参考 ENet作者提供的教程
总结
在这个文章中,我们学习了如何使用OpenCV,深度学习和ENet架构来应用语义分割。在Cityscapes数据集上使用预先训练的ENet模型,我们能够在自动驾驶汽车和道路场景分割的背景下将图像和视频流分成20个类别,包括人(步行和骑自行车),车辆(汽车,卡车,公共汽车,摩托车等),建筑(建筑物,墙壁,围栏等),以及植被,地形和地面本身。如果您喜欢今天的文章,请分享哦!
需要源代码的朋友可以在下方留言邮箱即可。
参考文献
- 十分钟看懂图像语义分割技术
- [论文]ENet: A Deep Neural Network Architecture for Real-Time Semantic Segmentation
- 训练自己的ENet模型
- 什么是神经网络中的前向和后向传递?
不足之处,敬请斧正; 若你觉得文章还不错,请关注微信公众号“SLAM 技术交流”继续支持我们,笔芯:D。


