ESP8266 OLED显示demo
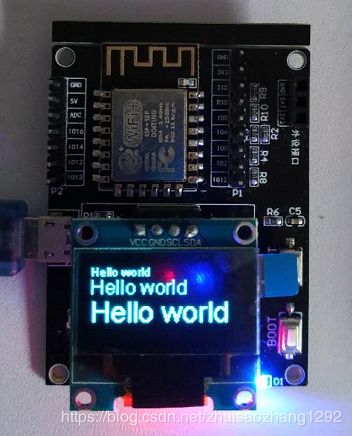
实际效果:
使用OLED库文件时,需要注意
SSD1306Wire display(0x3c, 2, 14); // 注意SDA和SCL pin的选择,依据实际而定
// Include the correct display library

// For a connection via I2C using the Arduino Wire include:
#include                // Only needed for Arduino 1.6.5 and earlier
#include "SSD1306Wire.h"        // legacy: #include "SSD1306.h"
// OR #include "SH1106Wire.h"   // legacy: #include "SH1106.h"

// For a connection via I2C using brzo_i2c (must be installed) include:
// #include         // Only needed for Arduino 1.6.5 and earlier
// #include "SSD1306Brzo.h"
// OR #include "SH1106Brzo.h"

// For a connection via SPI include:
// #include              // Only needed for Arduino 1.6.5 and earlier
// #include "SSD1306Spi.h"
// OR #include "SH1106SPi.h"


// Optionally include custom images
#include "images.h"


// Initialize the OLED display using Arduino Wire:
//SSD1306Wire display(0x3c, SDA, SCL);   // ADDRESS, SDA, SCL  -  SDA and SCL usually populate automatically based on your board's pins_arduino.h
SSD1306Wire display(0x3c, 2, 14);
// SSD1306Wire display(0x3c, D3, D5);  // ADDRESS, SDA, SCL  -  If not, they can be specified manually.
// SSD1306Wire display(0x3c, SDA, SCL, GEOMETRY_128_32);  // ADDRESS, SDA, SCL, OLEDDISPLAY_GEOMETRY  -  Extra param required for 128x32 displays.
// SH1106 display(0x3c, SDA, SCL);     // ADDRESS, SDA, SCL

// Initialize the OLED display using brzo_i2c:
// SSD1306Brzo display(0x3c, D3, D5);  // ADDRESS, SDA, SCL
// or
// SH1106Brzo display(0x3c, D3, D5);   // ADDRESS, SDA, SCL

// Initialize the OLED display using SPI:
// D5 -> CLK
// D7 -> MOSI (DOUT)
// D0 -> RES
// D2 -> DC
// D8 -> CS
// SSD1306Spi display(D0, D2, D8);  // RES, DC, CS
// or
// SH1106Spi display(D0, D2);       // RES, DC

#include

#define DEMO_DURATION 3000
typedef void (*Demo)(void);

int demoMode = 0;
int counter = 1;

void setup() {
  Serial.begin(115200);
  Serial.println();
  Serial.println();


  // Initialising the UI will init the display too.
  display.init();

  display.flipScreenVertically();
  display.setFont(ArialMT_Plain_10);

}

void drawFontFaceDemo() {
    // Font Demo1
    // create more fonts at http://oleddisplay.squix.ch/
    display.setTextAlignment(TEXT_ALIGN_LEFT);
    display.setFont(ArialMT_Plain_10);
    display.drawString(0, 0, "Hello world");
    display.setFont(ArialMT_Plain_16);
    display.drawString(0, 10, "Hello world");
    display.setFont(ArialMT_Plain_24);
    display.drawString(0, 26, "Hello world");
}

void drawTextFlowDemo() {
    display.setFont(ArialMT_Plain_10);
    display.setTextAlignment(TEXT_ALIGN_LEFT);
    display.drawStringMaxWidth(0, 0, 128,
      "Lorem ipsum\n dolor sit amet, consetetur sadipscing elitr, sed diam nonumy eirmod tempor invidunt ut labore." );
}

void drawTextAlignmentDemo() {
    // Text alignment demo
  display.setFont(ArialMT_Plain_10);

  // The coordinates define the left starting point of the text
  display.setTextAlignment(TEXT_ALIGN_LEFT);
  display.drawString(0, 10, "Left aligned (0,10)");

  // The coordinates define the center of the text
  display.setTextAlignment(TEXT_ALIGN_CENTER);
  display.drawString(64, 22, "Center aligned (64,22)");

  // The coordinates define the right end of the text
  display.setTextAlignment(TEXT_ALIGN_RIGHT);
  display.drawString(128, 33, "Right aligned (128,33)");
}

void drawRectDemo() {
      // Draw a pixel at given position
    for (int i = 0; i < 10; i++) {
      display.setPixel(i, i);
      display.setPixel(10 - i, i);
    }
    display.drawRect(12, 12, 20, 20);

    // Fill the rectangle
    display.fillRect(14, 14, 17, 17);

    // Draw a line horizontally
    display.drawHorizontalLine(0, 40, 20);

    // Draw a line horizontally
    display.drawVerticalLine(40, 0, 20);
}

void drawCircleDemo() {
  for (int i=1; i < 8; i++) {
    display.setColor(WHITE);
    display.drawCircle(32, 32, i*3);
    if (i % 2 == 0) {
      display.setColor(BLACK);
    }
    display.fillCircle(96, 32, 32 - i* 3);
  }
}

void drawProgressBarDemo() {
  int progress = (counter / 5) % 100;
  // draw the progress bar
  display.drawProgressBar(0, 32, 120, 10, progress);

  // draw the percentage as String
  display.setTextAlignment(TEXT_ALIGN_CENTER);
  display.drawString(64, 15, String(progress) + "%");
}

void drawImageDemo() {
    // see http://blog.squix.org/2015/05/esp8266-nodemcu-how-to-create-xbm.html
    // on how to create xbm files
    display.drawXbm(34, 14, WiFi_Logo_width, WiFi_Logo_height, WiFi_Logo_bits);
}

Demo demos[] = {drawFontFaceDemo, drawTextFlowDemo, drawTextAlignmentDemo, drawRectDemo, drawCircleDemo, drawProgressBarDemo, drawImageDemo};
int demoLength = (sizeof(demos) / sizeof(Demo));
long timeSinceLastModeSwitch = 0;

void loop() {
  // clear the display
  display.clear();
  // draw the current demo method
  demos[demoMode]();

  display.setTextAlignment(TEXT_ALIGN_RIGHT);
  display.drawString(10, 128, String(millis()));
  // write the buffer to the display
  display.display();

  if (millis() - timeSinceLastModeSwitch > DEMO_DURATION) {
    demoMode = (demoMode + 1)  % demoLength;
    timeSinceLastModeSwitch = millis();
  }
  counter++;
  delay(10);
    GPIO_OUTPUT_SET(4, 1);
  delay(1000);
  GPIO_OUTPUT_SET(4, 0);
  delay(1000);
}
